The Roku City home screen is getting an upgrade from 720p to full HD 1080p resolution.
Originally appeared here:
Your Roku device is getting a free, high-definition upgrade for the holidays
Originally appeared here:
Your Roku device is getting a free, high-definition upgrade for the holidays
Go Here to Read this Fast! Microsoft patches worrying zero-day along with 71 other flaws
Originally appeared here:
Microsoft patches worrying zero-day along with 71 other flaws
Originally appeared here:
British startup launches low-power RISC-V processor design to address the twin problems of memory and energy; promises up to 50% faster calculation speeds
Go Here to Read this Fast! OpenAI introduces “Santa Mode” to ChatGPT for ho-ho-ho voice chats
Originally appeared here:
OpenAI introduces “Santa Mode” to ChatGPT for ho-ho-ho voice chats

When developing computer vision algorithms, the journey from concept to working implementation often involves countless iterations of watching, analyzing, and debugging video frames. As I dove deeper into computer vision projects, I found myself repeatedly writing the same boilerplate code for video visualization and debugging.
At some point, I decided enough was enough, so I created CV VideoPlayer, a Python-based open-source video player package, specifically designed for computer vision practitioners that will solve this problem once and for all.
If you’ve ever developed an algorithm for video analysis, you’ve probably written some version of the following code to help you visualize and debug it:
import cv2

cap = cv2.VideoCapture(<video_path>)
ret = True
while ret:
  ret, frame = cap.read()
  algo_output = some_video_analsys_algorithm(frame)
  frame_to_display = visualizer(frame, algo_output)
  cv2.imshow(frame_to_display)
  cv2.waitKey()
But in almost all projects I’ve worked on this code was rarely enough. As the project went on I found myself adding more and more functionality to help me understand what was going on.
For example:
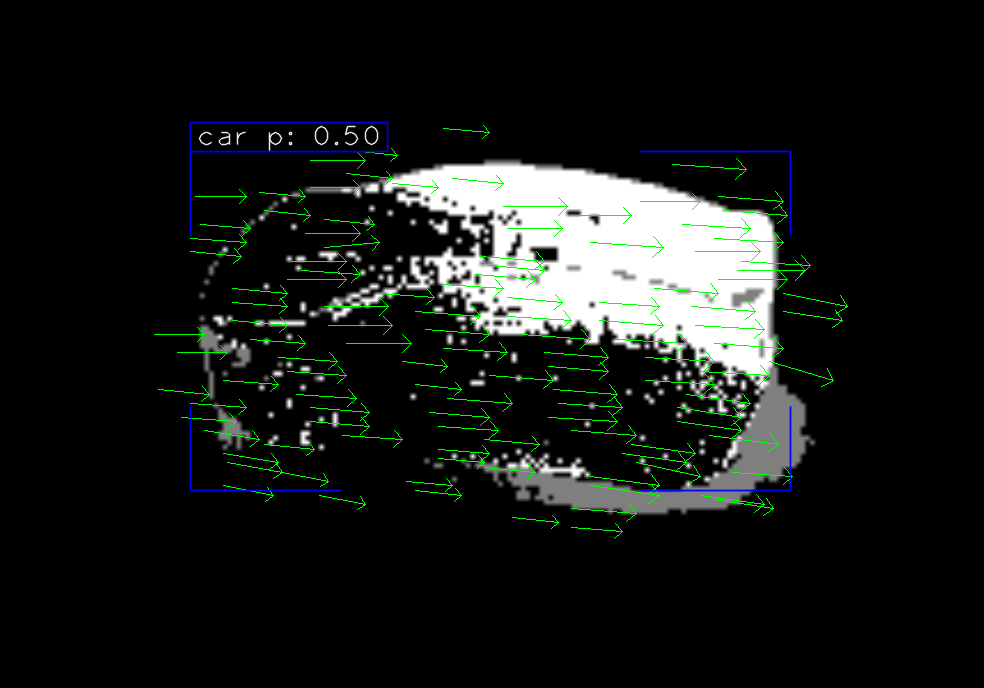
But the thing that annoyed me the most was the lack of interactivity. Using this kind of code, The visualization is created before rendering and cannot change once displayed. And, while this is okay for simple algorithms, for the more complex ones, there is just way too much information needed for each frame. And without the ability to decide, on the fly, what you want to display, you find yourself running the same video again and again, each time with different visualization parameters.
This process was tedious and exhausting.

CV VideoPlayer was born from the need for a simple customizable solution for interactively rendering videos and frames. It allows any number of overlays, sidebars, or any other frame edits, each of which can be easily switched on and off by the user during run time. let’s see an example of how this is done:
We start by installing the package using pip install cvvideoplayer
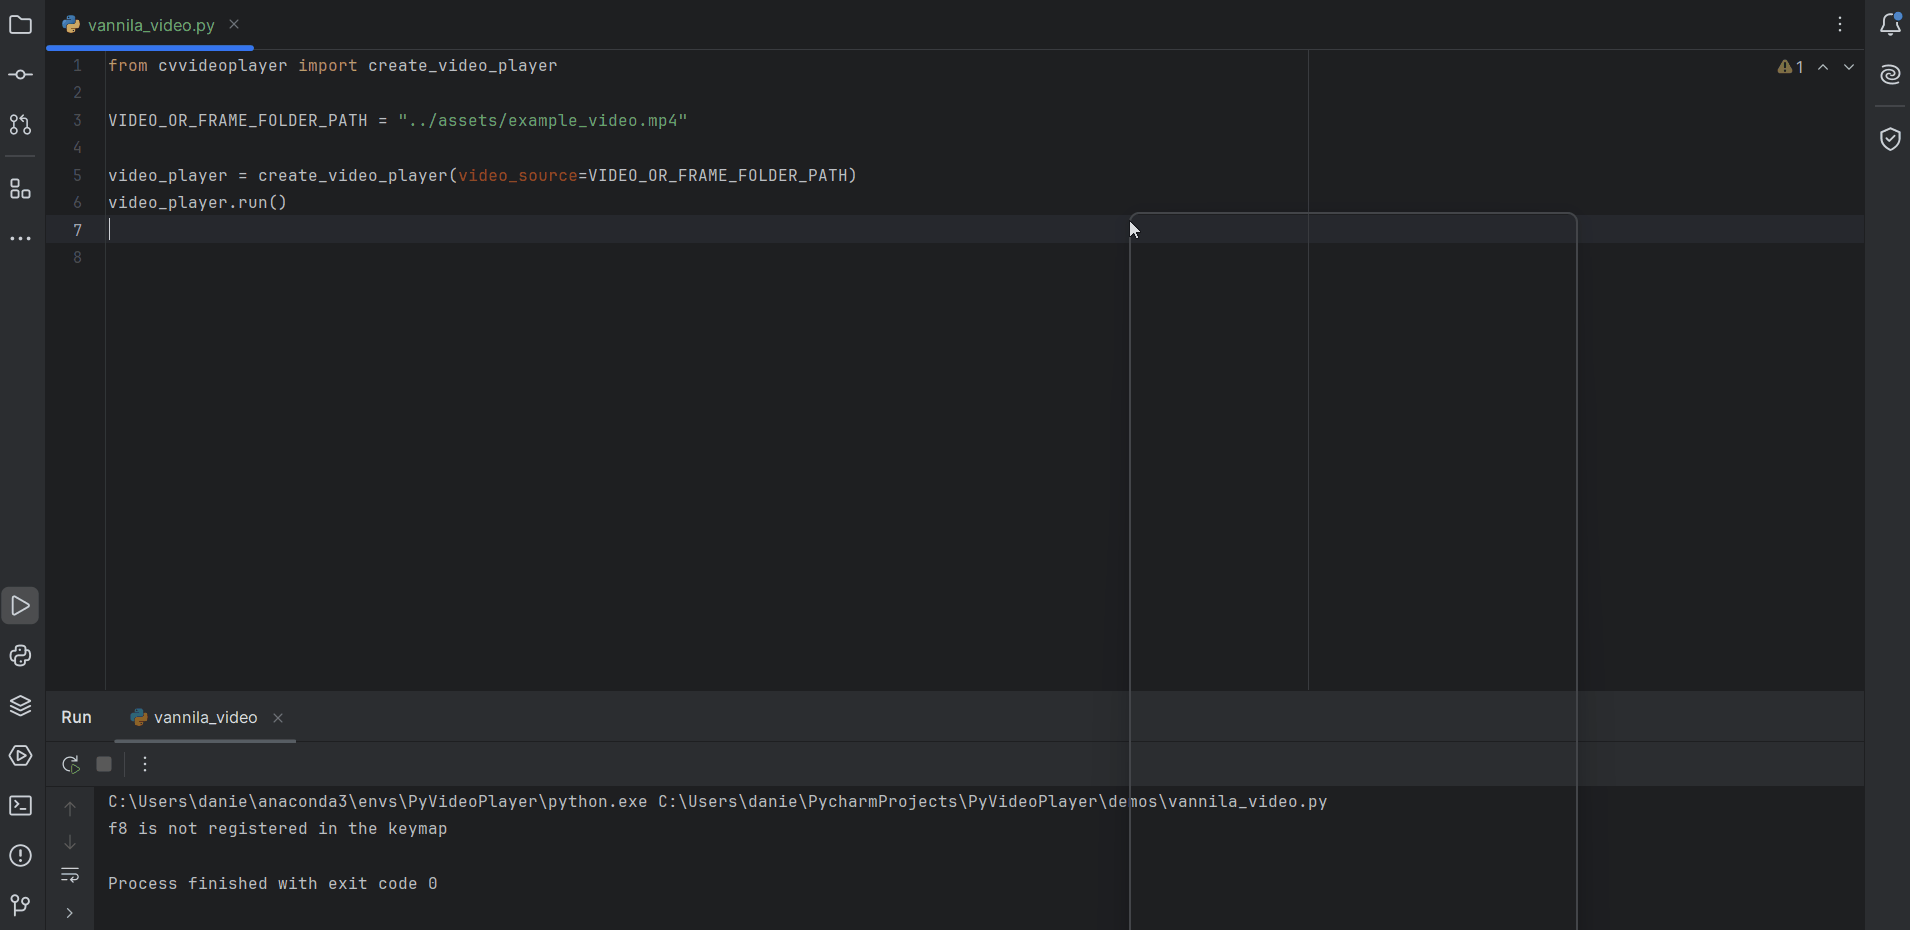
We can then import the video player and run an unedited video with the following code:
from cvvideoplayer import create_video_player

VIDEO_OR_FRAME_FOLDER_PATH = "<add local path here>"

video_player = create_video_player(video_source=VIDEO_OR_FRAME_FOLDER_PATH)
video_player.run()
This will open the video player and allow you to play it with the spacebar or using the arrows, it will also add some default built-in frame-edit-callbacks which we will elaborate on in the following section.
To add custom-built visualization to the video we can use the frame_edit_callbacks argument of the create_video_player constructor function like so:
from cvvideoplayer import VideoPlayer

VIDEO_OR_FRAME_FOLDER_PATH = "<add local path here>"

video_player = create_video_player(
  video_source=VIDEO_OR_FRAME_FOLDER_PATH,
  frame_edit_callbacks=[
            FitFrameToScreen(),
            FrameInfoOverlay(),
            KeyMapOverlay(),
        ]
)
video_player.run()
When unspecified, the default list will be exactly the one in the example above.
There are a bunch of built-in callbacks to use such as:
And more are added with each version.
Here is where the usefulness of the package shines. To add your own custom visualization you create a new class that inherits BaseFrameEditCallback and implements the edit_frame method, for example:
class MyCallback(BaseFrameEditCallback):
    def __init__(
        self,
        enable_by_default: bool = True,
        enable_disable_key: Optional[str] = None,
        additional_keyboard_shortcuts: Optional[List[KeyFunction]] = None
        **any_other_needed_params
    ):
        super().__init__(
            enable_by_default,
            enable_disable_key,
            additional_keyboard_shortcuts
         )

    def edit_frame(
        self,
        video_player: "VideoPlayer",
        frame: np.ndarray,
        frame_num: int,
        original_frame: np.ndarray,
    ) -> np.ndarray:
        """
        This function receives the displayed frame and should return it
        after it has been altered in any way desirable by the user

        Args:
            video_player: an instance fo VideoPlayer
            frame (): the frame to be edited and displayed
            frame_num ():
            original_frame () the frame before any alterations

        Returns: the edited frame
        """
        frame = add_any_visalizations(frame)
        return frame
Additionally, you can add setup and teardown methods by overriding these methods in the parent class:
class MyCallback(BaseFrameEditCallback):
    ...
    def setup(self, video_player: "VideoPlayer", frame) -> None:
        """
        Optionally configure more parameters according to the
        first incoming frame
        """

    def teardown(self) -> None:
        """
        Optionally define how the callback should close when the
        video player is closed
        """
For each callback, CV Video Player allows you to add custom keyboard shortcuts that can change the visualization it does at run time.
The most basic shortcut is enabling/disabling the callback and is created using the enable_disable_key parameter like so:
my_callback = MyCallback(
    enable_disable_key="ctrl+a"
)
The string passed here can be any combination of modifiers (ctrl, alt, and shift) with a letter or number for example: “crtl+alt+s”, “g”, “shift+v”, “crtl+1” and so on.
To add shortcuts that change the visualization itself, you can override theadditional_keyboard_shortcuts property which returns a list of the dataclassKeyFunction .
from cvvideoplayer import KeyFunction

class MyCallback(BaseFrameEditCallback):
    ...
    @property
    def additional_keyboard_shortcuts(self) -> List[KeyFunction]:
      [
          KeyFunction(
              key="alt+r",
              function=self.a_function_to_modify_the_visualiztion,
              description="what this does"
          )
      ]
A KeyFunction is constructed using three arguments:
In many cases, the KeyFunction will receive a function that toggles some boolean attribute of the callback, which will change something that the edit_framemethod does. So something like:
from cvvideoplayer import KeyFunction

class MyCallback(BaseFrameEditCallback):
...
    @property
    def additional_keyboard_shortcuts(self) -> List[KeyFunction]:
      [
          KeyFunction(
              key="alt+r",
              function=self.a_function_to_modify_the_visualiztion,
              description="what this does"
          )
      ]
    def a_function_to_modify_the_visualiztion():
        self._draw_something = bool(1 - self._draw_somthing)
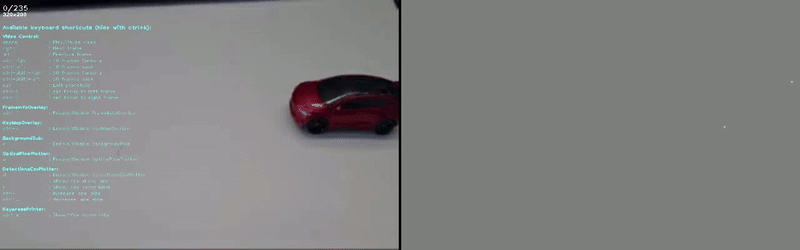
Many times, I found myself wanting to compare two different visualizations side by side. For example, comparing two detectors or an algorithm’s output with the original frame without modifications, and so on.
To do that I added double_frame_mode which can be turned on by:
video_player = create_video_player(
  ...
  double_frame_mode=True
)
The video at the beginning of this blog is an example of what this mode looks like.
In this mode, you can use “ctrl+1” and “ctrl+2″ to decide which frame visualization you want to control with the keyboard.
By default, both frames will have the same callbacks available but if you want different callbacks for the right frame you can use the right_frame_callback argument to give the right frame a different set of callbacks (the left frame will have the ones passed to the frame_edit_callback argument):
video_player = create_video_player(
    ...
    double_frame_mode=True
    right_frame_callbacks = [callback1, callback2, ...]
)
I Hope this tool comes in handy for all of you. If you have any ideas on how to improve it, please let me know in the issues tab on the project’s GitHub page, and don’t forget to leave a star while you’re at it 🙂 …
CV VideoPlayer — Once and For All was originally published in Towards Data Science on Medium, where people are continuing the conversation by highlighting and responding to this story.
Originally appeared here:
CV VideoPlayer — Once and For All
Go Here to Read this Fast! CV VideoPlayer — Once and For All
10 essential steps, from data exploration to model deployment.
Originally appeared here:
Sentiment analysis template: A complete data science project
Go Here to Read this Fast! Sentiment analysis template: A complete data science project


Originally appeared here:
Accelerate your ML lifecycle using the new and improved Amazon SageMaker Python SDK – Part 2: ModelBuilder

Originally appeared here:
Accelerate your ML lifecycle using the new and improved Amazon SageMaker Python SDK – Part 1: ModelTrainer