Space simulator “No Mans Sky” has a new update, and to celebrate it, they’ve made the title free to play between February 15 and February 19.
‘No Mans Sky’ is free to play through February 19
Eight years after launch, and 24 major updates later, Hello Games’ No Mans Sky has another update. To celebrate that Omega update, the title has gone free to play for the weekend.
“This represents a moment for new players to try No Man’s Sky, and existing players to welcome them into the community,” the developers wrote in a blog post. “There are no microtransactions, no free to play mechanics, just a huge universe to explore for free with your friends.”
Workers at the Indian plant of Apple supplier Flex staged a one-day strike over pay, conditions, and the firm’s refusal to recognize a union.
A Flex facility in India (Source: Flex)
Flex makes chargers for Apple and while not the best-known of the Cupertino firm’s suppliers, it is a huge multinational corporation employing 172,000 worldwide. Its Tamil Nadu plant alone employs a total of 4,000 people.
According to Reuters, that 4,000 is a mixture of staff and contract workers. Under Indian law, contractors cannot be used for what are described as core activities, and they did not join the strike.
The cold winter is a good time to watch these 5 underrated shows on Amazon Prime Video, which includes two great sci-fi shows and an acclaimed 2023 series.
I really like the Google Pixel 8 Pro. It’s a splendid phone with great cameras, clean software, and more. But something about it is really bothering me.
I’ve been using the AIAIAI Unit-4 Wireless+ studio monitors for a couple of months now. And initially, I wasn’t sure what to make of them. They’re solid studio monitors with 4-inch woofers and 1-inch silk tweeters. They sound good and look good. But the pitch — the reason these things cost $800 for a pair — is that they’re wireless. And not, “they’re studio monitors that also happen to have Bluetooth” wireless, though they have that as well. They include AIAIAI’s low-latency 2.4Ghz wireless tech that made its debut on the Studio Wireless+ a couple of years back. Plus they have sizable batteries, allowing them to run for up to 20 hours without any cables at all.
I was skeptical of the Studio Wireless+, but was eventually won over by the surprising convenience of not being tethered to my audio interface by a 3-meter long coiled cable. The Unit-4 have a somewhat tougher case to make, though. The cables that keep my current PreSonus monitors tethered to my desk don’t get in the way. I don’t have to unplug them to put on my guitar and I don’t trip over them while grabbing a synth from the shelf. Instead, the Unit-4 are meant to solve a very specific problem: needing studio quality monitors when you’re not in your studio.
As you might imagine, this is not a thing I find myself needing terribly often. I’m sure that someone out there, likely professional musicians who spend significant time on the road, would immediately see the appeal. But for a hobbyist like me, finding a use case is harder.
Before we get too deep into the “why,” let’s talk a little bit about the “what.” Until now AIAIAI has focused exclusively on headphones. A more conservative company might have simply made some bog-standard studio monitors and called it a day. But today you can get bog-standard studio monitors, and pretty decent ones at that, for not much money. So rather than just add more noise to an already saturated market, AIAIAI looked to see what it could do that would be unique.
Terrence O’Brien / Engadget
The somewhat surprising answer it got from some artists was wireless, battery-powered monitors. So it took the low-latency W+ Link technology it had developed for Studio Wireless+ and adapted it for use in a pair of 4-inch studio monitors. Where Bluetooth latency can be all over the map, ranging from around 40ms under ideal conditions with the latest hardware, to well over 100ms, W+ Link is a consistent 16ms. It’s not zero latency, but it’s close enough for a quick recording session or a casual jam.
Because of their size you’re not gonna get a ton of bass out of them. You get a surprising amount more low end just by jumping up to 5-inch woofers. But, it’s not like the Unit-4 lack oomph. They’ve got a decent amount of punch and a reasonably flat frequency response. That said, as with the Studio Wireless+, I find their tone a touch on the dark side.
There is an app for iOS and Android, though, where you can tune the EQ to your liking. I personally scooped the mids and cut the sub bass just a smidge to help brighten up the sound ever so slightly and keep things from getting muddy in my small attic studio. But there are also useful presets in there depending on where you are and what orientation the speakers are in, whether that’s horizontal on your desktop or on a picnic blanket in a park.
Terrence O’Brien / Engadget
While it’s purely subjective and of little practical value, the Unit-4 look great in any orientation or setting. They’re much better looking than most studio monitors. They’re sleek, black and have a stylish metal speaker grill that attaches firmly with the help of a few magnets. A ring of white light glows around the woofer when they’re powered on too. Like I said, it makes no functional difference, but they’re certainly a visual upgrade from my PreSonus Eris E5s.
There are a few design choices that I can quibble with, however, even if I understand the reasoning (usually to shave size and weight). First off, the Unit-4 lack XLR hookups. This isn’t unheard of on portable studio monitors, and they do have balanced TRS connections, but combo XLR / TRS jacks are pretty ubiquitous at this point and wouldn’t have required much more room.
The power bricks for each speaker are also enormous.Obviously, putting those components inside the speaker, along with their sizable 77Wh batteries, would have dramatically increased their size and weight. But it seems odd that, what I believe are, the largest power bricks in my home currently belong to the Unit-4, while none of the other studio monitors or speakers I own have external power supplies at all, just standard AC cables. They weigh more than a pound each, which means that, despite AIAIAI bragging that the Unit-4 only tip the scales at 2.5kg (or about 5.5 pounds), if you were to hit the road with two monitors and the chargers for each you’d be looking at a total weight of close to 14 pounds.
Terrence O’Brien / Engadget
That’s hardly unreasonable if your definition of portable is simply that you can move them from place to place — nobody is taking the Unit-4 with them on a whim on the off chance that they might need a studio monitor. Still, I will say that I think AIAIAI should include the carrying case if they’re pitching the portability factor, rather than it being a $70 add-on.
My biggest issue, though, was the decision to remove the battery from the transmitter. The X01 Transmitter that comes with the Studio Wireless+ has a built-in battery. The X02 Transmitter that is packaged with the Unit-4 does not. The perk of this is that, when used as a USB-C audio dongle with a laptop, it’s nice and discrete. The downside is that if you use the minijack output you need to provide your own power, preferably via a powerbank, rather than an AC adapter to minimize opportunity for interference or ground loops.
Part of AIAIAI’s rationale for ditching the battery was that, well, batteries have a tendency to wear out. And this way, you don’t have to chuck the whole transmitter just because it won’t hold a charge anymore. But, the company has figured out how to make practically every part of the studio monitors removable and replaceable (including the battery), so it seems like doing that for the transmitter shouldn’t have been too tough.
Terrence O’Brien / Engadget
The lack of a battery is a non-issue if you’re primarily using the Unit-4 connected to a computer. But if you’re using a standalone piece of gear like an SP-404, connecting to a mixer for a jam session or out busking it in a park, the extra cable and external power bank become something else to forget at home and kind of undermine the whole “wireless” thing.
I know that seems like a lot of negatives all in a row, but these are honestly pretty minor complaints. And I think that, if you are one of the people who will get a lot of use out of the Unit-4, they probably won’t deter you. The audience here is undoubtedly smaller than with the Studio Wireless+, though. Where almost any bedroom producer could use a solid set of headphones that can be wired or wireless at a moment’s notice, bouncing from low-latency studio mode to Bluetooth at the flip of a switch. The list of musicians that need the same from their desktop studio monitors is probably pretty short.
I can imagine these being super handy on a tour bus but, I am not a touring musician. Instead where I found the wireless feature most useful was for dabbling with new musical toys from anywhere in my house. Rather than hide in my attic, I could bring one of the Unit-4s down into the living room (but not both), connect the transmitter and a powerbank to say, the Gaia 2 and get some work done while also hanging out with my kids.
Terrence O’Brien / Engadget
Just for the hell of it, I took the Unit-4 to a park to shoot some review photos. I can’t say that’s something I’d want to do terribly often. Lugging them through the park as I looked for a decent enough place to stage my shoot got tiresome pretty quickly. But, I did put their loudness to the test by cranking the speakers all the way with my SP-404 MKII set to top volume. Quite a lot of people stopped and stared at me with open hostility. They still sounded great, with no distortion and the audio remained clear and punchy even from a few dozen feet away. But, like with the Wireless Studio+, the W+ Link does introduce some noise that becomes noticeable as you approach the 75-percent mark on the volume.
They were handy as just regular ol’ Bluetooth speakers. While it’s been a touch too cold to throw parties in my backyard, I’ve set one of the Unit-4s up outside while I’ve raked the leaves. If I really wanted to make my neighbors hate me, I could turn the speakers all the way up and they’d even be audible over my trimmer and leaf blower.
And thanks to their giant batteries they’d easily be able to last through a few hours of yard work, a raucous BBQ, some late night cleanup and then some. AIAIAI claims over 20 hours of battery life, but doesn’t specify if that’s over Bluetooth or W+ Link. I did a battery rundown test where I left the Unit-4 connected over W+, occasionally playing music through them from Ableton Live and djay Pro with the volume set at 75 percent. The first speaker gave up the ghost after 17 hours and 46 minutes, and the second followed 11 minutes later. Considering the Studio Wireless+ last more than four times as long when on Bluetooth versus W+ Link, it’s safe to assume you’d be able to eke quite a bit more playtime out of the Unit-4 if you were using them strictly as Bluetooth speakers. Of course, if you did that you’d be missing out on the whole point of the Unit-4.
Terrence O’Brien / Engadget
Even though they’re pricey, perhaps the ideal customer would be a busker. The Unit-4 can cover live performances with low enough latency to not be distracting, are reliable monitors for mixing in a studio, and also loud enough fill up an apartment or yard with tunes for a party. The only thing I wouldn’t want to rely on them for is DJing. While you could work around the latency by feeding both the cue and the live mix to a pair of headphones, it’s just a smidge too much if you really want to make sure your transitions are 100-percent on point.
One other thing worth noting is that the amount of latency you experience with the Unit-4 will vary depending on your source (USB-C vs ⅛” TRS) and even whether you’re on Windows or macOS. If you intend to use the Unit-4 with a Windows PC over USB-C you absolutely need to install the ASIO4ALL driver. Built-in Windows audio drivers have improved over the years, but they still can’t hold a candle to Apple’s Core Audio or Steinberg’s ASIO. To be clear, this isn’t an issue with the Unit-4, but with Windows. For the best results and the lowest latency, your best bet is still to use a dedicated Audio interface and to connect the X02 Transmitter to that using a TRS cable. Of course, that also means you’ll have to bring some way to power the transmitter, whether that’s a power bank or a USB-C power adapter.
Terrence O’Brien / Engadget
If you are someone looking for a pair of portable studio monitors that let you (more or less) ditch the cables entirely, the Unit-4 are basically the only game in town. They’re stylish, natural sounding and have a completely unique set of features. But they’re definitely more of a niche product than the Studio Wireless+. While their $350 price tag isn’t cheap, the flexibility and broader appeal make them an easier sell. The Unit-4 on the other hand are both quite expensive at $800, and trying to solve a very specific problem. At least I can say unequivocally, they solve that problem quite well.
This article originally appeared on Engadget at https://www.engadget.com/aiaiai-unit-4-review-unique-wireless-portable-studio-monitors-130048854.html?src=rss
You might have been familiar with AI chats powered by Large Language Model (LLM) such as OpenAI ChatGPT or Google Bard. And you might have noticed one thing — these LLMs have extensive general knowledge about the world, but might not give you satisfactory answers when you ask about a very specific or professional area, especially if the knowledge of this area is not that publicly available or sharable.
Have you thought about “giving” your private knowledge to LLM and creating your own Chatbot?
Do you know this can be done within 5 minutes with no code or low code?
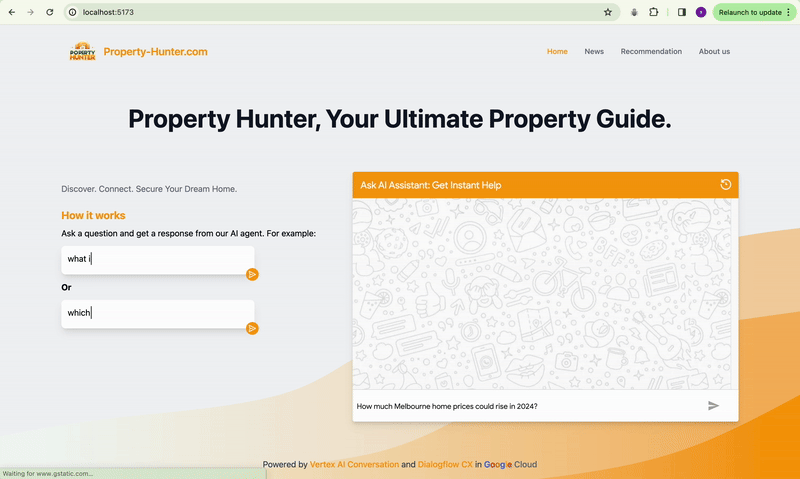
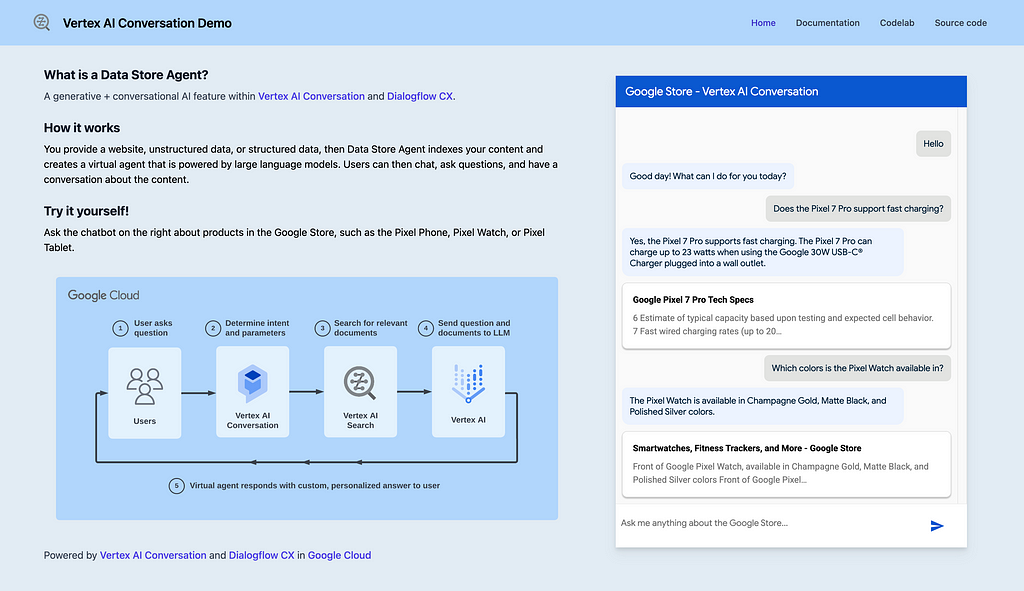
The end product will be like this:
The Solution
During the Asia Pacific Google Cloud Applied AI Summit, Alan Blount from Google shared an interesting idea of achieving this using Google Cloud Vertex AI Search and Conversation, which I found pretty attractive to try out.
The idea is simple, first put a corpus of private knowledge documents onto Google Cloud Storage:
then create a Data Store, and import the documents from the Cloud Storage into the Data Store:
finally plug that Data Store into Dialogflow CX:
then we are done!
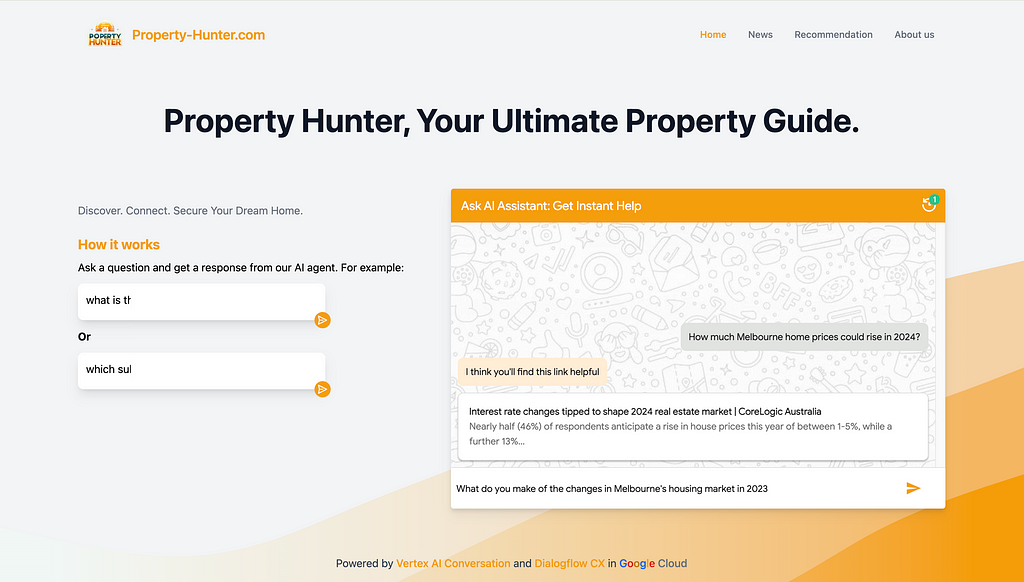
We can test Chatbot like this:
And if we want to publish it through a beautiful application, Google provides a public git repo for a Chat App that we can utilise. With a bit of coding knowledge, we can plug the link of the Dialogflow Chatbot into the Chat App, and customize the interface like this:
OR this:
Use Case
In this case, assuming I am the owner of an ecommerce website. I would like to create a Chatbot, so my users can ask specific questions regarding anything about this website (price, product, service, shipping, etc.) as they are in the store. The Chatbot will be supplied with the “private knowledge” and ground its answers to the contents of the website.
Given I am not actually owning an ecommerce website, I will take a workaround to crawl contents from an existing website available on the Internet. This is tricky because most websites are anti-scraping as specified in their terms of use, and it could be illegal to scrape ecommerce websites such as Amazon, eBay, Alibaba, etc.
ChatGPT provided me with a perfect option —
Books to Scrape (https://books.toscrape.com/). A simulated bookstore specifically designed for web scraping practice. It offers a straightforward structure for scraping book details like title, price, and rating.
In this use case, I would assume I am the owner of this Books to Scrape website, and create the Chatbot based on it.
Step by Step Guide
This might look a bit lengthy at first glance because it covers every detailed step that you will need. Once you have run through, you can get the same done within 5 minutes.
Step 1: Environment Setup
The tool we are going to use is sitting on Google Vertex AI and we will need a Google Cloud Platform (GCP) account.
Google has a free-tier program to provide new Google Cloud Platform (GCP) users with a 90-day trial period that includes $300 as free Cloud Billing credits.
Follow the tutorial here to set up the free Google Cloud account.
After you have set up Google Cloud account and can access the console, create a storage bucket (step-by-step guide here) for the next step use.
Step 2: Prepare Private Knowledge and store them into Google Cloud Storage (low code)
As mentioned above, the private knowledge in this case will be the contents sitting on the book store website.
For owners of ecommerce websites, all you need to do is to provide the website URLs, and Google can automatically crawl website content from a list of domains you define.
Given I am not a real owner, I will resolve this by scrawling. Alan Blount from Google provided a very useful notebook to achieve this. All the code snippet does is to scrawl webpages from the website that you specified and store them in a Google Cloud Storage bucket that you specified.
This is all you need to do:
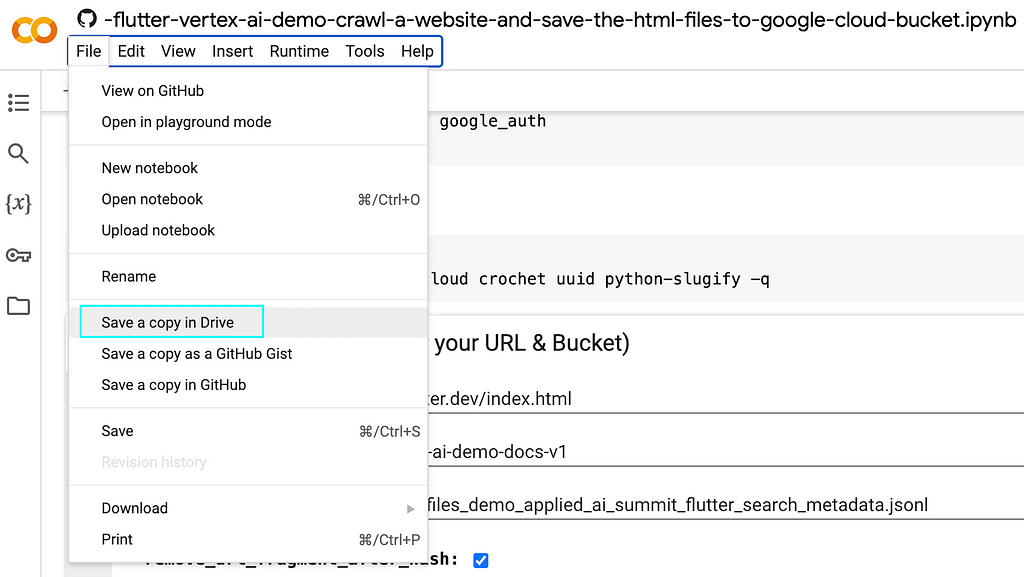
2.1 Save a copy of the notebook in your own drive
Recall that in step 2 you have created a new Google account when you registered for Google Cloud? Your Google account will have Google Drive and you can save a copy of this notebook to your drive.
Select “Save a copy in Drive” option from the dropdown menu of “File”
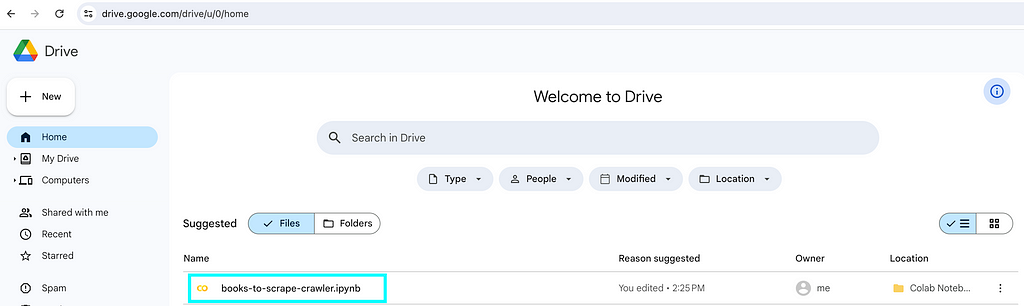
Then if you go to Google Drive, you will be able to see the notebook you created. Feel free to rename it according to your need.
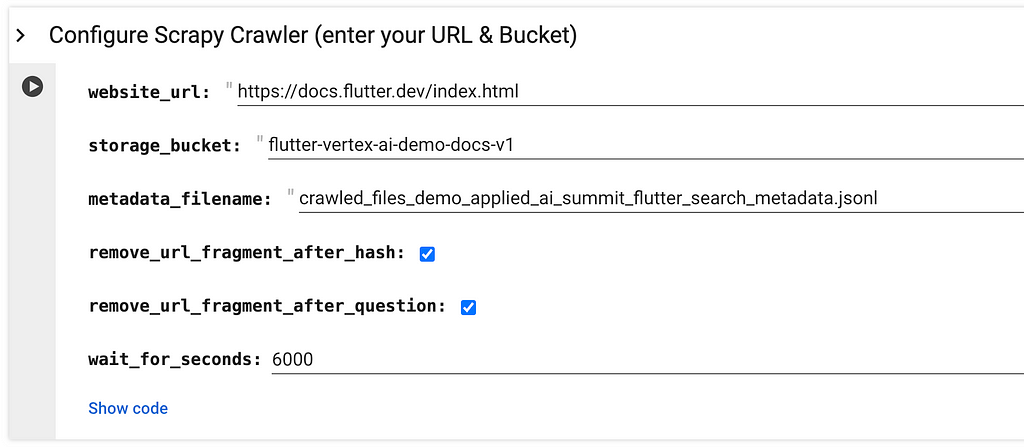
2.2 On your own notebook, locate the below and specify
Image from Google Colab Notebook
website_url refers to the website page URL that you would like to scrawl.
storage_bucket refers to the Google Cloud Storage that you created in above step 1.
metadata_filename refers to a json file that will be created and stored together with the webpages. You might want to make it relevant to your website by changing applied_ai_summit_flutter_search to something that can describe your use case.
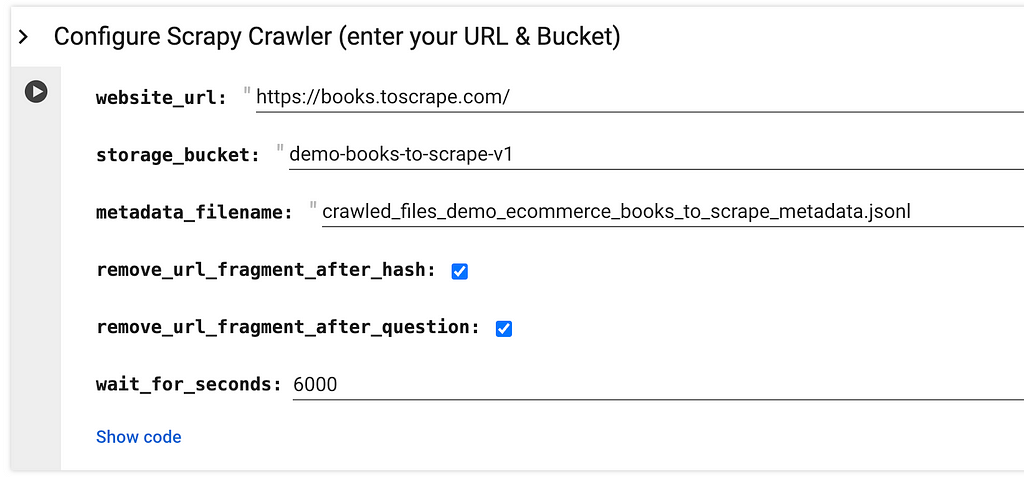
This is my version:
Image from Google Colab Notebook
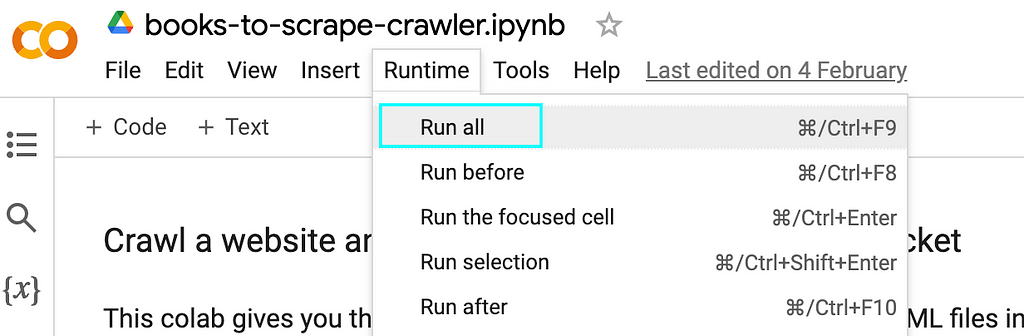
2.3 Run all
Image from Google Colab Notebook
2.4 When it prompts you to authenticate the Google Colab notebook to access your Google credentials, click “Allow” -> “Continue”
Image from Google Colab Notebook
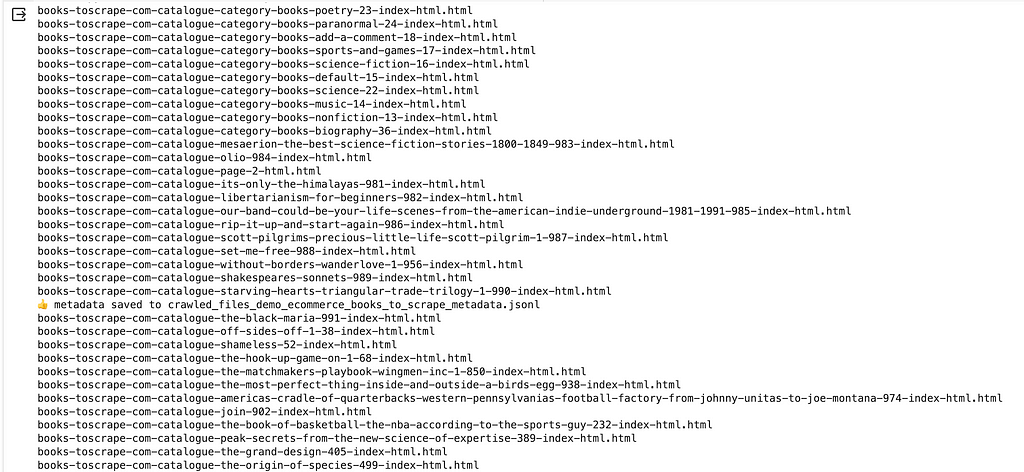
Then the script should run through and show the progress of the scrawling at the bottom, just like this:
Image from Google Colab Notebook
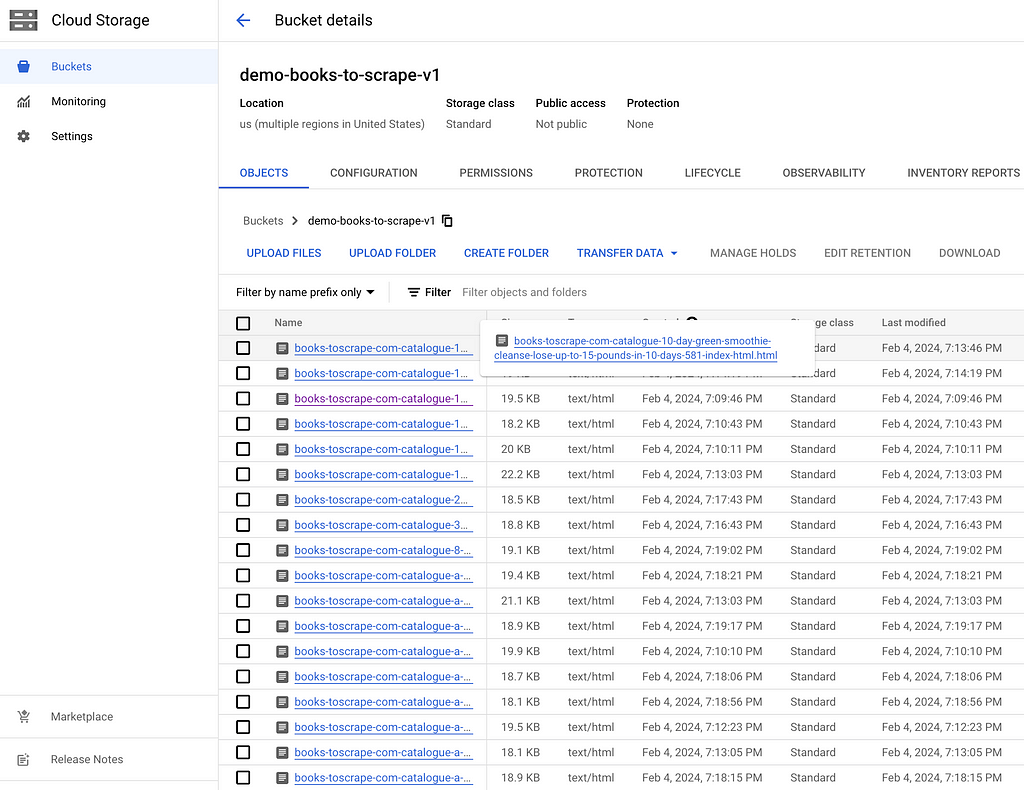
And if you refer to your Google Cloud storage bucket, you will see these html files get scrawled and stored properly within your bucket:
Image from Google Cloud Console
One thing to notice is that the code snippet is not designed for every use case, and you might need some slight tuning of the codes to achieve your goal.
For example, in my case, I tuned the code a bit by changing
By default the html_string will be uploaded as text/plain . By changing into text/html , I would like to enable this HTML contents to show properly in a later stage.
You can tune the code as much as you like.
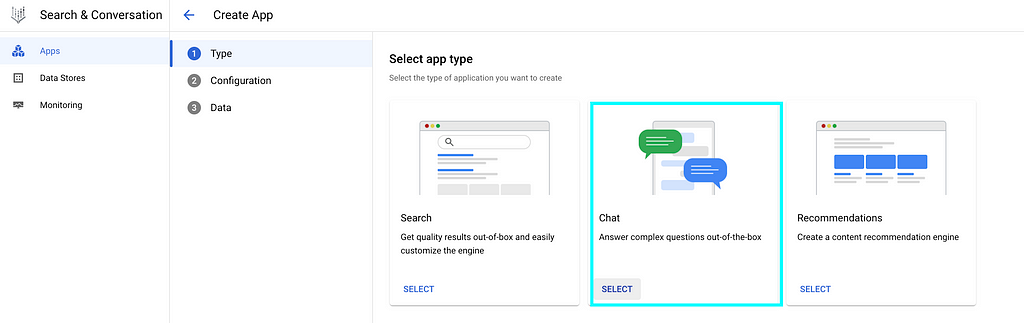
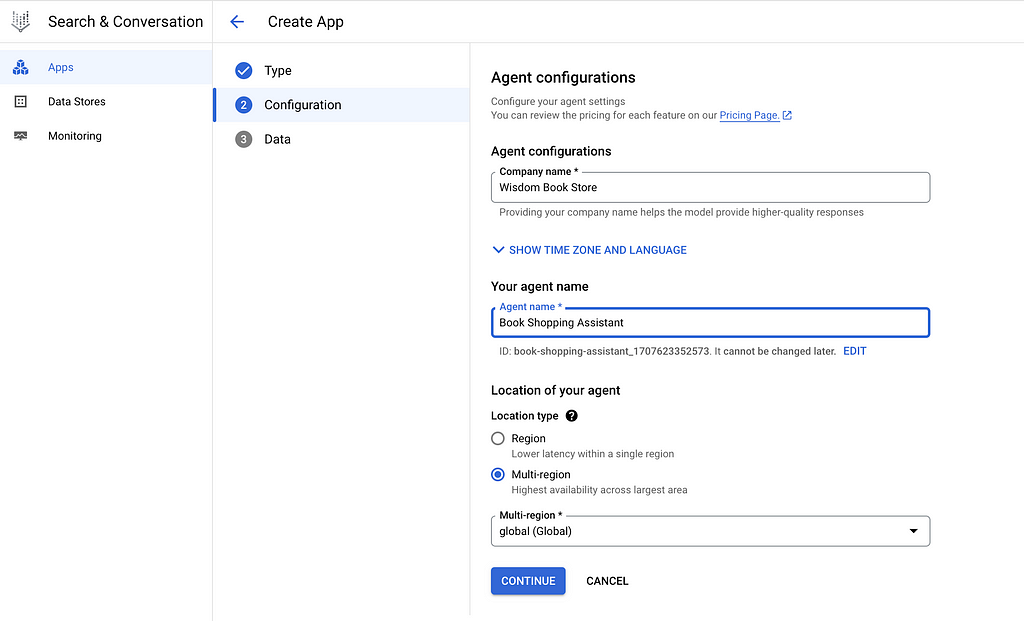
Step 3: Create Chatbot and the Data Store sitting behind the Chatbot (no code)
Provide your “Company name” and “Agent name”. Note that the “Agent name” here will be the name of the Chatbot, you might want to put a good name for your users.
Image from Google Cloud Console
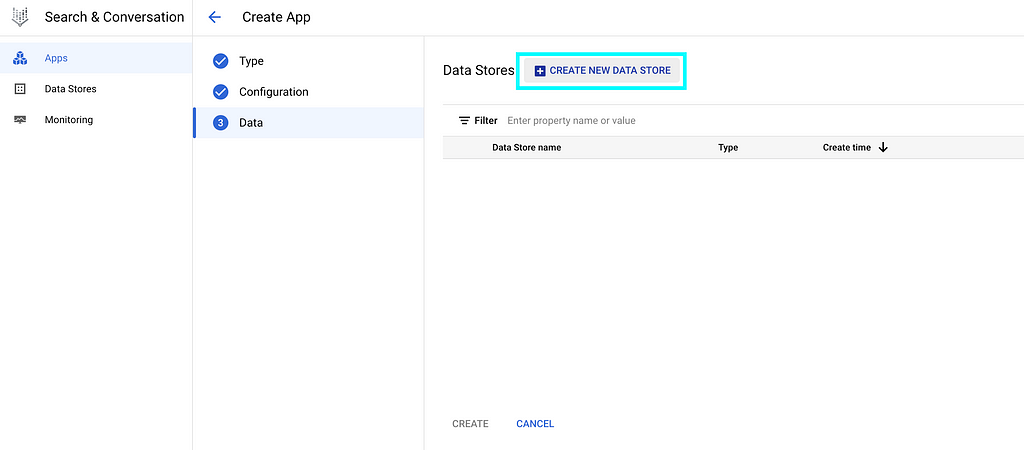
At this “Data” page, select “CREATE NEW DATA STORE”:
Image from Google Cloud Console
For owners of ecommerce websites, select “Website URLs” and provision your website URLs
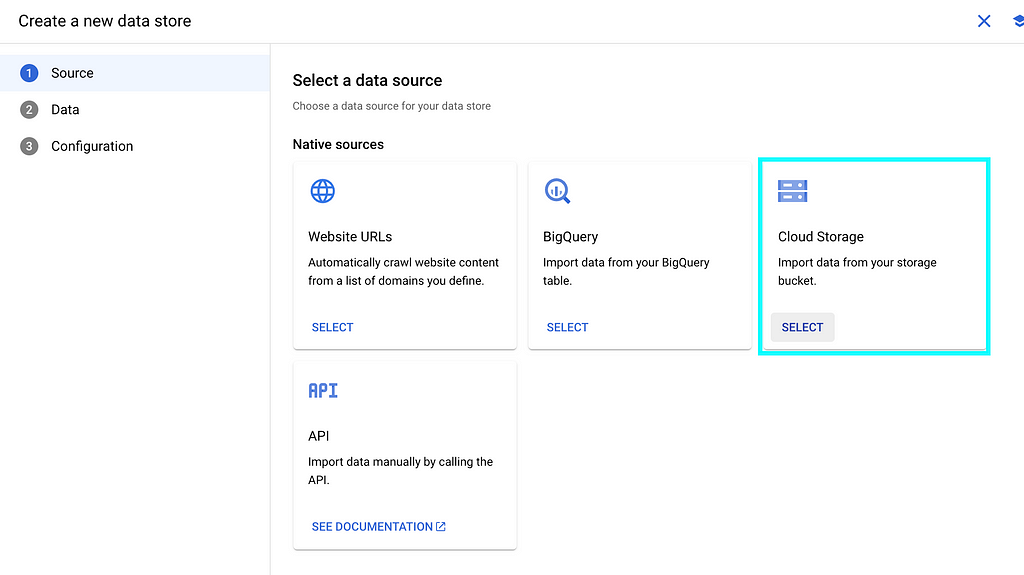
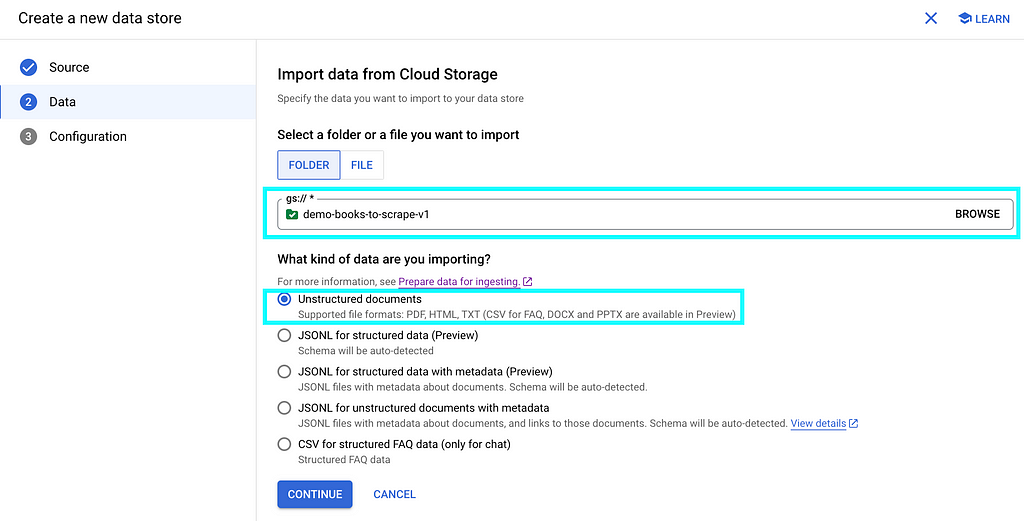
As I have scrawled the website contents into Cloud Storage, we can select “Cloud Storage” here:
Image from Google Cloud Console
Specify the Cloud Storage bucket name, and select “Unstructured documents” in below:
Image from Google Cloud Console
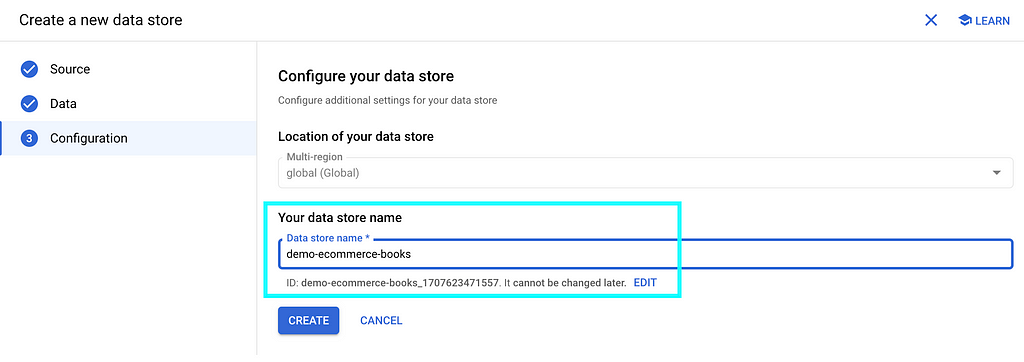
Give your data store a name, then “CREATE”
Image from Google Cloud Console
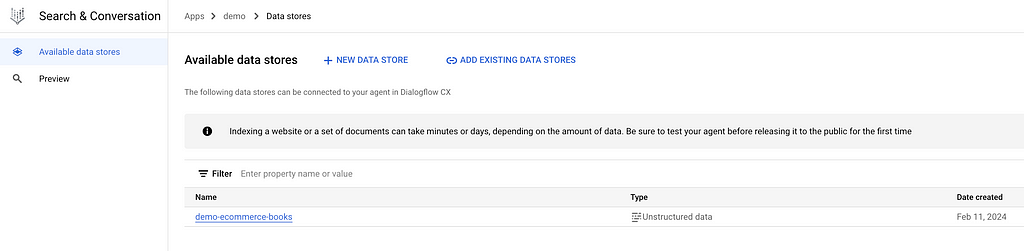
You will see your data store listed, then “CREATE”
Image from Google Cloud Console
Your data store will be created as below
Image from Google Cloud Console
If you click into it, you will see your data store is “processing data” by importing documents from the Cloud Storage bucket that we specified earlier:
Image from Google Cloud Console
If we click the “ACTIVITY” tab, we can see the import is in progress:
Image from Google Cloud Console
Import will take minutes to hours depending on the number of documents in your Cloud Storage bucket.
In my case, I have over 1,000 files and it finishes within minutes.
After import is completed, the status as highlighted has changed:
Image from Google Cloud Console
And if you switch back to the “DOCUMENTS” tab, you will see the list of files imported into the data store:
Image from Google Cloud Console
That means you’ve got all the materials and you are ready to cook!
Step 4: Test the Chatbot (no code)
In step 3 above, we have already created a Chatbot app as well as the data store sitting behind it.
Click “Apps” on the top:
Image from Google Cloud Console
You will see the Chatbot you created in the previous step 3:
Image from Google Cloud Console
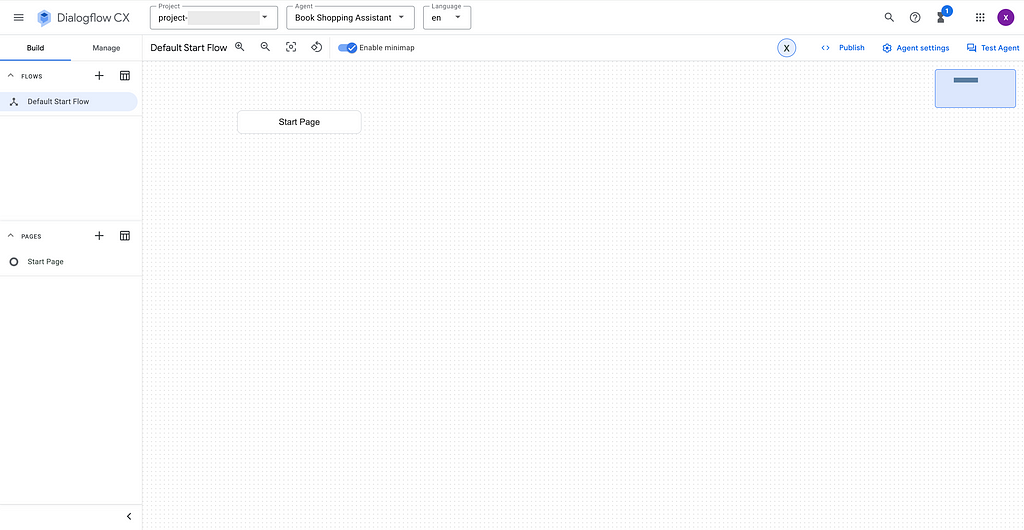
If you click into the Chatbot name, you will be directed to the Dialogflow CX page like below:
Image from Google Cloud Console
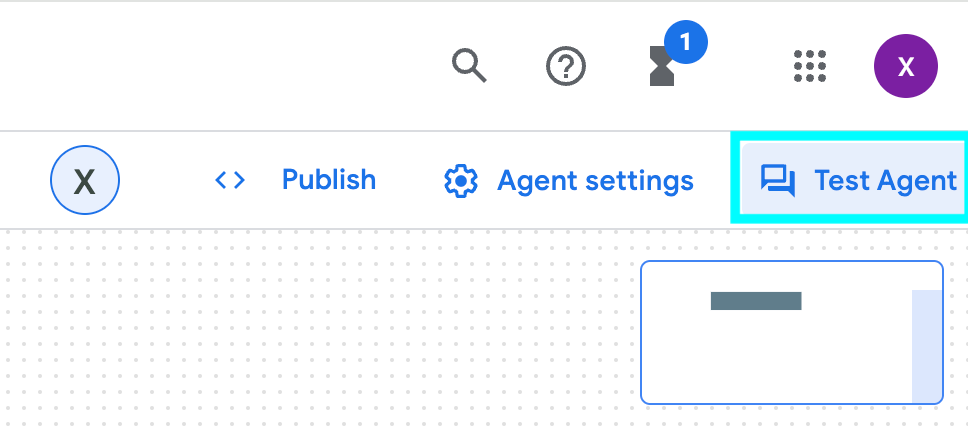
To test the Chatbot, select “Test Agent” in the right up corner:
Image from Google Cloud Console
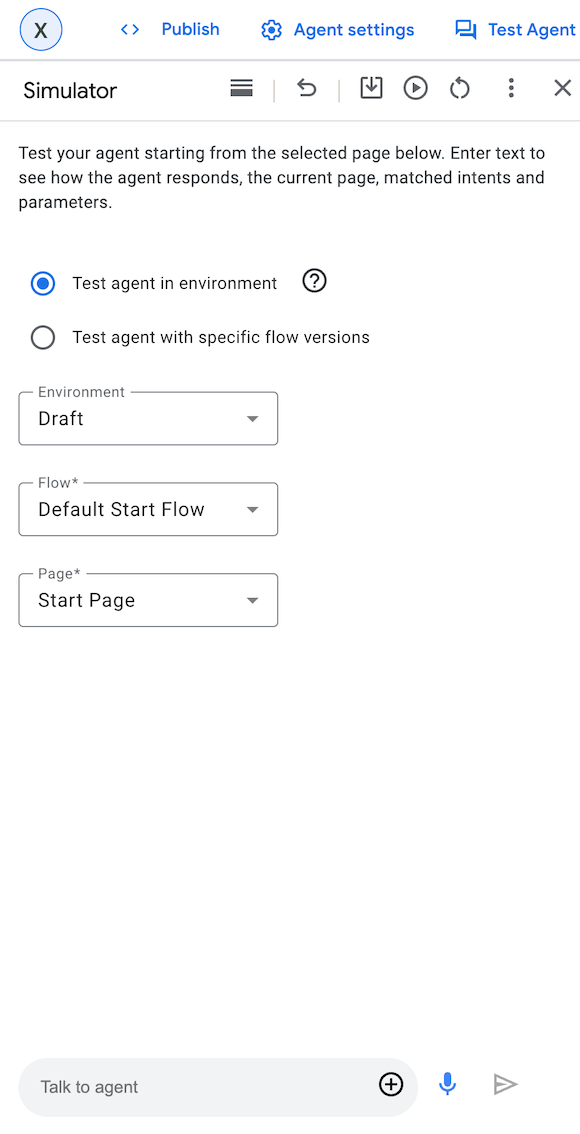
And the dialogue box will pop up:
Image from Google Cloud Console
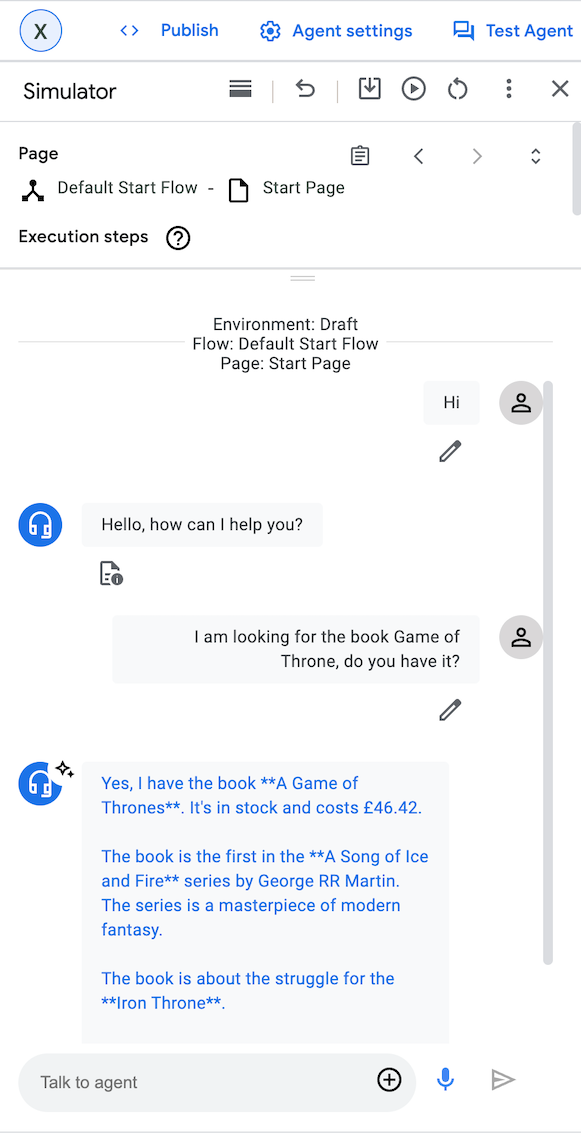
You can start the conversation by saying “hi” and start asking questions to the Chatbot:
Image from Google Cloud Console
It works!
Step 5: Publish / Integrate your Chatbot (low code)
If you are happy with the Chatbot, it is easy to integrate it with your web application
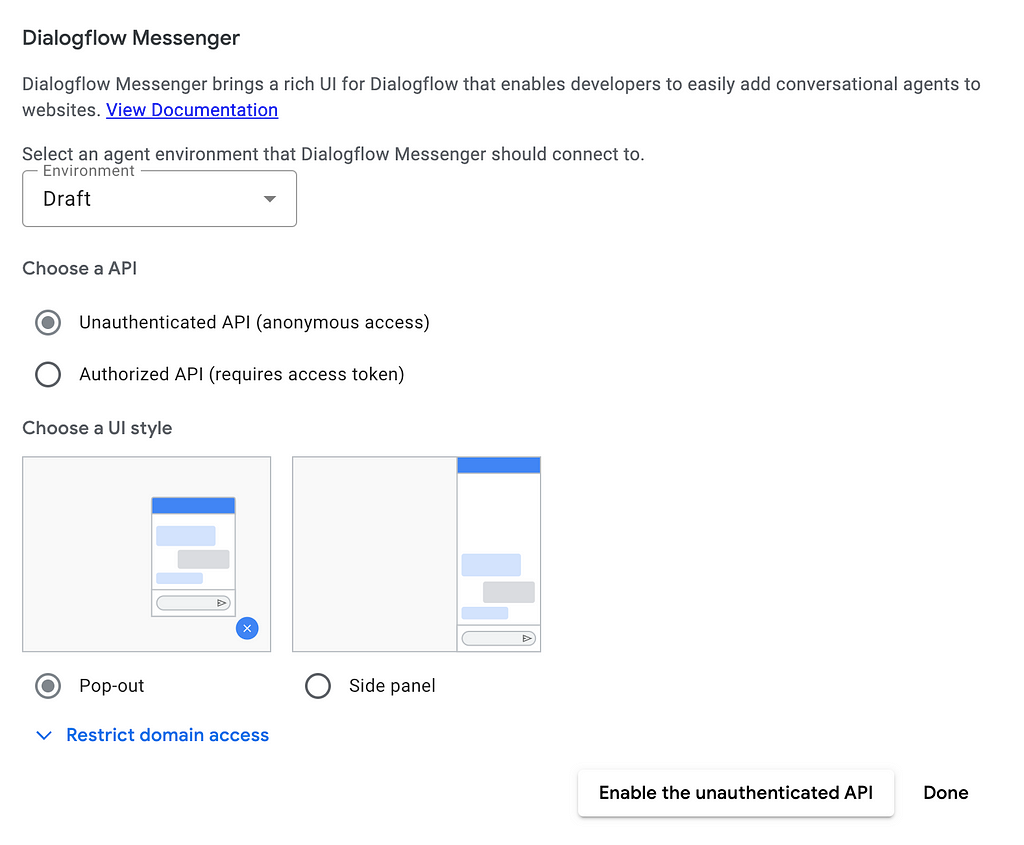
Go to the left pane, select “Manage” -> “Integrations” -> “Dialogflow Messenger”
Image from Google Cloud Console
You can choose the type of API and UI style according to your needs
For demo purpose, I selected “Unauthenticated API” as API and “Pop-out” as UI style:
Image from Google Cloud Console
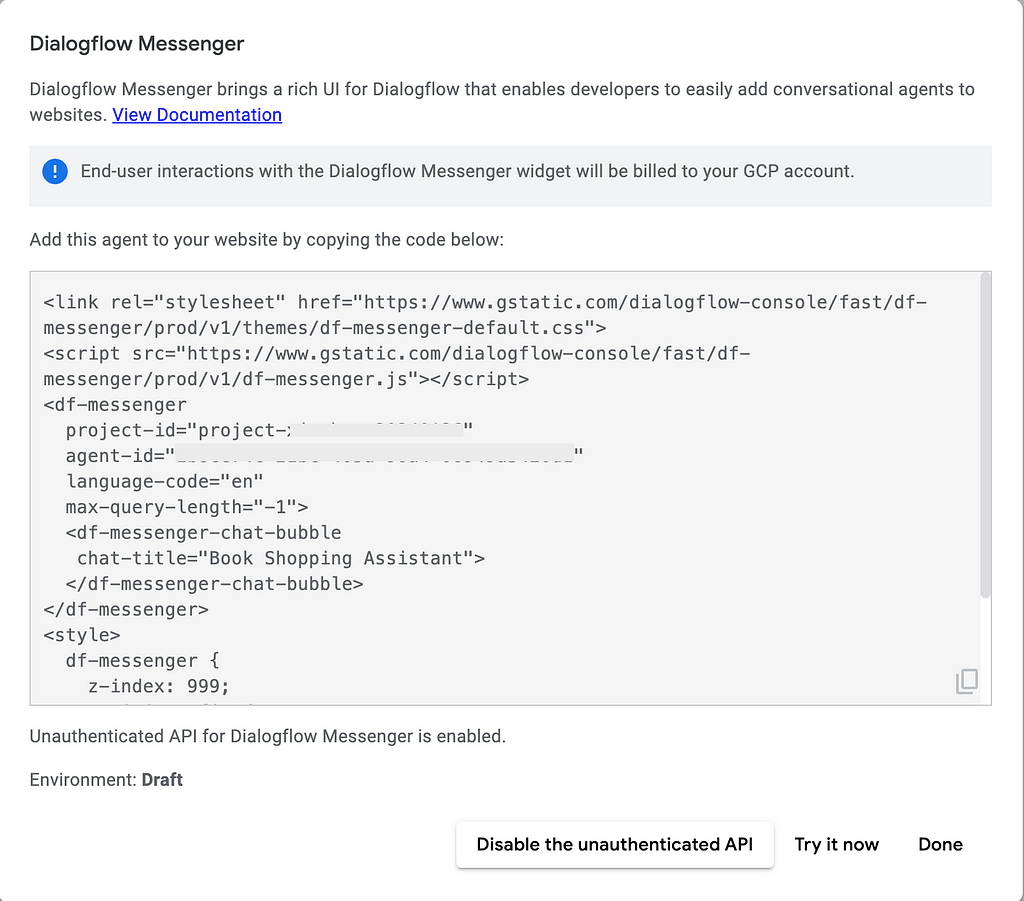
After selecting “Done”, a code snippet in HTML will be generated in the next page as below:
Image from Google Cloud Console
You may copy the code snippet and easily paste it into your applications for integration.
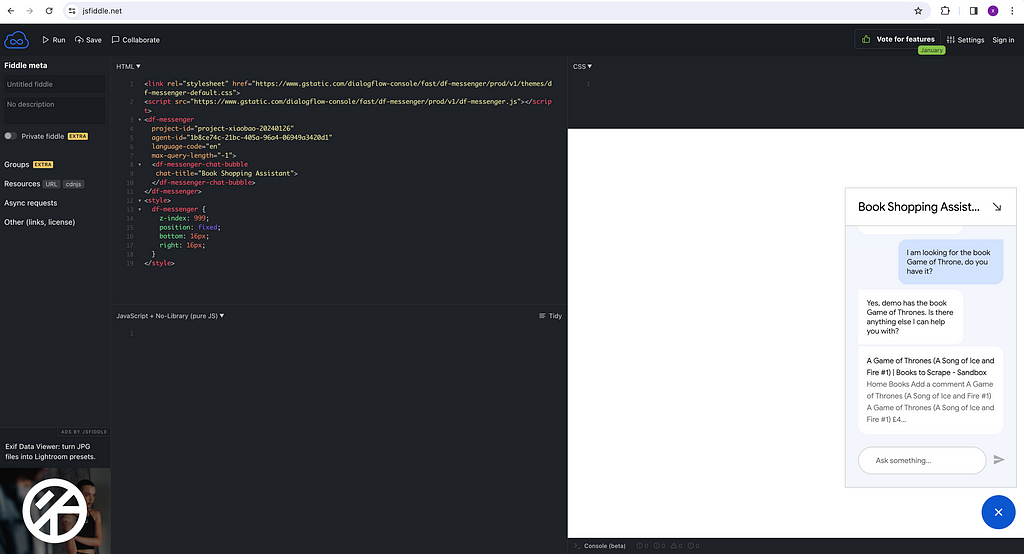
For demo purpose, I copy paste this HTML snippet into JSFiddle and run it, then I am getting my little Chatbot working as shown in the right down corner!
Step 6 (Optional): Publish it through a Beautiful Application (low code)
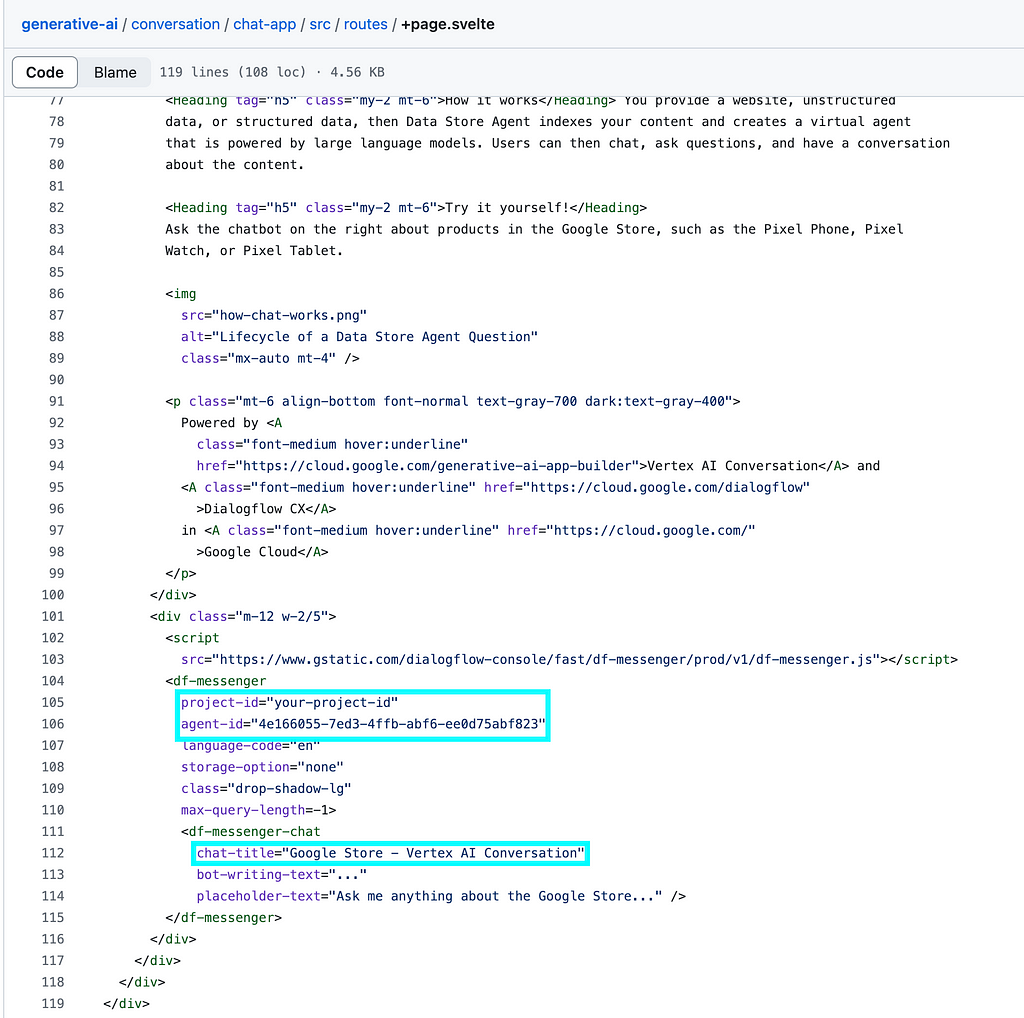
In case you don’t have an application yet and you want to have one, Google provides a good starting point through a public git repository Chat App.
This is a Chatbot Application written in Node.js and you can easily adapt it for your own use by changing the code snippets a bit within chat-app/src/routes/+page.svelte .
You will need to change the project-id, agent-id and chat-title into yours.
Of course you can change the appearance of the UI as you like.
Now you can have your own application!
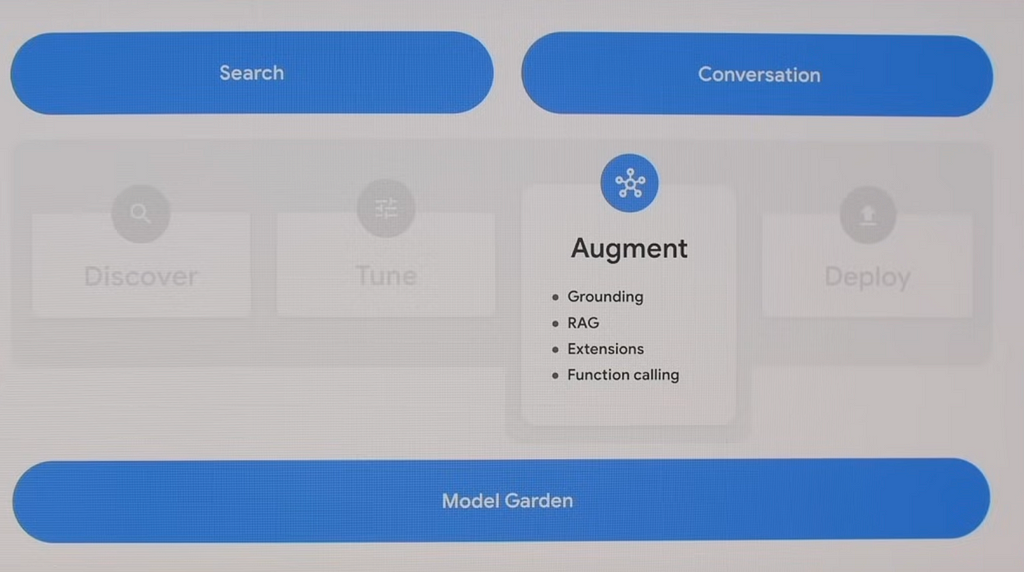
What makes this “magic”?
Recalling the solution design that we mentioned at the beginning. This looks a bit magic as you can get your own LLM powered Chatbot by simply supplying your private knowledge to a Google Cloud Storage bucket.
This is achieved as Google has done quite a bit of integrations behind the scene, by integrating Vertex AI platform with the chatbot agent service Dialogflow CX, and coming up with a new abstraction called Vertex AI Conversation (formerly Gen App Builder). This new abstraction also supports Search and Recommend, and the full name of this service is “Vertex AI Search and Conversation”.
As we can see, this new abstraction of “Vertex AI Search and Conversation” is sitting on top of Vertex AI which has orchestrated a bunch of foundation models, and gets “augmented” by user-supplied updated real world information, so it can contextualize its responses to these information.
The integration is great as it can help at least two groups of people —
traditional Chatbot builder, and
people exploring GenAI solutions but having not identified a good use case
Imagine you are a traditional Chatbot builder using Dialogflow CX, you are creating pages, intents and routes to route customer intentions to the corresponding page. Basically you are defining “if customer say this then I respond with this” which is a bit hard-coding. Now Google plugs in Vertex AI which can utilise LLM models (e.g. text-bison, gemini) to generate agent responses and control conversation flow in a much smarter way. This can significantly reduce agent design time and improve agent quality.
On the other hand, image you are exploring the power of LLMs and Generative AI but not sure what to do with it. This Vertex AI Conversation feature can enable you to easily build and launch your own Chatbot applications quickly and make them available for real use case. This can significantly shorten the go-to-market time of LLM and GenAI solutions.
Some Observations
Despite the “magic” as it appears, we observed several things worth sharing with developers who are considering use this “Vertex AI Search and Conversation” feature.
Our gut feeling is this is a new product Google brought in by “integrating” several existing tools and is still working towards making it better. It lacks clarity how the integration happens behind the scene, and how developers can best understand and configure it.
I got our chatbot very quickly but once I started looking at how to fine tune it, it took me quite a bit of time to figure out how Dialogflow CX works, what is “generator” and how it works. At this moment I’m still confused why this Chatbot works so great without me even configuring any “generator” as described in Google doc, and whether/how we can make it better by using “generator”.
Some other observations during the development:
Indexing a website or a set of documents can take minutes or days, depending on the amount of data. There is no clear estimate on how long this process will take, and what developers can do is just wait and check periodically.
We know how to link a datastore to a Chatbot app, but looks like we cannot “unlink” it.
Despite the level of grounding, the quality of the data supplied by users can significantly impact the performance of the Chatbot. “Rubbish in, rubbish out” still applies to a great extent.
“Augment” by supplying private data and knowledge helps resolve one issue of LLM — lack of updated real world information. But the issue of hallucination stays as sometimes the Chatbot can give “fake” information (of course depending on the data quality of the private knowledge you supplied).
The Chatbot provides links to the relevant web page / document page (e.g. PDF) during chat with users. This is great, but the link supplied by the Chatbot comes as Google Cloud Storage Authenticated URL and can only be accessed by users with granted permission. Developers need to figure out how to make them into the signed-URLs which are safe to share with public anonymous users, instead of using the Google Cloud Storage Authenticated URLs.
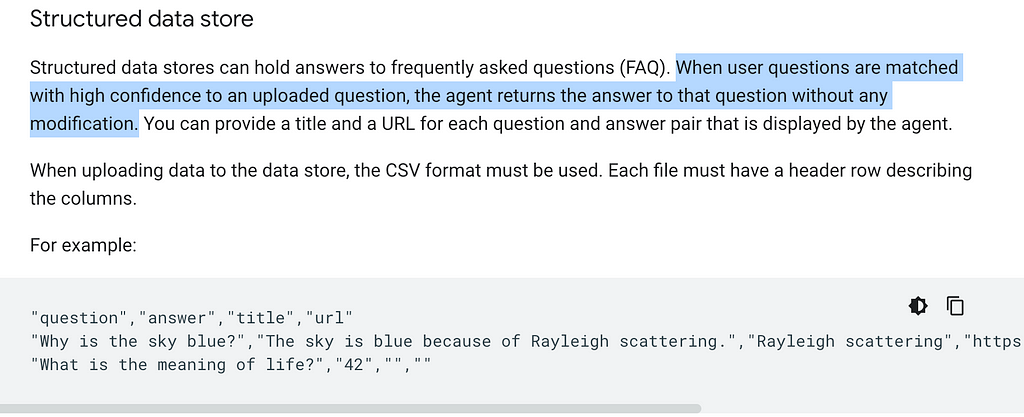
The data store sitting behind the Chatbot works best for unstructured data. For structured data, it supports linking to CSV structured data but it has to be in the format of “question” and “answer” as mentioned in Google doc:
In the above use case, I assume I am an online book store owner and created a Chatbot based on my e-commerce website contents in HTML.
Similarly, you can supply “private knowledge” in the format of blogs, files (e.g. PDF, HTML, TXT) and all kinds of websites to the Google Cloud Storage, and create your own Chatbot.
This enables individuals / businesses to fully utilize the power of the Google LLMs (text-bison, gemini, etc.) and augment it with private knowledge, and create own Chatbots in a very quick manner.
This marks the end of this article. Hope you find it helpful!
(PS: I am working on a video to make this step-by-step guide easier to follow. Will share if I get it done in near future.)
Enjoyed This Story?
Selina Li (Selina Li, LinkedIn) is a Principal Data Engineer working at Officeworks in Melbourne Australia. Selina is passionate about AI/ML, data engineering and investment.
Jason Li (Tianyi Li, LinkedIn) is a Full-stack Developer working at Mindset Health in Melbourne Australia. Jason is passionate about AI, front-end development and space related technologies.
Selina and Jason would love to explore technologies to help people achieve their goals.
Unless otherwise noted, all images are by the authors.
AI might be ready to disrupt how businesses operate, but businesess aren’t ready for the AI transformation. According to Cisco’s AI Readiness Index for 2023, only 14% of businesses across the globe are prepared to leverage and deploy artificial intelligence. European companies in particular also struggle to train their employees on AI use and develop a clear strategy for responsible AI. “At the moment, businesses aren’t well-equipped to deal with AI,” David Shrier tells TNW. “It’s not going as fast as it should.” Shrier is a futurist and leads venture studio Visionary Futures LLC, which supports companies in their growth…
We use cookies on our website to give you the most relevant experience by remembering your preferences and repeat visits. By clicking “Accept”, you consent to the use of ALL the cookies.
This website uses cookies to improve your experience while you navigate through the website. Out of these, the cookies that are categorized as necessary are stored on your browser as they are essential for the working of basic functionalities of the website. We also use third-party cookies that help us analyze and understand how you use this website. These cookies will be stored in your browser only with your consent. You also have the option to opt-out of these cookies. But opting out of some of these cookies may affect your browsing experience.
Necessary cookies are absolutely essential for the website to function properly. These cookies ensure basic functionalities and security features of the website, anonymously.
Cookie
Duration
Description
cookielawinfo-checkbox-analytics
11 months
This cookie is set by GDPR Cookie Consent plugin. The cookie is used to store the user consent for the cookies in the category "Analytics".
cookielawinfo-checkbox-functional
11 months
The cookie is set by GDPR cookie consent to record the user consent for the cookies in the category "Functional".
cookielawinfo-checkbox-necessary
11 months
This cookie is set by GDPR Cookie Consent plugin. The cookies is used to store the user consent for the cookies in the category "Necessary".
cookielawinfo-checkbox-others
11 months
This cookie is set by GDPR Cookie Consent plugin. The cookie is used to store the user consent for the cookies in the category "Other.
cookielawinfo-checkbox-performance
11 months
This cookie is set by GDPR Cookie Consent plugin. The cookie is used to store the user consent for the cookies in the category "Performance".
viewed_cookie_policy
11 months
The cookie is set by the GDPR Cookie Consent plugin and is used to store whether or not user has consented to the use of cookies. It does not store any personal data.
Functional cookies help to perform certain functionalities like sharing the content of the website on social media platforms, collect feedbacks, and other third-party features.
Performance cookies are used to understand and analyze the key performance indexes of the website which helps in delivering a better user experience for the visitors.
Analytical cookies are used to understand how visitors interact with the website. These cookies help provide information on metrics the number of visitors, bounce rate, traffic source, etc.
Advertisement cookies are used to provide visitors with relevant ads and marketing campaigns. These cookies track visitors across websites and collect information to provide customized ads.