While reading a PDF document in the Files by Google app, users can now seamlessly pull Gemini and ask it to make sense of the contents with a single tap.
Google has filed a proposal outlining how it would remedy the antitrust violations it’s been accused of by the Department of Justice, after the DOJ called for Google to sell off Chrome and face restrictions that would prevent it from favoring its own search engine in Android. Judge Amit Mehta of the US District Court for the District of Columbia ruled in August that Google has violated Section 2 of the Sherman Act, and called Google “a monopolist.” Google said in the proposal filed on Friday night that it disagreed with the ruling but suggested ways to make its contracts with browser companies and Android device makers more flexible.
In a blog post summarizing the filing, Google’s VP of regulatory affairs Lee-Anne Mulholland wrote that the proposal would let browser companies like Apple and Mozilla “continue to offer Google Search to their users and earn revenue from that partnership,” while allowing them to have “multiple default agreements across different platforms (e.g., a different default search engine for iPhones and iPads) and browsing modes.” And browsers would be able to change their default search provider every 12 months. The proposal would also give device makers “additional flexibility in preloading multiple search engines, and preloading any Google app independently of preloading Search or Chrome.”
Google said it plans to appeal the judge’s decision ahead of a hearing in April, and will submit a revised proposal on March 7. In the blog post, Mulholland called the DOJ’s proposal “overboard,” going on to write that it reflects an “interventionist agenda” and “goes far beyond what the Court’s decision is actually about — our agreements with partners to distribute search.”
This article originally appeared on Engadget at https://www.engadget.com/big-tech/google-proposes-alternative-remedies-for-its-search-monopoly-after-doj-demands-radical-changes-185253526.html?src=rss
An open-source, model-agnostic agentic framework that supports dependency injection
Ideally, you can evaluate agentic applications even as you are developing them, instead of evaluation being an afterthought. For this to work, though, you need to be able to mock both internal and external dependencies of the agent you are developing. I am extremely excited by PydanticAI because it supports dependency injection from the ground up. It is the first framework that has allowed me to build agentic applications in an evaluation-driven manner.
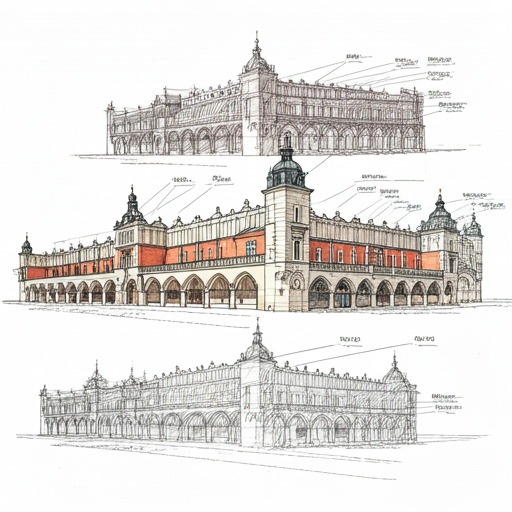
Image of Krakow Cloth Hall, generated using Google Imagen by the author. This building was built in phases over the centuries, with improvements based on where the current building was falling short. Evaluation-driven development, in other words.
In this article, I’ll talk about the core challenges and demonstrate developing a simple agent in an evaluation-driven way using PydanticAI.
Challenges when developing GenAI applications
Like many GenAI developers, I’ve been waiting for an agentic framework that supports the full development lifecycle. Each time a new framework comes along, I try it out hoping that this will be the One — see, for example, my articles about DSPy, Langchain, LangGraph, and Autogen.
I find that there are core challenges that a software developer faces when developing an LLM-based application. These challenges are typically not blockers if you are building a simple PoC with GenAI, but they will come to bite you if you are building LLM-powered applications in production.
What challenges?
(1) Non-determinism: Unlike most software APIs, calls to an LLM with the exact same input could return different outputs each time. How do you even begin to test such an application?
(2) LLM limitations: Foundational models like GPT-4, Claude, and Gemini are limited by their training data (e.g., no access to enterprise confidential information), capability (e.g., you can not invoke enterprise APIs and databases), and can not plan/reason.
(3) LLM flexibility: Even if you decide to stick to LLMs from a single provider such as Anthropic, you may find that you need a different LLM for each step — perhaps one step of your workflow needs a low-latency small language model (Haiku), another requires great code-generation capability (Sonnet), and a third step requires excellent contextual awareness (Opus).
(4) Rate of Change: GenAI technologies are moving fast. Recently, many of the improvements have come about in foundational model capabilities. No longer are the foundational models just generating text based on user prompts. They are now multimodal, can generate structured outputs, and can have memory. Yet, if you try to build in an LLM-agnostic way, you often lose the low-level API access that will turn on these features.
To help address the first problem, of non-determinism, your software testing needs to incorporate an evaluation framework. You will never have software that works 100%; instead, you will need to be able to design around software that is x% correct, build guardrails and human oversight to catch the exceptions, and monitor the system in real-time to catch regressions. Key to this capability is evaluation-driven development (my term), an extension of test-driven development in software.
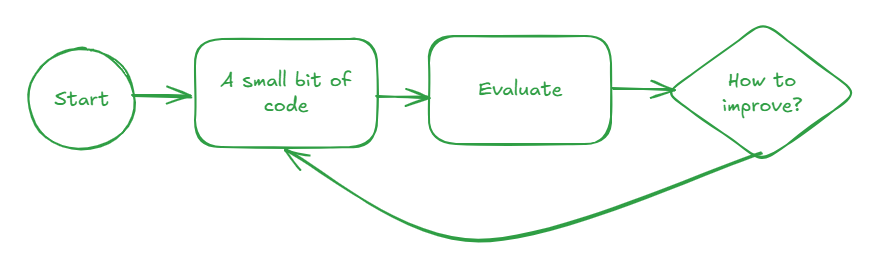
Evaluation-driven development. sketch by author.
The current workaround for all the LLM limitations in Challenge #2 is to use agentic architectures like RAG, provide the LLM access to tools, and employ patterns like Reflection, ReACT and Chain of Thought. So, your framework will need to have the ability to orchestrate agents. However, evaluating agents that can call external tools is hard. You need to be able to inject proxies for these external dependencies so that you can test them individually, and evaluate as you build.
To handle challenge #3, an agent needs to be able to invoke the capabilities of different types of foundational models. Your agent framework needs to be LLM-agnostic at the granularity of a single step of an agentic workflow. To address the rate of change consideration (challenge #4), you want to retain the ability to make low-level access to the foundational model APIs and to strip out sections of your codebase that are no longer necessary.
Is there a framework that meets all these criteria? For the longest time, the answer was no. The closest I could get was to use Langchain, pytest’s dependency injection, and deepeval with something like this (full example is here):
from unittest.mock import patch, Mock from deepeval.metrics import GEval
llm_as_judge = GEval( name="Correctness", criteria="Determine whether the actual output is factually correct based on the expected output.", evaluation_params=[LLMTestCaseParams.INPUT, LLMTestCaseParams.ACTUAL_OUTPUT], model='gpt-3.5-turbo' )
@patch('lg_weather_agent.retrieve_weather_data', Mock(return_value=chicago_weather)) def eval_query_rain_today(): input_query = "Is it raining in Chicago?" expected_output = "No, it is not raining in Chicago right now." result = lg_weather_agent.run_query(app, input_query) actual_output = result[-1]
Essentially, I’d construct a Mock object (chicago_weather in the above example) for every LLM call and patch the call to the LLM (retrieve_weather_data in the above example) with the hardcoded object whenever I needed to mock that part of the agentic workflow. The dependency injection is all over the place, you need a bunch of hardcoded objects, and the calling workflow becomes extremely hard to follow. Note that if you don’t have dependency injection, there is no way to test a function like this: obviously, the external service will return the current weather and there is no way to determine what the correct answer is for a question such as whether or not it’s raining right now.
So … is there an agent framework that supports dependency injection, is Pythonic, provides low-level access to LLMs, is model-agnostic, supports building it one eval-at-a-time, and is easy to use and follow?
Almost. PydanticAI meets the first 3 requirements; the fourth (low-level LLM access) is not possible, but the design does not preclude it. In the rest of this article, I’ll show you how to use it to develop an agentic application in an evaluation-driven way.
1. Your first PydanticAI Application
Let’s start out by building a simple PydanticAI application. This will use an LLM to answer questions about mountains:
    agent = llm_utils.agent()
    question = "What is the tallest mountain in British Columbia?"
    print(">> ", question)
    answer = agent.run_sync(question)
    print(answer.data)
In the code above, I’m creating an agent (I’ll show you how, shortly) and then calling run_sync passing in the user prompt, and getting back the LLM’s response. run_sync is a way to have the agent invoke the LLM and wait for the response. Other ways are to run the query asynchronously, or to stream its response. (Full code is here if you want to follow along).
Run the code above, and you will get something like:
>>  What is the tallest mountain in British Columbia?
The tallest mountain in British Columbia is **Mount Robson**, at 3,954 metres (12,972 feet).
To create the agent, create a model and then tell the agent to use that Model for all its steps.
import pydantic_ai from pydantic_ai.models.gemini import GeminiModel
def default_model() -> pydantic_ai.models.Model: model = GeminiModel('gemini-1.5-flash', api_key=os.getenv('GOOGLE_API_KEY')) return model
The idea behind default_model() is to use a relatively inexpensive but fast model like Gemini Flash as the default. You can then change the model used in specific steps as necessary by passing in a different model to run_sync()
PydanticAI model support looks sparse, but the most commonly used models — the current frontier ones from OpenAI, Groq, Gemini, Mistral, Ollama, and Anthropic — are all supported. Through Ollama, you can get access to Llama3, Starcoder2, Gemma2, and Phi3. Nothing significant seems to be missing.
2. Pydantic with structured outputs
The example in the previous section returned free-form text. In most agentic workflows, you’ll want the LLM to return structured data so that you can use it directly in programs.
Considering that this API is from Pydantic, returning structured output is quite straightforward. Just define the desired output as a dataclass (full code is here):
from dataclasses import dataclass

@dataclass
class Mountain:
    name: str
    location: str
    height: float
When you create the Agent, tell it the desired output type:
agent = Agent(llm_utils.default_model(),
                  result_type=Mountain,
                  system_prompt=(
                      "You are a mountaineering guide, who provides accurate information to the general public.",
                      "Provide all distances and heights in meters",
                      "Provide location as distance and direction from nearest big city",
                  ))
Note also the use of the system prompt to specify units etc.
Running this on three questions, we get:
>>  Tell me about the tallest mountain in British Columbia?
Mountain(name='Mount Robson', location='130km North of Vancouver', height=3999.0)
>>  Is Mt. Hood easy to climb?
Mountain(name='Mt. Hood', location='60 km east of Portland', height=3429.0)
>>  What's the tallest peak in the Enchantments?
Mountain(name='Mount Stuart', location='100 km east of Seattle', height=3000.0)
But how good is this agent? Is the height of Mt. Robson correct? Is Mt. Stuart really the tallest peak in the Enchantments? All of this information could have been hallucinated!
There is no way for you to know how good an agentic application is unless you evaluate the agent against reference answers. You can not just “eyeball it”. Unfortunately, this is where a lot of LLM frameworks fall short — they make it really hard to evaluate as you develop the LLM application.
3. Evaluate against reference answers
It is when you start to evaluate against reference answers that PydanticAI starts to show its strengths. Everything is quite Pythonic, so you can build custom evaluation metrics quite simply.
For example, this is how we will evaluate a returned Mountain object on three criteria and create a composite score (full code is here):
def evaluate(answer: Mountain, reference_answer: Mountain) -> Tuple[float, str]:
    score = 0
    reason = []
    if reference_answer.name in answer.name:
        score += 0.5
        reason.append("Correct mountain identified")
        if reference_answer.location in answer.location:
            score += 0.25
            reason.append("Correct city identified")
        height_error = abs(reference_answer.height - answer.height)
        if height_error < 10:
            score += 0.25 * (10 - height_error)/10.0
        reason.append(f"Height was {height_error}m off. Correct answer is {reference_answer.height}")
    else:
        reason.append(f"Wrong mountain identified. Correct answer is {reference_answer.name}")

    return score, ';'.join(reason)
Now, we can run this on a dataset of questions and reference answers:
questions = [ "Tell me about the tallest mountain in British Columbia?", "Is Mt. Hood easy to climb?", "What's the tallest peak in the Enchantments?" ]
>>  Tell me about the tallest mountain in British Columbia?
Mountain(name='Mount Robson', location='130 km North-East of Vancouver', height=3999.0)
0.75 : Correct mountain identified;Correct city identified;Height was 45.0m off. Correct answer is 3954
>>  Is Mt. Hood easy to climb?
Mountain(name='Mt. Hood', location='60 km east of Portland, OR', height=3429.0)
1.0 : Correct mountain identified;Correct city identified;Height was 0.0m off. Correct answer is 3429
>>  What's the tallest peak in the Enchantments?
Mountain(name='Dragontail Peak', location='14 km east of Leavenworth, WA', height=3008.0)
0.5 : Correct mountain identified;Height was 318.0m off. Correct answer is 2690
Average score: 0.75
Mt. Robson’s height is 45m off; Dragontail peak’s height was 318m off. How would you fix this?
That’s right. You’d use a RAG architecture or arm the agent with a tool that provides the correct height information. Let’s use the latter approach and see how to do it with Pydantic.
Note how evaluation-driven development shows us the path forward to improve our agentic application.
4a. Using a tool
PydanticAI supports several ways to provide tools to an agent. Here, I annotate a function to be called whenever it needs the height of a mountain (full code here):
   agent = Agent(llm_utils.default_model(),
                  result_type=Mountain,
                  system_prompt=(
                      "You are a mountaineering guide, who provides accurate information to the general public.",
                      "Use the provided tool to look up the elevation of many mountains."
                      "Provide all distances and heights in meters",
                      "Provide location as distance and direction from nearest big city",
                  ))
    @agent.tool
    def get_height_of_mountain(ctx: RunContext[Tools], mountain_name: str) -> str:
        return ctx.deps.elev_wiki.snippet(mountain_name)
The function, though, does something strange. It pulls an object called elev_wiki out of the run-time context of the agent. This object is passed in when we call run_sync:
class Tools:
    elev_wiki: wikipedia_tool.WikipediaContent
    def __init__(self):
        self.elev_wiki = OnlineWikipediaContent("List of mountains by elevation")

tools = Tools()  # Tools or FakeTools

l_answer = agent.run_sync(l_question, deps=tools) # note how we are able to inject
Because the Runtime context can be passed into every agent invocation or tool call , we can use it to do dependency injection in PydanticAI. You’ll see this in the next section.
The wiki itself just queries Wikipedia online (code here) and extracts the contents of the page and passes the appropriate mountain information to the agent:
import wikipedia

class OnlineWikipediaContent(WikipediaContent):
    def __init__(self, topic: str):
        print(f"Will query online Wikipedia for information on {topic}")
        self.page = wikipedia.page(topic)

    def url(self) -> str:
        return self.page.url

    def html(self) -> str:
        return self.page.html()
Indeed, when we run it, we get correct heights now:
Will query online Wikipedia for information on List of mountains by elevation
>>  Tell me about the tallest mountain in British Columbia?
Mountain(name='Mount Robson', location='100 km west of Jasper', height=3954.0)
0.75 : Correct mountain identified;Height was 0.0m off. Correct answer is 3954
>>  Is Mt. Hood easy to climb?
Mountain(name='Mt. Hood', location='50 km ESE of Portland, OR', height=3429.0)
1.0 : Correct mountain identified;Correct city identified;Height was 0.0m off. Correct answer is 3429
>>  What's the tallest peak in the Enchantments?
Mountain(name='Mount Stuart', location='Cascades, Washington, US', height=2869.0)
0 : Wrong mountain identified. Correct answer is Dragontail
Average score: 0.58
4b. Dependency injecting a mock service
Waiting for the API call to Wikipedia each time during development or testing is a bad idea. Instead, we will want to mock the Wikipedia response so that we can develop quickly and be guaranteed of the result we are going to get.
Doing that is very simple. We create a Fake counterpart to the Wikipedia service:
class FakeWikipediaContent(WikipediaContent):
    def __init__(self, topic: str):
        if topic == "List of mountains by elevation":
            print(f"Will used cached Wikipedia information on {topic}")
            self.url_ = "https://en.wikipedia.org/wiki/List_of_mountains_by_elevation"
            with open("mountains.html", "rb") as ifp:
                self.html_ = ifp.read().decode("utf-8")

    def url(self) -> str:
        return self.url_

    def html(self) -> str:
        return self.html_
Then, inject this fake object into the runtime context of the agent during development:
class FakeTools:
    elev_wiki: wikipedia_tool.WikipediaContent
    def __init__(self):
        self.elev_wiki = FakeWikipediaContent("List of mountains by elevation")

tools = FakeTools()  # Tools or FakeTools

l_answer = agent.run_sync(l_question, deps=tools) # note how we are able to inject
This time when we run, the evaluation uses the cached wikipedia content:
Will used cached Wikipedia information on List of mountains by elevation
>>  Tell me about the tallest mountain in British Columbia?
Mountain(name='Mount Robson', location='100 km west of Jasper', height=3954.0)
0.75 : Correct mountain identified;Height was 0.0m off. Correct answer is 3954
>>  Is Mt. Hood easy to climb?
Mountain(name='Mt. Hood', location='50 km ESE of Portland, OR', height=3429.0)
1.0 : Correct mountain identified;Correct city identified;Height was 0.0m off. Correct answer is 3429
>>  What's the tallest peak in the Enchantments?
Mountain(name='Mount Stuart', location='Cascades, Washington, US', height=2869.0)
0 : Wrong mountain identified. Correct answer is Dragontail
Average score: 0.58
Look carefully at the above output — there are different errors from the zero-shot example. In Section #2, the LLM picked Vancouver as the closest city to Mt. Robson and Dragontail as the tallest peak in the Enchantments. Those answers happened to be correct. Now, it picks Jasper and Mt. Stuart. We need to do more work to fix these errors — but evaluation-driven development at least gives us a direction of travel.
Current Limitations
PydanticAI is very new. There are a couple of places where it could be improved:
There is no low-level access to the model itself. For example, different foundational models support context caching, prompt caching, etc. The model abstraction in PydanticAI doesn’t provide a way to set these on the model. Ideally, we can figure out a kwargs way of doing such settings.
The need to create two versions of agent dependencies, one real and one fake, is quite common. It would be good if we were able to annoate a tool or provide a simple way to switch between the two types of services across the board.
During development, you don’t need logging as much. But when you go to run the agent, you will usually want to log the prompts and responses. Sometimes, you will want to log the intermediate responses. The way to do this seems to be a commercial product called Logfire. An OSS, cloud-agnostic logging framework that integrates with the PydanticAI library would be ideal.
It is possible that these already exist and I missed them, or perhaps they will have been implemented by the time you are reading this article. In either case, leave a comment for future readers.
Overall, I like PydanticAI — it offers a very clean and Pythonic way to build agentic applications in an evaluation-driven manner.
Suggested next steps:
This is one of those blog posts where you will benefit from actually running the examples because it describes a process of development as well as a new library. This GitHub repo contains the PydanticAI example I walked through in this post: https://github.com/lakshmanok/lakblogs/tree/main/pydantic_ai_mountains Follow the instructions in the README to try it out.
Investigating an early generative architecture and applying it to image generation from text input
Recently I was tasked with text-to-image synthesis using a conditional variational autoencoder (CVAE). Being one of the earlier generative structures, it has its limitations but is easily implementable. This article will cover CVAEs at a high level, but the reader is presumed to have a high level understanding to cover the applications.
Generative modeling is a field within machine learning focused on learning the underlying distributions responsible for creating data. Understanding these distributions enables models to generalize across various datasets, facilitating knowledge transfer and effectively addressing issues of data sparsity. We ideally want contiguous encodings while still being distinct to allow for smooth interpolation to generate new samples.
Introduction to VAEs
While typical autoencoders are deterministic, VAEs are probabilistic models due to modeling the latent space as a probability distribution. VAEs are unsupervised models that encode input data x into a latent representation z and reconstruct the input from this latent space. They technically don’t need to be implemented with neural networks and can be constructed from generative probability models. However, in our current state of deep learning, most are typically implemented with neural networks.
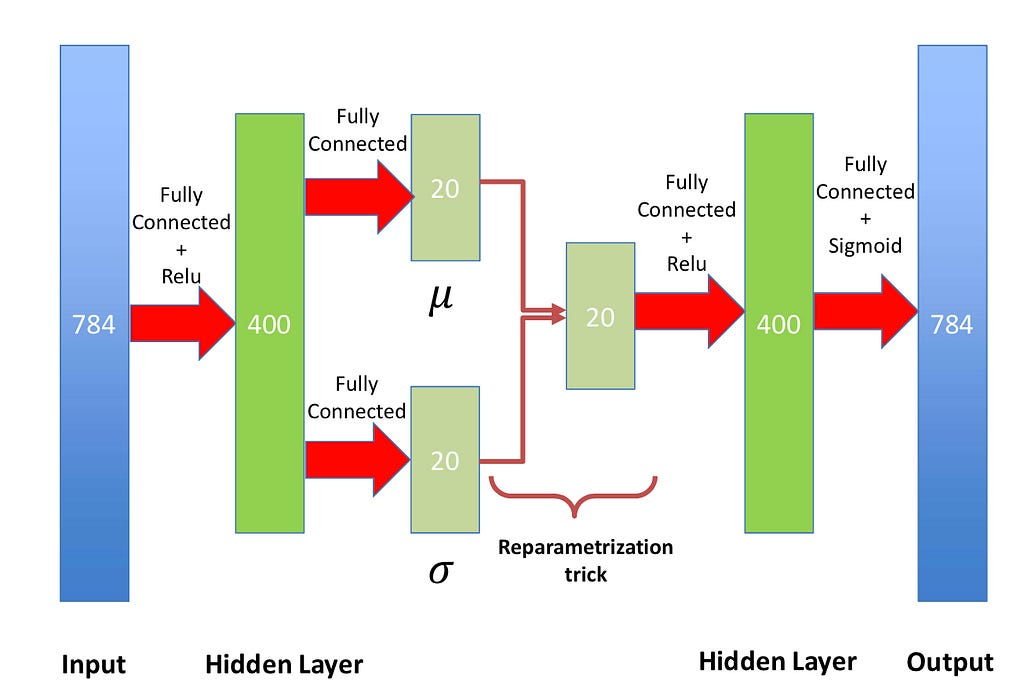
Example VAE framework with reparameterization trick. Source: Author
Explained briefly, the reparameterization trick is used since we can’t backpropagate on the probabilistic distribution of the latent space, but we need to update our encoding distribution. Therefore, we define a differentiable and invertible function so that we can differentiate with respect to lambda and x while still keeping a probabilistic element.
Reparameterization trick for z. Source: Author
VAEs are trained using an ELBO loss consisting of a reconstruction term and a Kullback-Leibler Divergence (KLD) of the encoding model to the prior distribution.
Loss function for VAE with KLD term on left and reconstruction term on righ [1]
Adding a Conditional Input to VAE
CVAEs extend VAEs by incorporating additional information such as class labels as conditional variables. This conditioning enables CVAEs to produce controlled generations. The conditional input feature can be added at differing points in the architecture, but it is commonly inserted with the encoder and the decoder. The loss function with the conditional input is an adaptation of the ELBO loss in the traditional VAE.
Loss function for VAE with KLD term on left and reconstruction term on right [2]
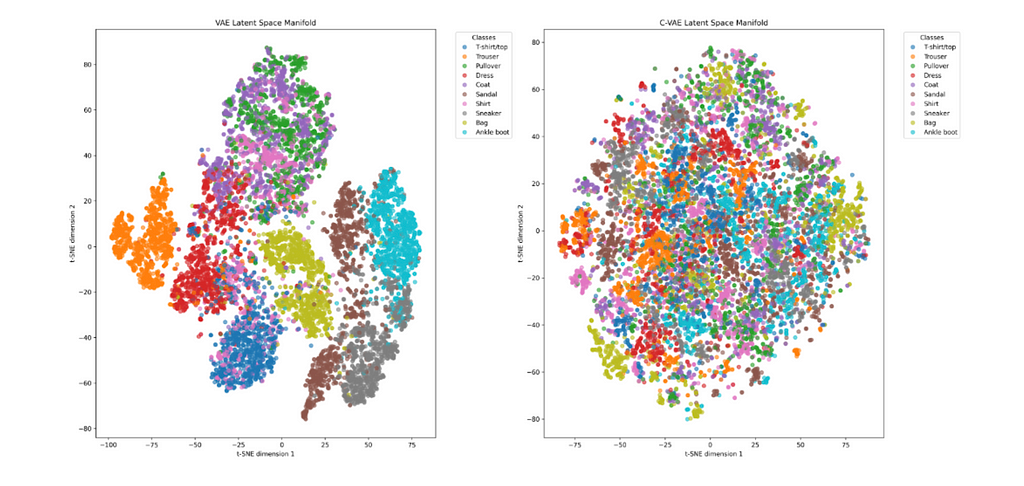
To illustrate the difference between a VAE and CVAE, both networks were trained on Fashion-MNIST using a convolutional encoder and decoder architecture. A tSNE of the latent space of each network is shown.
Latent space manifold of VAE (left) and CVAE (right). Source: Author
The vanilla VAE shows distinct clusters while the CVAE has a more homogeneous distribution. Vanilla VAE encodes class and class variation into the latent space since there is no provided conditional signal. However, the CVAE does not need to learn class distinction and the latent space can focus on the variation within classes. Therefore, a CVAE can potentially learn more information as it does not rely on having to learn basic class conditioning.
Model Architecture for CVAEs
Two model architectures were created to test image generation. The first architecture was a convolutional CVAE with a concatenating conditional approach. All networks were built for Fashion-MNIST images of size 28×28 (784 total pixels).
def decode(self, z, c): c = self.label_embedding(c) # Concatenate condition with latent vector z = torch.cat([z, c], dim=1) z = self.decoder_input(z) z = z.view(-1, 128, 4, 4) return self.decoder(z)
def forward(self, x, c): mu, log_var = self.encode(x, c) z = self.reparameterize(mu, log_var) return self.decode(z, c), mu, log_var
The CVAE encoder consists of 3 convolutional layers each followed by a ReLU non-linearity. The output of the encoder is then flattened. The class number is then passed through an embedding layer and added to the encoder output. The reparameterization trick is then used with 2 linear layers to obtain a μ and σ in the latent space. Once sampled, the output of the reparameterized latent space is passed to the decoder now concatenated with the class number embedding layer output. The decoder consists of 3 transposed convolutional layers. The first two contain a ReLU non-linearity with the last layer containing a sigmoid non-linearity. The output of the decoder is a 28×28 generated image.
The other model architecture follows the same approach but with adding the conditional input instead of concatenating. A major question was if adding or concatenating will lead to better reconstruction or generation results.
def decode(self, z, c): # Add condition to latent vector c = self.decoder_label_embedding(c) z = z + c z = self.decoder_input(z) z = z.view(-1, 128, 4, 4) return self.decoder(z)
def forward(self, x, c): mu, log_var = self.encode(x, c) z = self.reparameterize(mu, log_var) return self.decode(z, c), mu, log_var
The same loss function is used for all CVAEs from the equation shown above.
def loss_function(recon_x, x, mu, logvar):
    """Computes the loss = -ELBO = Negative Log-Likelihood + KL Divergence.
        Args:
        recon_x: Decoder output.
        x: Ground truth.
        mu: Mean of Z
        logvar: Log-Variance of Z
    """
    BCE = F.binary_cross_entropy(recon_x, x, reduction='sum')
    KLD = -0.5 * torch.sum(1 + logvar - mu.pow(2) - logvar.exp())
    return BCE + KLD
In order to assess model-generated images, 3 quantitative metrics are commonly used. Mean Squared Error (MSE) was calculated by summing the squares of the difference between the generated image and a ground truth image pixel-wise. Structural Similarity Index Measure (SSIM) is a metric that evaluates image quality by comparing two images based on structural information, luminance, and contrast [3]. SSIM can be used to compare images of any size while MSE is relative to pixel size. SSIM score ranges from -1 to 1, where 1 indicates identical images. Frechet inception distance (FID) is a metric for quantifying the realism and diversity of images generated. As FID is a distance measure, lower scores are indicative of a better reconstruction of a set of images.
Short Text to Image from Fashion-MNIST
Before scaling up to full text to image, CVAEs image reconstruction and generation on Fashion-MNIST. Fashion-MNIST is an MNIST-like dataset consisting of a training set of 60,000 examples and a test set of 10,000 examples. Each example is a 28×28 grayscale image, associated with a label from 10 classes [4].
Preprocessing functions were created to extract the relevant key word containing the class name from the input short-text regular expression matching. Extra descriptors (synonyms) were used for most classes to account for similar fashion items included in each class (e.g. Coat & Jacket).
def class_embedding(input_str, classes): for key in list(classes.keys()): template = f'(?i)\b{key}\b' output = re.search(template, input_str) if output: return classes[key] return -1
The class name was then converted to its class number and used as the conditional input to the CVAE along. In order to generate an image, the class label extracted from the short text description is passed into the decoder with random samples from a Gaussian distribution to input the variable from the latent space.
Before testing generation, image reconstruction is tested to ensure the functionality of the CVAE. Due to creating a convolutional network with 28×28 images, the network can be trained in less than an hour with less than 100 epochs.
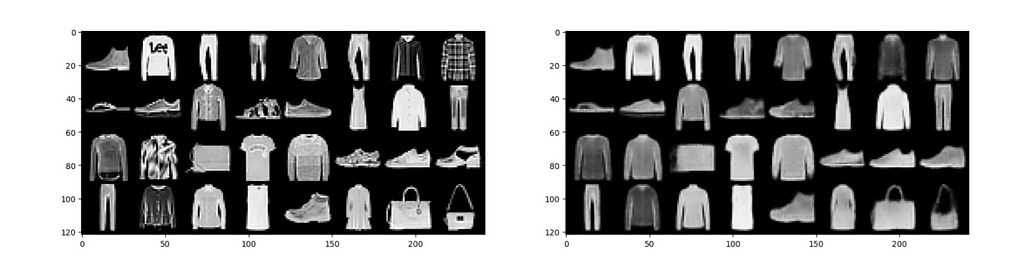
CVAE reconstruction results with ground truth (left) and model output (right). Source: Author
Reconstructions contain the general shape of the ground truth images, but sharp, high frequency features are missing from the image. Any text or intricate design patterns are blurred in the model output. Inputting any short text containing a class of Fashion-MNIST gives generated outputs resembling reconstructed images.
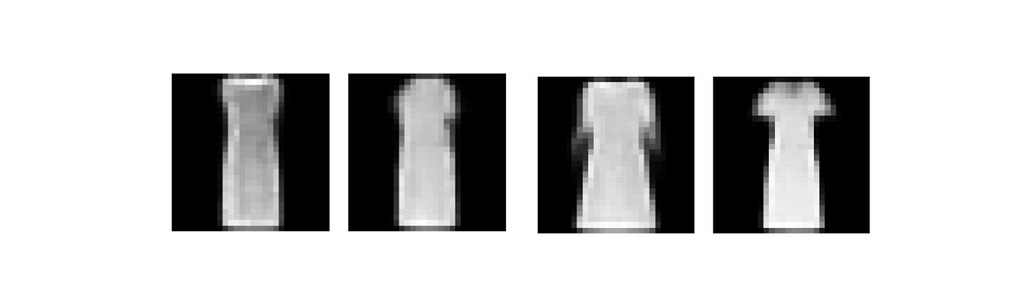
Generated images “dress” from CVAE Fashion-MNIST. Source: Author
The generated images have an MSE of 11 and a SSIM of 0.76. These constitute good generations signifying that in simple, small images, CVAEs can generate quality images. GANs and DDPMs will produce higher quality images with complex features, but CVAEs can handle simple cases.
Long Text to Image using CLIP and COCO
When scaling up to image generation to text of any length, more robust methods would be needed besides regular expression matching. To do this, Open AI’s CLIP is used to convert text into a high dimensional embedding vector. The embedding model is used in its ViT-B/32 configuration, which outputs embeddings of length 512. A limitation of the CLIP model is that it has a maximum token length of 77, with studies showing an even smaller effective length of 20 [5]. Thus, in instances where the input text contains multiple sentences, the text is split up by sentence and passed through the CLIP encoder. The resulting embeddings are averaged together to create the final output embedding.
A long text model requires far more complicated training data than Fashion-MNIST, so COCO dataset was used. COCO dataset has annotations (that are not completely robust but that will be discussed later) that can be passed into CLIP to get embeddings. However, COCO images are of size 640×480, meaning that even with cropping transforms, a larger network is needed. Adding and concatenating conditional inputs architectures are both tested for long text to image generation, but the concatenating approach is shown here:
class cVAE(nn.Module): def __init__(self, latent_dim=128): super().__init__()
device = torch.device("cuda" if torch.cuda.is_available() else "cpu")
self.clip_model, _ = clip.load("ViT-B/32", device=device) self.clip_model.eval() for param in self.clip_model.parameters(): param.requires_grad = False
def decode(self, z, c): z = torch.cat([z, c], dim=1) z = self.decoder_input(z) z = z.view(-1, 512, 4, 4) return self.decoder(z)
def forward(self, x, c): mu, log_var = self.encode(x, c) z = self.reparameterize(mu, log_var) return self.decode(z, c), mu, log_var
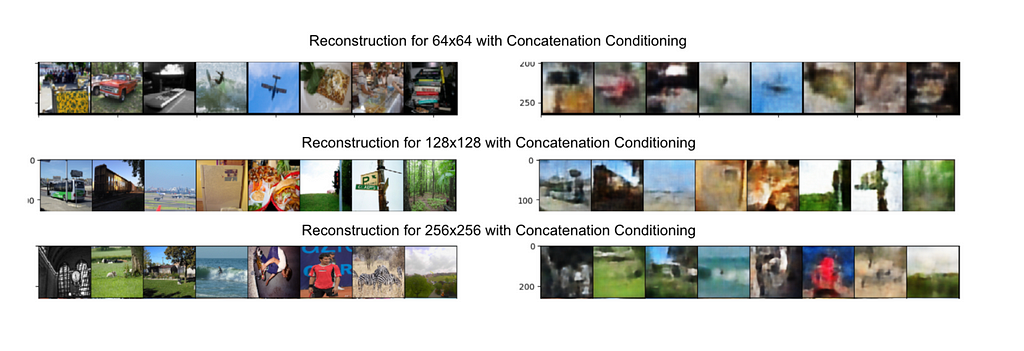
Another major point of investigation was image generation and reconstruction on images of different sizes. Specifically, modifying COCO images to be of size 64×64, 128×128, and 256×256. After training the network, reconstruction results should first be tested.
CVAE reconstruction on COCO with different image sizes. Source: Author
All image sizes lead to reconstructed background with some feature outlines and correct colors. However, as image size increases, more features are able to be recovered. This makes sense as although it will take a lot longer to train a model with a larger image size, there is more information that can be captured and learned by the model.
With image generation, it is extremely difficult to generate high quality images. Most images have backgrounds to some degree and blurred features in the image. This would be expected for image generation from a CVAE. This occurs in both concatenation and addition for the conditional input, but the concatenated approach performs better. This is likely because concatenated conditional inputs will not interfere with important features and ensures information is preserved distinctly. Conditions can be ignored if they are irrelevant. However, additive conditional inputs can interfere with existing features and completely mess up the network when updating weights during backpropagation.
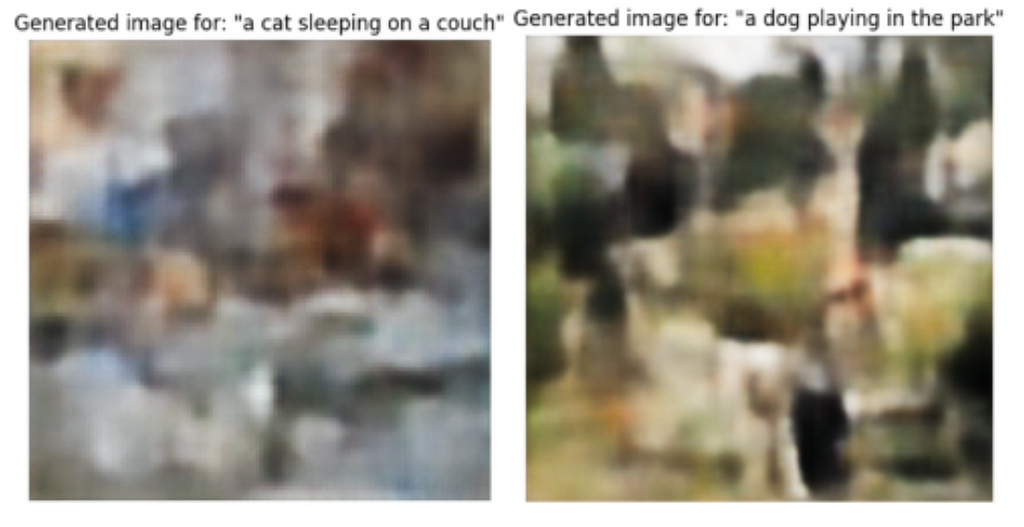
Generated images by CVAE on COCO. Source: Author
All of the COCO generated images have a far lower SSIM of about 0.4 compared to the SSIM on Fashion-MNIST. MSE is proportional to image size, so it is difficult to quanity differences. FID for COCO image generations are in the 200s for further proof that COCO CVAE generated images are not robust.
Limitations of CVAEs for Image Generation
The biggest limitation in trying to use CVAEs for image generation is, well, the CVAE. The amount of information that can be contained and reconstructed/generated is extremely dependent on the size of the latent space. A latent space that is too small won’t capture any meaningful information and is proportional to the size of the output image. A 28×28 image needs a far smaller latent space than a 64×64 image (as it proportionally squares from image size). However, a latent space bigger than the actual image adds unnecessary info and at that point just create a 1-to-1 mapping. For the COCO dataset, a latent space of at least 512 is needed to capture some features. And while CVAEs are generative models, a convolutional encoder and decoder is a rather rudimentary network. The training style of a GAN or the complex denoising process of a DDPM allows for far more complicated image generation.
Another major limitation in image generation is the dataset trained on. Although the COCO dataset has annotations, the annotations are not extensively detailed. In order to train complex generative models, a different dataset should be used for training. COCO does not provide locations or excess information for background details. A complex feature vector from the CLIP encoder can’t be effectively utilized to a CVAE on COCO.
Although CVAEs and image generation on COCO have their limitations, it creates a workable image generation model. More code and details can be provided just reach out!
Last-minute holiday deals are in effect now at Best Buy, with doorbuster pricing driving Apple products down to $22.99 and up.
Last-minute holiday doorbuster deals are going on now – Image credit: Best Buy
MacBooks, AirTags, Apple Watches and more are heavily discounted as Best Buy and Amazon compete for your last-minute shopping dollars. Save up to 30% on products at a variety of budget points, with prices starting at $22.99.
We use cookies on our website to give you the most relevant experience by remembering your preferences and repeat visits. By clicking “Accept”, you consent to the use of ALL the cookies.
This website uses cookies to improve your experience while you navigate through the website. Out of these, the cookies that are categorized as necessary are stored on your browser as they are essential for the working of basic functionalities of the website. We also use third-party cookies that help us analyze and understand how you use this website. These cookies will be stored in your browser only with your consent. You also have the option to opt-out of these cookies. But opting out of some of these cookies may affect your browsing experience.
Necessary cookies are absolutely essential for the website to function properly. These cookies ensure basic functionalities and security features of the website, anonymously.
Cookie
Duration
Description
cookielawinfo-checkbox-analytics
11 months
This cookie is set by GDPR Cookie Consent plugin. The cookie is used to store the user consent for the cookies in the category "Analytics".
cookielawinfo-checkbox-functional
11 months
The cookie is set by GDPR cookie consent to record the user consent for the cookies in the category "Functional".
cookielawinfo-checkbox-necessary
11 months
This cookie is set by GDPR Cookie Consent plugin. The cookies is used to store the user consent for the cookies in the category "Necessary".
cookielawinfo-checkbox-others
11 months
This cookie is set by GDPR Cookie Consent plugin. The cookie is used to store the user consent for the cookies in the category "Other.
cookielawinfo-checkbox-performance
11 months
This cookie is set by GDPR Cookie Consent plugin. The cookie is used to store the user consent for the cookies in the category "Performance".
viewed_cookie_policy
11 months
The cookie is set by the GDPR Cookie Consent plugin and is used to store whether or not user has consented to the use of cookies. It does not store any personal data.
Functional cookies help to perform certain functionalities like sharing the content of the website on social media platforms, collect feedbacks, and other third-party features.
Performance cookies are used to understand and analyze the key performance indexes of the website which helps in delivering a better user experience for the visitors.
Analytical cookies are used to understand how visitors interact with the website. These cookies help provide information on metrics the number of visitors, bounce rate, traffic source, etc.
Advertisement cookies are used to provide visitors with relevant ads and marketing campaigns. These cookies track visitors across websites and collect information to provide customized ads.