CDC (Change Data Capture) is a term that has been gaining significant attention over the past few years. You might already be familiar with it (if not, don’t worry — there’s a quick introduction below). One question that puzzled me, though, was how tools like the Debezium CDC connectors can read changes from MySQL and PostgreSQL databases. Sure, transactional logs might be the answer — but why? Is the process of pulling logs from MySQL and PostgreSQL the same? If not, what are the key differences?
These are the questions I’ll explore and attempt to answer in this article. For those new to CDC, I’ll also provide a brief overview to get you up to speed. Enjoy the read, and don’t forget to follow!
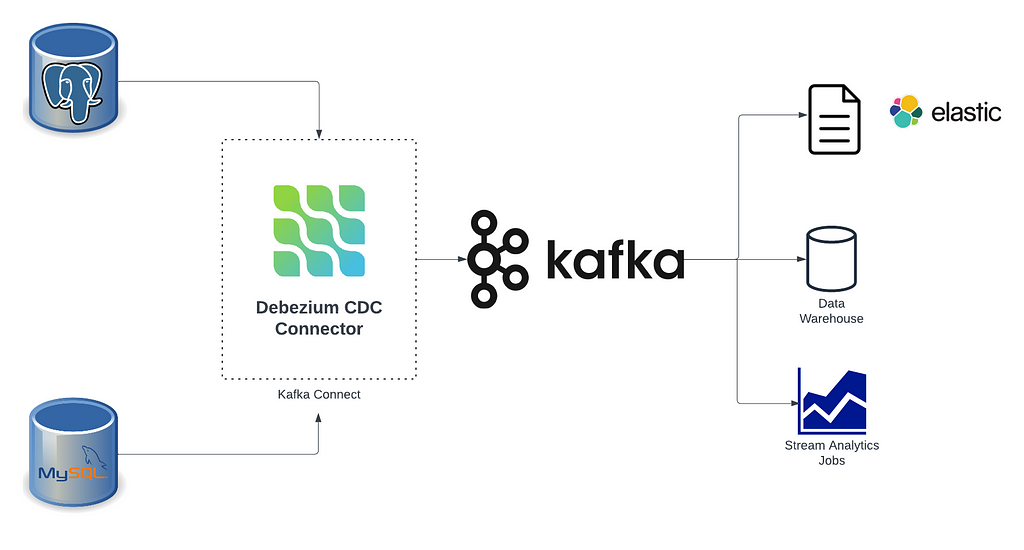
Change Data Capture (CDC) System — Example Diagram (Created using Lucidchart)
What is Change Data Capture?
Change Data Capture (CDC) is a powerful and efficient tool for transmitting data changes from relational databases such as MySQL and PostgreSQL. By recording changes as they occur, CDC enables real-time data replication and transfer, minimizing the impact on source systemsandensuring timely consistency across downstream data stores and processing systems that depend on this data.
Instead of relying on infrequent, large batch jobs that may run only once a day or every few hours, CDC allows incremental data updates to be loaded in micro batches—such as every minute—providing a faster and more responsive approach to data synchronization.
There are a couple of ways that we can track the changes in a database:
Query-based CDC: This method involves using SQL queries to retrieve new or updated data from the database. Typically, it relies on a timestamp column to identify changes. For example:
SELECT * FROM table_A WHERE ts_col > previous_ts; --This query fetches rows where the timestamp column (ts_col) is greater than the previously recorded timestamp.
Log-based CDC: This method utilizes the database’s transaction log to capture every change made. As we’ll explore further, the specific implementation of transaction logs varies between databases; however, the core principle remains consistent: all changes to the database are recorded in a transaction log (commonly known as a redo log, binlog, WAL, etc.). This log serves as a detailed and reliable record of modifications, making it a key component of Change Data Capture.
In this article, we will focus on the transaction logs of MySQL and PostgreSQL databases, which serve as the backbone for CDC tools like Debezium CDC Connectors and Flink CDC.
Mysql — Binlog
MySQL uses a binary log to record changes to the database. Every operation in a transaction — whether it’s a data INSERT, UPDATE, or DELETE — is logged in sequence (Log Sequence Number — LSN). The binlog contains events that describe database changes and can operate in three formats:
Row-based: RBR logs the actual data changes at the row level. Instead of writing the SQL statements, it records each modified row’s old and new values. For example: If a row in the users table is updated, the binlog will contain both the old and new values:
Mixed: Combines row-based and statement-based logging. It uses statement-based replication for simple, deterministic queries and row-based replication.
PostgreSQL — WAL & Logical Decoding
Unlike MySQL, which uses binary logging for replication and recovery, PostgreSQL relies on a Write-Ahead Log (WAL). MySQL replication is based on logical replication, where SQL statements are recorded in the binlog, whereas PostgreSQL uses a physical streaming replication model.
The key difference lies in how changes are captured and replicated:
MySQL (Logical Replication): Records SQL statements (e.g., INSERT, UPDATE, DELETE) in the binlog. These changes are then replicated to the replica databases at the SQL statement level. Logical replication is more flexible and captures the exact SQL commands executed on the master.
PostgreSQL (Physical Replication): Uses Write-Ahead Logs (WAL), which record low-level changes to the database at a disk block level. In physical replication, changes are transmitted as raw byte-level data, specifying exactly what blocks of disk pages have been modified. For example, it could record something like: “At offset 14 of disk page 18 in relation 12311, wrote tuple with hex value 0x2342beef1222…”. This form of replication is more efficient in terms of storage but less flexible.
To address the need for more flexible replication and change capture, PostgreSQL introduced logical decoding in version 9.4. Logical decoding extracts a detailed stream of database changes (inserts, updates, and deletes) from a database in a more flexible and manageable way compared to physical replication. Under the covers, a logical replication captures changes in the Postgres Write-Ahead Log (WAL) and streams them in a human-readable format to the client.
Similarly to what we saw in MySQL, take the below INSERT statement as an example:
-- Insert a new record
INSERT INTO users (id, name, email) VALUES (1, 'Peter', '[email protected]');
Once the changes are made, pg_recvlogical (a tool for controlling PostgreSQL logical decoding streams) should output the following changes:
BEGIN
table customer: INSERT: id[integer]:1,name[text]:Peter,email[text]:[email protected]
It is through PostgreSQL’s logical decoding capability that CDC tools can stream real-time data changes from PostgreSQL to downstream systems, such as streaming applications, message queues, data lakes, and other external data platforms.
Conclusion
By understanding how transaction logs work in MySQL and PostgreSQL, we gain valuable insights into how CDC tools leverage these logs to perform incremental replication to downstream systems such as streaming applications, data lakes, and analytics platforms. We explored the differences between MySQL’s Binlog and PostgreSQL’s WAL, highlighting how PostgreSQL’s introduction of logical decoding enabled seamless integration with CDC tools.
This is the first post in our Change Data Capture and Streaming Applications series. Stay tuned for more insights, and don’t forget to follow, share, and leave a like!
Put a real-world object into fully AI-generated 4D scenes with minimal effort, so that it can star in your videos.
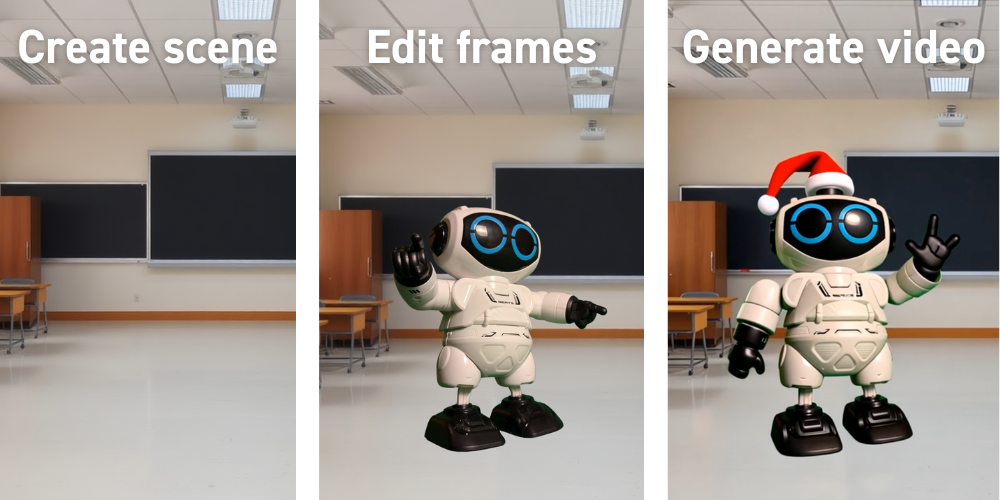
The three steps of consistent video creation using GenAI.
Progress in generative AI (GenAI) is astonishingly fast. It’s becoming more mature in various text-driven tasks, going from typical natural language processing (NLP) to independent AI agents, capable of performing high-level tasks by themselves. However, it’s still in its infancy for image, audio, and video creation. While these domains are still new, hard to control, and occasionally gimmicky, they are getting better month by month. To illustrate, the video below shows how video generation evolved over the past year, using the infamous “spaghetti eating benchmark” as an example.
In this article, I focus on video generation and show you how you can generate your own videos featuring yourself or actual real-world objects — as shown by the “GenAI Christmas” video below. This article will answer the following questions:
How good is video generation nowadays?
Is it possible to generate videos centered around a specific object?
How can I create one myself?
What level of quality can I expect?
Let’s dive right in!
Types of GenAI video creation
Video generation through AI comes in various forms, each with unique capabilities and challenges. Most often, you can classify a GenAI video into one of three categories:
Videos featuring known concepts and celebrities
Image-based videos starting from fine-tuned image-generation models
Image-based videos starting from edited content
Let’s break down each in more detail!
Videos featuring known concepts and celebrities
This type of video generation solely relies on text prompts to produce content using concepts that the Large Vision Models (LVM) already know. These are often generic concepts (“A low-angle shot captures a flock of pink flamingos gracefully wading in a lush, tranquil lagoon.” ~ Veo 2 demo shown below) mixed together to create a truly authentic video that aligns well with the inputted prompt.
Video made by Google’s Veo 2 — prompt: A low-angle shot captures a flock of pink flamingos gracefully wading in a lush, tranquil lagoon. […]
However, a single picture is worth a thousand words, and prompts are never this long (nor would the video generation listen even if this was the case). This makes it nearly impossible for this approach to create consistent follow-up shots that fit together in a longer-lasting video. Look for example at Coca-Cola’s 2024 fully AI-generated advertisement — and the lack of consistency in the featured trucks (they change every frame!).
Learning: It’s nearly impossible to create consistent follow-up shots with text-to-video models.
One — and probably the most known — exception to the just mentioned limitation are celebrities. Due to their elaborate media presence, LVMs usually have enough training data to generate images or videos of these celebrities following the text prompt’s command. Add some explicit content to it and you have a chance to go viral — as shown by the music video below from The Dor Brothers. Though, notice how they still struggled to maintain consistency, as shown by the clothes that change in every single shot.
The democratization of GenAI tools has made it easier than ever for people to create their own content. This is great since it acts as a creative enabler, but it also increases the chances of misuse. Which, in turn, raises important ethical and legal questions, especially around consent and misrepresentation. Without proper rules in place, there’s a high risk of harmful or misleading content flooding digital platforms, making it even harder to trust what we see online. Luckily, many tools, like Runway, have systems in place to flag questionable or inappropriate content, helping to keep things in check.
Learning: Celebrities can be generated consistently due to the abundance of (visual) data on them, which, rightfully, raises ethical and legal concerns. Luckily, most generation engines help to monitor misuse by flagging such requests.
Runway blocking video generation because it detected a celebrity.
Image-based videos starting from fine-tuned image-generation models
Another popular approach to generating videos is to start from a generated image, which serves as the first frame of the video. This frame can be completely generated — as shown in the first example below — or based on a real image that’s slightly manipulated to provide better control. You can, for example, modify the image either manually or by using an image-to-image model. One way of doing so is through inpainting, as shown in the second example below.
Learnings: — Using images as specific frames in the generated video provide for greater control, helping you anchor the video to specific views. — Frames can be created from scratch using image generation models. — You can utilize image-to-image models to change existing images that fit the storyline better.
A cat reading a book based on a generated image, self-made usinng Flux for the image generation and Ruway to turn the image into a video.A cat reading a book based on a real image, self-made using Flux for the inpainting and Runway to turn the image into a video.
Other, more sophisticated approaches include completely changing the style of your photos using style transfer models or making models learn a specific concept or person to then generate variations, as is done in DreamBooth. This, however, is very tough to pull off since fine-tuning isn’t trivial and requires a lot of trial and error to get right. Also, the final results will always be “as good as it can get”, with an output quality that’s nearly impossible to predict at the start of the tuning process. Nevertheless, when done right, the results look amazing, as shown in this “realistic Simpsons” video:
Image-based videos starting from edited content
A last option — which is what I mostly used to generate the video shown in this article’s introduction — is to manually edit images before feeding them into an image-to-video generative model. These manually edited images then serve as the starting frames of the generated video, or even as intermediate and final frames. This approach offers significant control, as you’re only bound by your own editing skills and the interpretative freedom of the video generation model between the anchoring frames. The following figure shows how I used Sora to create a segue between two consecutive anchor frames.
Learning: Most video generation tools (Runway, Sora, …) allow you to specify starting, intermediate, and/or ending frames, providing great control in the video generation process.
Transition from a starting to an ending frame, self-made using Flux 1.1 Schnell to generate the two backgrounds, and Sora for the video generation. Note that Sora generated the top-view of the robot in the second frame of the video — a “happy accident” since it fitted well.
The great thing is that the quality of the edits doesn’t even need to be high, as long as the video generation model understands what you’re trying to do. The example below shows the initial edit — a simple copy-paste of a robot onto a generated background scene — and how this is transformed into the same robot walking through the forest.
Learning: Low-quality edits can still lead to high-quality video generation.
AI-generated video based on a (badly) edited image where a robot is simply pasted onto a scene, self-made video generated using Runway.
Since the generated video is anchored by the self-edited images, it becomes significantly easier to control the flow of the video and thus ensure that successive shots fit better together. In the next section, I dive into the details of how exactly this can be done.
Learning: Manually editing specific frames to anchor the generated video allows you to create consistent follow-up shots.
Make your own video!
OK, long intro aside, how can you now start to actually make a video?
The next three sections explain step by step how I made most of the shots from the video you saw at the beginning of this article. In a nutshell, they almost always follow the same approach:
Step 1: generate a scene through image generation
Step 2: make edits to your scenes — even bad ones allowed!
Step 3: turn your images into a generated video
Let’s get our hands dirty!
Step 1: generate a scene through image generation
First, let’s generate the setting of a specific scene. In the music video I created, increasingly smarter agents are mentioned, so I decided a classroom setting would work well. To generate this scene, I used Flux 1.1 Schnell. Personally, I find the results from Black Forest Labs’ Flux models more satisfactory than those from OpenAI’s DALL-E3, Midjourney’s models, or Stability AI’s Stable Diffusion models.
Learning: At the time of writing, Black Forest Labs’ Flux models provide the best text-to-image and inpainting results.
Image of an empty classroom, self-made using Flux 1.1 Schnell.
Step 2: make edits to your scenes — even bad ones allowed!
Next, I wanted to include a toy robot —the subject of the video — in the scene. To do so, I took a photo of the robot. For easier background removal, I used a green screen, though this is not a necessity. Nowadays AI models like Daniel Gatis’ rembg or Meta’s Segment Anything Model (SAM) are great at doing this. If you don’t want to worry about the local setup of these models, you can always use online solutions like remove.bg, too.
Image capture of a real-world toy robot.
Once you remove the subject’s background — and optionally add some other components, like dumbbells — you can paste these into the original scene. The better the edit, the higher the quality of the generated video. Getting the light setup right was a challenge I didn’t seem to succeed at. Nonetheless, it’s surprising how good the video generation can be, even when starting from very badly edited images. For editing, I recommend looking into Canva, it’s an easy-to-use online tool with a very small learning curve.
Learning: Canva is great for editing images.
Edit of the photographed toy robot holding dumbbells.
Step 3: turn your images into a generated video
Once you have your anchor frames, you can turn these into a video using a video generation model of choice and a well-crafted prompt. For this, I experimented with Runway’s video generation models and OpenAI’s Sora (no access to Google’s Veo 2 yet, unfortunately). In my experiments, Runway usually gave better results. Interestingly, though, is that Runway Gen-3 Alpha Turbo had the highest success rate, not its larger brother Gen-3 Alpha. Good, since it’s cheaper and generation credits are quite expensive and sparse for video generative models. Based on the videos I see passing around online, it seems that Google’s Veo 2 is yet another big jump in generation capability. Hope it’ll be generally available soon!
Learnings: — Runway’s Gen-3 Alpha Turbo had the highest success rate over Runway’s other models — Gen-2 and Gen-3 Alpha — and OpenAI’s Sora. — Generation credits are expensive and sparse on all platforms. You don’t get much for your money, especially considering the high dependency on ‘luck’ during generation.
AI-generated video based on an edited starting frame, self-made using Runway.
Generating videos is unfortunately still more often a miss than a hit. While it is rather trivial to pan the camera around in the scene, asking for specific movement of the video’s subject remains very tough. Instructions like “raise right hand” are nearly impossible — so don’t even think of trying to direct how the subject’s right hand should be raised. To illustrate, below is a failed generation of the same transition between a starting and an ending frame discussed in the previous section. For this generation, the instruction was to zoom in on a snowy road with a robot walking on it. For more hilariously uncanny video generations, see the next section; “Be aware! Expect failure …”.
Learning: Generating videos is more a miss than a hit. Directed movements, in particular, remain challenging to almost impossible.
Failed generation of a starting-to-ending-frame video transition, self-made using Runway.
Repeat …
Once you get satisfactory results, you can repeat this process to get consecutive shots that fit together. This can be done in various ways, like by creating a new starting frame (see first example below), or by continuing the video generation with the frame of the last generation but with a different prompt to change the subject’s behaviors (see second example below).
Example of a fitting next shot based on a newly created starting frame.Example of a fitting next shot based on the previous generation’s final frame. This method relies heavily on the video-generation prompt to bring changes to the scene.
Be aware! Expect failure …
As said earlier, generating videos is tough, so keep your expectations low. Do you want to generate a specific shot or movement? No chance. Do you want to make a good-looking shot of anything, but you don’t care about what exactly? Yeah, that could work! Is the generated result good, but do you want to change something minor in it? No chance again …
To give you a bit of a feel for this process, here’s a compilation of a few of the best failures I generated during the process of creating my video.
Failed video generations, all starting from edited start frames. Top-left: “Reindeer wearing the European flag appearing […]”. Top-right: “Robots playing in the orchestra […]”. Bottom-left: “Robot helping tutor a kid […]”. Bottom-right: “Robot that’s going to sit down on the couch behind it […]”. Videos generating using either Sora or Runway.
From regular video to music video — turn your story into a song
The cherry on the cake is a fully AI-generated song to complement the story depicted in the video. Of course, this was actually the foundation of the cake, since the music was generated before the video, but that’s not the point. The point is … how great did music generation become?!
The song used in the music video in the introduction of this article was created using Suno, the AI application that has had the biggest “wow!” factor for me so far. The ease and speed of generating music that’s actually quite good is amazing. To illustrate, the music video was generated within five minutes of work — this included the time the models took to process!
Learning: Suno is awesome!
My ideal music-generation workflow is as follows:
Brainstorm about a story with ChatGPT (simple 4o is fine, o1 did not add much extra) and extract good parts.
Converge the good parts and ideas to complete lyrics by providing ChatGPT with feedback and manual edits.
Use Suno (v4) to generate songs and play around with different styles. Rewrite specific words differently if they sound off (instead of “GenAI” wtire “Gen-AI” to prevent a spoken “genaj”).
Remaster the song in Suno (v4). This improves the quality and range of the song, which is almost always an improvement over the original.
All learnings in a nutshell
To summarize, here are all the lessons I learned while making my own music video and writing this article:
It’s nearly impossible to create consistent follow-up shots with text-to-video models.
Celebrities can be generated consistently due to the abundance of (visual) data on them, which, rightfully, raises ethical and legal concerns. Luckily, most generation engines help to monitor misuse by flagging such requests.
Using images as specific frames in the generated video provide for greater control, helping you anchor the video to specific views.
Frames can be created from scratch using image generation models.
You can utilize image-to-image models to change existing images that fit the storyline better.
Most video generation tools (Runway, Sora, …) allow you to specify starting, intermediate, and/or ending frames, providing great control in the video generation process.
Low-quality edits can still lead to high-quality video generation.
Manually editing specific frames to anchor the generated video allows you to create consistent follow-up shots.
At the time of writing, Black Forest Labs’ Flux models provide the best text-to-image and inpainting results.
Canva is great for editing images.
Runway’s Gen-3 Alpha Turbo had the highest success rate over Runway’s other models — Gen-2 and Gen-3 Alpha — and OpenAI’s Sora.
Generation credits are expensive and sparse on all platforms. You don’t get much for your money, especially considering the high dependency on ‘luck’ during generation.
Generating videos is more a miss than a hit. Directed movements, in particular, remain challenging to almost impossible.
Suno is awesome!
Did you like this content? Feel free to follow me on LinkedIn to see my next explorations, or follow me on Medium!
Generative AI applications should be developed with adequate controls for steering the behavior of FMs. Responsible AI considerations such as privacy, security, safety, controllability, fairness, explainability, transparency and governance help ensure that AI systems are trustworthy. In this post, we demonstrate how to use the AWS generative AI best practices framework on AWS Audit Manager to evaluate this insurance claim agent from a responsible AI lens.
In this blog post, we explore a client services agent assistant application developed by the London Stock Exchange Group (LSEG) using Amazon Q Business. We will discuss how Amazon Q Business saved time in generating answers, including summarizing documents, retrieving answers to complex Member enquiries, and combining information from different data sources (while providing in-text citations to the data sources used for each answer).
This blog post with accompanying code presents a solution to experiment with real-time machine translation using foundation models (FMs) available in Amazon Bedrock. It can help collect more data on the value of LLMs for your content translation use cases.
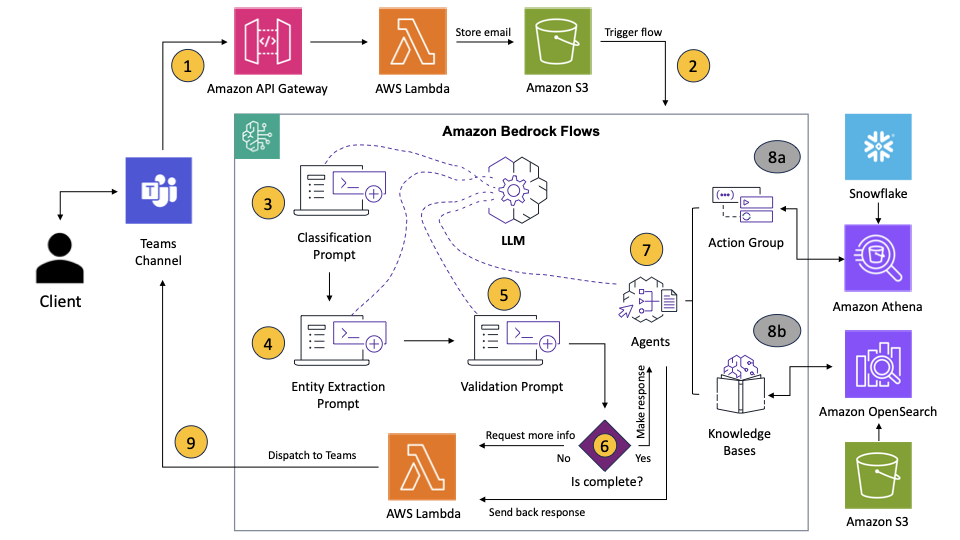
In this post, we show you how Parameta used Amazon Bedrock Flows to transform their manual client email processing into an automated, intelligent workflow that reduced resolution times from weeks to days while maintaining high accuracy and operational control.
We use cookies on our website to give you the most relevant experience by remembering your preferences and repeat visits. By clicking “Accept”, you consent to the use of ALL the cookies.
This website uses cookies to improve your experience while you navigate through the website. Out of these, the cookies that are categorized as necessary are stored on your browser as they are essential for the working of basic functionalities of the website. We also use third-party cookies that help us analyze and understand how you use this website. These cookies will be stored in your browser only with your consent. You also have the option to opt-out of these cookies. But opting out of some of these cookies may affect your browsing experience.
Necessary cookies are absolutely essential for the website to function properly. These cookies ensure basic functionalities and security features of the website, anonymously.
Cookie
Duration
Description
cookielawinfo-checkbox-analytics
11 months
This cookie is set by GDPR Cookie Consent plugin. The cookie is used to store the user consent for the cookies in the category "Analytics".
cookielawinfo-checkbox-functional
11 months
The cookie is set by GDPR cookie consent to record the user consent for the cookies in the category "Functional".
cookielawinfo-checkbox-necessary
11 months
This cookie is set by GDPR Cookie Consent plugin. The cookies is used to store the user consent for the cookies in the category "Necessary".
cookielawinfo-checkbox-others
11 months
This cookie is set by GDPR Cookie Consent plugin. The cookie is used to store the user consent for the cookies in the category "Other.
cookielawinfo-checkbox-performance
11 months
This cookie is set by GDPR Cookie Consent plugin. The cookie is used to store the user consent for the cookies in the category "Performance".
viewed_cookie_policy
11 months
The cookie is set by the GDPR Cookie Consent plugin and is used to store whether or not user has consented to the use of cookies. It does not store any personal data.
Functional cookies help to perform certain functionalities like sharing the content of the website on social media platforms, collect feedbacks, and other third-party features.
Performance cookies are used to understand and analyze the key performance indexes of the website which helps in delivering a better user experience for the visitors.
Analytical cookies are used to understand how visitors interact with the website. These cookies help provide information on metrics the number of visitors, bounce rate, traffic source, etc.
Advertisement cookies are used to provide visitors with relevant ads and marketing campaigns. These cookies track visitors across websites and collect information to provide customized ads.