Tag: tech

  • Speak, Don’t Type: Exploring Voice Interaction with LLMs [Part 1]

    Speak, Don’t Type: Exploring Voice Interaction with LLMs [Part 1]

    Youness Mansar

    Augmenting LLM Apps with a Voice Modality

    Photo by Ian Harber on Unsplash

    Many LLMs, particularly those that are open-source, have typically been limited to processing text or, occasionally, text with images (Large Multimodal Models or LMMs). But what if you want to communicate with your LLM using your voice? Thanks to the advancement of powerful speech-to-text open-source technologies in recent years, this becomes achievable.

    We will go into the integration of Llama 3 with a speech-to-text model, all within a user-friendly interface. This fusion enables (near) real-time communication with an LLM through speech. Our exploration involves selecting Llama 3 8B as the LLM, using the Whisper speech-to-text model, and the capabilities of NiceGUI — a framework that uses FastAPI on the backend and Vue3 on the frontend, interconnected with socket.io.

    After reading this post, you will be able to augment an LLM with a new audio modality. This will allow you to build a full end-to-end workflow and UI that enables you to use your voice to command and prompt an LLM instead of typing. This feature can prove especially beneficial for mobile applications, where typing on a keyboard may not be as user-friendly as on desktops. Additionally, integrating this functionality can enhance the accessibility of your LLM app, making it more inclusive for individuals with disabilities.

    Here are the tools and technologies that this project will help you get familiar with:

    • Llama 3 LLM
    • Whisper STT
    • NiceGUI
    • (Some) Basic Javascript and Vue3
    • The Replicate API

    List of Components

    In this project, we integrate various components to enable voice interaction with LLMs (Large Language Models). Firstly, LLMs serve as the core of our system, processing inputs and generating outputs based on extensive language knowledge. Next, Whisper, our chosen speech-to-text model, converts spoken input into text, enabling smooth communication with the LLMs. Our frontend, based on Vue3, incorporates custom components within the NiceGUI framework, providing an intuitive user interface for interaction. On the backend, custom code combined with FastAPI forms the base of the app’s functionality. Finally, Replicate.com provides the hosting infrastructure for the ML models, ensuring reliable access and scalability. Together, these components converge to create a basic app for (near) real-time voice interaction with LLMs.
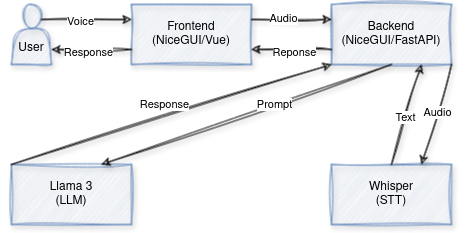
    Image by author

    Frontend

    NiceGUI does not yet have an audio recording component so I contributed one to their example set: https://github.com/zauberzeug/nicegui/tree/main/examples/audio_recorder that I’ll be reusing here.

    In order to create such component, we just need to define a .vue file that defines what we want:

    <template>
    <div>
    <button class="record-button" @mousedown="startRecording" @mouseup="stopRecording">Hold to speak</button>
    </div>
    </template>

    Here, basically, we create a button element where when clicked will call a method startRecording and as soon as the mouse is up will call stopRecording.

    For this, we define these main methods:

      methods: {
    async requestMicrophonePermission() {
    try {
    this.stream = await navigator.mediaDevices.getUserMedia({ audio: true });
    } catch (error) {
    console.error('Error accessing microphone:', error);
    }
    },
    async startRecording() {
    try {
    if (!this.stream) {
    await this.requestMicrophonePermission();
    }
    this.audioChunks = [];
    this.mediaRecorder = new MediaRecorder(this.stream);
    this.mediaRecorder.addEventListener('dataavailable', event => {
    if (event.data.size > 0) {
    this.audioChunks.push(event.data);
    }
    });
    this.mediaRecorder.start();
    this.isRecording = true;
    } catch (error) {
    console.error('Error accessing microphone:', error);
    }
    },
    stopRecording() {
    if (this.isRecording) {
    this.mediaRecorder.addEventListener('stop', () => {
    this.isRecording = false;
    this.saveBlob();
    // this.playRecordedAudio();
    });
    this.mediaRecorder.stop();
    }
    }

    This code defines three methods: requestMicrophonePermission, startRecording, and stopRecording. The requestMicrophonePermission method asynchronously attempts to access the user’s microphone using navigator.mediaDevices.getUserMedia, handling any errors that may occur. The startRecording method, also asynchronous, initializes recording by setting up a media recorder with the obtained microphone stream, while the stopRecording method stops the recording process and saves the recorded audio.

    Once the recording is done, this code will also emit an event named ‘audio_ready’ along with a base64 encoded audio data. Inside the method, a new FileReader object is created. Upon loading the file, the onload event is triggered, extracting the base64 data from the loaded file result. Finally, this base64 data is emitted as part of the ‘audio_ready’ event using $emit() function with the key ‘audioBlobBase64’ containing the base64 data.

    emitBlob() {
    const reader = new FileReader();
    reader.onload = () => {
    const base64Data = reader.result.split(',')[1]; // Extracting base64 data from the result
    this.$emit('audio_ready', { audioBlobBase64: base64Data });
    };
    }

    This event will be received by the backend along with the base64 data.

    The backend

    The backend will be basically the glue that ties the user’s input with the ML models hosted in Replicate.

    We will be employing two primary models for our project:

    1. openai/whisper: This Transformer sequence-to-sequence model is dedicated to speech-to-text tasks, proficient in converting audio into text. Trained across various speech processing tasks, such as multilingual speech recognition, speech translation, spoken language identification, and voice activity detection.
    2. meta/meta-llama-3-8b-instruct: The Llama 3 family, including this 8 billion-parameter variant, is an LLM family created by Meta. These pretrained and instruction-tuned generative text models are specifically optimized for dialogue use cases.

    For the first one, we define a simple function that takes as input the base64 audio and calls the replicate api:

    def transcribe_audio(base64_audio):
    audio_bytes = base64.b64decode(base64_audio)
    prediction = replicate.run(
    f"{MODEL_STT}:{VERSION}", input={"audio": io.BytesIO(audio_bytes), **ARGS}
    )
    text = "n".join(segment["text"] for segment in prediction.get("segments", []))
    return text

    Which can be used easily as:

    with open("audio.ogx", "rb") as f:
    content = f.read()

    _base64_audio = base64.b64encode(content).decode("utf-8")

    _prediction = transcribe_audio(_base64_audio)
    pprint.pprint(_prediction)

    Then, for the second component, we define a similar function:

    def call_llm(prompt):
    prediction = replicate.stream(MODEL_LLM, input={"prompt": prompt, **ARGS})
    output_text = ""
    for event in prediction:
    output_text += str(event)
    return output_text

    This will query the LLM and stream responses from it token by token into the output_text

    Next, we define the full workflow in the following async method:

    async def run_workflow(self, audio_data):
    self.prompt = "Transcribing audio..."
    self.response_html = ""
    self.audio_byte64 = audio_data.args["audioBlobBase64"]
    self.prompt = await run.io_bound(
    callback=transcribe_audio, base64_audio=self.audio_byte64
    )
    self.response_html = "Calling LLM..."
    self.response = await run.io_bound(callback=call_llm, prompt=self.prompt)
    self.response_html = self.response.replace("n", "</br>")
    ui.notify("Result Ready!")

    Once the audio data is ready, we first transcribe the audio, then once this is done, we call the LLM and display its response. The variables self.prompt and self.response_html are bound to other NiceGUI components that get updated automatically. If you want to know more about how that works, you can look into a previous tutorial I wrote:

    Meet the NiceGUI: Your Soon-to-be Favorite Python UI Library

    The full workflow result looks like this:

    Pretty neat!

    What takes the most time here is the audio transcription. The endpoint is always warm on replicate when I check it, but this version is the large-v3 which is not the fastest one. Audio files are also a lot heavier to move around than plain text, so this contributes to the small latency.

    Notes:

    • You will need to set REPLICATE_API_TOKEN before running this code. You can get this by signing up in replicate.com. I was able to do these experiments using their free tier.
    • Sometimes the transcription is delayed a little bit and is returned after a short “Queuing” period.
    • Code is at: https://github.com/CVxTz/LLM-Voice The entry point is main.py.

    Conclusion

    In summary, the integration of open-source models like Whisper and Llama 3 has significantly simplified voice interaction with LLMs, making it highly accessible and user-friendly. This combination is particularly convenient for users who prefer not to type, offering a smooth experience. However, this is only the first part of the project; there will be more improvements to come. The next steps include enabling two-way voice communication, providing the option to utilize local models for enhanced privacy, enhancing the overall design for a more polished interface, implementing multi-turn conversations for more natural interactions, developing a desktop application for wider accessibility, and optimizing latency for real-time speech-to-text processing. With these enhancements, the aim is to improve the experience of voice interaction with LLMs, making it easier to use for those, like me, that don’t like typing that much.
    Let me know which improvements do you think I should work on first.


    Speak, Don’t Type: Exploring Voice Interaction with LLMs [Part 1] was originally published in Towards Data Science on Medium, where people are continuing the conversation by highlighting and responding to this story.

    Originally appeared here:
    Speak, Don’t Type: Exploring Voice Interaction with LLMs [Part 1]

    Go Here to Read this Fast! Speak, Don’t Type: Exploring Voice Interaction with LLMs [Part 1]

  • Denoising Radar Satellite Images with Python Has Never Been So Easy

    Denoising Radar Satellite Images with Python Has Never Been So Easy

    Hadrien Mariaccia

    Presentation of the latest release of deepdespeckling

    Optical and radar image of an agricultural area near Nîmes, France

    Synthetic aperture radar (SAR) images are widely use in a large variety of sectors (aerospace, military, meteorology, etc.). The problem is this kind of images suffer from noise in their raw format. While these images are also usually heavy files, the task of denoising it efficiently appears to be both challenging from a scientific perspective and very useful in the real world.

    In this Towards Data Science article, we presented deepdespeckling, an open-source python package enabling to despeckle synthetic aperture radar (SAR) images using a novel deep learning based method.

    We are happy to announce that we have released a new version of deepdespeckling, enabling to use both MERLIN and SAR2SAR methods for despeckling radar satellite images.

    A quick reminder on satellite images

    There are two big categories of satellite images :

    • Optical images : the ones we are used to see when we watch a weather forecast for example. These images are taken by optical sensors.
      While these images generally provide a high level of detail, they encounter at least two significant challenges in capturing Earth’s intricacies: the limitations posed by nighttime conditions and adverse weather.
    • Radar images : while optical systems rely on the sunlight (the sensor is passive), radars send an electromagnetic wave and measure the component backscattered by the objects on the ground (the sensor is active). radar sensors can acquire data at any time of the day and with any meteorological conditions, as the wavelength of the transmitted wave allows it to penetrate clouds. They however encounter an intrinsic issue : speckle noise.

    What is speckle noise ?

    Speckle is a granular interference due to bouncing properties of emitted radio waves that degrades the quality of images and therefore their interpretability with a human eye.

    Example of an image respectively without and with speckle noise

    How to get rid of it

    Several methods exist, but deep learning has brought significant improvements for this task. Emanuele Dalsasso, Loïc Denis and Florence Tupin developed two deep learning based methods for despeckling SAR images :

    • MERLIN (coMplex sElf-supeRvised despeckLINg) : a self-supervised strategy based on the separation of the real and imaginary parts of single-look complex SAR images that we presented in the previous Towards Data Science article
    • SAR2SAR : Multi-temporal time series are leveraged in order to train neural network to restore SAR images by only looking at noisy acquisitions. This method is part of the new features of the latest release of deepdespeckling. Hence, we will focus on this method in this article

    SAR2SAR

    Just as MERLIN, SAR2SAR also draws inspiration from the noise2noise algorithm, which showed that it is possible to train a model to denoise without looking at noise-free examples. This feature is of particular importance in SAR despeckling, as speckle-free acquisition do not exist.

    SAR2SAR builds on the assumption that two images acquired over the same area at different times are corrupted by two uncorrelated speckle realizations, matching with the hypothesis allowing the application of the noise2noise principle. This allows to develop a model to remove speckle from Ground Range Detected (GRD) SAR images, which are only available in amplitude (the phase is suppressed during the detection step) and thus MERLIN cannot be used on such data. Temporal acquisitions are leveraged to generate a dataset containing independent speckle realisations of the same scene (a change compensations strategy relying on a pre-trained model is used to ensure that the temporal acquisitions only differ for the speckle component).

    Once the model is trained, during inference SAR2SAR requires a single GRD image and can be effectively deployed to suppress speckle from Sentinel-1 GRD SAR images.

    SAR images acquisition

    Different acquisition modes exist depending on the compromise between the illuminated scene (the swath) and and the image resolution. Each acquisition mode thus produces images having a different resolution, thus the appearance of objects is specific to each acquisition mode.

    For this reason, a model specific for each modality must be developed. Given the simplicity of application of MERLIN, which requires single SAR images, datasets for each specific modality can be seamlessly collected. We have trained MERLIN on the following images:

    • TerraSAR-X images acquired in Stripmap mode
    • TerraSAR-X images acquired in HighResolution SpotLight mode
    • Sentinel-1 images acquired in TOPS mode

    deepdespeckling package usage

    Package installation

    Before installing deepdespeckling, make sure to install gdal dependancies, it can be done using conda with the following command :

    conda install -c conda-forge gdal

    Then you can install the package this way :

    pip install deepdespeckling

    Despeckle one image with MERLIN

    To despeckle SAR images using MERLIN, images need to be in .cos or .npy format.

    Two parameters have to be set:

    • model_name : “spotlight” for SAR images retrieved with spotlight mode, “stripmap” for SAR images retrieved with stripmap mode or “Sentinel-TOPS” for images retrieved with TOPS mode
    • symetrise: during the preprocessing steps of the noisy image for MERLIN, the real and the imaginary parts are “symetrised” (to match the theoretical assumptions of MERLIN). To skip this step, the symetrise parameter can be set to False
    from deepdespeckling.utils.load_cosar import cos2mat
    from deepdespeckling.utils.constants import PATCH_SIZE, STRIDE_SIZE
    from deepdespeckling.merlin.merlin_denoiser import MerlinDenoiser

    # Path to one image (cos or npy file)
    image_path="path/to/cosar/image"
    # Model name, can be "spotlight", "stripmap" or "Sentinel-TOPS"
    model_name = "spotlight"
    symetrise = True

    image = cos2mat(image_path).astype(np.float32)

    denoiser = MerlinDenoiser(model_name=model_name, symetrise=symetrise)
    denoised_image = denoiser.denoise_image(image, patch_size=PATCH_SIZE, stride_size=STRIDE_SIZE)

    This snippet of code will store the despeckled image in a numpy array in the denoised_image variable.

    Example of a full size noisy SAR image
    The same image denoised using MERLIN

    Despeckle one image with SAR2SAR

    To despeckle SAR images using SAR2SAR, images need to be in .tiff or .npy format.

    from deepdespeckling.utils.load_cosar import cos2mat
    from deepdespeckling.utils.constants import PATCH_SIZE, STRIDE_SIZE
    from deepdespeckling.sar2sar.sar2sar_denoiser import Sar2SarDenoiser

    # Path to one image (tiff or npy file)
    image_path="path/to/cosar/image"

    # Works exactly the same as with MERLIN
    image = cos2mat(image_path).astype(np.float32)

    # Denoise the image with SAR2SAR
    denoiser = Sar2SarDenoiser()
    denoised_image = denoiser.denoise_image(image, patch_size=PATCH_SIZE, stride_size=STRIDE_SIZE)
    Example of result using SAR2SAR (displayed after a conversion to png)

    Despeckle a set of images using MERLIN or SAR2SAR

    For both MERLIN and SAR2SAR, you can choose between 3 different functions to despeckle a set of SAR images contained in a folder :

    • despeckle to despeckle full size images
    • despeckle_from_coordinates to despeckle a sub-part of the images defined by some coordinates
    • despeckle_from_crop to despeckle a sub-part of the images defined using a crop tool

    Despeckle fullsize images

    from deepdespeckling.despeckling import despeckle

    # Path to a folder of several images
    # images have to be in .tiff or .npy formats if using sar2sar
    # images have to be in .cos or .npy formats is using merlin ("spotlight", "stripmap" or "Sentinel-TOPS")
    image_path="path/to/cosar/image"
    # Folder where results are stored
    destination_directory="path/where/to/save/results"

    # Can be "sar2sar", "spotlight' or "stripmap"
    model_name = "spotlight"
    # symetrise parameter if using "spotlight", "stripmap" or "Sentinel-TOPS" (harmless if using "sar2sar")
    symetrise = True

    despeckle(image_path, destination_directory, model_name=model_name, symetrise=symetrise)

    The despeckle function will create several folders in the destination_directory :

    • processed_images: the npy files (numpy array conversion) of the raw images stored in the folder defined in image_path.
    • noisy:the preprocessed noisy images in both .npy and .png formats
    • denoised: the denoised images in both .npy and .png formats

    Despeckle parts of images using custom coordinates

    from deepdespeckling.despeckling import despeckle_from_coordinates

    # Path to a folder of several images
    # images have to be in .tiff or .npy formats if using sar2sar
    # images have to be in .cos or .npy formats is using merlin ("spotlight", "stripmap" or "Sentinel-TOPS")
    image_path="path/to/cosar/image"
    # Folder where results are stored
    destination_directory="path/where/to/save/results"
    # Example of coordinates of the subparts of the images to be despeckled
    coordinates_dictionnary = {'x_start':2600,'y_start':1000,'x_end':3000,'y_end':1200}

    # Can be "sar2sar", "spotlight", "stripmap" or "Sentinel-TOPS"
    model_name = "spotlight"
    # symetrise parameter if using "spotlight", "stripmap" or "Sentinel-TOPS" (harmless if using "sar2sar")
    symetrise = True

    despeckle_from_coordinates(image_path, coordinates_dict, destination_directory,
    model_name=model_name, symetrise=symetrise)

    Thedespeckle_from_coordinates function will create the same folders as thedespeckle function, with images croped with the specified coordinates.

    Example of image denoised using custom coordinates (displayed after a conversion to png)

    Despeckle parts of images using a crop tool

    from deepdespeckling.merlin.inference.despeckling import despeckle_from_crop

    # Path to a folder of several images
    # images have to be in .tiff or .npy formats if using sar2sar
    # images have to be in .cos or .npy formats is using merlin ("spotlight", "stripmap" or "Sentinel-TOPS")
    image_path="path/to/cosar/image"
    # Folder where results are stored
    destination_directory="path/where/to/save/results"

    # If True it will crop a 256*256 image from the position of your click
    # If False you will draw free-handly the area of your interest
    fixed = True
    # Can be "sar2sar", "spotlight", "stripmap" or "Sentinel-TOPS"
    model_name = "spotlight"
    # symetrise parameter if using "spotlight""stripmap" or "Sentinel-TOPS" (harmless if using "sar2sar")
    symetrise = True

    despeckle_from_crop(image_path, destination_directory, model_name=model_name, fixed=fixed, symetrise=symetrise)

    Thedespeckle_from_crop function will first launch the crop tool : just select an area and press “q” when you are satisfied with the crop

    the cropping tool in action
    Results of the denoising using the crop tool

    Then, the despeckle_from_crop function will create :

    • The same folders as thedespeckle function, with images cropped using the crop tool
    • cropping_coordinates.txt file containing the coordinates of the selected crop

    Going further

    Now you know to use deepdespeckling, to understand further more how it works, you can check the github repository. We also provide a sphinx documentation available here.

    Feel free to contact me for any questions and feedback !

    Authors

    Unless otherwise noted, all images are by the authors

    Contact

    Don’t hesitate to contact me if you have any questions.

    To know more about Hi! PARIS and its Engineering Team:


    Denoising Radar Satellite Images with Python Has Never Been So Easy was originally published in Towards Data Science on Medium, where people are continuing the conversation by highlighting and responding to this story.

    Originally appeared here:
    Denoising Radar Satellite Images with Python Has Never Been So Easy

    Go Here to Read this Fast! Denoising Radar Satellite Images with Python Has Never Been So Easy

  • Accelerate ML workflows with Amazon SageMaker Studio Local Mode and Docker support

    Accelerate ML workflows with Amazon SageMaker Studio Local Mode and Docker support

    Shweta Singh

    We are excited to announce two new capabilities in Amazon SageMaker Studio that will accelerate iterative development for machine learning (ML) practitioners: Local Mode and Docker support. ML model development often involves slow iteration cycles as developers switch between coding, training, and deployment. Each step requires waiting for remote compute resources to start up, which […]

    Originally appeared here:
    Accelerate ML workflows with Amazon SageMaker Studio Local Mode and Docker support

    Go Here to Read this Fast! Accelerate ML workflows with Amazon SageMaker Studio Local Mode and Docker support

  • The long nightmare may be over — iPad could finally get a Calculator app

    The long nightmare may be over — iPad could finally get a Calculator app

    The Calculator app could finally make its way to the iPad with iPadOS 18, and we could see the debut of some exciting new features and powerful upgrades in the process.

    Graphic calculator interface with buttons for mathematical operations and currency conversion options displayed on an orange background.
    Apple’s redesigned Calculator app could make its way to iPad as well

    Last week, we published an exclusive report on Apple’s Project GrayParrot detailing the revamped macOS Calculator application Apple is developing. A new report now claims that the iPad will receive a Calculator app of its own, for the very first time.

    A report from MacRumors on Tuesday citing sources familiar the matter says that the Calculator app will be available on all iPads compatible with iPadOS 18. While the provenance of this unnamed source cannot be verified by us, we have recently received details that corroborate the report’s claim.

    Continue Reading on AppleInsider | Discuss on our Forums

    Go Here to Read this Fast! The long nightmare may be over — iPad could finally get a Calculator app

    Originally appeared here:
    The long nightmare may be over — iPad could finally get a Calculator app