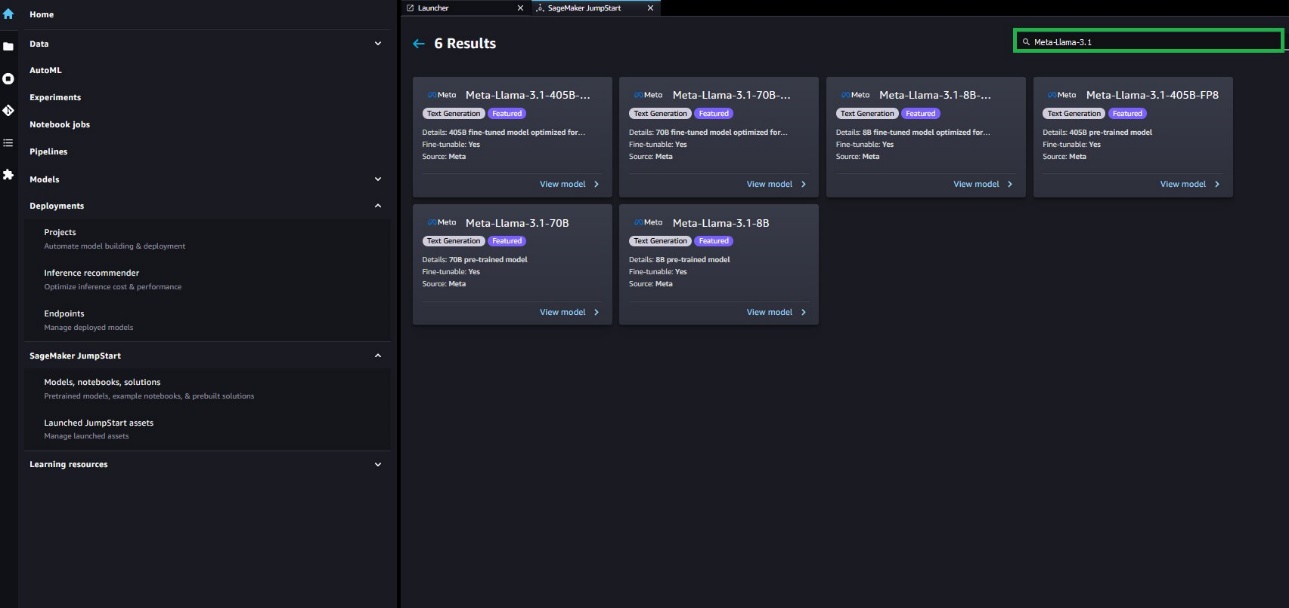
Fine-tuning Meta Llama 3.1 models with Amazon SageMaker JumpStart enables developers to customize these publicly available foundation models (FMs). The Meta Llama 3.1 collection represents a significant advancement in the field of generative artificial intelligence (AI), offering a range of capabilities to create innovative applications. The Meta Llama 3.1 models come in various sizes, with 8 billion, 70 billion, and 405 billion parameters, catering to diverse project needs. In this post, we demonstrate how to fine-tune Meta Llama 3-1 pre-trained text generation models using SageMaker JumpStart.
Have you ever wondered the amount of calories you consume when you eat your dinner, for example? I do that all the time. Wouldn’t it be wonderful if you could simply pass a picture of your plate through an app and get an estimate of the total number of calories before you decide how far in you want to dip?
This calorie counter app that I created can help you achieve this. It is a Python application that uses Google’s Gemini-1.5-Pro-Latest model to estimate the number of calories in food items.
The app takes two inputs: a question about the food and an image of the food or food items, or simply, a plate of food. It outputs an answer to the question, the total number of calories in the image and a breakdown of calories by each food item in the image.
In this article, I will explain the entire end-to-end process of building the app from scratch, using Google’s Gemini-1.5-pro-latest (a Large Language generative AI model released by Google), and how I developed the front-end of the application using Streamlit.
It is worth noting here that with advancements in the world of AI, it is incumbent on data scientists to gradually shift from traditional deep learning to generative AI techniques in order to revolutionize their role. This is my main purpose of educating on this subject.
Let me start by briefly explaining Gemini-1.5-pro-latest and the streamlit framework, as they are the major components in the infrastructure of this calorie counter app.
Gemini-1.5-pro-latest
Gemini-1.5-pro-latest is an advanced AI language model developed by Google. Since it is the latest version, it has enhanced capabilities over previous versions in the light of faster response times and improved accuracy when used in natural language processing and building applications.
This is a multi-modal model that works with both texts and images — an advancement from Google Gemini-pro model which only works with text prompts.
The model works by understanding and generating text, like humans, based on prompts given to it. In this article, this model will be used to to generate text for our calories counter app.
Gemini-1.5-pro-latest can be integrated into other applications to reinforce their AI capabilities. In this current application, the model uses generative AI techniques to break the uploaded image into individual food items . Based on its contextual understanding of the food items from its nutritional database, it uses image recognition and object detection to estimate the number of calories, and then totals up the calories for all items in the image.
Streamlit
Streamlit is an open-source Python framework that will manage the user interface. This framework simplifies web development so that throughout the project, you do not need to write any HTML and CSS codes for the front end.
Let us dive into building the app.
Building your calorie counter application
I will show you how to build the app in 5 clear steps.
1. Set up your Folder structure
For a start, go into your favorite code editor (mine is VS Code) and start a project file. Call it Calories-Counter, for example. This is the current working directory. Create a virtual environment (venv), activate it in your terminal, and then create the following files: .env, calories.py, requirements.txt.
Here’s a recommendation for the look of your folder structure:
Please note that Gemini-1.5-Pro works best with Python versions 3.9 and greater.
2. Get the Google API key
Like other Gemini models, Gemini-1.5-pro-latest is currently free for public use. Accessing it requires that you obtain an API key, which you can get from Google AI Studio by going to “Get API key” in this link. Once the key is generated, copy it for subsequent use in your code. Save this key as an environment variable in the .env file as follows.
GOOGLE_API_KEY="paste the generated key here"
3. Install dependencies
Type the following libraries into your requirements.txt file.
streamlit
google-generativeai
python-dotenv
In the terminal, install the libraries in requirements.txt with:
python -m pip install -r requirements.txt
4. Write the Python script
Now, let’s start writing the Python script in calories.py. With the following code, import all required libraries:
# import the libraries
from dotenv import load_dotenv
import streamlit as st
import os
import google.generativeai as genai
from PIL import Image
Here’s how the various modules imported will be used:
dotenv — Since this application will be configured from a Google API key environment variable, dotenv is used to load configuration from the .env file.
Streamlit — to create an interactive user interface for front-end
os module is used to handle the current working directory while performing file operations like getting the API key from the .env file
google.generativeai module, of course, gives us access to the Gemini model we’re about to use.
PIL is a Python imaging library used for managing image file formats.
The following lines will configure the API keys and load them from the environment variables store.
In the above function, you see that it takes as input, the input prompt that will be specified further down in the script, an image that will be supplied by the user, and a user prompt/question that will be supplied by the user. All that goes into the gemini model to return the response text.
Since Gemini-1.5-pro expects input images in the form of byte arrays, the next thing to do is write a function that processes the uploaded image, converting it to bytes.
def input_image_setup(uploaded_file):
    # Check if a file has been uploaded
    if uploaded_file is not None:
        # Read the file into bytes
        bytes_data = uploaded_file.getvalue()

        image_parts = [
            {
                "mime_type": uploaded_file.type,  # Get the mime type of the uploaded file
                "data": bytes_data
            }
        ]
        return image_parts
    else:
        raise FileNotFoundError("No file uploaded")
Next, specify the input prompt that will determine the behaviour of your app. Here, we are simply telling Gemini what to do with the text and image that the app will be fed with by the user.
input_prompt="""
You are an expert nutritionist.
You should answer the question entered by the user in the input based on the uploaded image you see.
You should also look at the food items found in the uploaded image and calculate the total calories.
Also, provide the details of every food item with calories intake in the format below:

               1. Item 1 - no of calories
               2. Item 2 - no of calories
               ----
               ----

"""
The next step is to initialize streamlit and create a simple user interface for your calorie counter app.
st.set_page_config(page_title="Gemini Calorie Counter App")
st.header("Calorie Counter App")
input=st.text_input("Ask any question related to your food: ",key="input")
uploaded_file = st.file_uploader("Upload an image of your food", type=["jpg", "jpeg", "png"])
image=""
if uploaded_file is not None:
    image = Image.open(uploaded_file)
    st.image(image, caption="Uploaded Image.", use_column_width=True)    #show the image

submit=st.button("Submit & Process")  #creates a "Submit & Process" button
The above steps have all the pieces of the app. At this point, the user is able to open the app, enter a question and upload an image.
Finally, let’s put all the pieces together such that once the “Submit & Process” button is clicked, the user will get the required response text.
# Once submit&Process button is clicked
if submit:
    image_data=input_image_setup(uploaded_file)
    response=get_gemini_reponse(input_prompt,image_data,input)
    st.subheader("The Response is")
    st.write(response)
5. Run the script and interact with your app
Now that the app development is complete, you can execute it in the terminal using the command:
streamlit run calories.py
To interact with your app and see how it performs, view your Streamlit app in your browser using the local url or network URL generated.
Demo images of our Calorie Counter App on a Chrome browser
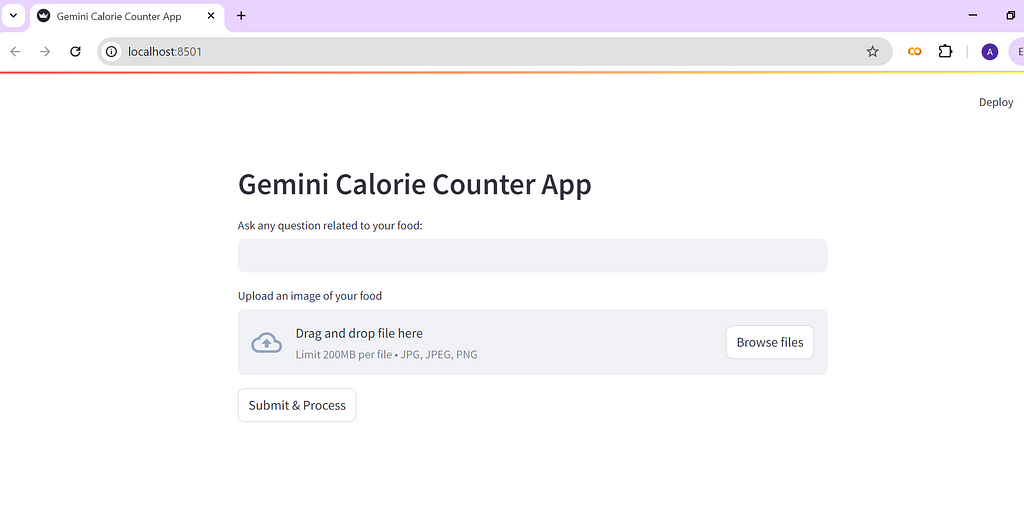
This how your Streamlit app looks like when it is first opened on the browser.
Demo image of the initial display of the Calorie Counter App: Photo by author.
Once the user asks a question and uploads an image, here is the display:
Demo image of the Calorie Counter App with user input question and user uploaded image: Photo by author. The food image loaded in the app: Photo by Odiseo Castrejon on Unsplash
Once the user pushes the “Submit & Process” button, the response in the image below is generated at the bottom of the screen.
Demo image of the Calories Counter App with the generated response: Photo by author
The Next Steps
For external access, consider deploying your app using cloud services like AWS, Heroku, Streamlit Community Cloud. In this case, let’s use Streamlit Community Cloud to deploy the app for free.
On the top right of the app screen, click ‘Deploy’ and follow the prompts to complete the deployment.
After deployment, you can share the generated app URL to other users.
Limitations of the Calorie Counter App
Just like other AI applications, the results outputed are the best estimates of the model, so, before completely relying on the app, please note the following as some of the potential risks:
The calorie counter app may misclassify certain food items and thus, give the wrong number of calories.
The app does not have a reference point to estimate the size of the food — portion — based on the uploaded image. This can lead to errors.
Over-reliance on the app can lead to stress and mental health issues as one may become obsessed with counting calories and worrying about results that may not be too accurate.
Mitigating the limitations of the App
To help reduce the risks that come with using the calorie counter, here are possible enhancements that could be integrated into its development:
Adding contextual analysis of the image, which will help to gauge the size of the food portion being analysed. For instance, the app could be built such that a standard object like a spoon, included in the food image, could be used as a reference point for measuring the sizes of the food items. This will reduce errors in resulting total calories.
Google could improve the diversity of the food items in their training set to reduce misclassification errors. They could expand it to include food from more cultures so that even rare African food items will be identified.
A walkthrough on how to create a RAG chatbot using Langflow’s intuitive interface, integrating LLMs with vector databases for context-driven responses.
A Retrieval-Augmented Generation, or RAG, is a natural language process that involves combining traditional retrieval techniques with LLMs to generate a more accurate and relevant text by integrating the generation properties with the context provided by the retrievals. It has been used widely recently in the context of chatbots, providing the ability for companies to improve their automated communications with clients by using cutting-edge LLM models customized with their data.
Langflow is the graphical user interface of Langchain, a centralized development environment for LLMs. Back in October 2022, Langchain was released and by June 2023 it had become one of the most used open-source projects on GitHub. It took the AI community by storm, specifically for the framework developed to create and customize multiple LLMs with functionalities like integrations with the most relevant text generation and embedding models, the possibility of chaining LLM calls, the ability to manage prompts, the option of equipping vector databases to speed up calculations, and delivering smoothly the outcomes to external APIs and task flows.
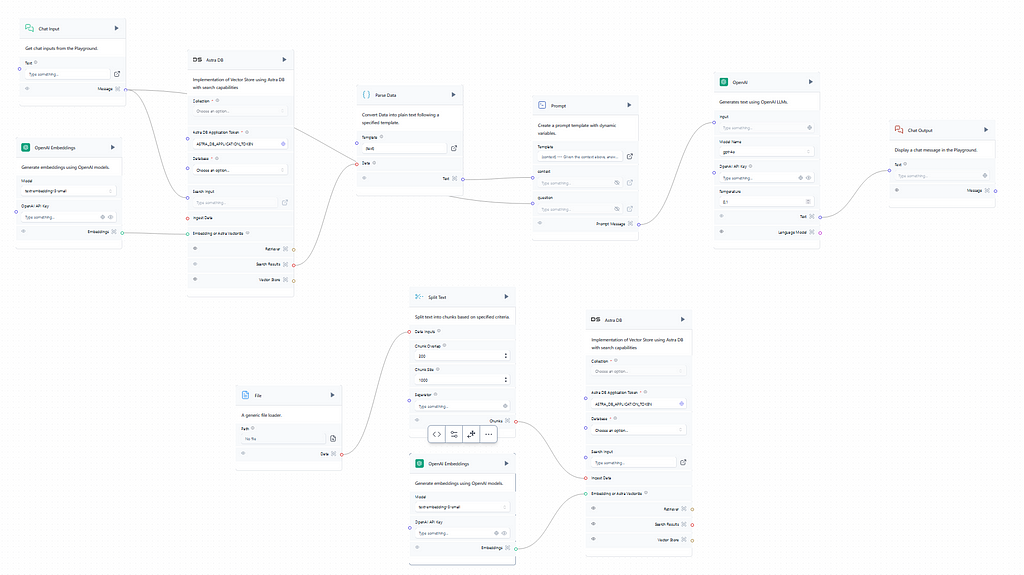
In this article, an end-to-end RAG Chatbot created with Langflow is going to be presented using the famous Titanic dataset. First, the sign-up needs to be made in the Langflow platform, here. To begin a new project some useful pre-built flows can be quickly customizable based on the user needs. To create a RAG Chatbot the best option is to select the Vector Store RAG template. Image 1 exhibits the original flow:
Image 1 — Langflow Vector Store RAG Template Flows. Source: The author.
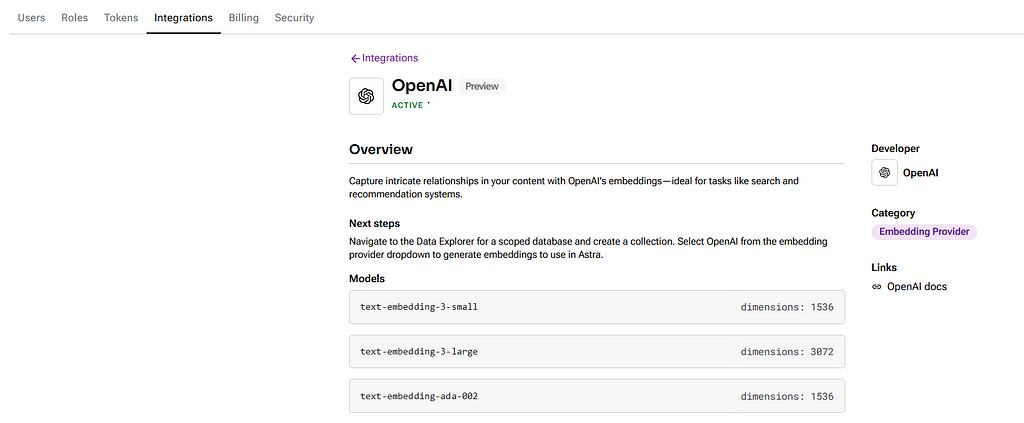
The template has OpenAI preselected for the embeddings and text generations, and those are the ones used in this article, but other options like Ollama, NVIDIA, and Amazon Bedrock are available and easily integrable by just setting up the API key. Before using the integration with an LLM provider is important to check if the chosen integration is active on the configurations, just like in Image 2 below. Also, global variables like API keys and model names can be defined to facilitate the input on the flow objects.
Image 2 — OpenAI Active Integrations and Overview. Source: The author.
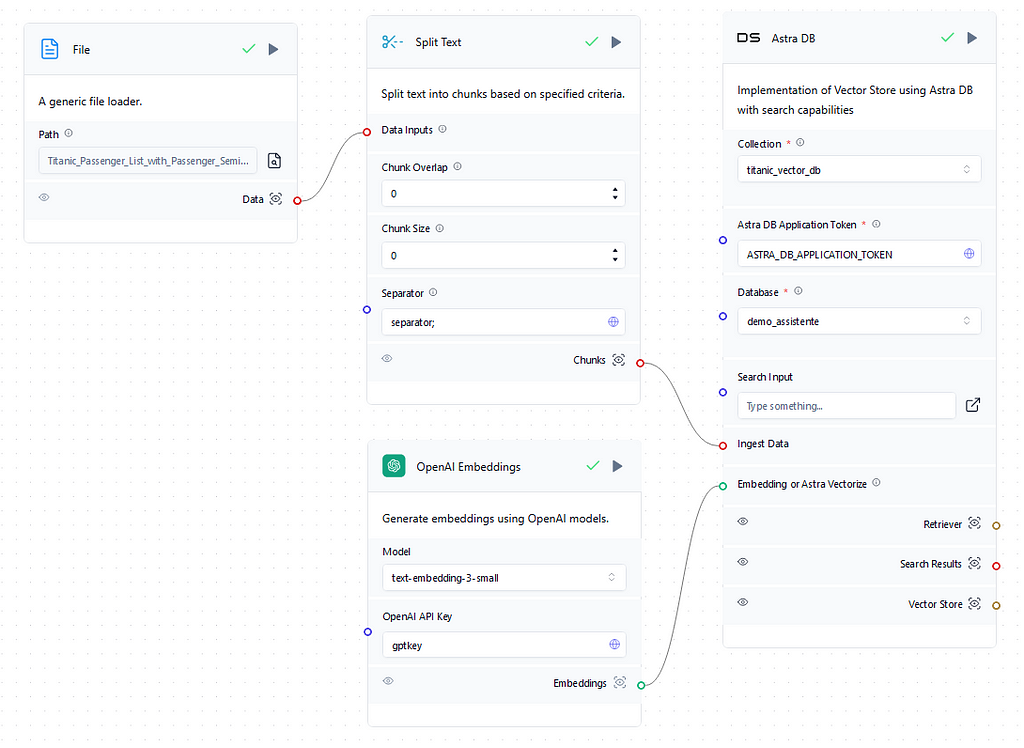
There are two different flows on the Vector Store Rag template, the one below displays the retrieval part of the RAG where the context is provided by uploading a document, splitting, embedding, and then saving it into a Vector Database on Astra DB that can be created easily on the flow interface. Currently, by default, the Astra DB object retrieves the Astra DB application token so it is not even necessary to gather it. Finally, the collection that will store the embedded values in the vector DB needs to be created. The collection dimension needs to match the one from the embedding model, which is available in the documentation, for proper storing of the embedding results. So if the chosen embedding model is OpenAI’s text-embedding-3-small therefore the created collection dimension has to be 1536. Image 3 below presents the complete retrieval flow.
Image 3 — Retrieval Flow From the Titanic Dataset. Source: The author.
The dataset used to enhance the chatbot context was the Titanic dataset (CC0 License). By the end of the RAG process, the chatbot should be able to provide specific details and answer complex questions about the passengers. But first, we update the file on a generic file loader object and then split it using the global variable “separator;” since the original format was CSV. Also, the chunk overlap and chunk size were set to 0 since each chunk will be a passenger by using the separator. If the input file is in straight text format it is necessary to apply the chunk overlap and size setups to properly create the embeddings. To finish the flow the vectors are stored in the titanic_vector_db on the demo_assistente database.
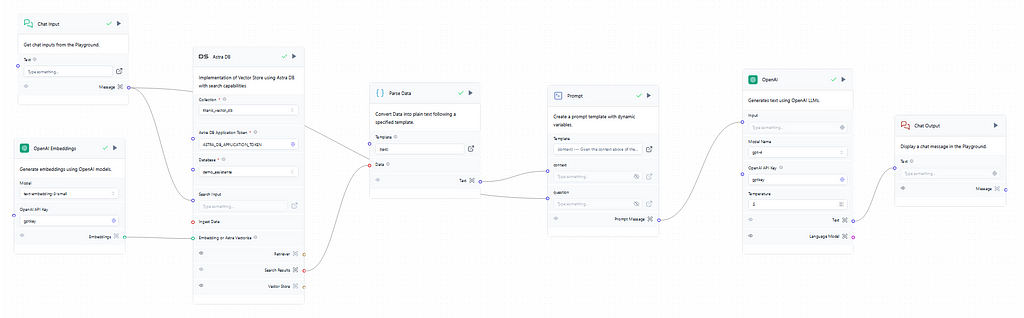
Image 4 — Full Generation Flow. The Author.
Moving to the generation flow of the RAG, displayed in Image 4, it is triggered with the user input on the chat which is then searched into the database to provide context for the prompt later on. So if the user asks something related to the name “Owen” on the input the search will run through the vector DB’s collection looking for “Owen” related vectors, retrieve and run them through the parser to convert them to text, and finally, the context necessary for the prompt later on is obtained. Image 5 shows the results of the search.
Image 5 — Result of the search conducted in the Vector DB to obtain context. Source: The Author.
Back to the beginning, it is also critical to connect again the embedding model to the vector DB using the same model in the retrieval flow to run a valid search, otherwise, it would always come empty since the embedding models used in the retrieval and generation flows then would be different. Furthermore, this step evidences the massive performance benefits of using vector DBs in a RAG, where the context needs to be retrieved and passed to the prompt quickly before forging any type of response to the user.
In the prompt, shown in Image 6, the context comes from the parser already converted to text and the question comes from the original user input. The image below shows how the prompt can be structured to integrate the context with the question.
Image 6 — Prompt that will be passed to the AI model. Source: The Author.
With the prompt written it is time for the text generation model. In this flow, the GPT4 model was chosen with a temperature of 0.5, a recommended standard for chatbots. The temperature controls the randomness of predictions made by a LLM. A lower temperature will generate more deterministic and straightforward answers, leading to a more predictable text. A higher one will generate more creative outputs even though if it is too high the model can easily hallucinate and produce incoherent text. Finally, just set the API key using the global variable with OpenAI’s API key and it’s as easy as that. Then, it’s time to run the flows and check the results on the playground.
Image 7 — Playground showing the result of the RAG Chatbot. Source: The Author.
The conversation in Image 7 clearly shows that the chatbot has correctly obtained the context and rightfully answered detailed questions about the passengers. And even though it might be disappointing to find out that there were not any Rose or Jack on the Titanic, unfortunately, that is true. And that’s it. The RAG chatbot is created, and of course, it can be enhanced to increase conversational performance and cover some possible misinterpretations, but this article demonstrates how easy Langflow makes it to adapt and customize LLMs.
Finally, to deploy the flow there are multiple possibilities. HuggingFace Spaces is an easy way to deploy the RAG chatbot with scalable hardware infrastructure and native Langflow that wouldn’t require any installations. Langflow can also be installed and used through a Kubernetes cluster, a Docker container, or directly in GCP by using a VM and Google Cloud Shell. For more information about deployment look at the documentation.
New times are coming and low-code solutions are starting to set the tone of how AI is going to be developed in the real world in the short future. This article presented how Langflow revolutionizes AI by centralizing multiple integrations with an intuitive UI and templates. Nowadays anyone with basic knowledge of AI can build a complex application that at the beginning of the decade would take a huge amount of code and deep learning frameworks expertise.
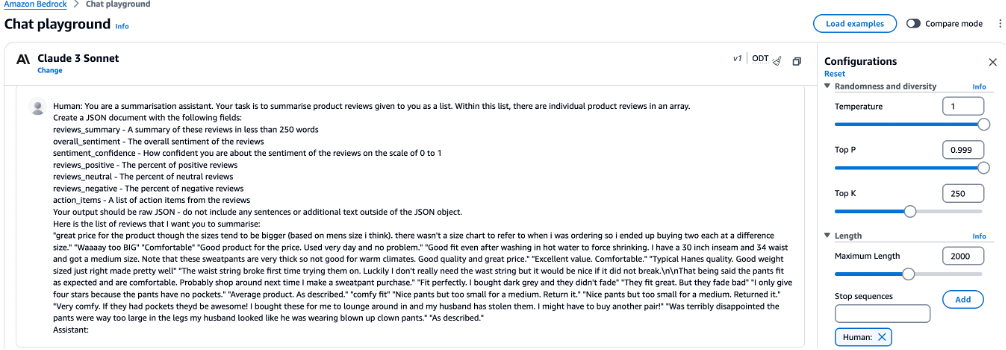
This post explores an innovative application of large language models (LLMs) to automate the process of customer review analysis. LLMs are a type of foundation model (FM) that have been pre-trained on vast amounts of text data. This post discusses how LLMs can be accessed through Amazon Bedrock to build a generative AI solution that automatically summarizes key information, recognizes the customer sentiment, and generates actionable insights from customer reviews. This method shows significant promise in saving human analysts time while producing high-quality results. We examine the approach in detail, provide examples, highlight key benefits and limitations, and discuss future opportunities for more advanced product review summarization through generative AI.
Generative artificial intelligence (AI), particularly Retrieval Augmented Generation (RAG) solutions, are rapidly demonstrating their vast potential to revolutionize enterprise operations. RAG models combine the strengths of information retrieval systems with advanced natural language generation, enabling more contextually accurate and informative outputs. From automating customer interactions to optimizing backend operation processes, these technologies are not just […]
Today, physicians spend about 49% of their workday documenting clinical visits, which impacts physician productivity and patient care. Did you know that for every eight hours that office-based physicians have scheduled with patients, they spend more than five hours in the EHR? As a consequence, healthcare practitioners exhibit a pronounced inclination towards conversational intelligence solutions, […]
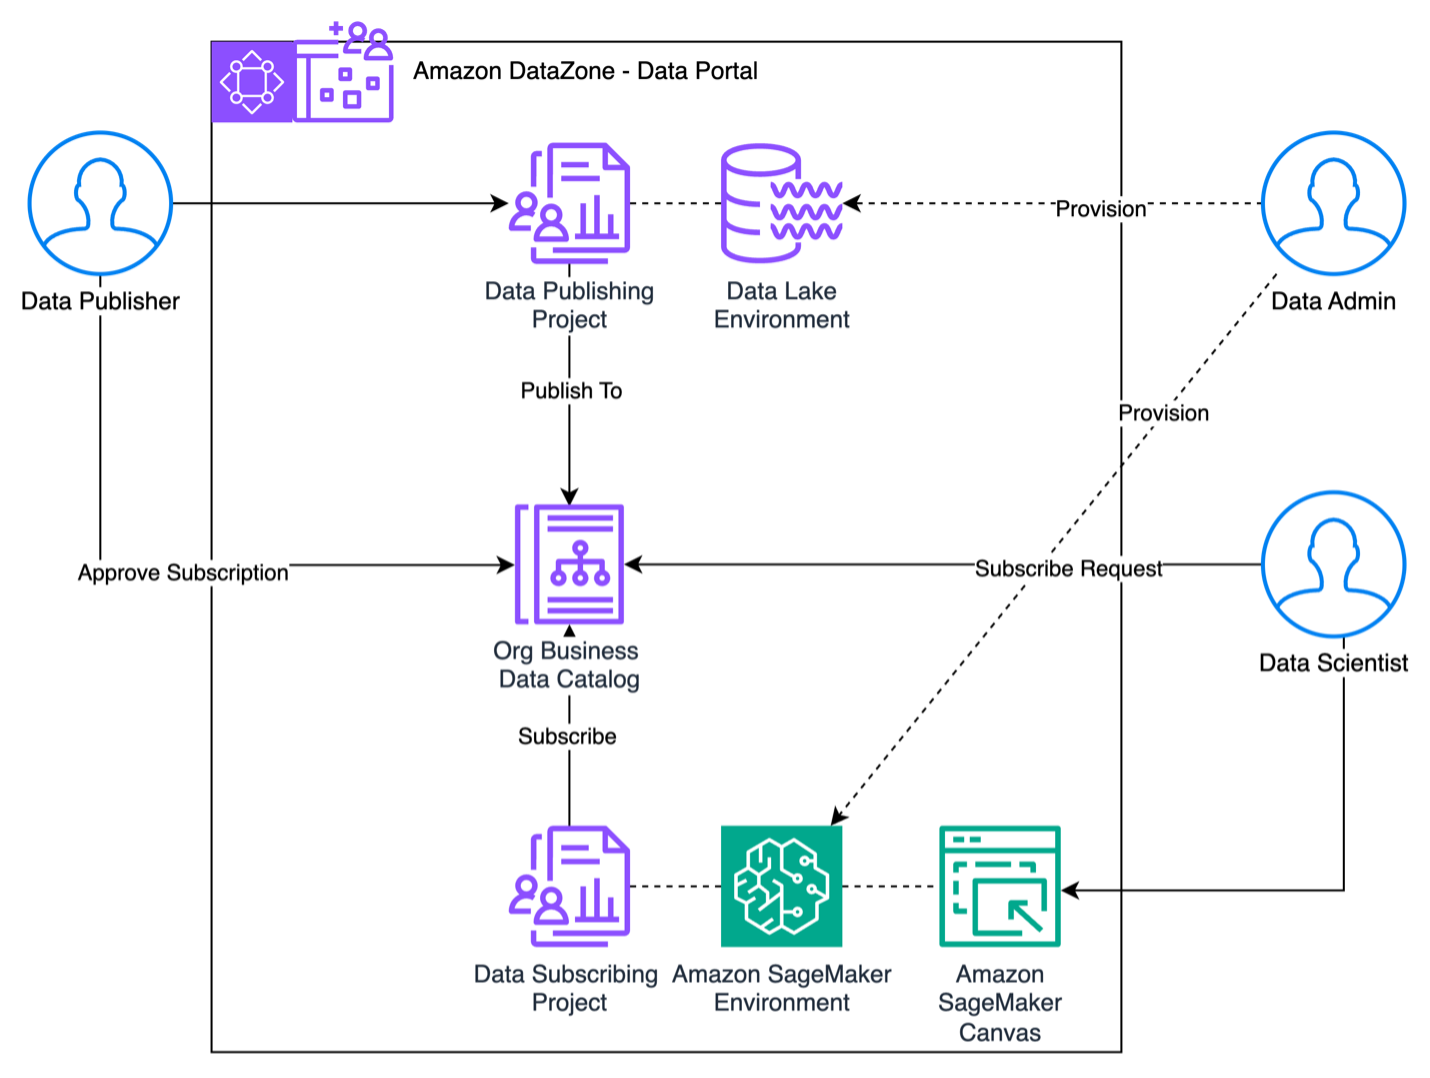
Amazon DataZone is a data management service that makes it quick and convenient to catalog, discover, share, and govern data stored in AWS, on-premises, and third-party sources. Amazon DataZone allows you to create and manage data zones, which are virtual data lakes that store and process your data, without the need for extensive coding or […]
We use cookies on our website to give you the most relevant experience by remembering your preferences and repeat visits. By clicking “Accept”, you consent to the use of ALL the cookies.
This website uses cookies to improve your experience while you navigate through the website. Out of these, the cookies that are categorized as necessary are stored on your browser as they are essential for the working of basic functionalities of the website. We also use third-party cookies that help us analyze and understand how you use this website. These cookies will be stored in your browser only with your consent. You also have the option to opt-out of these cookies. But opting out of some of these cookies may affect your browsing experience.
Necessary cookies are absolutely essential for the website to function properly. These cookies ensure basic functionalities and security features of the website, anonymously.
Cookie
Duration
Description
cookielawinfo-checkbox-analytics
11 months
This cookie is set by GDPR Cookie Consent plugin. The cookie is used to store the user consent for the cookies in the category "Analytics".
cookielawinfo-checkbox-functional
11 months
The cookie is set by GDPR cookie consent to record the user consent for the cookies in the category "Functional".
cookielawinfo-checkbox-necessary
11 months
This cookie is set by GDPR Cookie Consent plugin. The cookies is used to store the user consent for the cookies in the category "Necessary".
cookielawinfo-checkbox-others
11 months
This cookie is set by GDPR Cookie Consent plugin. The cookie is used to store the user consent for the cookies in the category "Other.
cookielawinfo-checkbox-performance
11 months
This cookie is set by GDPR Cookie Consent plugin. The cookie is used to store the user consent for the cookies in the category "Performance".
viewed_cookie_policy
11 months
The cookie is set by the GDPR Cookie Consent plugin and is used to store whether or not user has consented to the use of cookies. It does not store any personal data.
Functional cookies help to perform certain functionalities like sharing the content of the website on social media platforms, collect feedbacks, and other third-party features.
Performance cookies are used to understand and analyze the key performance indexes of the website which helps in delivering a better user experience for the visitors.
Analytical cookies are used to understand how visitors interact with the website. These cookies help provide information on metrics the number of visitors, bounce rate, traffic source, etc.
Advertisement cookies are used to provide visitors with relevant ads and marketing campaigns. These cookies track visitors across websites and collect information to provide customized ads.