Navigating the Changing Product Landscape: From Flashy Demos to Trustworthy AI Solutions that Win Customer Trust.
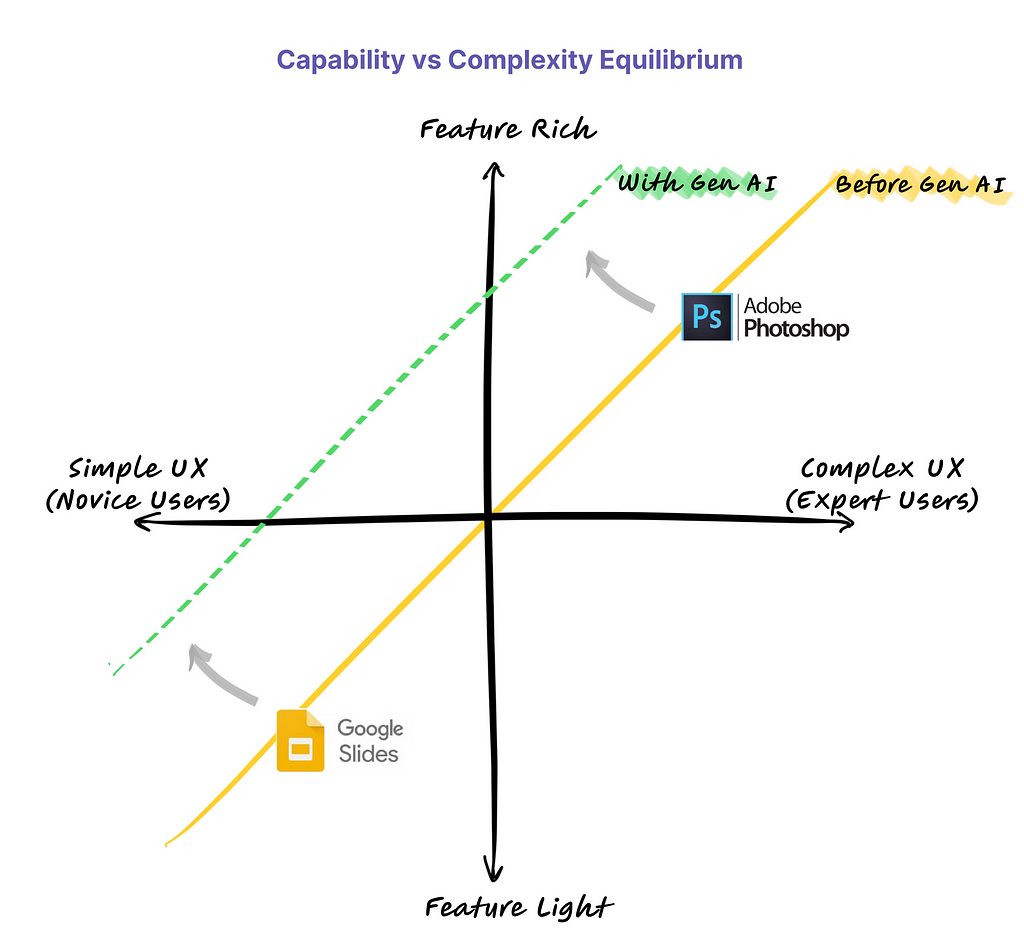
For decades, product builders long accepted a seemingly unbreakable rule: as the capabilities of a product increase, so does its complexity. For users, this has often meant choosing between simplicity and power. Anyone who has grappled with advanced softwares knows the frustration of navigating through countless menus and options to find that one feature they need! It’s the classic trade-off that has, until now, dictated the user experience.
But the rise of generative AI promises to disrupt this trade-off.
Imagine the Adobe Photoshop of yesteryears: while the product boasted a staggering array of rich design features, the product became so complex that only experts could use it. Today, with generative AI, Photoshop can enable users to make requests in plain speech like “remove background” or “make this portrait pop with sharper contrast.” This is a glimpse into how AI is making powerful tools more accessible for everyone.
By interpreting natural language commands, advanced feature-rich products can now make their user experience more accessible and intuitive for users without sacrificing their sophisticated capabilities. Conversely, the existing feature-light products aimed at novice users, which typically favor simple user experience, can now offer a newfound depth of Generative AI capabilities without adding complicating the user interface.
Source: Author
This is the essence of the paradigm shift — where complexity is no longer the cost of capability.
As generative AI redefines the product design landscape, it’s clear that established companies with strong user bases and domain expertise have a head-start. However, success is far from guaranteed.
You can integrate a generative AI API today, but where is the moat?
I have talked with half a dozen product leaders builders just this month. Every believes that paradigm shift of Generative AI has kick started a race. In the end, there will be winners and losers. This article, brings out some of the key strategies that product leaders are leveraging to use Generative AI for delivering a differentiated offerings to their customers.
1. Tailored Experience with Proprietary Domain-Specific Data
In Generative AI, “one size fits all” approach doesn’t make the cut for specialized use cases. Generic foundation models are trained on internet data, which lacks industry-specific nuanced knowledge.
Take large vision models (LVMs) as example. LVMs are typically trained on internet images — which include pictures of pets, people, landmarks and every day objects. However, many practical vision applications (manufacturing, aerial imagery, life sciences, etc.) use images that look nothing like most internet images.
Adapting foundation models with proprietary data can vastly improve performance.
“A large vision model trained with domain-specific data performed 36–52% better than generic models for industry specific use cases.” — Andrew NG, Founder DeepLearning.AI
The narrative is similar for text-based large language models (LLMs). For instance, Bloomberg trained an LLM with proprietary financial data to build BloombergGPT, which outperforms other generic models of similar size on most finance NLP tasks. By augmenting foundation models with proprietary, in-domain data, companies can develop tailored generative AI that understands the nuances of the industry and delivers differentiated experience to meet users’ specialized needs.
2. Solving AI’s “Last Mile” Challenges
For all their impressive abilities, generative AI models are a far from being reliable enough for most real-world applications. This gap between “wow!” demos and dependable deployments is what technologists refer to as the “last mile” problem. Generative AI produces probabilistic output and have tendency to hallucinate. This is a cause of concern in many business, finance, medicine, and other high-stakes use cases. As generative models become more capable, implementing practices to ensure fairness, transparency, privacy, and security grows increasingly important.
The framework below lists various initiatives that leading companies are prioritizing to manage the “last mile” risks pertinent to their industry.
Source: Author
By solving difficult responsible AI challenges unique to their industry, companies can successfully integrate these powerful technologies into critical real-world applications. Leading in AI ethics will earn user trust and gain a competitive advantage.
3. Product Enhancement through Continuous Learning and Personalization
The cornerstone of crafting an exceptional, human-centered user experience is to design products that don’t just respond to users but grows and adapts with them. Leading Generative AI products will implement tight feedback loops between users and AI to enable continuous learning and deliver personalized experience.
“To build an ever-improving AI service, begin with the end-user goals in mind. Build a data-flywheel that continuously captures actionable data points which helps you assess and improve AI to better meet those goals.” — AWS, Director
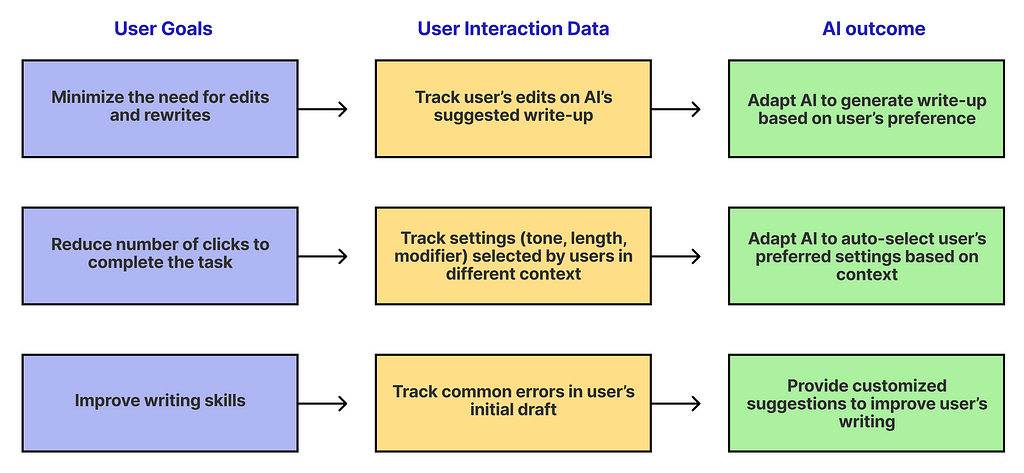
Consider Grammarly, a tool designed to refine and improve users’ writing. It has recently launched Generative AI features to provide users with personalized writing suggestions.
Here’s a conceptual breakdown of how Grammarly can implement feedback loop to enhance its product aligned with different user goals:
Source: Author
A successful implementation requires:
Thoughtful design of feedback loop based on user goals
Logging usage data securely with privacy safeguards
Scalable data infrastructure to fuel AI model adaptation
Testing interfaces to elicit high-quality user feedback
The result is an AI that becomes increasingly customized to individual needs — without compromising privacy.
Prioritizing these human-centered feedback loops creates living products that continuously improve through real user engagement. This cycle of learning will become a core competitive advantage.
4. AI-First Design: Full Stack Optimization with AI at the Core
Realizing the full potential of generative AI requires rethinking user experience from the ground up. Bolting an AI chatbot in the application as an afterthought is unlikely to provide a cohesive experience. This requires cross-functional collaboration and rethinking of interactions across the entire product stack right from the beginning.
“Think from first principles. If you had these generative AI capabilities from the start, how would you design the ideal experience?” — Ideo, Design Lead
Consider a bike repair app. A chatbot that allows users to upload pictures of their bike and receive text instructions can be a good MVP. But the ideal UX will likely be a visual interface where:
user open their camera and point it at the bike
computer vision analyzes visual to highlight relevant parts of the bike
app provides guided instructions on the live camera feed
Source: Author
Delivering this experience requires collaboration across teams:
UX Design: User research and prototyping for computer vision UI
Engineering: Data pipelines, performant APIs, caching for low-latency
Data: Building training/evaluation datasets early to fuel improvement
Science: Ensuring high-accuracy vision models tailored to bike repair
Domain Experts: Insights on bike mechanics and feedback to refine AI
By bringing these perspectives together from the outset, products can deliver fluid, human-centered user experience. Companies leveraging “AI-first” design thinking and full stack product optimization will be best placed to provide differentiated value to their customers.
Conclusion: Shaping the Future of Product Design
As generative AI becomes ubiquitous, product leaders have an enormous opportunity — and responsibility — to shape its impact. Companies who take a human-centered, ethical approach will earn users trust. The key is embracing AI not just for its functionality, but for its potential to augment human creativity and positively transform user experiences. With thoughtful implementation, generative AI can expand access to sophisticated tools, unlock new levels of personalization, and enable products to continuously learn from real-world use.
By keeping the human at the heart of generative product design, forward-thinking companies can form authentic connections with users and deliver truly differentiated value. This human-AI symbiosis is the hallmark of transformative product experiences yet to come.
Thanks for reading! If these insights resonate with you or spark new thoughts, let’s continue the conversation.
Share your perspectives in the comments below or connect with me on LinkedIn.
Resilience plays a pivotal role in the development of any workload, and generative AI workloads are no different. There are unique considerations when engineering generative AI workloads through a resilience lens. Understanding and prioritizing resilience is crucial for generative AI workloads to meet organizational availability and business continuity requirements. In this post, we discuss the […]
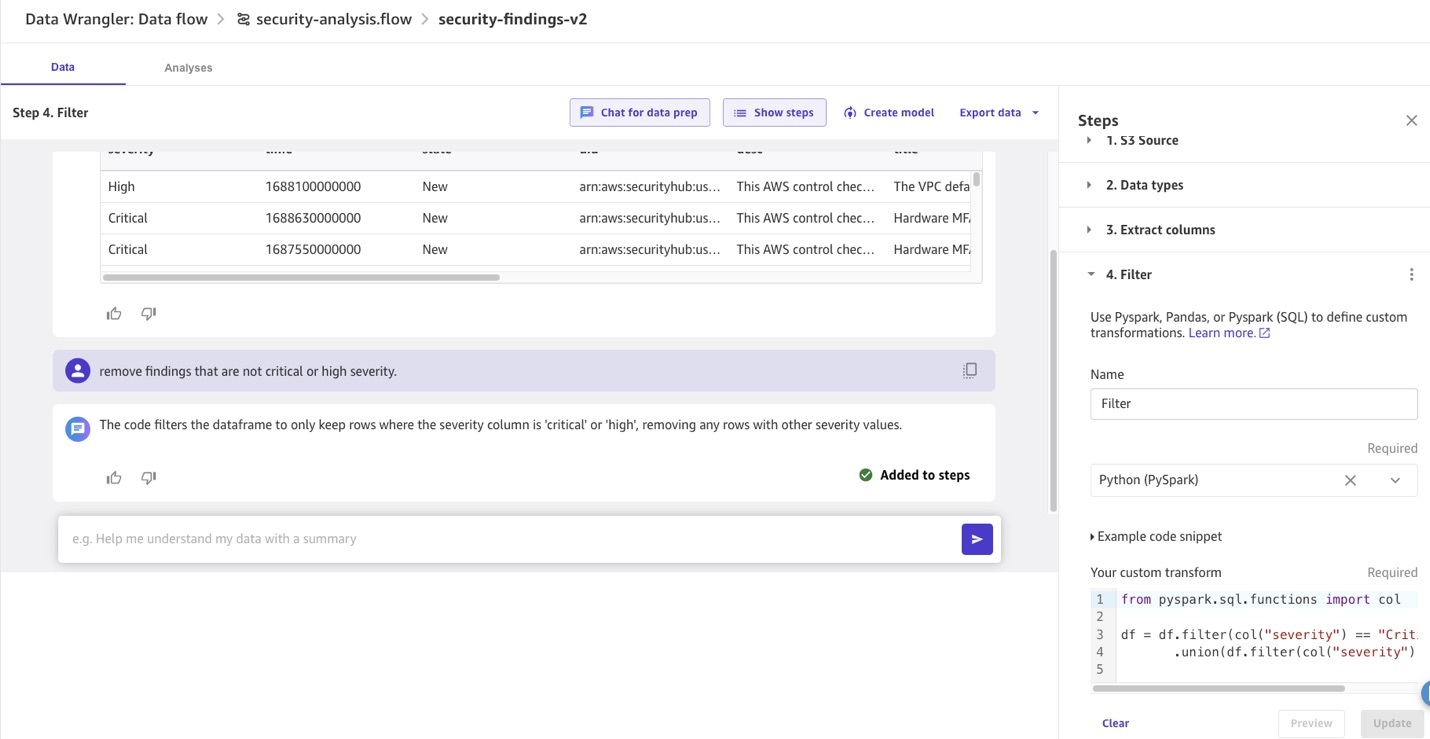
Data is the foundation to capturing the maximum value from AI technology and solving business problems quickly. To unlock the potential of generative AI technologies, however, there’s a key prerequisite: your data needs to be appropriately prepared. In this post, we describe how use generative AI to update and scale your data pipeline using Amazon […]
RAG Efficiency, Self-Learning Tips, the Business of AI, and Other January Must-Reads
By now we may have moved on from “Happy new year!” territory, but January’s jolt of energy and activity is still very much with us. We see it in the posts that have drawn the most readers and generated the liveliest conversations in recent weeks: they tend to focus on teaching oneself new skills, seeking out new opportunities, and gaining greater efficiency in established workflows.
Before we settle into the rhythm of a new month, let’s celebrate our most-read and biggest-splash-making stories from the first few weeks of 2024. As you’ll see, most have a strong practical flavor—whether in implementing RAG or writing better-performing code, among other areas—so we hope you’re still feeling motivated to explore new topics and expand your data science and ML toolkit. Let’s dive in.
How to Learn AI on Your Own (a Self-Study Guide) For those of you who are curious about AI but haven’t had a chance to learn about it in a structured or formal way, Thu Vu’s self-guided roadmap, complete with recommended resources—our most popular article in January!—is one you shouldn’t miss.
How I Became A Data Scientist — No CS Degree, No Bootcamp Another hit among the driven, self-starter members of our community was Egor Howell’s personal account of his career path as a machine learning-focused data professional; it offered many actionable insights for others who’d like to pursue a similar trajectory.
Fine-Tune a Mistral-7b Model with Direct Preference Optimization LLM optimization approaches continue to generate great interest for readers who are experimenting with cutting-edge workflows in their projects. Maxime Labonne has been among the ML professionals leading the charge in this area, including in his recent exploration of direct-preference optimization.
How to Cut RAG Costs by 80% Using Prompt Compression Retrieval-augmented generation probably needs no introduction at this point for anyone tinkering with LLMs. As Iulia Brezeanu shows in her recent article, though, there is still a lot of room for making this approach more cost-effective and sustainable for teams.
This is a sequel to a recent post on the topic of building custom, cloud-based solutions for machine learning (ML) model development using low-level instance provisioning services. Our focus in this post will be on Amazon EC2.
Cloud service providers (CSPs) typically offer fully managed solutions for training ML models in the cloud. Amazon SageMaker, for example, Amazon’s managed service offering for ML development, simplifies the process of training significantly. Not only does SageMaker automate the end-to-end training execution — from auto-provisioning the requested instance types, to setting up the training environment, to running your training workload, to saving the training artifacts and shutting everything down — but it also offers a number of auxiliary services that support ML development, such as automatic model tuning, platform optimized distributed training libraries, and more. However, as is often the case with high-level solutions, the increased ease-of-use of SageMaker training is coupled with a certain level of loss of control over the underlying flow.
In our previous post we noted some of the limitations sometimes imposed by managed training services such as SageMaker, including reduced user privileges, inaccessibility of some instance types, reduced control over multi-node device placement, and more. Some scenarios require a higher level of autonomy over the environment specification and training flow. In this post, we illustrate one approach to addressing these cases by creating a custom training solution built on top of Amazon EC2.
Many thanks to Max Rabin for his contributions to this post.
Poor Man’s Managed Training on Amazon EC2
In our previous post we listed a minimal set of features that we would require from an automated training solution and proceeded to demonstrate, in a step-by-step manner, one way of implementing these in Google Cloud Platform (GCP). And although the same sequence of steps would apply to any other cloud platform, the details can be quite different due to the unique nuances of each one. Our intention in this post will be to propose an implementation based on Amazon EC2 using the create_instances command of the AWS Python SDK (version 1.34.23). As in our previous post, we will begin with a simple EC2 instance creation command and gradually supplement it with additional components that will incorporate our desired management features. The create_instances command supports many controls. For the purposes of our demonstration, we will focus only on the ones that are relevant to our solution. We will assume the existence of a default VPC and an IAM instance profile with appropriate permissions (including access to Amazon EC2, S3, and CloudWatch services).
Note that there are multiple ways of using Amazon EC2 to fulfill the minimal set of features that we defined. We have chosen to demonstrate one possible implementation. Please do not interpret our choice of AWS, EC2, or any details of the specific implementation we have chosen as an endorsement. The best ML training solution for you will greatly depend on the specific needs and details of your project.
1. Create an EC2 Instance
We begin with a minimal example of a single EC2 instance request. We have chosen a GPU accelerated g5.xlarge instance type and a recent Deep Learning AMI (with an Ubuntu 20.4 operating system).
import boto3
region = 'us-east-1' job_id = 'my-experiment' # replace with unique id num_instances = 1 image_id = 'ami-0240b7264c1c9e6a9' # replace with image of choice instance_type = 'g5.xlarge' # replace with instance of choice
The first enhancement we would like to apply is for our training workload to automatically start as soon as our instance is up and running, without any need for manual intervention. Towards this goal, we will utilize the UserData argument of the create_instances API that enables you to specify what to run at launch. In the code block below, we propose a sequence of commands that sets up the training environment (i.e., updates the PATH environment variable to point to the prebuilt PyTorch environment included in our image), downloads our training code from Amazon S3, installs the project dependencies, runs the training script, and syncs the output artifacts to persistent S3 storage. The demonstration assumes that the training code has already been created and uploaded to the cloud and that it contains two files: a requirements file (requirements.txt) and a stand-alone training script (train.py). In practice, the precise contents of the startup sequence will depend on the project. We include a pointer to our predefined IAM instance profile which is required for accessing S3.
import boto3
region = 'us-east-1' job_id = 'my-experiment' # replace with unique id num_instances = 1 image_id = 'ami-0240b7264c1c9e6a9' # replace with image of choice instance_type = 'g5.xlarge' # replace with instance of choice instance_profile_arn = 'instance-profile-arn' # replace with profile arn
Note that the script above syncs the training artifacts only at the end of training. A more fault-tolerant solution would sync intermediate model checkpoints throughout the training job.
3. Self-destruct on Completion
When you train using a managed service, your instances are automatically shut down as soon as your script completes to ensure that you only pay for what you need. In the code block below, we append a self-destruction command to the end of our UserData script. We do this using the AWS CLI terminate-instances command. The command requires that we know the instance-id and the hosting region of our instance which we extract from the instance metadata. Our updated script assumes that our IAM instance profile has appropriate instance-termination authorization.
We highly recommend introducing additional mechanisms for verifying appropriate instance deletion to avoid the possibility of having unused (“orphan”) instances in the system racking up unnecessary costs. In a recent post we showed how serverless functions can be used to address this kind of problem.
4. Apply Custom Tags to EC2 Instances
Amazon EC2 enables you to apply custom metadata to your instance using EC2 instance tags. This enables you to pass information to the instance regarding the training workload and/or the training environment. Here, we use the TagSpecifications setting to pass in an instance name and a unique training job id. We use the unique id to define a dedicated S3 path for our job artifacts. Note that we need to explicitly enable the instance to access the metadata tags via the MetadataOptions setting.
import boto3
region = 'us-east-1' job_id = 'my-experiment' # replace with unique id num_instances = 1 image_id = 'ami-0240b7264c1c9e6a9' # replace with image of choice instance_type = 'g5.xlarge' # replace with instance of choice instance_profile_arn = 'instance-profile-arn' # replace with profile arn
Using metadata tags to pass information to our instances will be particularly useful in the next sections.
5. Write Application Logs to Persistent Storage
Naturally, we require the ability to analyze our application’s output logs both during and after training. This requires that they be periodically synced to persistent logging. In this post we implement this using Amazon CloudWatch. Below we define a minimum JSON configuration file for enabling CloudWatch log collection which we add to our source code tar-ball as cw_config.json. Please see the official documentation for details on CloudWatch setup and configuration.
In practice, we would like the log_stream_name to uniquely identify the training job. Towards that end, we use the sed command to replace the generic “job-id” string with the job id metadata tag from the previous section. Our enhanced script also includes the CloudWatch start up command and modifications for piping the standard output to the designated output.log defined in the CloudWatch config file.
Nowadays, it is quite common for training jobs to run on multiple nodes in parallel. Modifying our instance request code to support multiple nodes is a simple matter of modifying the num_instances setting. The challenge is how to configure the environment in a manner that supports distributed training, i.e., a manner that enables — and optimizes — the transfer of data between the instances.
To minimize the network latency between the instances and maximize throughput, we add a pointer to a predefined cluster placement group in the Placement field of our ec2 instance request. The following command line demonstrates the creation of a cluster placement group.
For our instances to communicate with one another, they need to be aware of each other’s presence. In this post we will demonstrate a minimal environment configuration required for running data parallel training in PyTorch. For PyTorch DistributedDataParallel (DDP), each instance needs to know the IP of the master node, the master port, the total number of instances, and its serial rank amongst all of the nodes. The script below demonstrates the configuration of a data parallel training job using the environment variables MASTER_ADDR, MASTER_PORT, NUM_NODES, and NODE_RANK.
import os, ast, socket import torch import torch.distributed as dist import torch.multiprocessing as mp
if __name__ == '__main__': mp.spawn(mp_fn, args=(), nprocs=torch.cuda.device_count())
The node rank can be retrieved from the ami-launch-index. The number of nodes and the master port are known at the time of create_instances invocation and can be passed in as EC2 instance tags. However, the IP address of the master node is only determined once the master instance is created and can only be communicated to the instances following the create_instances call. In the code block below, we chose to pass the master address to each of the instances using a dedicated call to the AWS Python SDKcreate_tags API. We use the same call to update the name tag of each instance according to its launch-index value.
The full solution for multi-node training appears below:
import boto3
region = 'us-east-1' job_id = 'my-multinode-experiment' # replace with unique id num_instances = 4 image_id = 'ami-0240b7264c1c9e6a9' # replace with image of choice instance_type = 'g5.xlarge' # replace with instance of choice instance_profile_arn = 'instance-profile-arn' # replace with profile arn placement_group = 'cluster-placement-group' # replace with placement group
# download and unpack code aws s3 cp s3://my-s3-path/$JOB_ID/my-code.tar . tar -xvf my-code.tar
# configure cloudwatch sed -i "s/job-id/${JOB_ID}_${NODE_RANK}/g" cw_config.json /opt/aws/amazon-cloudwatch-agent/bin/amazon-cloudwatch-agent-ctl -a fetch-config -m ec2 -c file:cw_config.json -s
# install dependencies python3 -m pip install -r requirements.txt 2>&1 | tee -a output.log
# retrieve master address # should be available but just in case tag application is delayed... while true; do export MASTER_ADDR=$(curl $CURL_FLAGS $INST_MD/tags/instance/MASTER_ADDR) if [[ $MASTER_ADDR == "<?xml"* ]]; then echo 'tags missing, sleep for 5 seconds' 2>&1 | tee -a output.log sleep 5 else break fi done
# run training workload python3 train.py 2>&1 | tee -a output.log
# find master_addr for inst in instances: if inst.ami_launch_index == 0: master_addr = inst.network_interfaces_attribute[0]['PrivateIpAddress'] break
# update ec2 tags for inst in instances: res = ec2.create_tags( Resources=[inst.id], Tags=[ {'Key': 'NAME', 'Value': f'test-vm-{inst.ami_launch_index}'}, {'Key': 'MASTER_ADDR', 'Value': f'{master_addr}'}] )
7. Support Spot Instance Usage
A popular way of reducing training costs is to use discounted Amazon EC2 Spot Instances. Utilizing Spot instances effectively requires that you implement a way of detecting interruptions (e.g., by listening for termination notices) and taking the appropriate action (e.g., resuming incomplete workloads). Below, we show how to modify our script to use Spot instances using the InstanceMarketOptions API setting.
import boto3
region = 'us-east-1' job_id = 'my-spot-experiment' # replace with unique id num_instances = 1 image_id = 'ami-0240b7264c1c9e6a9' # replace with image of choice instance_type = 'g5.xlarge' # replace with instance of choice instance_profile_arn = 'instance-profile-arn' # replace with profile arn placement_group = 'cluster-placement-group' # replace with placement group
Please see our previous posts (e.g., here and here) for some ideas for how to implement a solution for Spot instance life-cycle management.
Summary
Managed cloud services for AI development can simplify model training and lower the entry bar for potential incumbents. However, there are some situations where greater control over the training process is required. In this post we have illustrated one approach to building a customized managed training environment on top of Amazon EC2. Of course, the precise details of the solution will greatly depend on the specific needs of the projects at hand.
As always, please feel free to respond to this post with comments, questions, or corrections.
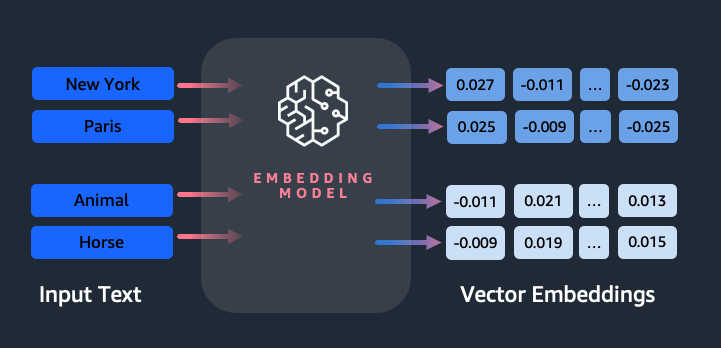
Embeddings play a key role in natural language processing (NLP) and machine learning (ML). Text embedding refers to the process of transforming text into numerical representations that reside in a high-dimensional vector space. This technique is achieved through the use of ML algorithms that enable the understanding of the meaning and context of data (semantic […]
We use cookies on our website to give you the most relevant experience by remembering your preferences and repeat visits. By clicking “Accept”, you consent to the use of ALL the cookies.
This website uses cookies to improve your experience while you navigate through the website. Out of these, the cookies that are categorized as necessary are stored on your browser as they are essential for the working of basic functionalities of the website. We also use third-party cookies that help us analyze and understand how you use this website. These cookies will be stored in your browser only with your consent. You also have the option to opt-out of these cookies. But opting out of some of these cookies may affect your browsing experience.
Necessary cookies are absolutely essential for the website to function properly. These cookies ensure basic functionalities and security features of the website, anonymously.
Cookie
Duration
Description
cookielawinfo-checkbox-analytics
11 months
This cookie is set by GDPR Cookie Consent plugin. The cookie is used to store the user consent for the cookies in the category "Analytics".
cookielawinfo-checkbox-functional
11 months
The cookie is set by GDPR cookie consent to record the user consent for the cookies in the category "Functional".
cookielawinfo-checkbox-necessary
11 months
This cookie is set by GDPR Cookie Consent plugin. The cookies is used to store the user consent for the cookies in the category "Necessary".
cookielawinfo-checkbox-others
11 months
This cookie is set by GDPR Cookie Consent plugin. The cookie is used to store the user consent for the cookies in the category "Other.
cookielawinfo-checkbox-performance
11 months
This cookie is set by GDPR Cookie Consent plugin. The cookie is used to store the user consent for the cookies in the category "Performance".
viewed_cookie_policy
11 months
The cookie is set by the GDPR Cookie Consent plugin and is used to store whether or not user has consented to the use of cookies. It does not store any personal data.
Functional cookies help to perform certain functionalities like sharing the content of the website on social media platforms, collect feedbacks, and other third-party features.
Performance cookies are used to understand and analyze the key performance indexes of the website which helps in delivering a better user experience for the visitors.
Analytical cookies are used to understand how visitors interact with the website. These cookies help provide information on metrics the number of visitors, bounce rate, traffic source, etc.
Advertisement cookies are used to provide visitors with relevant ads and marketing campaigns. These cookies track visitors across websites and collect information to provide customized ads.