

Originally appeared here:
Monte Carlo Methods Decoded
· The Problem
· The Solution
· Use Case
· Step by Step Guide
∘ Step 1: Environment Setup
∘ Step 2: Prepare Private Knowledge and store them into Google Cloud Storage (low code)
∘ Step 3: Create Chatbot and the Data Store sitting behind the Chatbot (no code)
∘ Step 4: Test the Chatbot (no code)
∘ Step 5: Publish / Integrate your Chatbot (low code)
∘ Step 6 (Optional): Publish it through a Beautiful Application (low code)
· What makes this “magic”?
· Some Observations
· Wrap-up
· Enjoyed This Story?
You might have been familiar with AI chats powered by Large Language Model (LLM) such as OpenAI ChatGPT or Google Bard. And you might have noticed one thing — these LLMs have extensive general knowledge about the world, but might not give you satisfactory answers when you ask about a very specific or professional area, especially if the knowledge of this area is not that publicly available or sharable.
Have you thought about “giving” your private knowledge to LLM and creating your own Chatbot?
Do you know this can be done within 5 minutes with no code or low code?
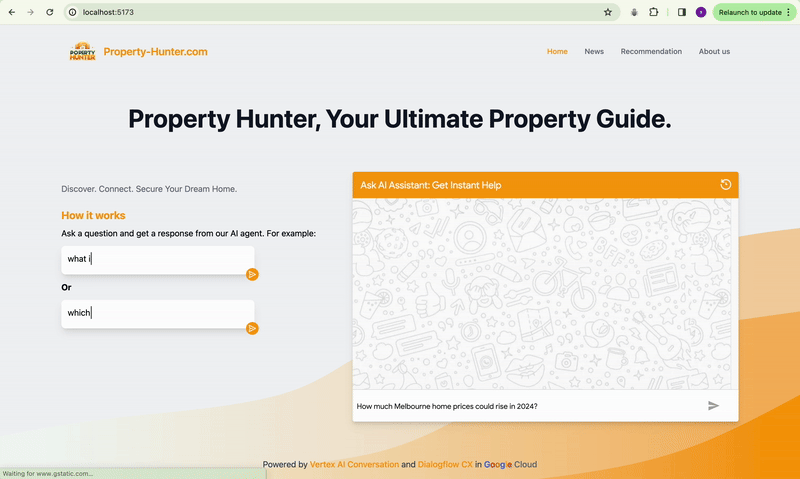
The end product will be like this:
During the Asia Pacific Google Cloud Applied AI Summit, Alan Blount from Google shared an interesting idea of achieving this using Google Cloud Vertex AI Search and Conversation, which I found pretty attractive to try out.
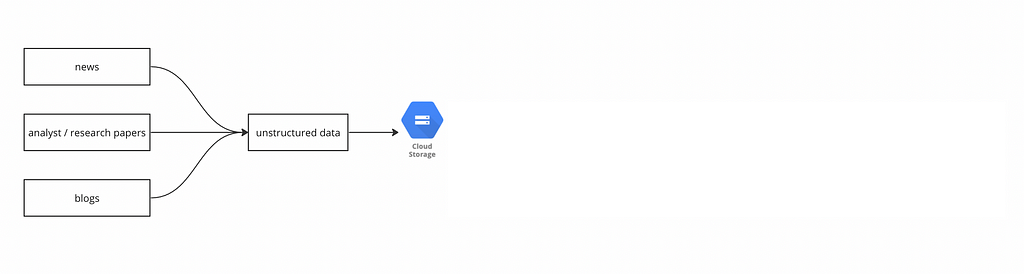
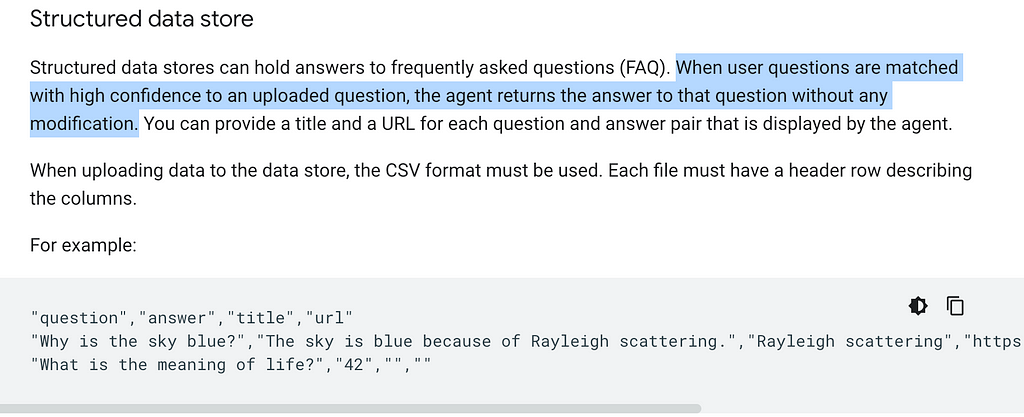
The idea is simple, first put a corpus of private knowledge documents onto Google Cloud Storage:
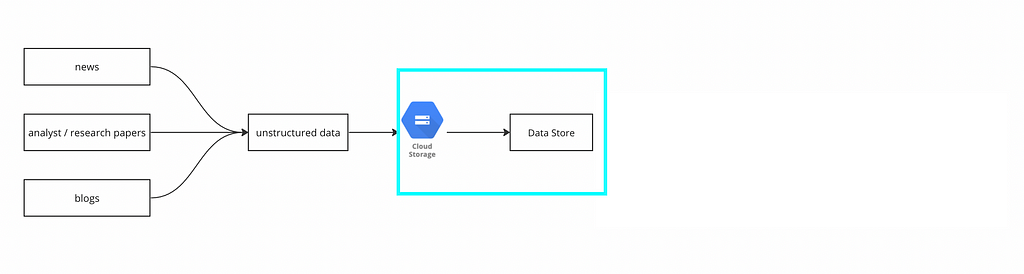
then create a Data Store, and import the documents from the Cloud Storage into the Data Store:
finally plug that Data Store into Dialogflow CX:

then we are done!
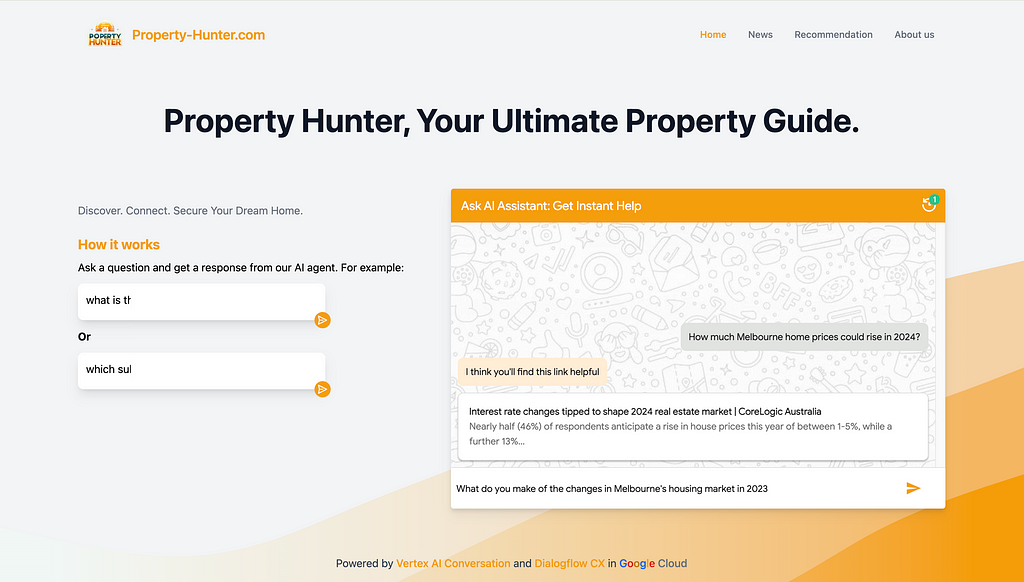
We can test Chatbot like this:

And if we want to publish it through a beautiful application, Google provides a public git repo for a Chat App that we can utilise. With a bit of coding knowledge, we can plug the link of the Dialogflow Chatbot into the Chat App, and customize the interface like this:

OR this:
In this case, assuming I am the owner of an ecommerce website. I would like to create a Chatbot, so my users can ask specific questions regarding anything about this website (price, product, service, shipping, etc.) as they are in the store. The Chatbot will be supplied with the “private knowledge” and ground its answers to the contents of the website.
Given I am not actually owning an ecommerce website, I will take a workaround to crawl contents from an existing website available on the Internet. This is tricky because most websites are anti-scraping as specified in their terms of use, and it could be illegal to scrape ecommerce websites such as Amazon, eBay, Alibaba, etc.
ChatGPT provided me with a perfect option —
Books to Scrape (https://books.toscrape.com/). A simulated bookstore specifically designed for web scraping practice. It offers a straightforward structure for scraping book details like title, price, and rating.
In this use case, I would assume I am the owner of this Books to Scrape website, and create the Chatbot based on it.
This might look a bit lengthy at first glance because it covers every detailed step that you will need. Once you have run through, you can get the same done within 5 minutes.
The tool we are going to use is sitting on Google Vertex AI and we will need a Google Cloud Platform (GCP) account.
Google has a free-tier program to provide new Google Cloud Platform (GCP) users with a 90-day trial period that includes $300 as free Cloud Billing credits.
Follow the tutorial here to set up the free Google Cloud account.
After you have set up Google Cloud account and can access the console, create a storage bucket (step-by-step guide here) for the next step use.
As mentioned above, the private knowledge in this case will be the contents sitting on the book store website.
For owners of ecommerce websites, all you need to do is to provide the website URLs, and Google can automatically crawl website content from a list of domains you define.
Given I am not a real owner, I will resolve this by scrawling. Alan Blount from Google provided a very useful notebook to achieve this. All the code snippet does is to scrawl webpages from the website that you specified and store them in a Google Cloud Storage bucket that you specified.
This is all you need to do:
2.1 Save a copy of the notebook in your own drive
Recall that in step 2 you have created a new Google account when you registered for Google Cloud? Your Google account will have Google Drive and you can save a copy of this notebook to your drive.
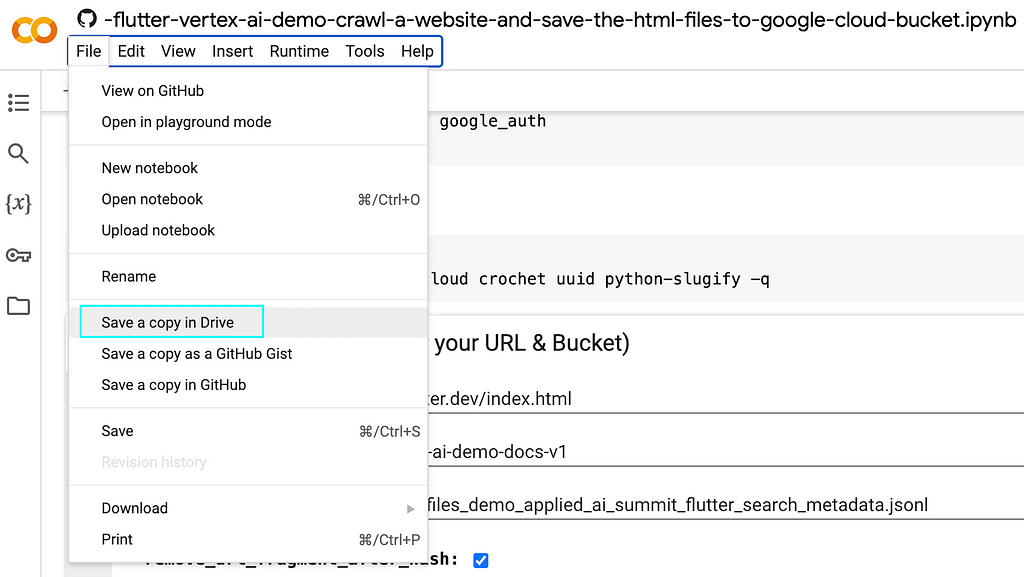
Select “Save a copy in Drive” option from the dropdown menu of “File”
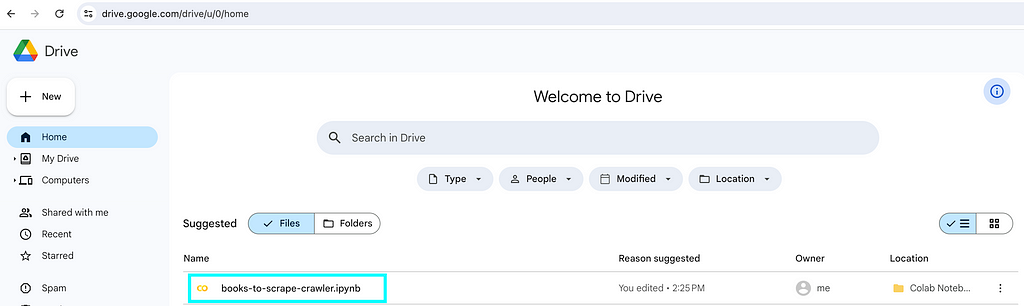
Then if you go to Google Drive, you will be able to see the notebook you created. Feel free to rename it according to your need.
2.2 On your own notebook, locate the below and specify
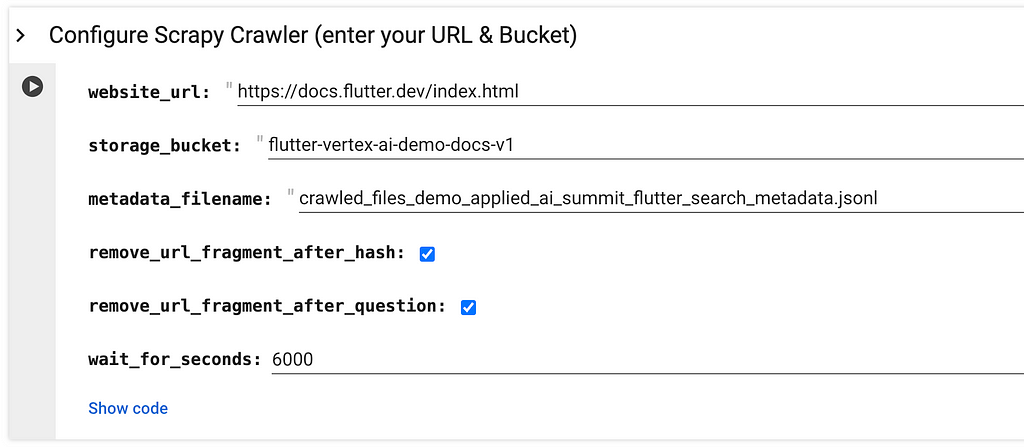
website_url refers to the website page URL that you would like to scrawl.
storage_bucket refers to the Google Cloud Storage that you created in above step 1.
metadata_filename refers to a json file that will be created and stored together with the webpages. You might want to make it relevant to your website by changing applied_ai_summit_flutter_search to something that can describe your use case.
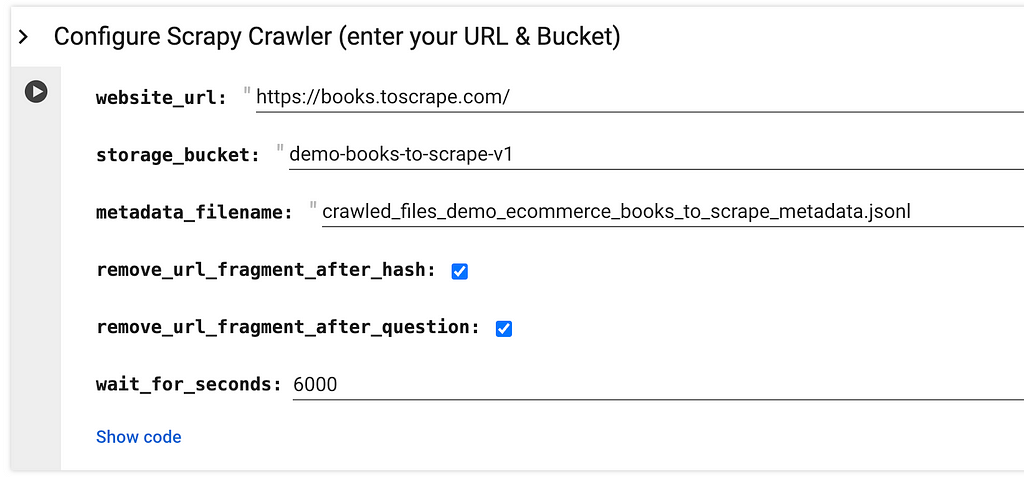
This is my version:
2.3 Run all
2.4 When it prompts you to authenticate the Google Colab notebook to access your Google credentials, click “Allow” -> “Continue”

Then the script should run through and show the progress of the scrawling at the bottom, just like this:
And if you refer to your Google Cloud storage bucket, you will see these html files get scrawled and stored properly within your bucket:
One thing to notice is that the code snippet is not designed for every use case, and you might need some slight tuning of the codes to achieve your goal.
For example, in my case, I tuned the code a bit by changing
blob.upload_from_string(html_string)
into
blob.upload_from_string(html_string, content_type='text/html')
By default the html_string will be uploaded as text/plain . By changing into text/html , I would like to enable this HTML contents to show properly in a later stage.
You can tune the code as much as you like.
Go to Google Cloud Console (https://console.cloud.google.com/) and type “search and conversation” as the service:

Create “NEW APP”:

Select “Chat”:
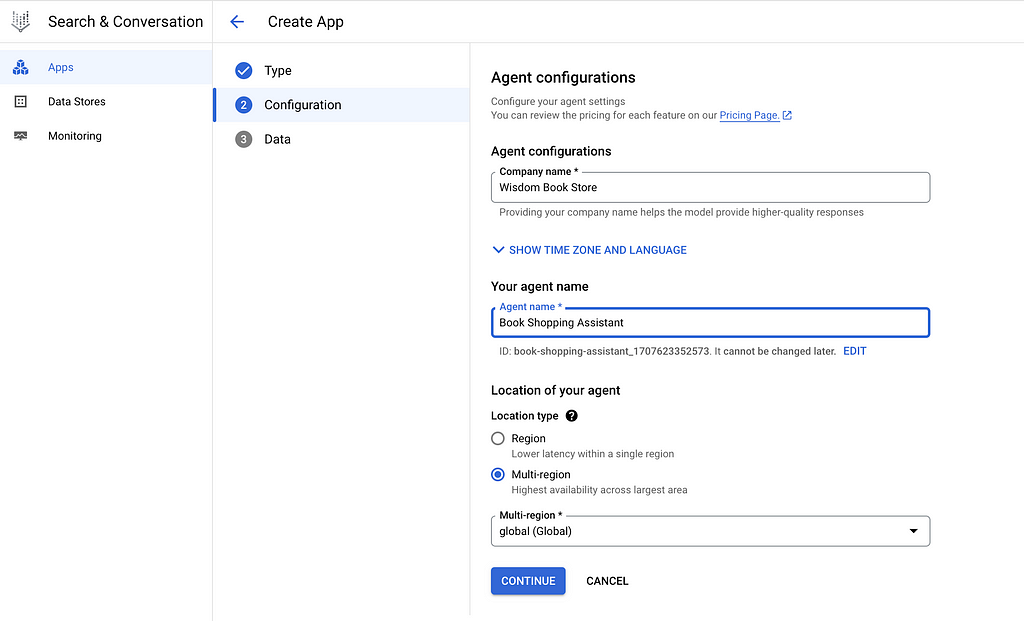
Provide your “Company name” and “Agent name”. Note that the “Agent name” here will be the name of the Chatbot, you might want to put a good name for your users.
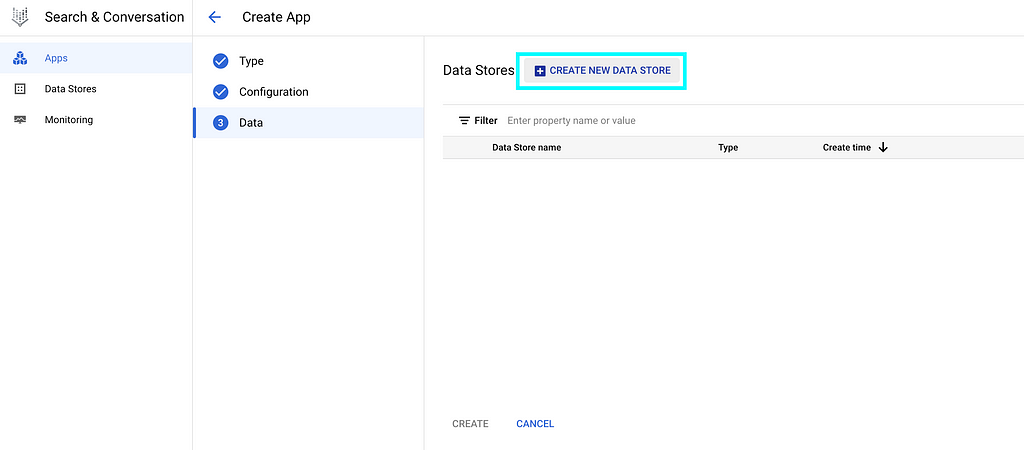
At this “Data” page, select “CREATE NEW DATA STORE”:
For owners of ecommerce websites, select “Website URLs” and provision your website URLs
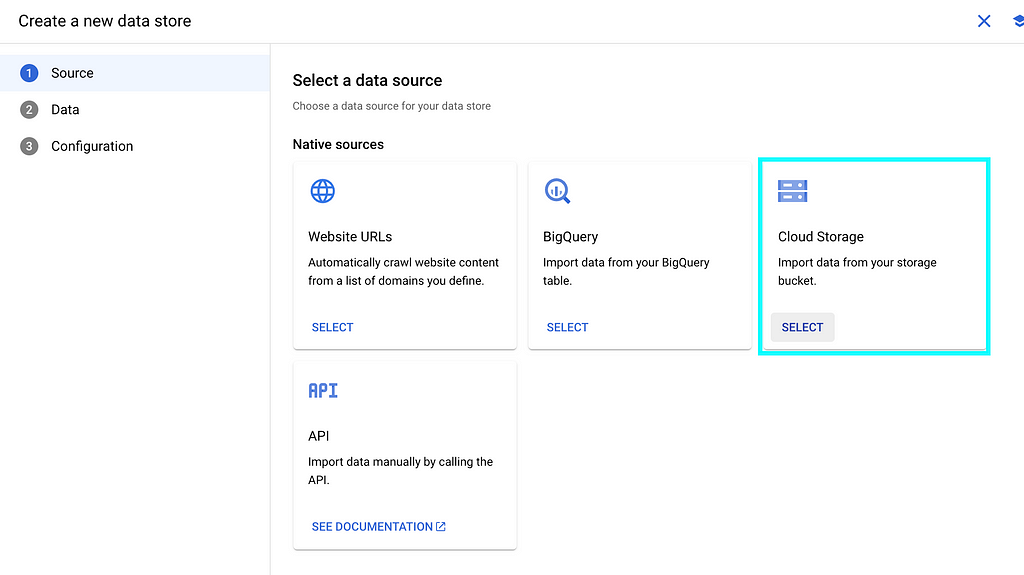
As I have scrawled the website contents into Cloud Storage, we can select “Cloud Storage” here:
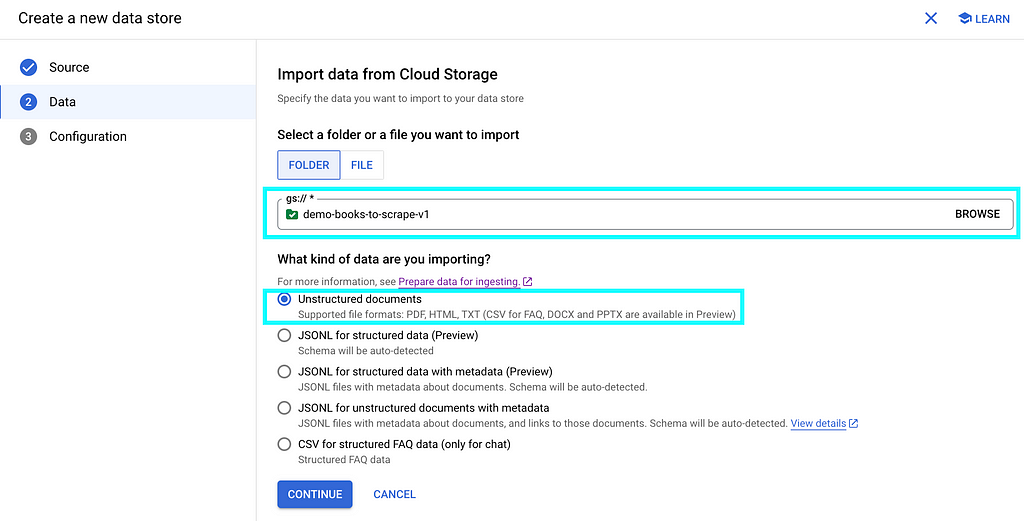
Specify the Cloud Storage bucket name, and select “Unstructured documents” in below:
Give your data store a name, then “CREATE”
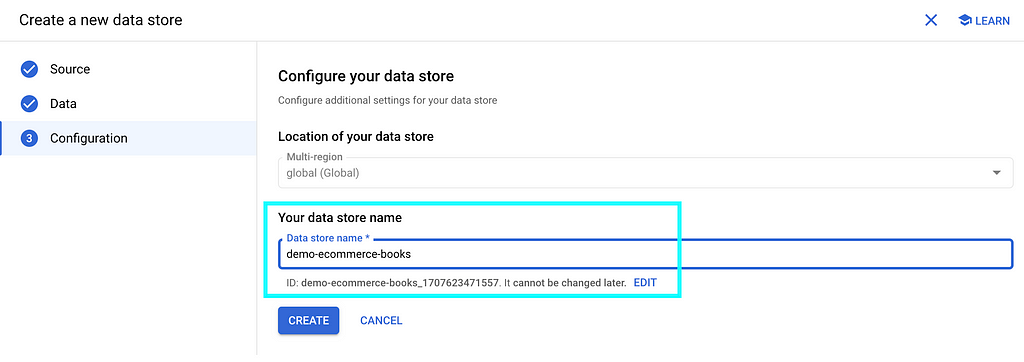
You will see your data store listed, then “CREATE”

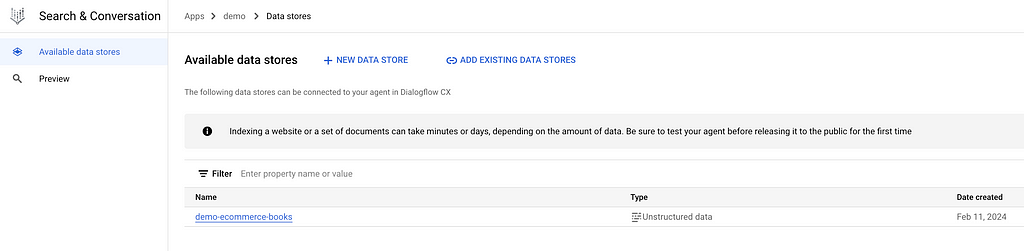
Your data store will be created as below
If you click into it, you will see your data store is “processing data” by importing documents from the Cloud Storage bucket that we specified earlier:

If we click the “ACTIVITY” tab, we can see the import is in progress:

Import will take minutes to hours depending on the number of documents in your Cloud Storage bucket.
In my case, I have over 1,000 files and it finishes within minutes.
After import is completed, the status as highlighted has changed:

And if you switch back to the “DOCUMENTS” tab, you will see the list of files imported into the data store:

That means you’ve got all the materials and you are ready to cook!
In step 3 above, we have already created a Chatbot app as well as the data store sitting behind it.
Click “Apps” on the top:

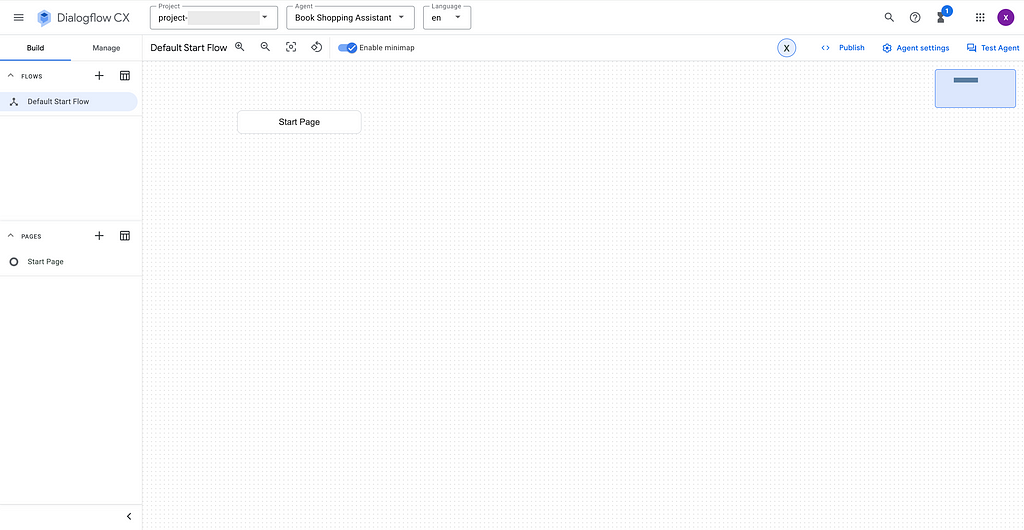
You will see the Chatbot you created in the previous step 3:

If you click into the Chatbot name, you will be directed to the Dialogflow CX page like below:
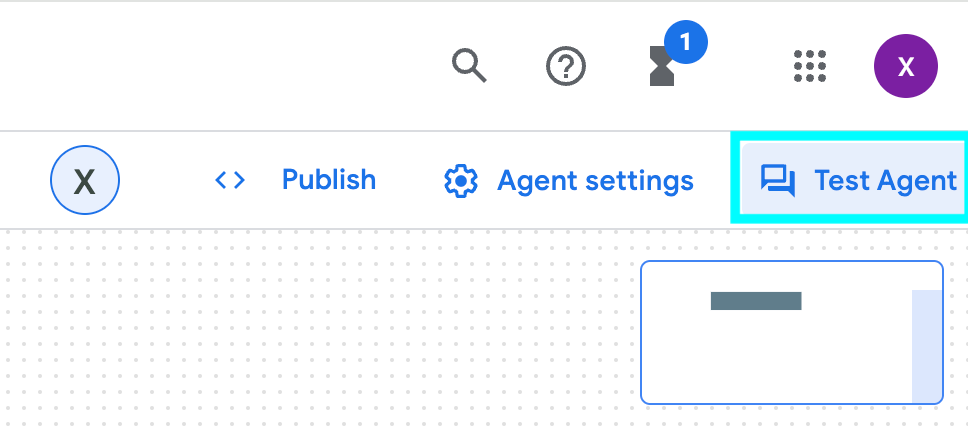
To test the Chatbot, select “Test Agent” in the right up corner:
And the dialogue box will pop up:
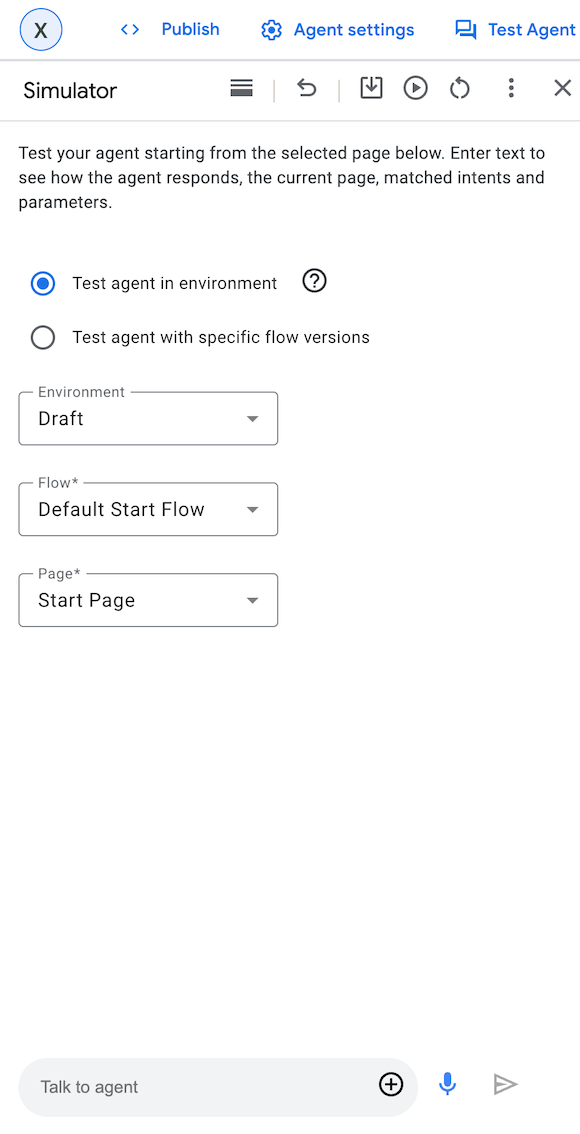
You can start the conversation by saying “hi” and start asking questions to the Chatbot:
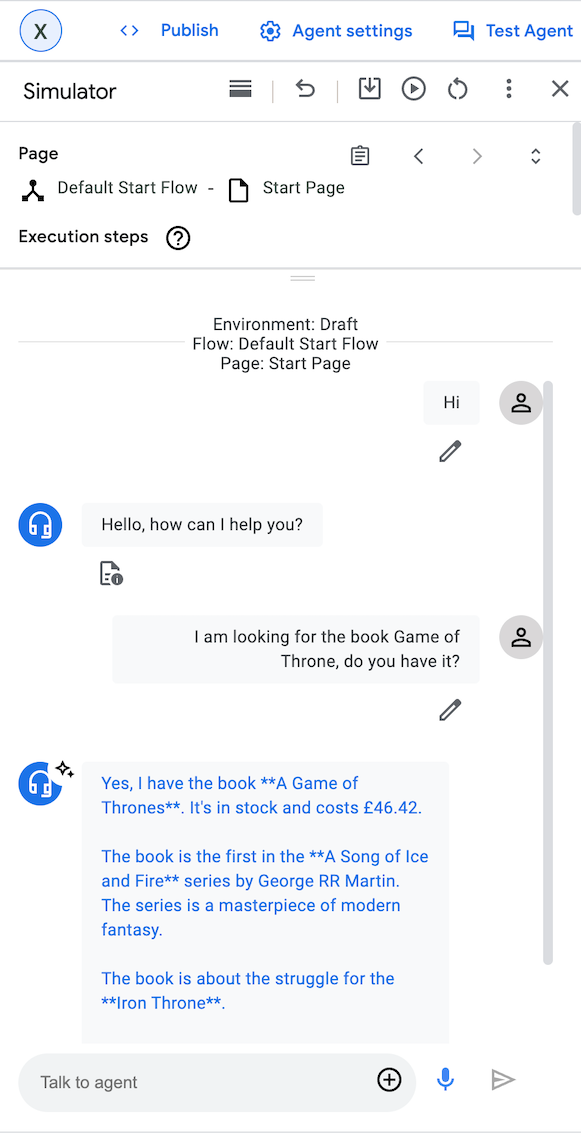
It works!
If you are happy with the Chatbot, it is easy to integrate it with your web application
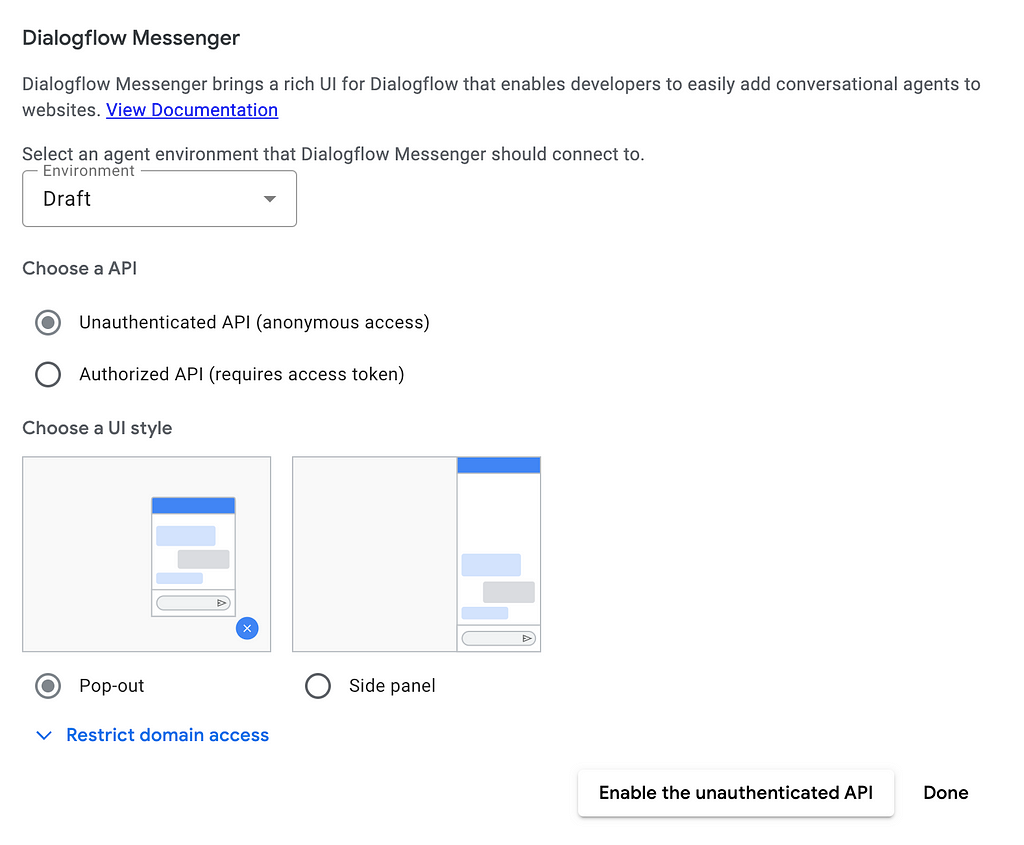
Go to the left pane, select “Manage” -> “Integrations” -> “Dialogflow Messenger”

You can choose the type of API and UI style according to your needs
For demo purpose, I selected “Unauthenticated API” as API and “Pop-out” as UI style:
After selecting “Done”, a code snippet in HTML will be generated in the next page as below:
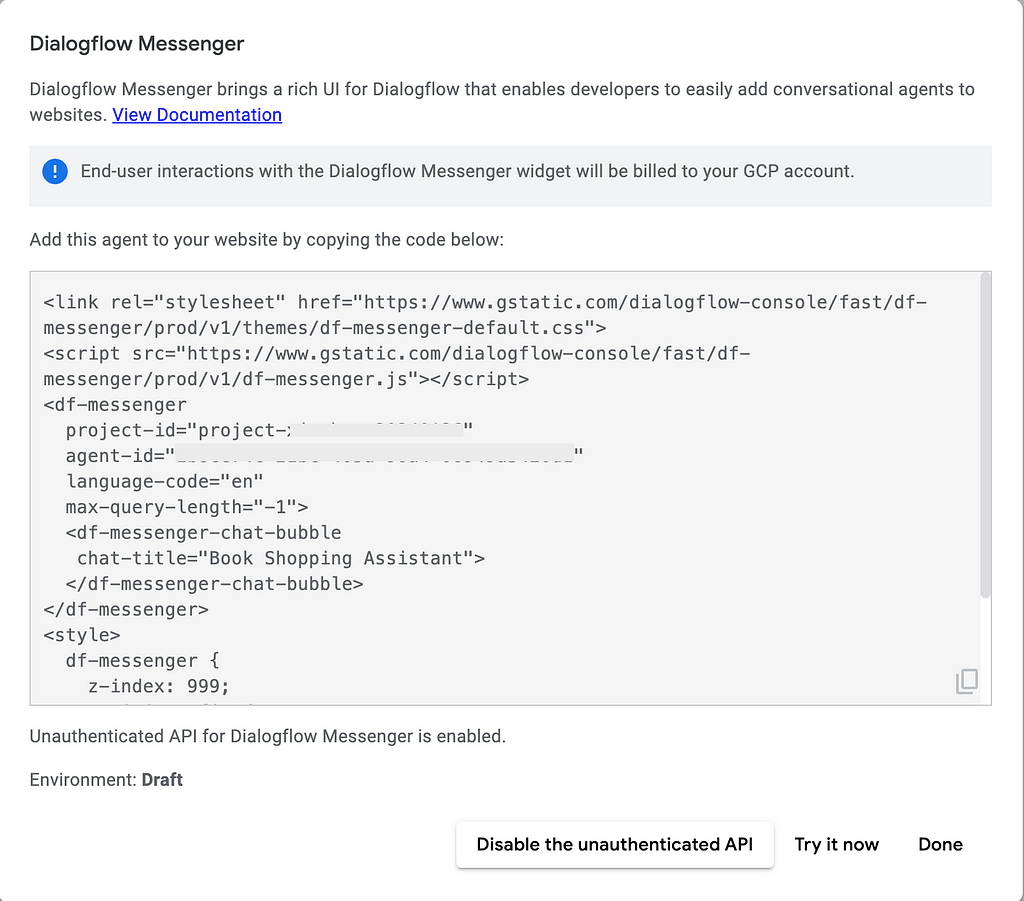
You may copy the code snippet and easily paste it into your applications for integration.
For demo purpose, I copy paste this HTML snippet into JSFiddle and run it, then I am getting my little Chatbot working as shown in the right down corner!
In case you don’t have an application yet and you want to have one, Google provides a good starting point through a public git repository Chat App.
This is a Chatbot Application written in Node.js and you can easily adapt it for your own use by changing the code snippets a bit within chat-app/src/routes/+page.svelte .
You will need to change the project-id, agent-id and chat-title into yours.
And once you run/deploy the app, you will get the web UI like this:
Of course you can change the appearance of the UI as you like.
Now you can have your own application!
Recalling the solution design that we mentioned at the beginning. This looks a bit magic as you can get your own LLM powered Chatbot by simply supplying your private knowledge to a Google Cloud Storage bucket.
This is achieved as Google has done quite a bit of integrations behind the scene, by integrating Vertex AI platform with the chatbot agent service Dialogflow CX, and coming up with a new abstraction called Vertex AI Conversation (formerly Gen App Builder). This new abstraction also supports Search and Recommend, and the full name of this service is “Vertex AI Search and Conversation”.
As we can see, this new abstraction of “Vertex AI Search and Conversation” is sitting on top of Vertex AI which has orchestrated a bunch of foundation models, and gets “augmented” by user-supplied updated real world information, so it can contextualize its responses to these information.
The integration is great as it can help at least two groups of people —
Imagine you are a traditional Chatbot builder using Dialogflow CX, you are creating pages, intents and routes to route customer intentions to the corresponding page. Basically you are defining “if customer say this then I respond with this” which is a bit hard-coding. Now Google plugs in Vertex AI which can utilise LLM models (e.g. text-bison, gemini) to generate agent responses and control conversation flow in a much smarter way. This can significantly reduce agent design time and improve agent quality.
On the other hand, image you are exploring the power of LLMs and Generative AI but not sure what to do with it. This Vertex AI Conversation feature can enable you to easily build and launch your own Chatbot applications quickly and make them available for real use case. This can significantly shorten the go-to-market time of LLM and GenAI solutions.
Despite the “magic” as it appears, we observed several things worth sharing with developers who are considering use this “Vertex AI Search and Conversation” feature.
Our gut feeling is this is a new product Google brought in by “integrating” several existing tools and is still working towards making it better. It lacks clarity how the integration happens behind the scene, and how developers can best understand and configure it.
I got our chatbot very quickly but once I started looking at how to fine tune it, it took me quite a bit of time to figure out how Dialogflow CX works, what is “generator” and how it works. At this moment I’m still confused why this Chatbot works so great without me even configuring any “generator” as described in Google doc, and whether/how we can make it better by using “generator”.
Some other observations during the development:

In the above use case, I assume I am an online book store owner and created a Chatbot based on my e-commerce website contents in HTML.
Similarly, you can supply “private knowledge” in the format of blogs, files (e.g. PDF, HTML, TXT) and all kinds of websites to the Google Cloud Storage, and create your own Chatbot.
This enables individuals / businesses to fully utilize the power of the Google LLMs (text-bison, gemini, etc.) and augment it with private knowledge, and create own Chatbots in a very quick manner.
This marks the end of this article. Hope you find it helpful!
(PS: I am working on a video to make this step-by-step guide easier to follow. Will share if I get it done in near future.)
Selina Li (Selina Li, LinkedIn) is a Principal Data Engineer working at Officeworks in Melbourne Australia. Selina is passionate about AI/ML, data engineering and investment.
Jason Li (Tianyi Li, LinkedIn) is a Full-stack Developer working at Mindset Health in Melbourne Australia. Jason is passionate about AI, front-end development and space related technologies.
Selina and Jason would love to explore technologies to help people achieve their goals.
Unless otherwise noted, all images are by the authors.
How to Build Your Own Google AI Chatbot Within 5 Minutes was originally published in Towards Data Science on Medium, where people are continuing the conversation by highlighting and responding to this story.
Originally appeared here:
How to Build Your Own Google AI Chatbot Within 5 Minutes
Go Here to Read this Fast! How to Build Your Own Google AI Chatbot Within 5 Minutes
· The Problem
· The Solution
· Use Case
· Step by Step Guide
∘ Step 1: Environment Setup
∘ Step 2: Prepare Private Knowledge and store them into Google Cloud Storage (low code)
∘ Step 3: Create Chatbot and the Data Store sitting behind the Chatbot (no code)
∘ Step 4: Test the Chatbot (no code)
∘ Step 5: Publish / Integrate your Chatbot (low code)
∘ Step 6 (Optional): Publish it through a Beautiful Application (low code)
· What makes this “magic”?
· Some Observations
· Wrap-up
· Enjoyed This Story?
You might have been familiar with AI chats powered by Large Language Model (LLM) such as OpenAI ChatGPT or Google Bard. And you might have noticed one thing — these LLMs have extensive general knowledge about the world, but might not give you satisfactory answers when you ask about a very specific or professional area, especially if the knowledge of this area is not that publicly available or sharable.
Have you thought about “giving” your private knowledge to LLM and creating your own Chatbot?
Do you know this can be done within 5 minutes with no code or low code?
The end product will be like this:
During the Asia Pacific Google Cloud Applied AI Summit, Alan Blount from Google shared an interesting idea of achieving this using Google Cloud Vertex AI Search and Conversation, which I found pretty attractive to try out.
The idea is simple, first put a corpus of private knowledge documents onto Google Cloud Storage:
then create a Data Store, and import the documents from the Cloud Storage into the Data Store:
finally plug that Data Store into Dialogflow CX:
then we are done!
We can test Chatbot like this:
And if we want to publish it through a beautiful application, Google provides a public git repo for a Chat App that we can utilise. With a bit of coding knowledge, we can plug the link of the Dialogflow Chatbot into the Chat App, and customize the interface like this:
OR this:
In this case, assuming I am the owner of an ecommerce website. I would like to create a Chatbot, so my users can ask specific questions regarding anything about this website (price, product, service, shipping, etc.) as they are in the store. The Chatbot will be supplied with the “private knowledge” and ground its answers to the contents of the website.
Given I am not actually owning an ecommerce website, I will take a workaround to crawl contents from an existing website available on the Internet. This is tricky because most websites are anti-scraping as specified in their terms of use, and it could be illegal to scrape ecommerce websites such as Amazon, eBay, Alibaba, etc.
ChatGPT provided me with a perfect option —
Books to Scrape (https://books.toscrape.com/). A simulated bookstore specifically designed for web scraping practice. It offers a straightforward structure for scraping book details like title, price, and rating.
In this use case, I would assume I am the owner of this Books to Scrape website, and create the Chatbot based on it.
This might look a bit lengthy at first glance because it covers every detailed step that you will need. Once you have run through, you can get the same done within 5 minutes.
The tool we are going to use is sitting on Google Vertex AI and we will need a Google Cloud Platform (GCP) account.
Google has a free-tier program to provide new Google Cloud Platform (GCP) users with a 90-day trial period that includes $300 as free Cloud Billing credits.
Follow the tutorial here to set up the free Google Cloud account.
After you have set up Google Cloud account and can access the console, create a storage bucket (step-by-step guide here) for the next step use.
As mentioned above, the private knowledge in this case will be the contents sitting on the book store website.
For owners of ecommerce websites, all you need to do is to provide the website URLs, and Google can automatically crawl website content from a list of domains you define.
Given I am not a real owner, I will resolve this by scrawling. Alan Blount from Google provided a very useful notebook to achieve this. All the code snippet does is to scrawl webpages from the website that you specified and store them in a Google Cloud Storage bucket that you specified.
This is all you need to do:
2.1 Save a copy of the notebook in your own drive
Recall that in step 2 you have created a new Google account when you registered for Google Cloud? Your Google account will have Google Drive and you can save a copy of this notebook to your drive.
Select “Save a copy in Drive” option from the dropdown menu of “File”
Then if you go to Google Drive, you will be able to see the notebook you created. Feel free to rename it according to your need.
2.2 On your own notebook, locate the below and specify
website_url refers to the website page URL that you would like to scrawl.
storage_bucket refers to the Google Cloud Storage that you created in above step 1.
metadata_filename refers to a json file that will be created and stored together with the webpages. You might want to make it relevant to your website by changing applied_ai_summit_flutter_search to something that can describe your use case.
This is my version:
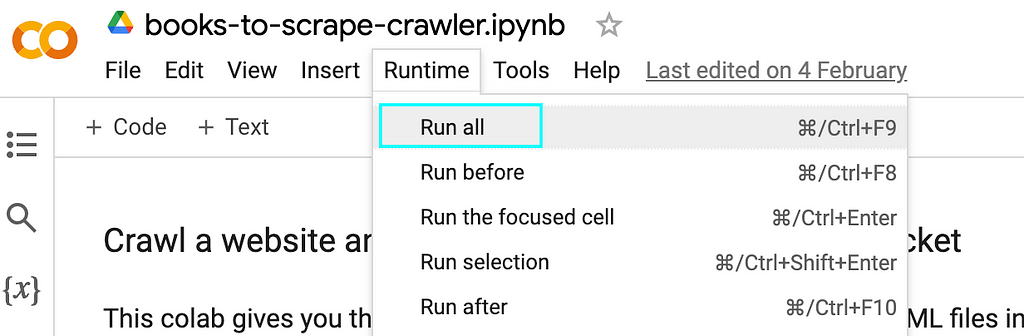
2.3 Run all
2.4 When it prompts you to authenticate the Google Colab notebook to access your Google credentials, click “Allow” -> “Continue”
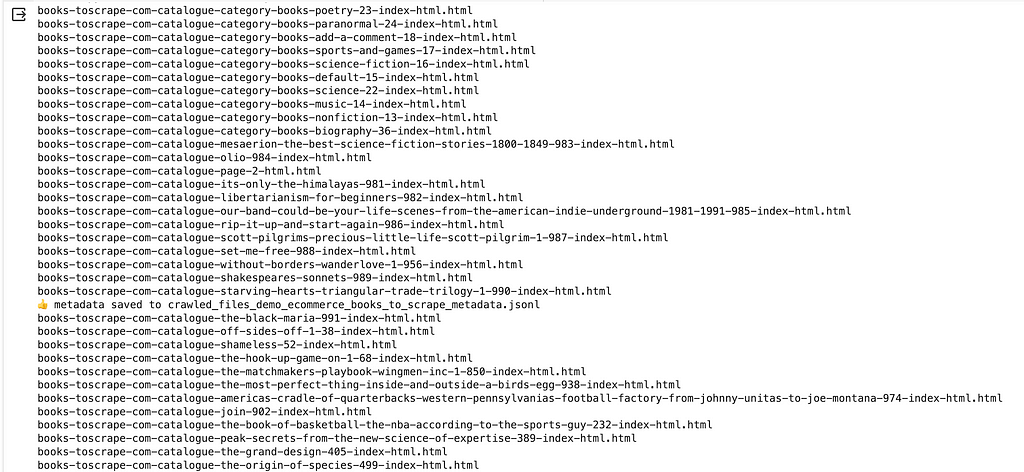
Then the script should run through and show the progress of the scrawling at the bottom, just like this:
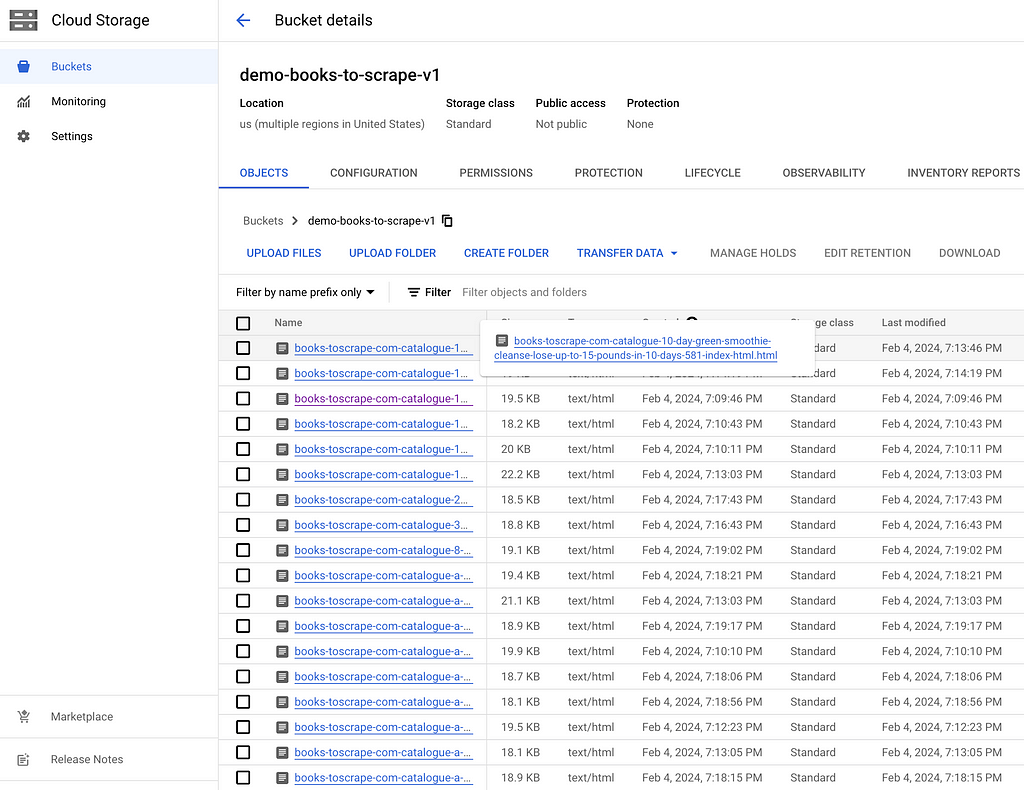
And if you refer to your Google Cloud storage bucket, you will see these html files get scrawled and stored properly within your bucket:
One thing to notice is that the code snippet is not designed for every use case, and you might need some slight tuning of the codes to achieve your goal.
For example, in my case, I tuned the code a bit by changing
blob.upload_from_string(html_string)
into
blob.upload_from_string(html_string, content_type='text/html')
By default the html_string will be uploaded as text/plain . By changing into text/html , I would like to enable this HTML contents to show properly in a later stage.
You can tune the code as much as you like.
Go to Google Cloud Console (https://console.cloud.google.com/) and type “search and conversation” as the service:
Create “NEW APP”:
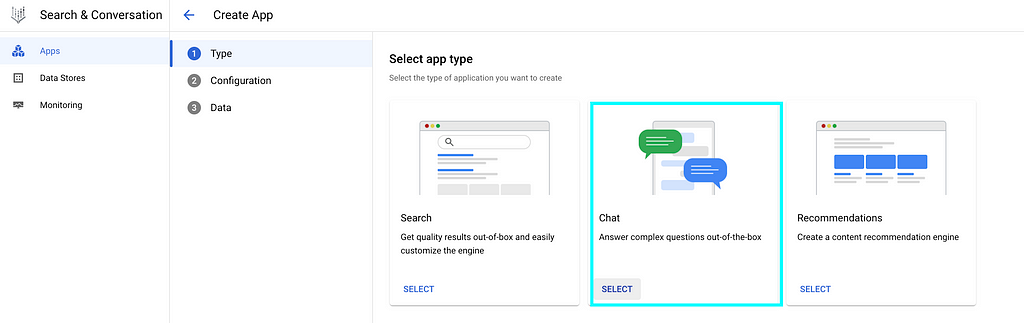
Select “Chat”:
Provide your “Company name” and “Agent name”. Note that the “Agent name” here will be the name of the Chatbot, you might want to put a good name for your users.
At this “Data” page, select “CREATE NEW DATA STORE”:
For owners of ecommerce websites, select “Website URLs” and provision your website URLs
As I have scrawled the website contents into Cloud Storage, we can select “Cloud Storage” here:
Specify the Cloud Storage bucket name, and select “Unstructured documents” in below:
Give your data store a name, then “CREATE”
You will see your data store listed, then “CREATE”
Your data store will be created as below
If you click into it, you will see your data store is “processing data” by importing documents from the Cloud Storage bucket that we specified earlier:
If we click the “ACTIVITY” tab, we can see the import is in progress:
Import will take minutes to hours depending on the number of documents in your Cloud Storage bucket.
In my case, I have over 1,000 files and it finishes within minutes.
After import is completed, the status as highlighted has changed:
And if you switch back to the “DOCUMENTS” tab, you will see the list of files imported into the data store:
That means you’ve got all the materials and you are ready to cook!
In step 3 above, we have already created a Chatbot app as well as the data store sitting behind it.
Click “Apps” on the top:
You will see the Chatbot you created in the previous step 3:
If you click into the Chatbot name, you will be directed to the Dialogflow CX page like below:
To test the Chatbot, select “Test Agent” in the right up corner:
And the dialogue box will pop up:
You can start the conversation by saying “hi” and start asking questions to the Chatbot:
It works!
If you are happy with the Chatbot, it is easy to integrate it with your web application
Go to the left pane, select “Manage” -> “Integrations” -> “Dialogflow Messenger”
You can choose the type of API and UI style according to your needs
For demo purpose, I selected “Unauthenticated API” as API and “Pop-out” as UI style:
After selecting “Done”, a code snippet in HTML will be generated in the next page as below:
You may copy the code snippet and easily paste it into your applications for integration.
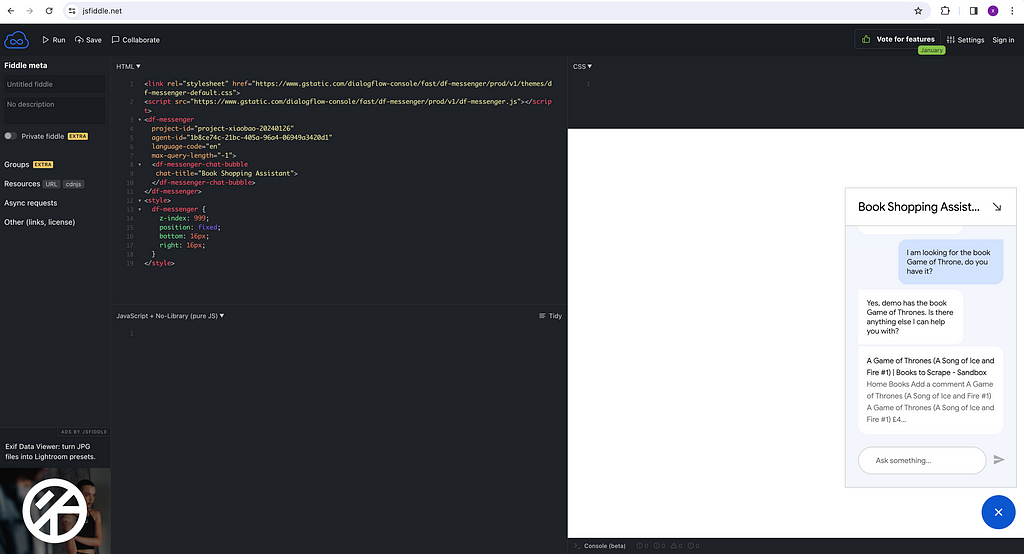
For demo purpose, I copy paste this HTML snippet into JSFiddle and run it, then I am getting my little Chatbot working as shown in the right down corner!
In case you don’t have an application yet and you want to have one, Google provides a good starting point through a public git repository Chat App.
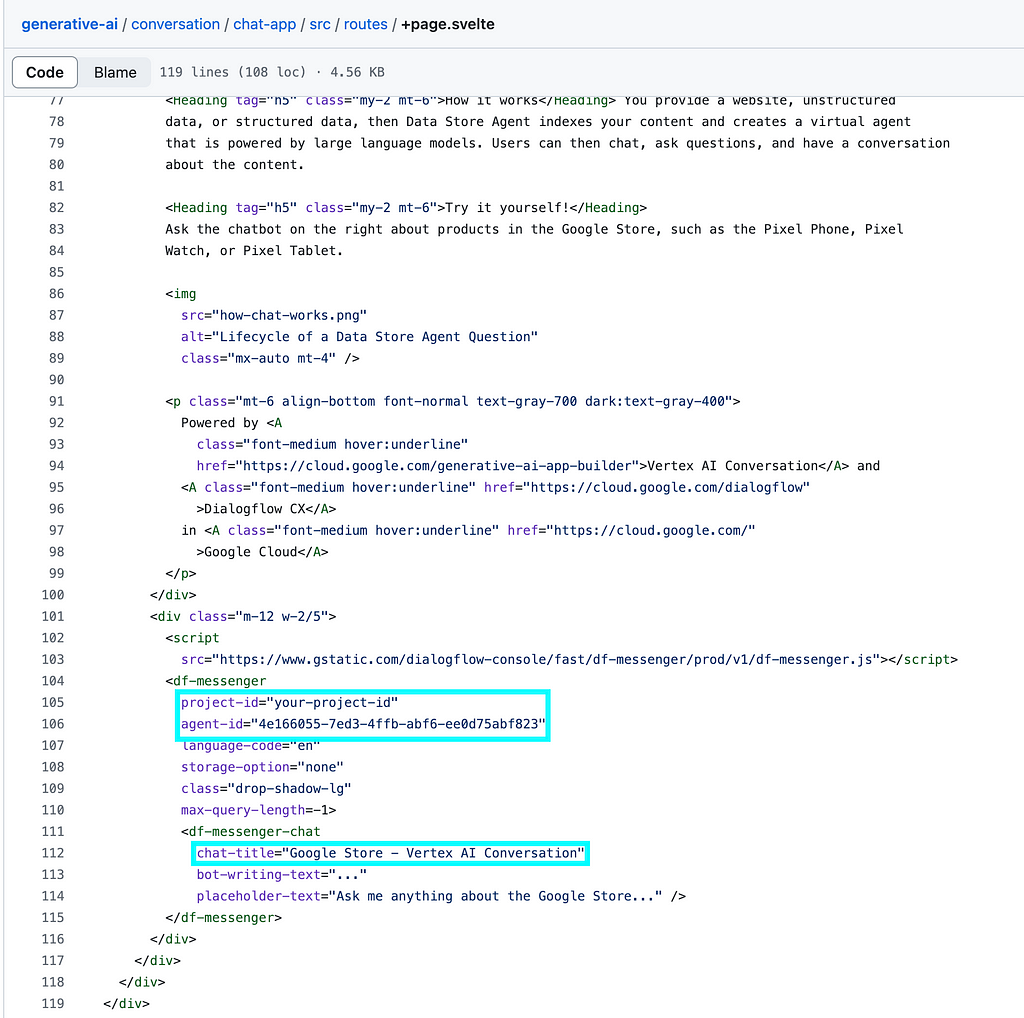
This is a Chatbot Application written in Node.js and you can easily adapt it for your own use by changing the code snippets a bit within chat-app/src/routes/+page.svelte .
You will need to change the project-id, agent-id and chat-title into yours.
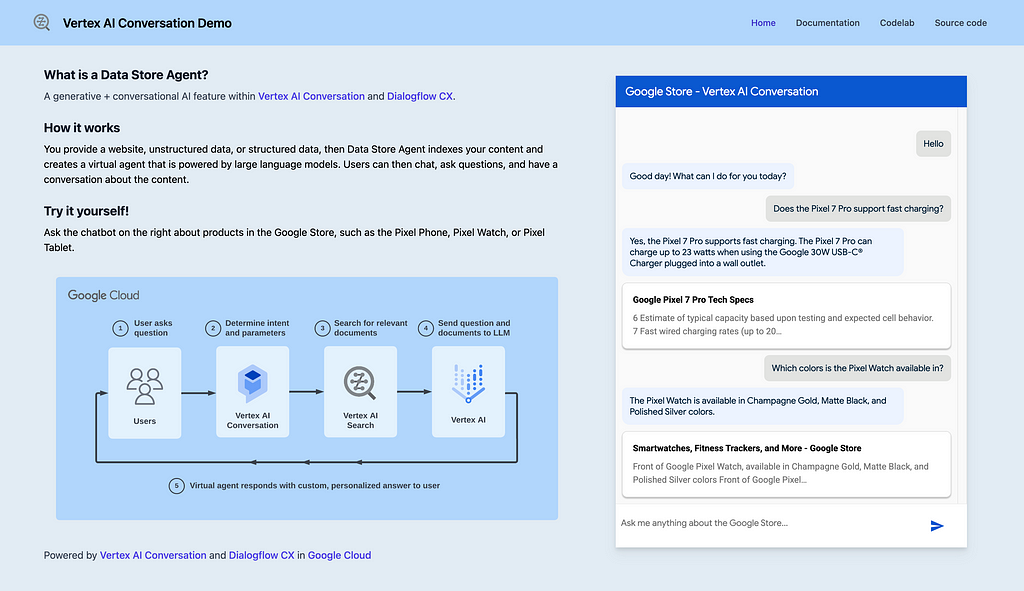
And once you run/deploy the app, you will get the web UI like this:
Of course you can change the appearance of the UI as you like.
Now you can have your own application!
Recalling the solution design that we mentioned at the beginning. This looks a bit magic as you can get your own LLM powered Chatbot by simply supplying your private knowledge to a Google Cloud Storage bucket.
This is achieved as Google has done quite a bit of integrations behind the scene, by integrating Vertex AI platform with the chatbot agent service Dialogflow CX, and coming up with a new abstraction called Vertex AI Conversation (formerly Gen App Builder). This new abstraction also supports Search and Recommend, and the full name of this service is “Vertex AI Search and Conversation”.
As we can see, this new abstraction of “Vertex AI Search and Conversation” is sitting on top of Vertex AI which has orchestrated a bunch of foundation models, and gets “augmented” by user-supplied updated real world information, so it can contextualize its responses to these information.
The integration is great as it can help at least two groups of people —
Imagine you are a traditional Chatbot builder using Dialogflow CX, you are creating pages, intents and routes to route customer intentions to the corresponding page. Basically you are defining “if customer say this then I respond with this” which is a bit hard-coding. Now Google plugs in Vertex AI which can utilise LLM models (e.g. text-bison, gemini) to generate agent responses and control conversation flow in a much smarter way. This can significantly reduce agent design time and improve agent quality.
On the other hand, image you are exploring the power of LLMs and Generative AI but not sure what to do with it. This Vertex AI Conversation feature can enable you to easily build and launch your own Chatbot applications quickly and make them available for real use case. This can significantly shorten the go-to-market time of LLM and GenAI solutions.
Despite the “magic” as it appears, we observed several things worth sharing with developers who are considering use this “Vertex AI Search and Conversation” feature.
Our gut feeling is this is a new product Google brought in by “integrating” several existing tools and is still working towards making it better. It lacks clarity how the integration happens behind the scene, and how developers can best understand and configure it.
I got our chatbot very quickly but once I started looking at how to fine tune it, it took me quite a bit of time to figure out how Dialogflow CX works, what is “generator” and how it works. At this moment I’m still confused why this Chatbot works so great without me even configuring any “generator” as described in Google doc, and whether/how we can make it better by using “generator”.
Some other observations during the development:
In the above use case, I assume I am an online book store owner and created a Chatbot based on my e-commerce website contents in HTML.
Similarly, you can supply “private knowledge” in the format of blogs, files (e.g. PDF, HTML, TXT) and all kinds of websites to the Google Cloud Storage, and create your own Chatbot.
This enables individuals / businesses to fully utilize the power of the Google LLMs (text-bison, gemini, etc.) and augment it with private knowledge, and create own Chatbots in a very quick manner.
This marks the end of this article. Hope you find it helpful!
(PS: I am working on a video to make this step-by-step guide easier to follow. Will share if I get it done in near future.)
Selina Li (Selina Li, LinkedIn) is a Principal Data Engineer working at Officeworks in Melbourne Australia. Selina is passionate about AI/ML, data engineering and investment.
Jason Li (Tianyi Li, LinkedIn) is a Full-stack Developer working at Mindset Health in Melbourne Australia. Jason is passionate about AI, front-end development and space related technologies.
Selina and Jason would love to explore technologies to help people achieve their goals.
Unless otherwise noted, all images are by the authors.
How to Build Your Own Google AI Chatbot Within 5 Minutes was originally published in Towards Data Science on Medium, where people are continuing the conversation by highlighting and responding to this story.
Originally appeared here:
How to Build Your Own Google AI Chatbot Within 5 Minutes
Go Here to Read this Fast! How to Build Your Own Google AI Chatbot Within 5 Minutes
· The Problem
· The Solution
· Use Case
· Step by Step Guide
∘ Step 1: Environment Setup
∘ Step 2: Prepare Private Knowledge and store them into Google Cloud Storage (low code)
∘ Step 3: Create Chatbot and the Data Store sitting behind the Chatbot (no code)
∘ Step 4: Test the Chatbot (no code)
∘ Step 5: Publish / Integrate your Chatbot (low code)
∘ Step 6 (Optional): Publish it through a Beautiful Application (low code)
· What makes this “magic”?
· Some Observations
· Wrap-up
· Enjoyed This Story?
You might have been familiar with AI chats powered by Large Language Model (LLM) such as OpenAI ChatGPT or Google Bard. And you might have noticed one thing — these LLMs have extensive general knowledge about the world, but might not give you satisfactory answers when you ask about a very specific or professional area, especially if the knowledge of this area is not that publicly available or sharable.
Have you thought about “giving” your private knowledge to LLM and creating your own Chatbot?
Do you know this can be done within 5 minutes with no code or low code?
The end product will be like this:
During the Asia Pacific Google Cloud Applied AI Summit, Alan Blount from Google shared an interesting idea of achieving this using Google Cloud Vertex AI Search and Conversation, which I found pretty attractive to try out.
The idea is simple, first put a corpus of private knowledge documents onto Google Cloud Storage:
then create a Data Store, and import the documents from the Cloud Storage into the Data Store:
finally plug that Data Store into Dialogflow CX:
then we are done!
We can test Chatbot like this:
And if we want to publish it through a beautiful application, Google provides a public git repo for a Chat App that we can utilise. With a bit of coding knowledge, we can plug the link of the Dialogflow Chatbot into the Chat App, and customize the interface like this:
OR this:
In this case, assuming I am the owner of an ecommerce website. I would like to create a Chatbot, so my users can ask specific questions regarding anything about this website (price, product, service, shipping, etc.) as they are in the store. The Chatbot will be supplied with the “private knowledge” and ground its answers to the contents of the website.
Given I am not actually owning an ecommerce website, I will take a workaround to crawl contents from an existing website available on the Internet. This is tricky because most websites are anti-scraping as specified in their terms of use, and it could be illegal to scrape ecommerce websites such as Amazon, eBay, Alibaba, etc.
ChatGPT provided me with a perfect option —
Books to Scrape (https://books.toscrape.com/). A simulated bookstore specifically designed for web scraping practice. It offers a straightforward structure for scraping book details like title, price, and rating.
In this use case, I would assume I am the owner of this Books to Scrape website, and create the Chatbot based on it.
This might look a bit lengthy at first glance because it covers every detailed step that you will need. Once you have run through, you can get the same done within 5 minutes.
The tool we are going to use is sitting on Google Vertex AI and we will need a Google Cloud Platform (GCP) account.
Google has a free-tier program to provide new Google Cloud Platform (GCP) users with a 90-day trial period that includes $300 as free Cloud Billing credits.
Follow the tutorial here to set up the free Google Cloud account.
After you have set up Google Cloud account and can access the console, create a storage bucket (step-by-step guide here) for the next step use.
As mentioned above, the private knowledge in this case will be the contents sitting on the book store website.
For owners of ecommerce websites, all you need to do is to provide the website URLs, and Google can automatically crawl website content from a list of domains you define.
Given I am not a real owner, I will resolve this by scrawling. Alan Blount from Google provided a very useful notebook to achieve this. All the code snippet does is to scrawl webpages from the website that you specified and store them in a Google Cloud Storage bucket that you specified.
This is all you need to do:
2.1 Save a copy of the notebook in your own drive
Recall that in step 2 you have created a new Google account when you registered for Google Cloud? Your Google account will have Google Drive and you can save a copy of this notebook to your drive.
Select “Save a copy in Drive” option from the dropdown menu of “File”
Then if you go to Google Drive, you will be able to see the notebook you created. Feel free to rename it according to your need.
2.2 On your own notebook, locate the below and specify
website_url refers to the website page URL that you would like to scrawl.
storage_bucket refers to the Google Cloud Storage that you created in above step 1.
metadata_filename refers to a json file that will be created and stored together with the webpages. You might want to make it relevant to your website by changing applied_ai_summit_flutter_search to something that can describe your use case.
This is my version:
2.3 Run all
2.4 When it prompts you to authenticate the Google Colab notebook to access your Google credentials, click “Allow” -> “Continue”
Then the script should run through and show the progress of the scrawling at the bottom, just like this:
And if you refer to your Google Cloud storage bucket, you will see these html files get scrawled and stored properly within your bucket:
One thing to notice is that the code snippet is not designed for every use case, and you might need some slight tuning of the codes to achieve your goal.
For example, in my case, I tuned the code a bit by changing
blob.upload_from_string(html_string)
into
blob.upload_from_string(html_string, content_type='text/html')
By default the html_string will be uploaded as text/plain . By changing into text/html , I would like to enable this HTML contents to show properly in a later stage.
You can tune the code as much as you like.
Go to Google Cloud Console (https://console.cloud.google.com/) and type “search and conversation” as the service:
Create “NEW APP”:
Select “Chat”:
Provide your “Company name” and “Agent name”. Note that the “Agent name” here will be the name of the Chatbot, you might want to put a good name for your users.
At this “Data” page, select “CREATE NEW DATA STORE”:
For owners of ecommerce websites, select “Website URLs” and provision your website URLs
As I have scrawled the website contents into Cloud Storage, we can select “Cloud Storage” here:
Specify the Cloud Storage bucket name, and select “Unstructured documents” in below:
Give your data store a name, then “CREATE”
You will see your data store listed, then “CREATE”
Your data store will be created as below
If you click into it, you will see your data store is “processing data” by importing documents from the Cloud Storage bucket that we specified earlier:
If we click the “ACTIVITY” tab, we can see the import is in progress:
Import will take minutes to hours depending on the number of documents in your Cloud Storage bucket.
In my case, I have over 1,000 files and it finishes within minutes.
After import is completed, the status as highlighted has changed:
And if you switch back to the “DOCUMENTS” tab, you will see the list of files imported into the data store:
That means you’ve got all the materials and you are ready to cook!
In step 3 above, we have already created a Chatbot app as well as the data store sitting behind it.
Click “Apps” on the top:
You will see the Chatbot you created in the previous step 3:
If you click into the Chatbot name, you will be directed to the Dialogflow CX page like below:
To test the Chatbot, select “Test Agent” in the right up corner:
And the dialogue box will pop up:
You can start the conversation by saying “hi” and start asking questions to the Chatbot:
It works!
If you are happy with the Chatbot, it is easy to integrate it with your web application
Go to the left pane, select “Manage” -> “Integrations” -> “Dialogflow Messenger”
You can choose the type of API and UI style according to your needs
For demo purpose, I selected “Unauthenticated API” as API and “Pop-out” as UI style:
After selecting “Done”, a code snippet in HTML will be generated in the next page as below:
You may copy the code snippet and easily paste it into your applications for integration.
For demo purpose, I copy paste this HTML snippet into JSFiddle and run it, then I am getting my little Chatbot working as shown in the right down corner!
In case you don’t have an application yet and you want to have one, Google provides a good starting point through a public git repository Chat App.
This is a Chatbot Application written in Node.js and you can easily adapt it for your own use by changing the code snippets a bit within chat-app/src/routes/+page.svelte .
You will need to change the project-id, agent-id and chat-title into yours.
And once you run/deploy the app, you will get the web UI like this:
Of course you can change the appearance of the UI as you like.
Now you can have your own application!
Recalling the solution design that we mentioned at the beginning. This looks a bit magic as you can get your own LLM powered Chatbot by simply supplying your private knowledge to a Google Cloud Storage bucket.
This is achieved as Google has done quite a bit of integrations behind the scene, by integrating Vertex AI platform with the chatbot agent service Dialogflow CX, and coming up with a new abstraction called Vertex AI Conversation (formerly Gen App Builder). This new abstraction also supports Search and Recommend, and the full name of this service is “Vertex AI Search and Conversation”.
As we can see, this new abstraction of “Vertex AI Search and Conversation” is sitting on top of Vertex AI which has orchestrated a bunch of foundation models, and gets “augmented” by user-supplied updated real world information, so it can contextualize its responses to these information.
The integration is great as it can help at least two groups of people —
Imagine you are a traditional Chatbot builder using Dialogflow CX, you are creating pages, intents and routes to route customer intentions to the corresponding page. Basically you are defining “if customer say this then I respond with this” which is a bit hard-coding. Now Google plugs in Vertex AI which can utilise LLM models (e.g. text-bison, gemini) to generate agent responses and control conversation flow in a much smarter way. This can significantly reduce agent design time and improve agent quality.
On the other hand, image you are exploring the power of LLMs and Generative AI but not sure what to do with it. This Vertex AI Conversation feature can enable you to easily build and launch your own Chatbot applications quickly and make them available for real use case. This can significantly shorten the go-to-market time of LLM and GenAI solutions.
Despite the “magic” as it appears, we observed several things worth sharing with developers who are considering use this “Vertex AI Search and Conversation” feature.
Our gut feeling is this is a new product Google brought in by “integrating” several existing tools and is still working towards making it better. It lacks clarity how the integration happens behind the scene, and how developers can best understand and configure it.
I got our chatbot very quickly but once I started looking at how to fine tune it, it took me quite a bit of time to figure out how Dialogflow CX works, what is “generator” and how it works. At this moment I’m still confused why this Chatbot works so great without me even configuring any “generator” as described in Google doc, and whether/how we can make it better by using “generator”.
Some other observations during the development:
In the above use case, I assume I am an online book store owner and created a Chatbot based on my e-commerce website contents in HTML.
Similarly, you can supply “private knowledge” in the format of blogs, files (e.g. PDF, HTML, TXT) and all kinds of websites to the Google Cloud Storage, and create your own Chatbot.
This enables individuals / businesses to fully utilize the power of the Google LLMs (text-bison, gemini, etc.) and augment it with private knowledge, and create own Chatbots in a very quick manner.
This marks the end of this article. Hope you find it helpful!
(PS: I am working on a video to make this step-by-step guide easier to follow. Will share if I get it done in near future.)
Selina Li (Selina Li, LinkedIn) is a Principal Data Engineer working at Officeworks in Melbourne Australia. Selina is passionate about AI/ML, data engineering and investment.
Jason Li (Tianyi Li, LinkedIn) is a Full-stack Developer working at Mindset Health in Melbourne Australia. Jason is passionate about AI, front-end development and space related technologies.
Selina and Jason would love to explore technologies to help people achieve their goals.
Unless otherwise noted, all images are by the authors.
How to build your own Google AI Chatbot within 5 minutes? was originally published in Towards Data Science on Medium, where people are continuing the conversation by highlighting and responding to this story.
Originally appeared here:
How to build your own Google AI Chatbot within 5 minutes?
Go Here to Read this Fast! How to build your own Google AI Chatbot within 5 minutes?

In the ever-evolving landscape of AI development, nothing rings truer than the old saying (attributed to Heraclitus), “the only constant in life is change”. In the case of AI, it seems that change is indeed constant, but the pace of change is forever increasing. Staying relevant in these unique and exciting times amounts to an unprecedented test of the capacity of AI teams to consistently adapt and adjust their development processes. AI development teams that fail to adapt, or are slow to adapt, may quickly become obsolete.
One of the most challenging developments of the past few years in AI development has been the increasing difficulty to attain the hardware required to train AI models. Whether it be due to an ongoing crisis in the global supply chain or a significant increase in the demand for AI chips, getting your hands on the GPUs (or alternative training accelerators) that you need for AI development, has gotten much harder. This is evidenced by the huge wait time for new GPU orders and by the fact that cloud service providers (CSPs) that once offered virtually infinite capacity of GPU machines, now struggle to keep up with the demand.
The changing times are forcing AI development teams that may have once relied on endless capacity of AI accelerators to adapt to a world with reduced accessibility and, in some cases, higher costs. Development processes that once took for granted the ability to spin up a new GPU machine at will, must be modified to meet the demands of a world of scarce AI resources that are often shared by multiple projects and/or teams. Those that fail to adapt risk annihilation.
In this post we will demonstrate the use of Kubernetes in the orchestration of AI-model training workloads in a world of scarce AI resources. We will start by specifying the goals we wish to achieve. We will then describe why Kubernetes is an appropriate tool for addressing this challenge. Last, we will provide a simple demonstration of how Kubernetes can be used to maximize the use of a scarce AI compute resource. In subsequent posts, we plan to enhance the Kubernetes-based solution and show how to apply it to a cloud-based training environment.
While this post does not assume prior experience with Kubernetes, some basic familiarity would certainly be helpful. This post should not, in any way, be viewed as a Kubernetes tutorial. To learn about Kubernetes, we refer the reader to the many great online resources on the subject. Here we will discuss just a few properties of Kubernetes as they pertain to the topic of maximizing and prioritizing resource utilization.
There are many alternative tools and techniques to the method we put forth here, each with their own pros and cons. Our intention in this post is purely educational; Please do not view any of the choices we make as an endorsement.
Lastly, the Kubernetes platform remains under constant development, as do many of the frameworks and tools in the field of AI development. Please take into account the possibility that some of the statements, examples, and/or external links in this post may become outdated by the time you read this and be sure to take into account the most up-to-date solutions available before making your own design decisions.
To simplify our discussion, let’s assume that we have a single worker node at our disposal for training our models. This could be a local machine with a GPU or a reserved compute-accelerated instance in the cloud, such as a p5.48xlarge instance in AWS or a TPU node in GCP. In our example below we will refer to this node as “my precious”. Typically, we will have spent a lot of money on this machine. We will further assume that we have multiple training workloads all competing for our single compute resource where each workload could take anywhere from a few minutes to a few days. Naturally, we would like to maximize the utility of our compute resource by ensuring that it is in constant use and that the most important jobs get prioritized. What we need is some form of a priority queue and an associated priority-based scheduling algorithm. Let’s try to be a bit more specific about the behaviors that we desire.
One approach to developing a solution that satisfies these requirements could be to take an existing API for submitting jobs to a training resource and wrap it with a customized implementation of a priority queue with the desired properties. At a minimum, this approach would require a data structure for storing a list of pending jobs, a dedicated process for choosing and submitting jobs from the queue to the training resource, and some form of mechanism for identifying when a job has been completed and the resource has become available.
An alternative approach and the one we take in this post, is to leverage an existing solution for priority-based scheduling that fulfils our requirements and align our training development workflow to its use. The default scheduler that comes with Kubernetes is an example of one such solution. In the next sections we will demonstrate how it can be used to address the problem of optimizing the use of scarce AI training resources.
In this section we will get a bit philosophical about the application of Kubernetes to the orchestration of ML training workloads. If you have no patience for such discussions (totally fair) and want to get straight to the practical examples, please feel free to skip to the next section.
Kubernetes is (another) one of those software/technological solutions that tend to elicit strong reactions in many developers. There are some that swear by it and use it extensively, and others that find it overbearing, clumsy, and unnecessary (e.g., see here for some of the arguments for and against using Kubernetes). As with many other heated debates, it is the author’s opinion that the truth lies somewhere in between — there are situations where Kubernetes provides an ideal framework that can significantly increase productivity, and other situations where its use borders on an insult to the SW development profession. The big question is, where on the spectrum does ML development lie? Is Kubernetes the appropriate framework for training ML models? Although a cursory online search might give the impression that the general consensus is an emphatic “yes”, we will make some arguments for why that may not be the case. But first, we need to be clear about what we mean by “ML training orchestration using Kubernetes”.
While there are many online resources that address the topic of ML using Kubernetes, it is important to be aware of the fact that they are not always referring to the same mode of use. Some resources (e.g., here) use Kubernetes only for deploying a cluster; once the cluster is up and running they start the training job outside the context of Kubernetes. Others (e.g., here) use Kubernetes to define a pipeline in which a dedicated module starts up a training job (and associated resources) using a completely different system. In contrast to these two examples, many other resources define the training workload as a Kubernetes Job artifact that runs on a Kubernetes Node. However, they too vary greatly in the particular attributes on which they focus. Some (e.g., here) emphasize the auto-scaling properties and others (e.g., here) the Multi-Instance GPU (MIG) support. They also vary greatly in the details of implementation, such as the precise artifact (Job extension) for representing a training job (e.g., ElasticJob, TrainingWorkload, JobSet, VolcanoJob, etc.). In the context of this post, we too will assume that the training workload is defined as a Kubernetes Job. However, in order to simplify the discussion, we will stick with the core Kubernetes objects and leave the discussion of Kubernetes extensions for ML for a future post.
Here are some arguments that could be made against the use of Kubernetes for training ML models.
Granted, we have taken a very one-sided view in the Kubernetes-for-ML debate. Based solely on the arguments above, you might conclude that we would need a darn good reason for choosing Kubernetes as a framework for ML training. It is our opinion that the challenge put forth in this post, i.e., the desire to maximize the utility of scarce AI compute resources, is exactly the type of justification that warrants the use of Kubernetes despite the arguments made above. As we will demonstrate, the default scheduler that is built-in to Kubernetes, combined with its support for priority and preemption makes it a front-runner for fulfilling the requirements stated above.
In this section we will share a brief example that demonstrates the priority scheduling support that is built in to Kubernetes. For the purposes of our demonstration, we will use Minikube (version v1.32.0). Minikube is a tool that enables you to run a Kubernetes cluster in a local environment and is an ideal playground for experimenting with Kubernetes. Please see the official documentation on installing and getting started with Minikube.
Let’s start by creating a two-node cluster using the Minikube start command:
minikube start --nodes 2
The result is a local Kubernetes cluster consisting of a master (“control-plane”) node named minikube, and a single worker node, named minikube-m02, which will simulate our single AI resource. Let’s apply the label my-precious to identify it as a unique resource type:
kubectl label nodes minikube-m02 node-type=my-precious
We can use the Minikube dashboard to visualize the results. In a separate shell run the command below and open the generated browser link.
minikube dashboard
If you press on the Nodes tab on the left-hand pane, you should see a summary of our cluster’s nodes:
Next, we define two PriorityClasses, low-priority and high-priority, as in the priorities.yaml file displayed below. New jobs will receive the low-priority assignment, by default.
apiVersion: scheduling.k8s.io/v1
kind: PriorityClass
metadata:
  name: low-priority
value: 0
globalDefault: true

---
apiVersion: scheduling.k8s.io/v1
kind: PriorityClass
metadata:
  name: high-priority
value: 1000000
globalDefault: false
To apply our new classes to our cluster, we run:
kubectl apply -f priorities.yaml
We define a simple job using a job.yaml file displayed in the code block below. For the purpose of our demonstration, we define a Kubernetes Job that does nothing more than sleep for 100 seconds. We use busybox as its Docker image. In practice, this would be replaced with a training script and an appropriate ML Docker image. We define the job to run on our special instance, my-precious, using the nodeSelector field, and specify the resource requirements so that only a single instance of the job can run on the instance at a time. The priority of the job defaults to low-priority as defined above.
apiVersion: batch/v1
kind: Job
metadata:
  name: test
spec:
  template:
    spec:
      containers:
        - name: test
          image: busybox
          command: # simple sleep command
            - sleep
            - '100'
          resources: # require all available resources
            limits:
              cpu: "2"
            requests:
              cpu: "2"
      nodeSelector: # specify our unique resource
          node-type: my-precious
      restartPolicy: Never
We submit the job with the following command:
kubectl apply -f job.yaml
To demonstrate the manner in which Kubernetes queues jobs for processing, we create three identical copies of the job defined above, named test1, test2, and test3. We group the three jobs in a single file, jobs.yaml, and submit them for processing:
kubectl apply -f jobs.yaml
The image below captures the Workload Status of our cluster in the Minikube dashboard shortly after the submission. You can see that my-precious has begun processing test1, while the other jobs are pending as they wait their turn.
Once test1 is completed, processing of test2 begins:
So long as no other jobs with higher priority are submitted, our jobs would continue to be processed one at a time until they are all completed.
We now demonstrate Kubernetes’ built-in support for job preemption by showing what happens when we submit a fourth job, this time with the high-priority setting:
apiVersion: batch/v1
kind: Job
metadata:
  name: test-p1
spec:
  template:
    spec:
      containers:
        - name: test-p1
          image: busybox
          command:
            - sleep
            - '100'
          resources:
            limits:
              cpu: "2"
            requests:
              cpu: "2"
      restartPolicy: Never
      priorityClassName: high-priority # high priority job
      nodeSelector:
          node-type: my-precious
The impact on the Workload Status is displayed in the image below:
The test2 job has been preempted — its processing has been stopped and it has returned to the pending state. In its stead, my-precious has begun processing the higher priority test-p1 job. Only once test-p1 is completed will processing of the lower priority jobs resume. (In the case where the preempted job is a ML training workload, we would program it to resume from the most recent saved model model checkpoint).
The image below displays the Workload Status once all jobs have been completed.
The solution we demonstrated for priority-based scheduling and preemption relied only on core components of Kubernetes. In practice, you may choose to take advantage of enhancements to the basic functionality introduced by extensions such as Kueue and/or dedicated, ML-specific features offered by platforms build on top of Kubernetes, such as Run:AI or Volcano. But keep in mind that to fulfill the basic requirements for maximizing the utility of a scarce AI compute resource all we need is the core Kubernetes.
The reduced availability of dedicated AI silicon has forced ML teams to adjust their development processes. Unlike in the past, when developers could spin up new AI resources at will, they now face limitations on AI compute capacity. This necessitates the procurement of AI instances through means such as purchasing dedicated units and/or reserving cloud instances. Moreover, developers must come to terms with the likelihood of needing to share these resources with other users and projects. To ensure that the scarce AI compute power is appropriated towards maximum utility, dedicated scheduling algorithms must be defined that minimize idle time and prioritize critical workloads. In this post we have demonstrated how the Kubernetes scheduler can be used to accomplish these goals. As emphasized above, this is just one of many approaches to address the challenge of maximizing the utility of scarce AI resources. Naturally, the approach you choose, and the details of your implementation will depend on the specific needs of your AI development.
Maximizing the Utility of Scarce AI Resources: A Kubernetes Approach was originally published in Towards Data Science on Medium, where people are continuing the conversation by highlighting and responding to this story.
Originally appeared here:
Maximizing the Utility of Scarce AI Resources: A Kubernetes Approach
Go Here to Read this Fast! Maximizing the Utility of Scarce AI Resources: A Kubernetes Approach