Tag: AI

  • Human Pose Tracking with MediaPipe in 2D and 3D: Rerun Showcase

    Andreas Naoum

    How to easily visualise MediaPipe’s human pose tracking with Rerun

    Human Pose Tracking | Image by Author

    Overview

    We explore a use case that leverages the power of MediaPipe for tracking human poses in both 2D and 3D. What makes this exploration even more fascinating is the visualisation aspect powered by the open-source visualisation tool Rerun, which provides a holistic view of human poses in action.

    In this blog post, you’ll be guided to use MediaPipe to track human poses in 2D and 3D, and explore the visualisation capabilities of Rerun.

    Human Pose Tracking

    Human pose tracking is a task in computer vision that focuses on identifying key body locations, analysing posture, and categorising movements. At the heart of this technology is a pre-trained machine-learning model to assess the visual input and recognise landmarks on the body in both image coordinates and 3D world coordinates. The use cases and applications of this technology include but are not limited to Human-Computer Interaction, Sports Analysis, Gaming, Virtual Reality, Augmented Reality, Health, etc.

    It would be good to have a perfect model, but unfortunately, the current models are still imperfect. Although datasets could have a variety of body types, the human body differs among individuals. The uniqueness of each individual’s body poses a challenge, particularly for those with non-standard arm and leg dimensions, which may result in lower accuracy when using this technology. When considering the integration of this technology into systems, it is crucial to acknowledge the possibility of inaccuracies. Hopefully, ongoing efforts within the scientific community will pave the way for the development of more robust models.

    Beyond lack of accuracy, ethical and legal considerations emerge from utilising this technology. For instance, capturing human body poses in public spaces could potentially invade privacy rights if individuals have not given their consent. It’s crucial to take into account any ethical and legal concerns before implementing this technology in real-world scenarios.

    Prerequisites & Setup

    Begin by installing the required libraries:

    # Install the required Python packages 
    pip install mediapipe
    pip install numpy
    pip install opencv-python<4.6
    pip install requests>=2.31,<3
    pip install rerun-sdk

    # or just use the requirements file
    pip install -r examples/python/human_pose_tracking/requirements.txt

    Track Human Pose using MediaPipe

    Image via Pose Landmark Detection Guide by Google [1]

    MediaPipe Python is a handy tool for developers looking to integrate on-device ML solutions for computer vision and machine learning.

    In the code below, MediaPipe pose landmark detection was utilised for detecting landmarks of human bodies in an image. This model can detect body pose landmarks as both image coordinates and 3D world coordinates. Once you have successfully run the ML model, you can use the image coordinates and the 3D world coordinates to visualise the output.

    import mediapipe as mp
    import numpy as np
    from typing import Any
    import numpy.typing as npt
    import cv2


    """
    Read 2D landmark positions from Mediapipe Pose results.

    Args:
    results (Any): Mediapipe Pose results.
    image_width (int): Width of the input image.
    image_height (int): Height of the input image.

    Returns:
    np.array | None: Array of 2D landmark positions or None if no landmarks are detected.
    """
    def read_landmark_positions_2d(
    results: Any,
    image_width: int,
    image_height: int,
    ) -> npt.NDArray[np.float32] | None:
    if results.pose_landmarks is None:
    return None
    else:
    # Extract normalized landmark positions and scale them to image dimensions
    normalized_landmarks = [results.pose_landmarks.landmark[lm] for lm in mp.solutions.pose.PoseLandmark]
    return np.array([(image_width * lm.x, image_height * lm.y) for lm in normalized_landmarks])


    """
    Read 3D landmark positions from Mediapipe Pose results.

    Args:
    results (Any): Mediapipe Pose results.

    Returns:
    np.array | None: Array of 3D landmark positions or None if no landmarks are detected.
    """
    def read_landmark_positions_3d(
    results: Any,
    ) -> npt.NDArray[np.float32] | None:
    if results.pose_landmarks is None:
    return None
    else:
    # Extract 3D landmark positions
    landmarks = [results.pose_world_landmarks.landmark[lm] for lm in mp.solutions.pose.PoseLandmark]
    return np.array([(lm.x, lm.y, lm.z) for lm in landmarks])


    """
    Track and analyze pose from an input image.

    Args:
    image_path (str): Path to the input image.
    """
    def track_pose(image_path: str) -> None:
    # Read the image, convert color to RGB
    image = cv2.imread(image_path)
    image = cv2.cvtColor(image, cv2.COLOR_BGR2RGB)

    # Create a Pose model instance
    pose_detector = mp.solutions.pose.Pose(static_image_mode=True)

    # Process the image to obtain pose landmarks
    results = pose_detector.process(image)
    h, w, _ = image.shape

    # Read 2D and 3D landmark positions
    landmark_positions_2d = read_landmark_positions_2d(results, w, h)
    landmark_positions_3d = read_landmark_positions_3d(results)

    Visualise the output of MediaPipe using Rerun

    Rerun Viewer | Image via Rerun Docs [2]

    Rerun serves as a visualisation tool for multi-modal data. Through the Rerun Viewer, you can build layouts, customise visualisations and interact with your data. The rest part of this section details how you can log and present data using the Rerun SDK to visualise it within the Rerun Viewer
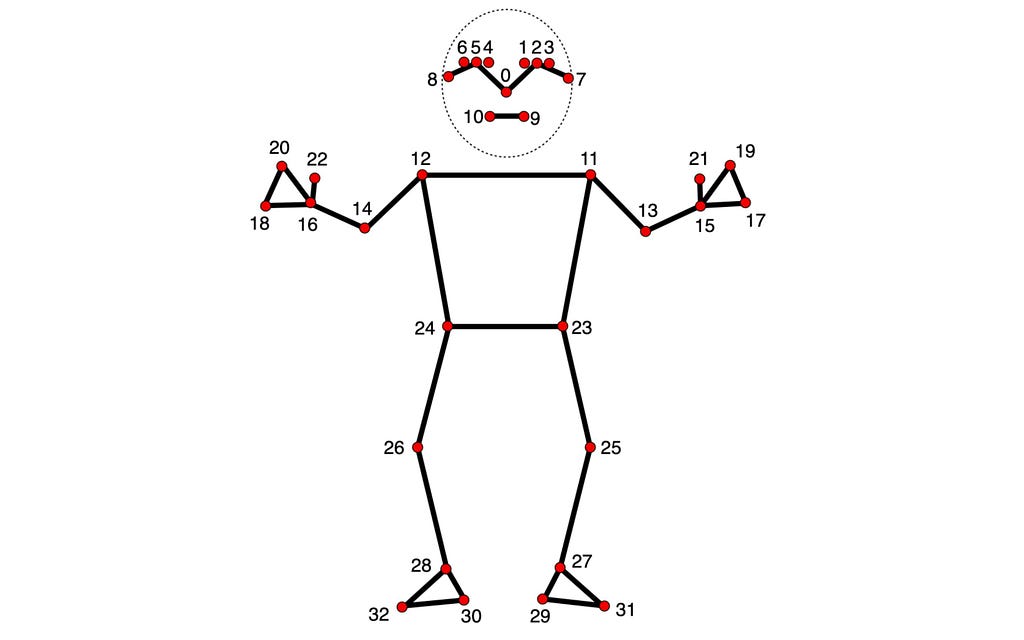
    Pose Landmarker Model | Image via Pose Landmark Detection Guide by Google [1]

    In both 2D and 3D points, specifying connections between points is essential. Defining these connections automatically renders lines between them. Using the information provided by MediaPipe, you can get the pose points connections from the POSE_CONNECTIONS set and then set them as keypoint connections using Annotation Context.

    rr.log(
    "/",
    rr.AnnotationContext(
    rr.ClassDescription(
    info=rr.AnnotationInfo(id=0, label="Person"),
    keypoint_annotations=[rr.AnnotationInfo(id=lm.value, label=lm.name) for lm in mp_pose.PoseLandmark],
    keypoint_connections=mp_pose.POSE_CONNECTIONS,
    )
    ),
    timeless=True,
    )

    Image Coordinates — 2D Positions

    Visualising Human Pose as 2D Points | Image by Author

    Visualising the body pose landmarks on the video appears to be a good choice. To achieve that, you need to follow the rerun documentation for Entities and Components. The Entity Path Hierarchy page describes how to log multiple Components on the same Entity. For example, you can create the ‘video’ entity and include the components ‘video/rgb’ for the video and ‘video/pose’ for the body pose. If you’re aiming to use that for a video, you need the concept of Timelines. Each frame can be associated with the appropriate data.

    Here is a function that can visualise the 2D points on the video:

    def track_pose_2d(video_path: str) -> None:
    mp_pose = mp.solutions.pose

    with closing(VideoSource(video_path)) as video_source, mp_pose.Pose() as pose:
    for idx, bgr_frame in enumerate(video_source.stream_bgr()):
    if max_frame_count is not None and idx >= max_frame_count:
    break

    rgb = cv2.cvtColor(bgr_frame.data, cv2.COLOR_BGR2RGB)

    # Associate frame with the data
    rr.set_time_seconds("time", bgr_frame.time)
    rr.set_time_sequence("frame_idx", bgr_frame.idx)

    # Present the video
    rr.log("video/rgb", rr.Image(rgb).compress(jpeg_quality=75))

    # Get the prediction results
    results = pose.process(rgb)
    h, w, _ = rgb.shape

    # Log 2d points to 'video' entity
    landmark_positions_2d = read_landmark_positions_2d(results, w, h)
    if landmark_positions_2d is not None:
    rr.log(
    "video/pose/points",
    rr.Points2D(landmark_positions_2d, class_ids=0, keypoint_ids=mp_pose.PoseLandmark),
    )

    3D World Coordinates — 3D Points

    Visualising Human Pose as 3D Points | Image by Author

    Why settle on 2D points when you have 3D Points? Create a new entity, name it “Person”, and log the 3D points. It’s done! You just created a 3D presentation of the human body pose.

    Here is how to do it:

    def track_pose_3d(video_path: str, *, segment: bool, max_frame_count: int | None) -> None:
    mp_pose = mp.solutions.pose

    rr.log("person", rr.ViewCoordinates.RIGHT_HAND_Y_DOWN, timeless=True)

    with closing(VideoSource(video_path)) as video_source, mp_pose.Pose() as pose:
    for idx, bgr_frame in enumerate(video_source.stream_bgr()):
    if max_frame_count is not None and idx >= max_frame_count:
    break

    rgb = cv2.cvtColor(bgr_frame.data, cv2.COLOR_BGR2RGB)

    # Associate frame with the data
    rr.set_time_seconds("time", bgr_frame.time)
    rr.set_time_sequence("frame_idx", bgr_frame.idx)

    # Present the video
    rr.log("video/rgb", rr.Image(rgb).compress(jpeg_quality=75))

    # Get the prediction results
    results = pose.process(rgb)
    h, w, _ = rgb.shape

    # New entity "Person" for the 3D presentation
    landmark_positions_3d = read_landmark_positions_3d(results)
    if landmark_positions_3d is not None:
    rr.log(
    "person/pose/points",
    rr.Points3D(landmark_positions_3d, class_ids=0, keypoint_ids=mp_pose.PoseLandmark),
    )

    Source Code Exploration

    The tutorial focuses on the main parts of the Human Pose Tracking example. For those who prefer a hands-on approach, the full source code for this example is available on GitHub. Feel free to explore, modify, and understand the inner workings of the implementation.

    Tips & Suggestions

    1. Compress the image for efficiency

    You can boost the overall procedure speed by compressing the logged images:

    rr.log(
    "video",
    rr.Image(img).compress(jpeg_quality=75)
    )

    2. Limit Memory Use

    If you’re logging more data than can be fitted into your RAM, it will start dropping the old data. The default limit is 75% of your system RAM. If you want to increase that you could use the command line argument — memory-limit. More information about memory limits can be found on Rerun’s How To Limit Memory Use page.

    3. Customise Visualisations for your needs

    Customise Rerun Viewer | Image by Author

    Beyond Human Pose Tracking

    If you found this article useful and insightful, there’s more!

    Similar articles:

    Real-Time Hand Tracking and Gesture Recognition with MediaPipe: Rerun Showcase

    I regularly share tutorials on visualisation for computer vision and robotics. Follow me for future updates!

    Also, you can find me on LinkedIn.

    Sources

    [1] Pose Landmark Detection Guide by Google, Portions of this page are reproduced from work created and shared by Google and used according to terms described in the Creative Commons 4.0 Attribution License.

    [2] Rerun Docs by Rerun under MIT license


    Human Pose Tracking with MediaPipe in 2D and 3D: Rerun Showcase was originally published in Towards Data Science on Medium, where people are continuing the conversation by highlighting and responding to this story.

    Originally appeared here:
    Human Pose Tracking with MediaPipe in 2D and 3D: Rerun Showcase

    Go Here to Read this Fast! Human Pose Tracking with MediaPipe in 2D and 3D: Rerun Showcase


  • Chain-of-table: Evolving tables in the reasoning chain for table understanding

    Chain-of-table: Evolving tables in the reasoning chain for table understanding

    Google AI

    People use tables every day to organize and interpret complex information in a structured, easily accessible format. Due to the ubiquity of such tables, reasoning over tabular data has long been a central topic in natural language processing (NLP). Researchers in this field have aimed to leverage language models to help users answer questions, verify statements, and analyze data based on tables. However, language models are trained over large amounts of plain text, so the inherently structured nature of tabular data can be difficult for language models to fully comprehend and utilize.

    Recently, large language models (LLMs) have achieved outstanding performance across diverse natural language understanding (NLU) tasks by generating reliable reasoning chains, as shown in works like Chain-of-Thought and Least-to-Most. However, the most suitable way for LLMs to reason over tabular data remains an open question.

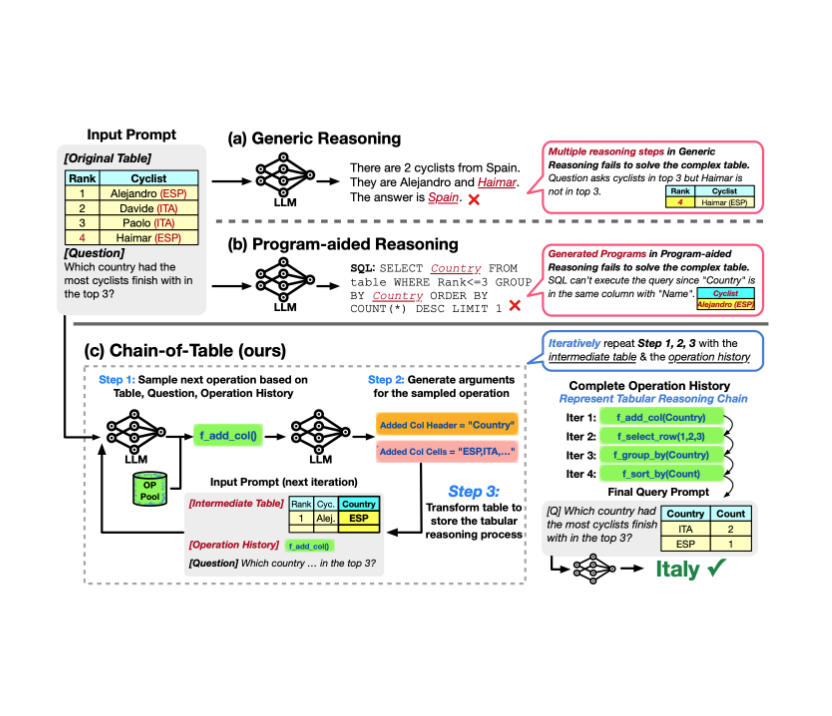
    In “Chain-of-Table: Evolving Tables in the Reasoning Chain for Table Understanding”, we propose a framework to tackle table understanding tasks, where we train LLMs to outline their reasoning step by step, updating a given table iteratively to reflect each part of a thought process, akin to how people solve the table-based problems. This enables the LLM to transform the table into simpler and more manageable segments so that it can understand and analyze each part of the table in depth. This approach has yielded significant improvements and achieved new state-of-the-art results on the WikiTQ, TabFact, and FeTaQA benchmarks. The figure below shows the high-level overview of the proposed Chain-of-Table and other methods.

    Given a complex table where a cyclist’s nationality and name are in the same cell, (a) generic, multi-step reasoning is unable to provide the correct answer (b) program-aided reasoning generates and executes programs (e.g., SQL queries) to deliver the answer, but falls short in accurately addressing the question. In contrast, (c) Chain-of-Table iteratively samples a chain of operations that effectively transform the complex table into a version specifically tailored to the question.

    Chain-of-Table

    In Chain-of-Table, we guide LLMs using in-context learning to iteratively generate operations and to update the table to represent its reasoning chain over tabular data. This enables LLMs to dynamically plan the next operation based on the results of previous ones. This continuous evolution of the table forms a chain, which provides a more structured and clear representation of the reasoning process for a given problem and enables more accurate and reliable predictions from the LLM.

    For example, when asked, “Which actor has the most NAACP image awards?” the Chain-of-Table framework prompts an LLM to generate tabular operations mirroring tabular reasoning processes. It first identifies the relevant columns. Then, it aggregates rows based on shared content. Finally, it reorders the aggregated results to yield a final table that clearly answers the posed question.

    These operations transform the table to align with the question presented. To balance performance with computational expense on large tables, we construct the operation chain according to a subset of tabular rows.. Meanwhile, the step-by-step operations reveal the underlying reasoning process through the display of intermediate results from the tabular operations, fostering enhanced interpretability and understanding.

    Illustration of the tabular reasoning process in Chain-of-Table. This iterative process involves dynamically planning an operation chain and accurately storing intermediate results in the transformed tables. These intermediate tables serve as a tabular thought process that can guide the LLM to land to the correct answer more reliably.

    Chain-of-Table consists of three main stages. In the first stage, it instructs the LLM to dynamically plan the next operation by in-context learning. Specifically, the prompt involves three components as shown in the following figure:

    1. The question Q: “Which country had the most cyclists finish in the top 3?”
    2. The operation history chain: f_add_col(Country) and f_select_row(1, 2, 3).
    3. The latest intermediate table T: the transformed intermediate table.

    By providing the triplet (T, Q, chain) in the prompt, the LLM can observe the previous tabular reasoning process and select the next operation from the operation pool to complete the reasoning chain step by step.

    Illustration of how Chain-of-Table selects the next operation from the operation pool and generates the arguments for the operation.(a) Chain-of-Table samples the next operation from the operation pool. (b) It takes the selected operation as input and generates its arguments.

    After the next operation f is determined, in the second stage, we need to generate the arguments. As above, Chain-of-Table considers three components in the prompt as shown in the figure: (1) the question, (2) the selected operation and its required arguments, and (3) the latest intermediate table.

    For instance, when the operation f_group_by is selected, it requires a header name as its argument.

    The LLM selects a suitable header within the table. Equipped with the selected operation and the generated arguments, Chain-of-Table executes the operation and constructs a new intermediate table for the following reasoning.

    Chain-of-Table iterates the previous two stages to plan the next operation and generate the required arguments. During this process, we create an operation chain acting as a proxy for the tabular reasoning steps. These operations generate intermediate tables presenting the results of each step to the LLM. Consequently, the output table contains comprehensive information about the intermediate phases of tabular reasoning. In our final stage, we employ this output table in formulating the final query and prompt the LLM along with the question for the final answer.

    Experimental setup

    We use PaLM 2-S and GPT 3.5 as the backbone LLMs and conduct the experiments on three public table understanding benchmarks: WikiTQ, TabFact, and FeTaQA. WikiTQ and FeTaQA are datasets for table-based question answering. TabFact is a table-based fact verification benchmark. In this blogpost, we will focus on the results on WikiTQ and TabFact. We compare Chain-of-Table with the generic reasoning methods (e.g., End-to-End QA, Few-Shot QA, and Chain-of-Thought) and the program-aided methods (e.g., Text-to-SQL, Binder, and Dater).

    More accurate answers

    Compared to the generic reasoning methods and program-aided reasoning methods, Chain-of-Table achieves better performance across PaLM 2 and GPT 3.5. This is attributed to the dynamically sampled operations and the informative intermediate tables.

    Understanding results on WikiTQ and TabFact with PaLM 2 and GPT 3.5 compared with various models.

    Better robustness on harder questions

    In Chain-of-Table, longer operation chains indicate the higher difficulty and complexity of the questions and their corresponding tables. We categorize the test samples according to their operation lengths in Chain-of-Table. We compare Chain-of-Table with Chain-of-Thought and Dater, as representative generic and program-aided reasoning methods. We illustrate this using results from PaLM 2 on WikiTQ.

    Performance of Chain-of-Thought, Dater, and the proposed Chain-of-Table on WikiTQ for questions that require an operation chain of varying lengths. Our proposed atomic operations significantly improve performance over generic and program-aided reasoning counterparts.

    Notably, Chain-of-Table consistently surpasses both baseline methods across all operation chain lengths, with a significant margin up to 11.6% compared with Chain-of-Thought, and up to 7.9% compared with Dater. Moreover, the performance of Chain-of-Table declines gracefully with increasing number of operations compared to other baseline methods, exhibiting only a minimal decrease when the number of operations increases from four to five.

    Better robustness with larger tables

    We categorize the tables from WikiTQ into three groups based on token number: small (<2000 tokens), medium (2000 to 4000 tokens) and large (>4000 tokens). We then compare Chain-of-Table with Dater and Binder, the two latest and strongest baselines.

    Performance of Binder, Dater, and the proposed Chain-of-Table on small (<2000 tokens), medium (2000 to 4000 tokens), and large (>4000 tokens) tables from WikiTQ. We observe that the performance decreases with larger input tables while Chain-of-Table diminishes gracefully, achieving significant improvements over competing methods. (As above, underlined text denotes the second-best performance; bold denotes the best performance.)

    Performance of Binder, Dater, and the proposed Chain-of-Table on small (<2000 tokens), medium (2000 to 4000 tokens), and large (>4000 tokens) tables from WikiTQ. We observe that the performance decreases with larger input tables while Chain-of-Table diminishes gracefully, achieving significant improvements over competing methods. (As above, underlined text denotes the second-best performance; bold denotes the best performance.)

    As anticipated, the performance decreases with larger input tables, as models are required to reason through longer contexts. Nevertheless, the performance of the proposed Chain-of-Table diminishes gracefully, achieving a significant 10+% improvement over the second best competing method when dealing with large tables. This demonstrates the efficacy of the reasoning chain in handling long tabular inputs.

    Conclusion

    Our proposed Chain-of-Table method enhances the reasoning capability of LLMs by leveraging the tabular structure to express intermediate steps for table-based reasoning. It instructs LLMs to dynamically plan an operation chain according to the input table and its associated question. This evolving table design sheds new light on the understanding of prompting LLMs for table understanding.

    Acknowledgements

    This research was conducted by Zilong Wang, Hao Zhang, Chun-Liang Li, Julian Martin Eisenschlos, Vincent Perot, Zifeng Wang, Lesly Miculicich, Yasuhisa Fujii, Jingbo Shang, Chen-Yu Lee, Tomas Pfister. Thanks to Chih-Kuan Yeh and Sergey Ioffe for their valuable feedback.

    Originally appeared here:
    Chain-of-table: Evolving tables in the reasoning chain for table understanding

    Go Here to Read this Fast! Chain-of-table: Evolving tables in the reasoning chain for table understanding

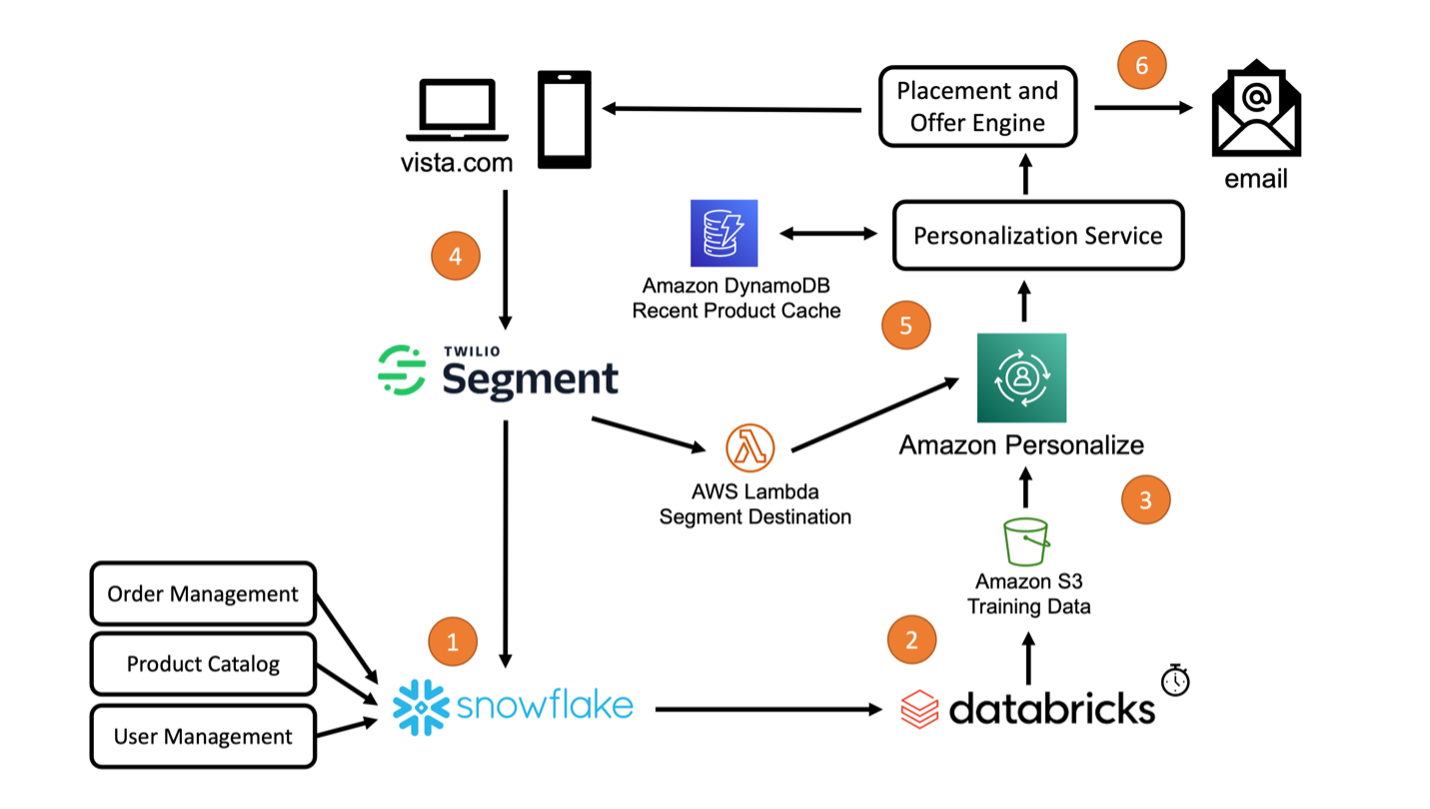
  • How VistaPrint delivers personalized product recommendations with Amazon Personalize

    How VistaPrint delivers personalized product recommendations with Amazon Personalize

    Ethan Fahy

    VistaPrint, a Cimpress business, is the design and marketing partner to millions of small businesses around the world. For more than two decades, VistaPrint has empowered small businesses to quickly and effectively create the marketing products – from promotional materials and signage to print advertising and more – to get the job done, regardless of […]

    Originally appeared here:
    How VistaPrint delivers personalized product recommendations with Amazon Personalize

    Go Here to Read this Fast! How VistaPrint delivers personalized product recommendations with Amazon Personalize