
Setting A Dockerized Python Environment — The Elegant Way
This post provides a step-by-step guide for setting up a Python dockerized development environment with VScode and the Dev Containers extension.
In the previous post on this topic, Setting A Dockerized Python Environment—The Hard Way, we saw how to set up a dockerized Python development environment via the command line interface (CLI). In this post, we will review a more elegant and robust approach for setting up a dockerized Python development environment using VScode and the Dev Containers extension.
Related articles:
Setting A Dockerized Python Environment — The Hard Way
By the end of this tutorial, you will be able to set up a simple Python development environment with VScode and the Dev Containers extension.

Prerequisites
To follow along with this tutorial, you will need the following:
- Docker Desktop (or equivalent) if you are using a macOS or Windows OS machine, or Docker installed if you are using a Linux OS
- Docker Hub account to pull the image from
- VScode IDE and the Dev Containers extension installed
Throughout this tutorial, we will use the official Python image — python:3.1o.
All the code examples in this post are available here:
GitHub – RamiKrispin/vscode-python-medium: Supporting code for Medium Article
The Dev Containers Extension
Before getting started, let’s explain what the Dev Containers extension is and when you should consider using it.
In a nutshell, the VScode Dev Containers extension enables you to open an isolated VScode session inside a docker container seamlessly. The level of isolation includes the following three layers:
- Environment
- VScode settings
- VScode extensions
The devcontainer.json file defines the session settings, enabling us to set and define the above three layers.
To set and launch your project folder inside a container with the Dev Containers extension, you will need the following two components:
- Install the Dev Containers extension
- On your project folder, create a folder named .devcontainer and set a devcontainer.json file
The below diagram describes the Dev Containers general architecture:
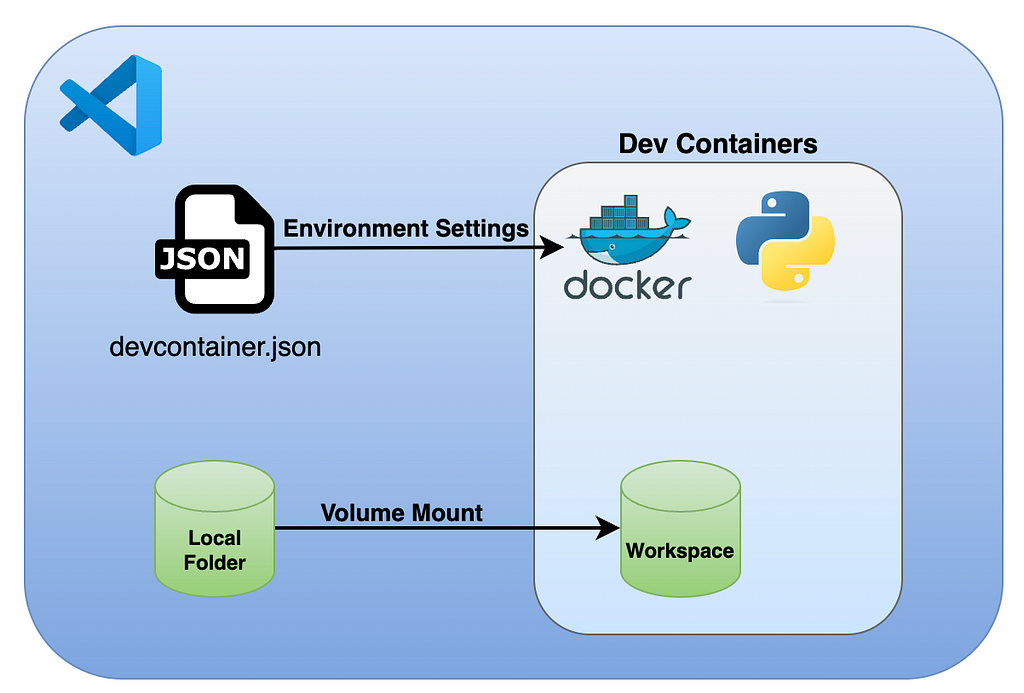
Upon launch, the Dev Containers extension spins a new VScode session inside a container. By default, it mounts the local folder to the container, which enables us to keep the code persistent and sync with our local folder. You can mount additional folders, but this is outside the scope of this tutorial.
In the next section, we will see how to set up a Python environment with the devcontainer.json file.
Setting a Dockerized Python Environment
Before getting started with the devcontainer.json settings, let’s first define the scope of the development environment. It should include the following features:
- Python 3.10
- Support Jupyter notebooks
- Install required libraries — Pandas and VScode Jupyter supporting libraries
- Install supporting extensions — Python and Jupyter
In the following sections, we will dive into the core functionality of the devcontainer.json file. We will start with a minimalist Python environment and demonstrate how to customize it by adding different customization layers.
Build vs. Image
The main requirement for launching a containerized session with the Dev Containers extension is to define the image settings. There are two approaches for setting the image:
- Build the image and run it during the launch time of the container with the build argument. This argument enables you to define a Dockerfile for the build and pass arguments to the docker build function. Once the build process is done, it will launch the session inside the container
- Launch the session with an existing image using the image argument
Depending on the use cases, each method has its own pros and cons. You should consider using the image argument when you have an image that fully meets the environment requirements. Likewise, a good use case for the build argument is when you have a base image but need to add minor customization settings.
In the next section, we will start with a simple example of launching a Python environment using the image argument to import the official Python image (python:3.10).
Basic Dockerized Python Environment
The below devcontainer.json file provides a simple example for setting up a Python environment. It uses the image argument to define the python:3.10 image as the session environment:
devcontainer.json
{
    "name": "Python Development Environment",
    "image": "python:3.10"
}
The name argument defines the environment name. In this case, we set it as Python Development Environment.
Before launching the environment, please make sure:
- Your Docker Desktop (or equivalent) is open
- You are logged in to Docker Hub (or pull in advance the Python image)
- The devcontainer.json file is set in the project folder under the .devcontainer folder:
.
└── .devcontainer
    └── devcontainer.json
The code for this example is available here.
To launch a session, click the Dev Container >< symbol on the bottom left and select the Reopen in Container option as demonstrated in the screenshot below:
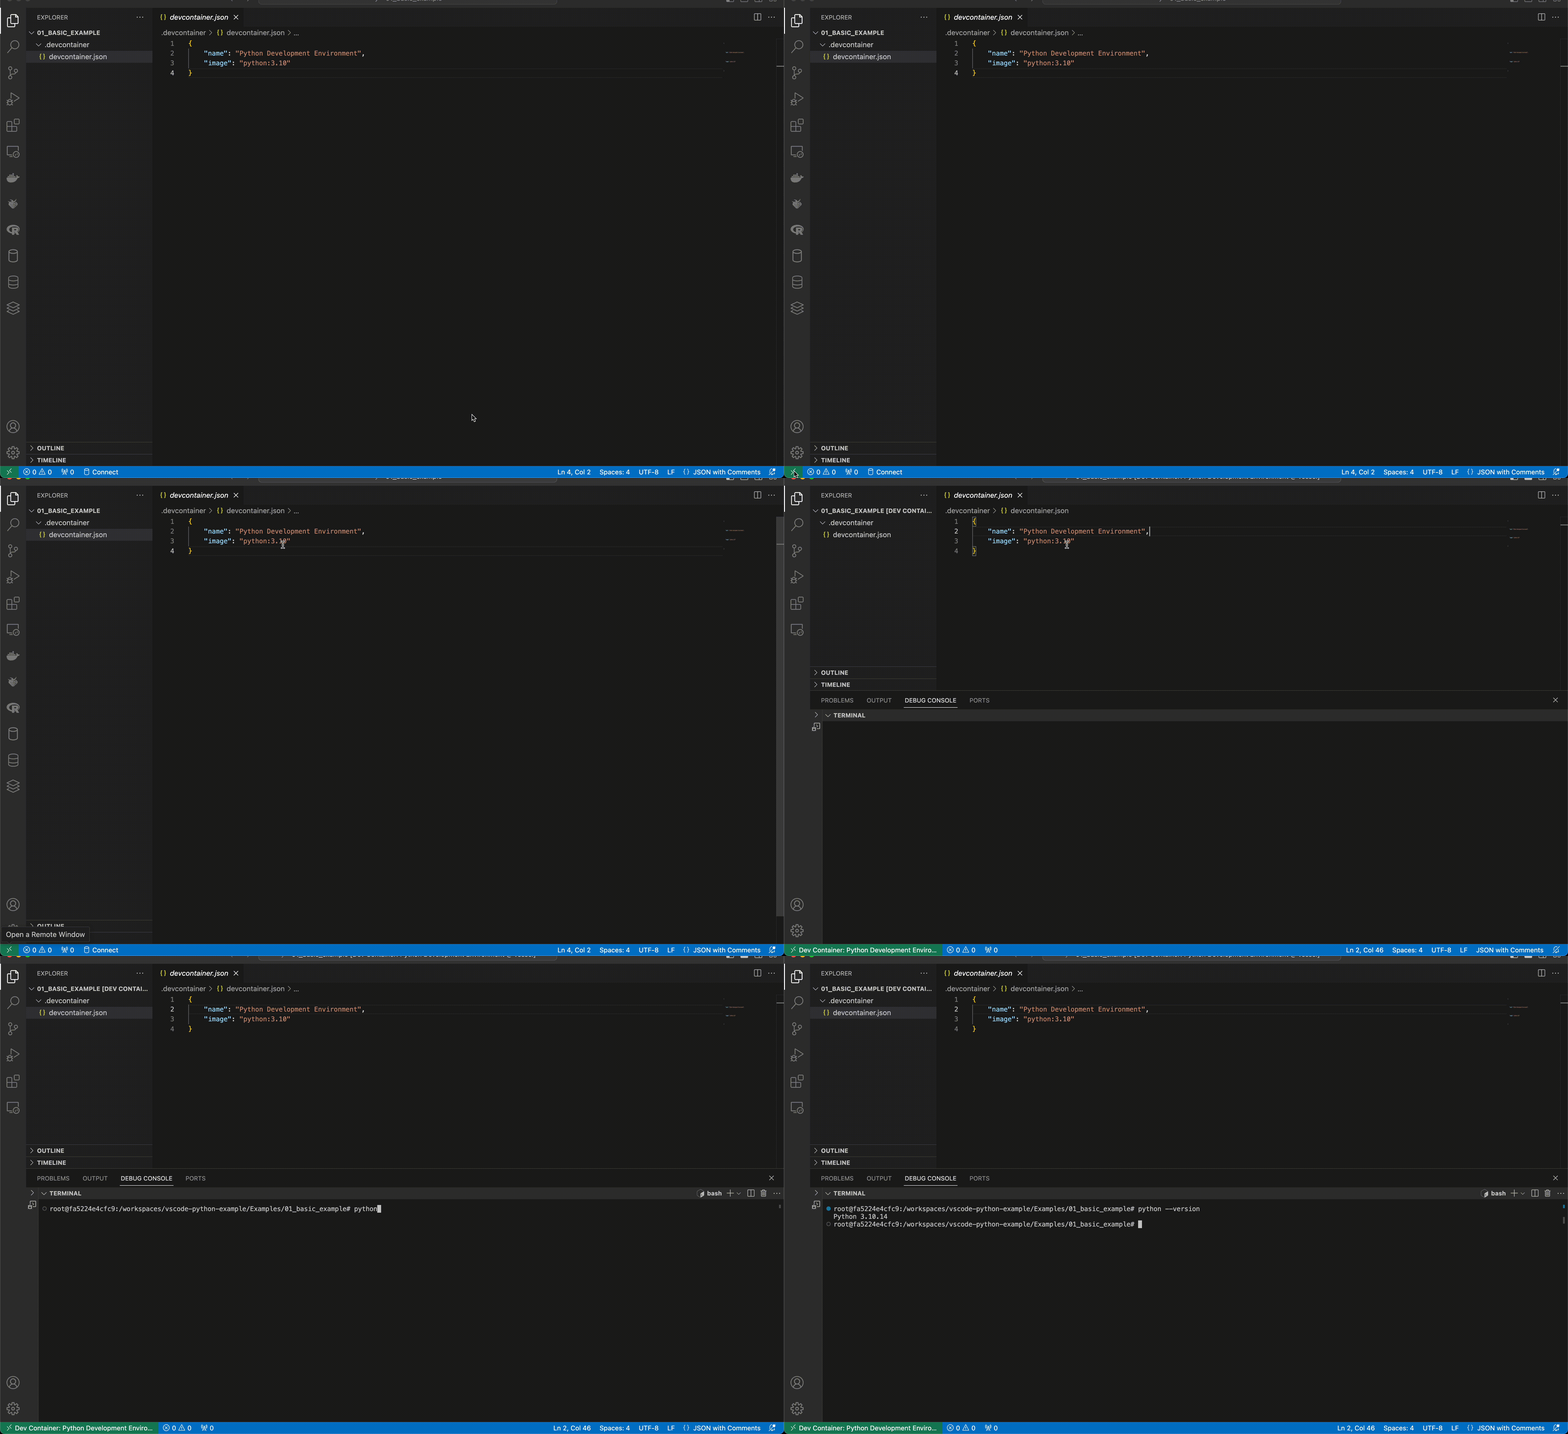
Note that during the first launch time of the session, the Dev Containers extension will look for the image that was defined by the image argument (in this case — python:3.10). If the image is not available locally, it will pull it from Docker Hub, and it might take a few minutes. Afterward, it should take a few seconds to launch the session.
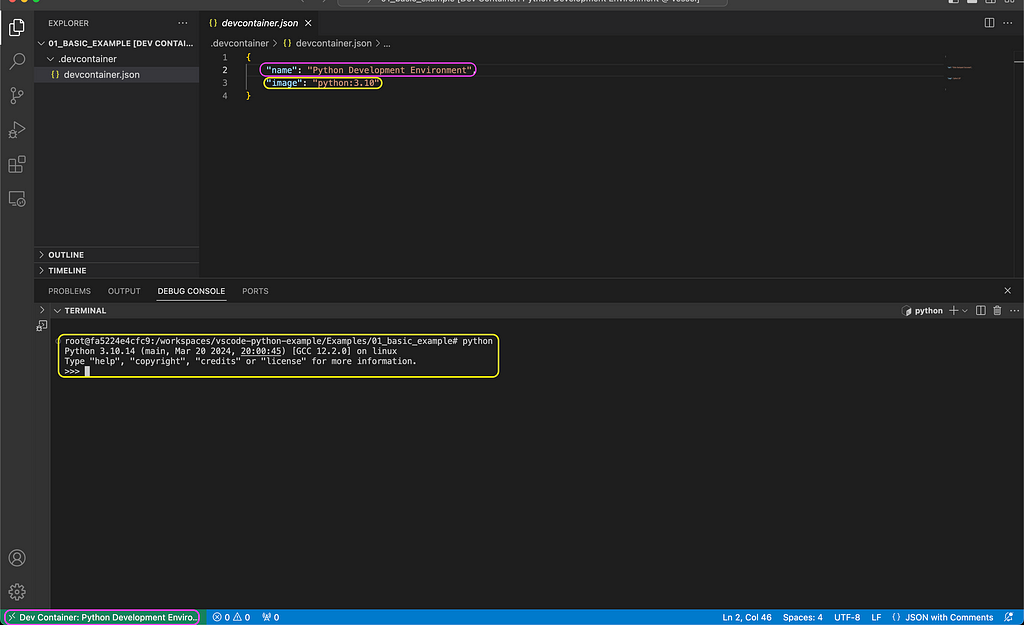
In the above screenshot, you can see the mapping between the devcontainer.json arguments and the session settings. The session name is now available on the bottom right (marked in purple) and aligned with the value of the name argument. Likewise, the session is now running inside the python:3.10 container, and you can launch Python from the terminal.
The Python container comes with the default Python libraries. In the following section, we will see how we can add more layers on top of the Python base image with the build argument.
Customize the Python Environment with a Dockerfile
Let’s now customize the above environment by modifying the devcontainer.json. We will replace the image argument with thebuild argument. The build argument enables us to build the image during the session launch time with a Dockerfile and pass arguments to the docker build function. We will follow the same approach as demonstrated in this post to set the Python environment:
- Import the python:3.10 as the base image
- Set a virtual environment
- Install the required libraries
We will use the following Dockerfile to set the Python environment:
Dockerfile
FROM python:3.10

ARG PYTHON_ENV=my_env

ENV PYTHON_ENV=$PYTHON_ENV

RUN mkdir requirements

COPY requirements.txt set_python_env.sh /requirements/

RUN bash ./requirements/set_python_env.sh $PYTHON_ENV
We use the FROM argument to import the Python image, and the ARG and ENVarguments to set the virtual environment as an argument and environment variable. In addition, we use the following two helper files to set a virtual environment and install the required libraries:
- requirements.txt — a setting file with a list of required libraries. For this demonstration, we will install the Pandas library, version 2.0.3., and the Jupyter supporting libraries (ipykernel, ipywidgets, jupyter). The wheels library is a supporting library that handles C dependencies
- set_python_env.sh — a helper bash script that sets a virtual environment and installs the required libraries using the requirements.txt file
requirements.txt
wheel==0.40.0
pandas==2.0.3
ipykernel
ipywidgets
jupyter
set_python_env.sh
#!/usr/bin/env bash

PYTHON_ENV=$1

python3 -m venv /opt/$PYTHON_ENV
        && export PATH=/opt/$PYTHON_ENV/bin:$PATH
        && echo "source /opt/$PYTHON_ENV/bin/activate" >> ~/.bashrc

source /opt/$PYTHON_ENV/bin/activate

pip3 install -r ./requirements/requirements.txt
Last but not least, we will use the following test file to evaluate if the Pandas library was installed properly and print Hello World! message:
test1.py
import pandas as pd

print("Hello World!")
Let’s make the changes in the devcontainer.json file, and replace the image argument with the build argument:
devcontainer.json
{
    "name": "Python Development Environment",
    "build": {
        "dockerfile": "Dockerfile",
        "context": ".",
        "args": {
            "PYTHON_ENV": "my_python_dev"
        }
    }
}
The files for this example are available here.
The build sub-arguments enable us to customize the image build by passing arguments to the docker build function. We use the following arguments to build the image:
- dockerfile — the path and name of the Dockerfile
- context — set the path of the local file system to enable access for files with the COPY argument during the build time. In this case, we use the current folder of the devcontainer.json file (e.g., the .devcontainer folder).
- args — set and pass arguments to the container during the build process. We use the PYTHON_ENV argument to set the virtual environment and name it as my_python_dev
You should have the three files — Dockerfile, requirements.txt, and set_python_env.sh stored under the .devcontainer folder, along with the devcontainer.json file:
.
├── .devcontainer
│   ├── Dockerfile
│   ├── devcontainer.json
│   ├── requirements.txt
│   └── set_python_env.sh
└── test2.py
Let’s now launch the session using the new settings and test it with the test1.py file:
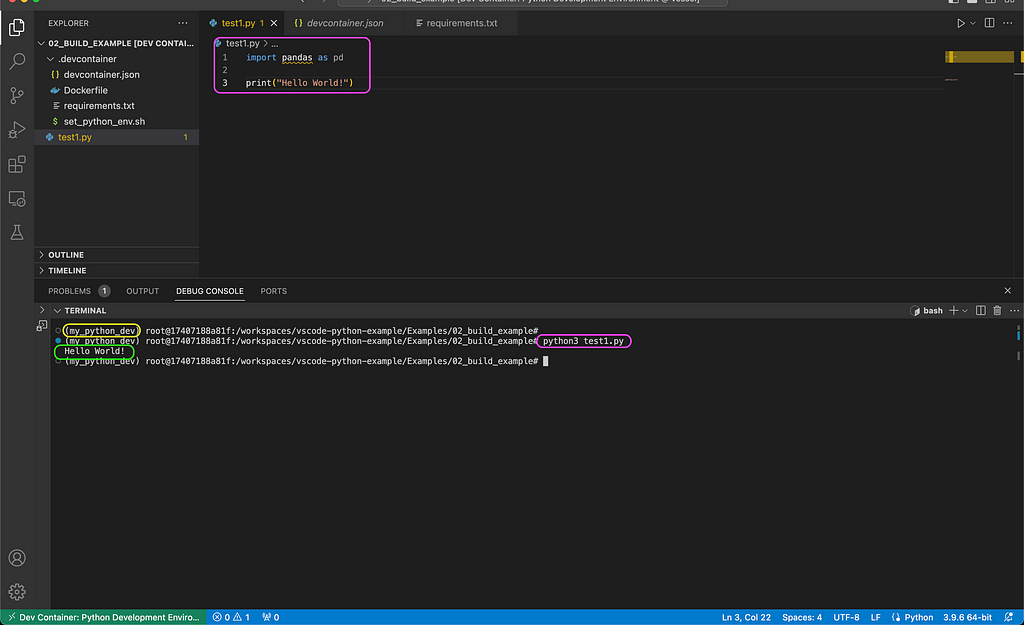
As you can notice in the above screenshot, we were able to successfully run the test script from the terminal (marked in purple), and it printed the Hello World! message as expected (marked in green). In addition, the virtual environment we set in the image (my_python_dev) is loaded by default (marked in yellow).
In the next section, we will see how to customize the VScode settings of the Dev Containers session.
Customize VScode Settings
One of the great features of the Dev Containers extension is that it isolates the session setting from the main VScode settings. This means you can fully customize your VScode settings at the project level. It extends the development environment’s reproducibility beyond the Python or OS settings. Last but not least, it makes collaboration with others or working on multiple machines seamless and efficient.
We will conclude this tutorial with the next example, where we see how to customize the VScode settings with the customizations argument. We will add the argument to the previous example and use the vscode sub-argument to set the environment default Python interpreter and the required extensions:
devcontainer.json
{
    "name": "Python Development Environment",
    "build": {
        "dockerfile": "Dockerfile",
        "context": ".",
        "args": {
            "PYTHON_ENV": "my_python_dev"
        }
    },
    "customizations": {
        "vscode": {
            "settings": {
                "python.defaultInterpreterPath": "/opt/my_python_dev/bin/python3",
                "python.selectInterpreter": "/opt/my_python_dev/bin/python3"
            },
            "extensions": [
                "ms-python.python",
                "ms-toolsai.jupyter"
            ]
        }
    }
}
The files for this example are available here.
We use the settings argument to define the Python virtual environment as defined in the image. In addition, we use the extensions argument for installing the Python and Jupyter supporting extensions.
Note: The path of the the virtual environment defined by the type of applicationas that was used to set the environment. As we use venv and named it as my_python_dev, the path is opt/my_python_dev/bin/python3.
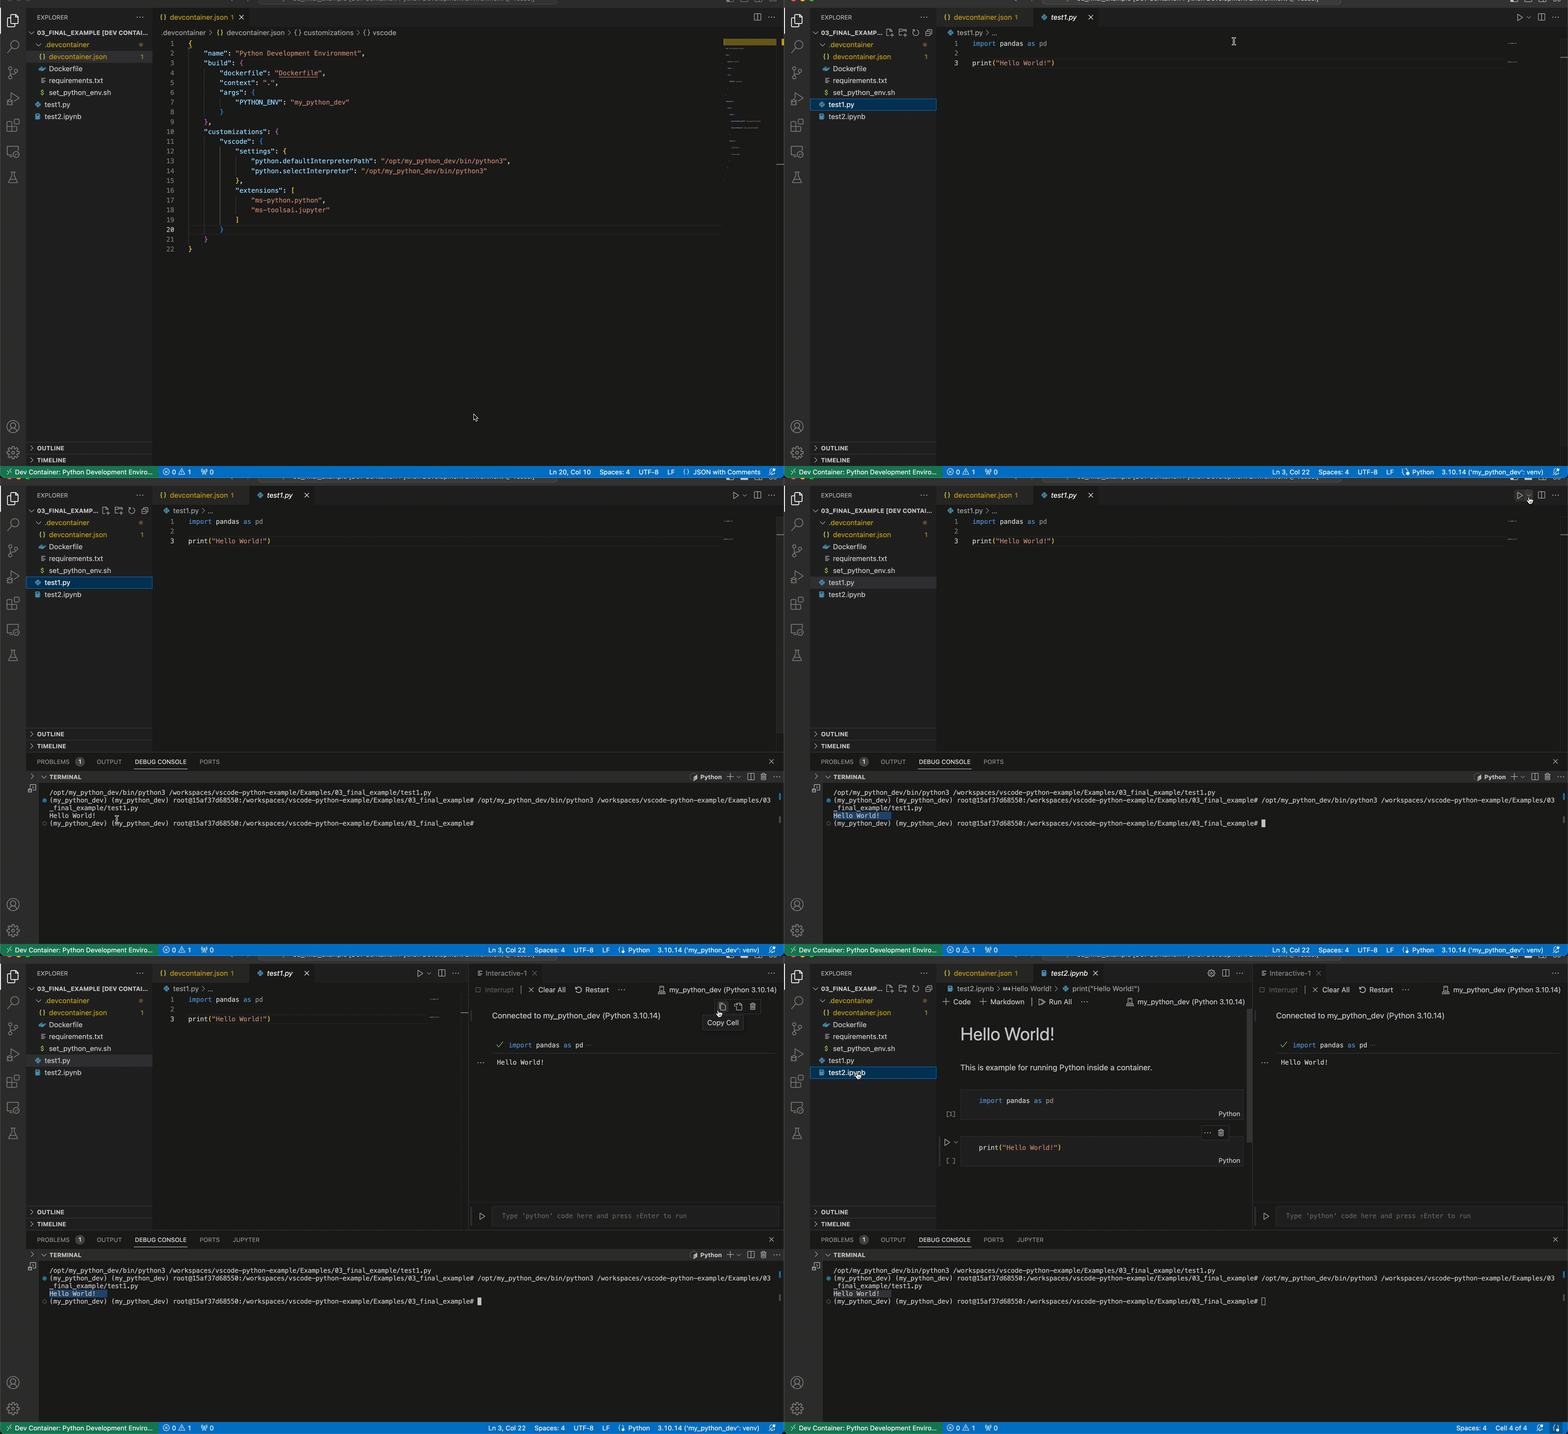
After we add the Python extension, we can launch Python scripts using the extension plug-in, as demonstrated in the screenshot below. In addition, we can execute the Python code leveraging the Juptyer extension, in an interactive mode:
Summary
In this tutorial, we reviewed how to set a dockerized Python environment with VScode and the Dev Containers extension. The Dev Containers extension makes the integration of containers with the development workflow seamless and efficient. We saw how, with a few simple steps, we can set and customize a dockerized Python environment using the devcontainer.json file. We reviewed the two approaches for setting the session image with the image and build arguments and setting extensions with the customizations argument. There are additional customization options that were not covered in this tutorial, and I recommend checking them:
- Define environment variables
- Mount additional volumes
- Set arguments to the docker run command
- Run post-launch command
If you are interested in diving into more details, I recommend checking this tutorial:
Resources
- Code examples — https://github.com/RamiKrispin/vscode-python-medium
- VScode — https://code.visualstudio.com/
- Dev Containers — https://code.visualstudio.com/docs/devcontainers/containers
- Setting a dockerized Python development environment with GitHub template — https://medium.com/@rami.krispin/setting-a-dockerized-python-development-environment-template-de2400c4812b
Setting A Dockerized Python Environment — The Elegant Way was originally published in Towards Data Science on Medium, where people are continuing the conversation by highlighting and responding to this story.
Originally appeared here:
Setting A Dockerized Python Environment — The Elegant Way
Go Here to Read this Fast! Setting A Dockerized Python Environment — The Elegant Way
