The cryptocurrency world is perpetually vibrant with daily revelations. Today, we dive into some of the most captivating developments in cryptocurrencies that are currently making waves. Stellar, once
Ethereum (ETH) experienced a notable surge on Friday, fueled by Bitcoin’s recent performance, which saw the leading crypto asset reclaim the $63,000 mark.
What a year 2024 has been for meme coins! PEPE faced some setbacks, with a 6.69% decrease in September, but is eyeing a strong 25% comeback. On the other hand, Simon’s Cat has climbed a whopping 85.09% since its debut in August. But it’s BlockDAG that’s stirring up the sports world, amassing $74.5 million from […]
When you build a chart with data that is not ours, you must cite the source from which you took the data. This serves to do justice to the work done by others and increase your credibility towards those who will look at the graph. If you cite the data source, your chart will surely be more authoritative because it is based on verifiable data.
In this article, you will see four strategies for placing credits in a chart, although you can use your creativity to place it wherever you want:
Under the title/subtitle
Under the main chart
Under the next steps
Sideways.
Under the title/subtitle
Placing the credits under the title/subtitle generates a sense of trust in the audience from the beginning of the story. The following figure shows an example of credits under the title/subtitle.
Image by Author
Use this placement if you want your audience to know the sources from the beginning of the story. Although this placement may generate trust, it could also be distracting since the audience may leave your story to search for the sources.
Under the Main Chart
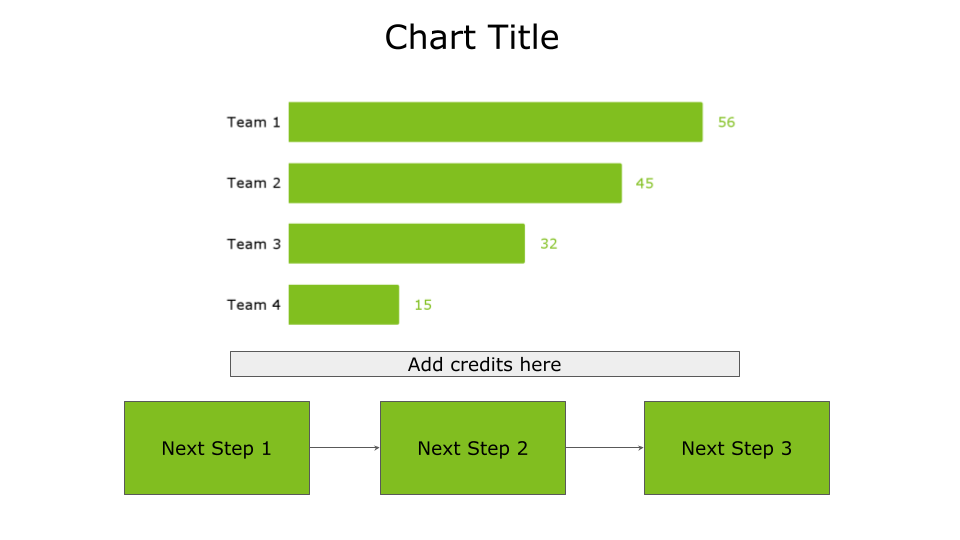
Placing the credits under the main chart involves adding detail to the story’s main point, which helps reinforce the story’s essential points. The following figure shows an example of credits placed under the main chart.
Image by Author
Use this placement if you want to reinforce the main message of your chart.
Under the Next Steps
In this case, credit the sources at the end of your story as an appendix to the next steps, as shown in the following figure.
Image by Author
Use this placement if you want to reinforce the next steps of your story.
Sideways
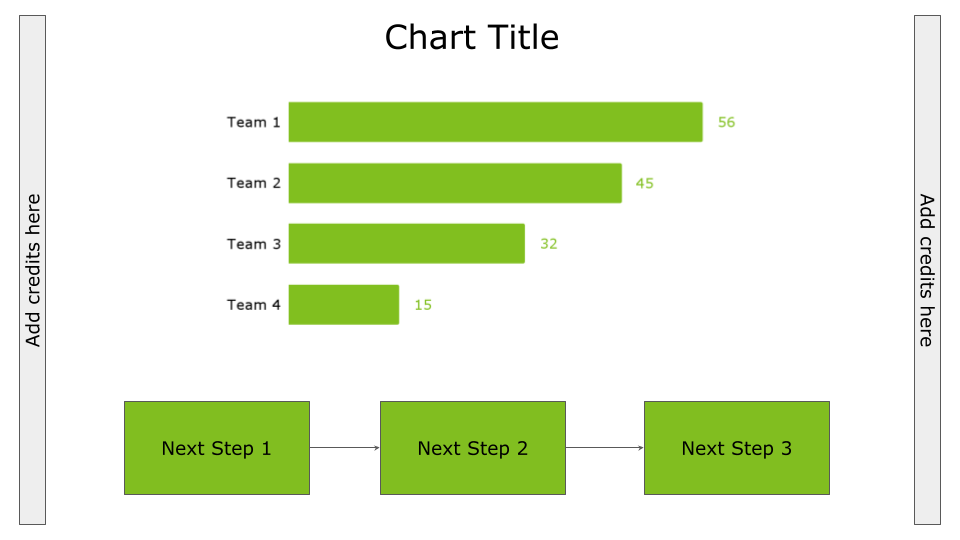
Placing credits sideways means considering them as external to the main data story workflow. You can place credits on the left or right, as shown in the following figure.
Image by Author
Use this placement to keep credits external to your main data story workflow and keep the audience concentrated on the story.
Discussion
You have seen how to place credits in a chart. If you have read carefully, at a certain point, precisely in the last type of placement—sideways—I talked about the main data story workflow. But what is it exactly? Any chart, if done well, tells a story, and a story normally follows a flow from the initial scene to its completion, with the final scene.
Even in a simple chart, you can tell a story, and precisely, a story in a chart has three main points: a beginning, a main point, and a final part.
The beginning corresponds to the context used to frame the chart’s content. Usually, you can insert the context immediately under the title, but you can also put it in other parts, such as on the left of the chart. In general, insert the context before the main chart so the reader can read it before the graph.
Then, there is the main point that corresponds precisely to your chart.
Finally, there is the final part of the story, which corresponds to the next steps. Place the next steps at the bottom, i.e., below the chart or to the right, so the reader will read them after reading the other parts of the graph.
Summary
Congratulations! You have just learned four possible ways to place credits in your chart. You have the following options: under the title/subtitle, under the main chart, under the next steps, or sideways.
Choosing one solution over another depends on your aesthetic taste and the space you have in the chart. The important thing is that the credits do not hinder the normal flow of the story.
This is a small final tip. If you can, always add a link to the data source in the credits so that the reader can personally verify the integrity of the data you show in your chart.
That’s all for me today. Thank you, as always, for reading the article.
If you want to learn more about turning your raw chart into a story, you can use the DIKW (Data-Information-Knowledge-Wisdom) pyramid.
Over the past few years, thanks to my children’s creativity and work, I have developed a passion for origami. This passion inspired me to create a practical pyramid to keep on the desk as a gadget.
In the DIKW origami pyramid, you will find, in a compact way:
the steps from data to wisdom
how to use them to transform data into a story
how to use Generative AI to help you build the story
In the following video, I explain how to create a DIKW pyramid gadget and how to use it to turn data into a story. You can download the DIKW pyramid origami template here.
Using Gemini + Text to Speech + MoviePy to create a video, and what this says about what GenAI is becoming rapidly useful for
Like most everyone, I was flabbergasted by NotebookLM and its ability to generate a podcast from a set of documents. And then, I got to thinking: “how do they do that, and where can I get some of that magic?” How easy would it be to replicate?
Goal: Create a video talk from an article
I don’t want to create a podcast, but I’ve often wished I could generate slides and a video talk from my blog posts —some people prefer paging through slides, and others prefer to watch videos, and this would be a good way to meet them where they are. In this article, I’ll show you how to do this.
I am going to use Google Gemini Flash because (a) it is the least expensive frontier LLM today, (b) it’s multimodal in that it can read and understand images also, and (c) it supports controlled generation, meaning that we can make sure the output of the LLM matches a desired structure.
import pdfkit import os import google.generativeai as genai from dotenv import load_dotenv
Note that I’m using Google Generative AI and not Google Cloud Vertex AI. The two packages are different. The Google one supports Pydantic objects for controlled generation; the Vertex AI one only supports JSON for now.
2. Get a PDF of the article
I used Python to download the article as a PDF, and upload it to a temporary storage location that Gemini can read:
Unfortunately, something about medium prevents pdfkit from getting the images in the article (perhaps because they are webm and not png …). So, my slides are going to be based on just the text of the article and not the images.
3. Create lecture notes in JSON
Here, the data format I want is a set of slides each of which has a title, key points, and a set of lecture notes. The lecture as a whole has a title and an attribution also.
class Slide(BaseModel):
    title: str
    key_points: List[str]
    lecture_notes: str

class Lecture(BaseModel):
    slides: List[Slide]
    lecture_title: str
    based_on_article_by: str
Let’s tell Gemini what we want it to do:
lecture_prompt = """
You are a university professor who needs to create a lecture to
a class of undergraduate students.

* Create a 10-slide lecture based on the following article.
* Each slide should contain the following information:
  - title: a single sentence that summarizes the main point
  - key_points: a list of between 2 and 5 bullet points. Use phrases, not full sentences.
  - lecture_notes: 3-10 sentences explaining the key points in easy-to-understand language. Expand on the points using other information from the article.
* Also, create a title for the lecture and attribute the original article's author.
"""
The prompt is pretty straightforward — ask Gemini to read the article, extract key points and create lecture notes.
Now, invoke the model, passing in the PDF file and asking it to populate the desired structure:
We pass in the prompt as the system prompt, so that we don’t need to keep sending in the prompt with new inputs.
We specify the desired response type as JSON, and the schema to be a Pydantic object
We send the PDF file to the model and tell it generate a response. We’ll wait for it to complete (no need to stream)
The result is JSON, so extract it into a Python object:
lecture = json.loads(response.text)
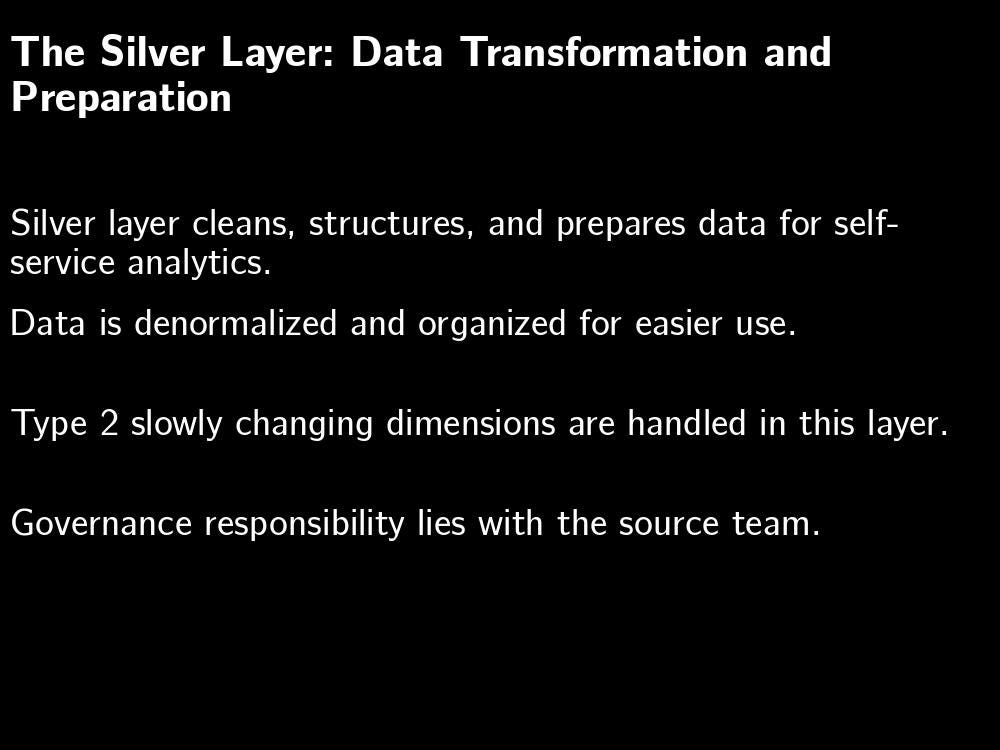
For example, this is what the 3rd slide looks like:
{'key_points': [
    'Silver layer cleans, structures, and prepares data for self-service analytics.',
    'Data is denormalized and organized for easier use.',
    'Type 2 slowly changing dimensions are handled in this layer.',
    'Governance responsibility lies with the source team.'
  ],
 'lecture_notes': 'The silver layer takes data from the bronze layer and transforms it into a usable format for self-service analytics. This involves cleaning, structuring, and organizing the data. Type 2 slowly changing dimensions, which track changes over time, are also handled in this layer. The governance of the silver layer rests with the source team, which is typically the data engineering team responsible for the source system.',
 'title': 'The Silver Layer: Data Transformation and Preparation'
}
4. Convert to PowerPoint
We can use the Python package pptx to create a Presentation with notes and bullet points. The code to create a slide looks like this:
for slidejson in lecture['slides']:
    slide = presentation.slides.add_slide(presentation.slide_layouts[1])
    title = slide.shapes.title
    title.text = slidejson['title']
    # bullets
    textframe = slide.placeholders[1].text_frame
    for key_point in slidejson['key_points']:
        p = textframe.add_paragraph()
        p.text = key_point
        p.level = 1
    # notes
    notes_frame = slide.notes_slide.notes_text_frame
    notes_frame.text = slidejson['lecture_notes']
The result is a PowerPoint presentation that looks like this:
The PowerPoint file that was generated from the keypoints and lecture notes. Screenshot by author.
Not very fancy, but definitely a great starting point for editing if you are going to give a talk.
5. Read the notes aloud and save audio
Well, we were inspired by a podcast, so let’s see how to create just an audio of someone summarizing the article.
We already have the lecture notes, so let’s create audio files of each of the slides.
Here’s the code to take some text, and have an AI voice read it out. We save the resulting audio into an mp3 file:
from google.cloud import texttospeech
def convert_text_audio(text, audio_mp3file): """Synthesizes speech from the input string of text.""" tts_client = texttospeech.TextToSpeechClient() input_text = texttospeech.SynthesisInput(text=text)
# The response's audio_content is binary. with open(audio_mp3file, "wb") as out: out.write(response.audio_content) print(f"{audio_mp3file} written.")
What’s happening in the code above?
We are using Google Cloud’s text to speech API
Asking it to use a standard US accent female voice. If you were doing a podcast, you’d pass in a “speaker map” here, one voice for each speaker.
We then give it in the input text, ask it generate audio
Save the audio as an mp3 file. Note that this has to match the audio encoding.
Now, create audio by iterating through the slides, and passing in the lecture notes:
for slideno, slide in enumerate(lecture['slides']):
        text = f"On to {slide['title']} n"
        text += slide['lecture_notes'] + "nn"
        filename = os.path.join(outdir, f"audio_{slideno+1:02}.mp3")
        convert_text_audio(text, filename)
        filenames.append(filename)
The result is a bunch of audio files. You can concatenate them if you wish using pydub:
combined = pydub.AudioSegment.empty()
for audio_file in audio_files:
    audio = pydub.AudioSegment.from_file(audio_file)
    combined += audio
    # pause for 4 seconds
    silence = pydub.AudioSegment.silent(duration=4000)
    combined += silence
combined.export("lecture.wav", format="wav")
But it turned out that I didn’t need to. The individual audio files, one for each slide, were what I needed to create a video. For a podcast, of course, you’d want a single mp3 or wav file.
6. Create images of the slides
Rather annoyingly, there’s no easy way to render PowerPoint slides as images using Python. You need a machine with Office software installed to do that — not the kind of thing that’s easily automatable. Maybe I should have used Google Slides … Anyway, a simple way to render images is to use the Python Image Library (PIL):
End result? We have four artifacts, all created automatically from the article.pdf:
lecture.json lecture.mp4 lecture.pptx lecture.wav
There’s:
a JSON file with keypoints, lecture notes, etc.
A PowerPoint file that you can modify. The slides have the key points, and the notes section of the slides has the “lecture notes”
An audio file consisting of an AI voice reading out the lecture notes
A mp4 movie (that I uploaded to YouTube) of the audio + images. This is the video talk that I set out to create.
Pretty cool, eh?
8. What this says about the future of software
We are all, as a community, probing around to find what this really cool technology (generative AI) can be used for. Obviously, you can use it to create content, but the content that it creates is good for brainstorming, but not to use as-is. Three years of improvements in the tech have not solved the problem that GenAI generates blah content, and not-ready-to-use code.
That brings us to some of the ancillary capabilities that GenAI has opened up. And these turn out to be extremely useful. There are four capabilities of GenAI that this post illustrates.
(1) Translating unstructured data to structured data
The Attention paper was written to solve the translation problem, and it turns out transformer-based models are really good at translation. We keep discovering use cases of this. But not just Japanese to English, but also Java 11 to Java 17, of text to SQL, of text to speech, between database dialects, …, and now of articles to audio-scripts. This, it turns out is the stepping point of using GenAI to create podcasts, lectures, videos, etc.
All I had to do was to prompt the LLM to construct a series of slide contents (keypoints, title, etc.) from the article, and it did. It even returned the data to me in structured format, conducive to using it from a computer program. Specifically, GenAI is really good at translating unstructured data to structured data.
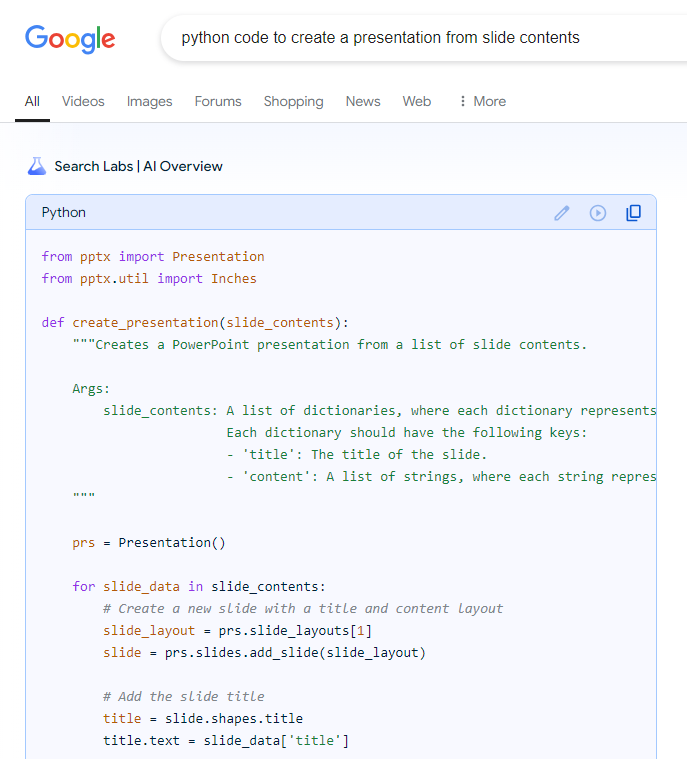
(2) Code search and coding assistance are now dramatically better
The other thing that GenAI turns out to be really good at is at adapting code samples dynamically. I don’t write code to create presentations or text-to-speech or moviepy everyday. Two years ago, I’d have been using Google search and getting Stack Overflow pages and adapting the code by hand. Now, Google search is giving me ready-to-incorporate code:
Google Search returning code samples, adapated to my specific query. Screenshot by author.
Of course, had I been using a Python IDE (rather than a Jupyter notebook), I could have avoided the search step completely — I could have written a comment and gotten the code generated for me. This is hugely helpful, and speeds up development using general purpose APIs.
(3) GenAI web services are robust and easy-to-consume
Let’s not lose track of the fact that I used the Google Cloud Text-to-Speech service to turn my audio script into actual audio files. Text-to-speech is itself a generative AI model (and another example of the translation superpower). The Google TTS service which was introduced in 2018 (and presumably improved since then) was one of the first generative AI services in production and made available through an API.
In this article, I used two generative AI models — TTS and Gemini — that are made available as web services. All I had to do was to call their APIs.
(4) It’s easier than ever to provide end-user customizability
I didn’t do this, but you can squint a little and see where things are headed. If I’d wrapped up the presentation creation, audio creation, and movie creation code in services, I could have had a prompt create the function call to invoke these services as well. And put a request-handling agent that would allow you to use text to change the look-and-feel of the slides or the voice of the person reading the video.
It becomes extremely easy to add open-ended customizability to the software you build.
Summary
Inspired by the NotebookLM podcast feature, I set out to build an application that would convert my articles to video talks. The key step is to prompt an LLM to produce slide contents from the article, another GenAI model to convert the audio script into audio files, and use existing Python APIs to put them together into a video.
This article illustrates four capabilities that GenAI is unlocking: translation of all kinds, coding assistance, robust web services, and end-user customizability.
I loved being able to easily and quickly create video lectures from my articles. But I’m even more excited about the potential that we keep discovering in this new tool we have in our hands.
Turns out Sascha Heyer wrote up how to use GenAI to generate a podcast, which is the exact Notebook LM usecase. His approach is somewhat similar to mine, except that there is no video, just audio. In a cool twist, he uses his own voice as one of the podcast speakers!
Of course, here’s the video talk of this article created using the technique shown in this video. Ideally, we are pulling out code snippets and images from the article, but this is a start …
A GCP native, fully serverless implementation that you will replicate in minutes
After discussing Graph RAG conceptually, let’s bring it into production. This is how to productionize GraphRAG: completely serverless, fully parallelized to minimize inference and indexing times, and without ever touching a graph database (promise!).
In this article, I will introduce you to graphrag-lite, an end-to-end Graph RAG ingestion and query implementation. I published graphrag-lite as an OSS project to make your life easier when deploying graphrag on GCP. Graphrag-lite is Google Cloud-native and ready to use off the shelf. The code is designed in a modular manner, adjustable for your platform of choice.
Recap:
Retrieval Augmented Generation itself does not yet describe any specific architecture or method. It only depicts the augmentation of a given generation task with an arbitrary retrieval method. The original RAG paper (Retrieval-Augmented Generation for Knowledge-Intensive NLP Tasks by Lewis et. al.) compares a two-tower embedding approach with bag-of-words retrieval.
Modern Q&A systems differentiate between local and global questions. A local (extractive) question on an unstructured sample knowledge base might be “Who won the Nobel Peace Prize in 2023?”. A global (aggregative) question might be “Who are the most recent Nobel prize winners you know about?”. Text2embedding RAG leaves obvious gaps when it comes to global and structured questions. Graph RAG can close these gaps and it does that well! Via an abstraction layer, it learns the semantics of the knowledge graph communities. That builds a more “global” understanding of the indexed dataset. Here is a conceptual intro to Graph RAG to read up on.
The Graph RAG pipeline
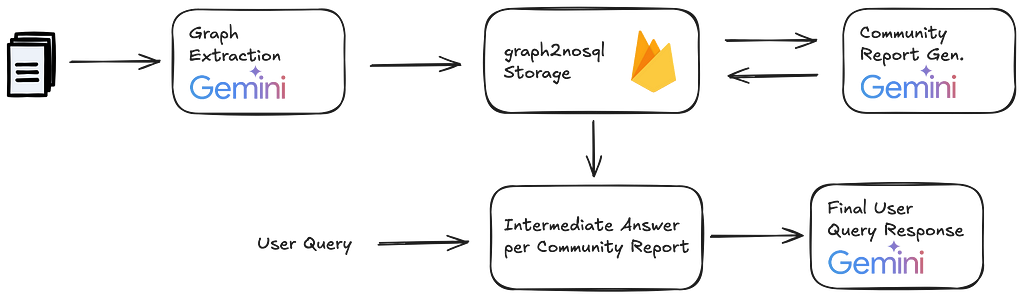
A Graph RAG pipeline will usually follows the following steps:
Graph Extraction
This is the main ingestion step. Your LLM scans every incoming document with a prompt to extract relevant nodes and edges for our knowledge graph. You iterate multiple times over this prompt to assure you catch all relevant pieces of information.
Graph Storage
You store the extracted nodes and edges in your data store of choice. Dedicated Graph DBs are one option, but they are often tedious. Graph2nosql is a Python-based interface to store and manage knowledge graphs in Firestore or any other NoSQL DB. I open sourced this project becase I did not find any other comparable, knowledge graph native option on the market.
Community detection
Once you store your knowledge graph data you will use a community detection algorithm to identify groups of nodes that are more densely connected within each other than they are to the rest of the graph. In the context of a knowledge graph, the assumption is that dense communities cover common topics.
Community report generation
You then instruct your LLM to generate a report for each graph community. These community reports help abstract across single topics to grasp wider, global concepts across your dataset. Community reports are stored along with your knowledge graph. This concludes the ingestion layer of the pipeline.
Map-Reduce for final context building.
At query time you follow a map-reduce pattern to generate an intermediate response to the user query for every community report in your knowledge graph. You have the LLM also rate the relevance of each intermediate query response. Finally, you rank the intermediate responses by relevance and select the top n as context for your final response to the user.
Graph RAG step-by-step logic — Image by author
Graph Extraction
In the initial ingestion step, you instruct your LLM to encode your input document(s) as a graph. An extensive prompt instructs your LLM to first identify nodes of given types, and secondly edges between the nodes you identified. Just like with any LLM prompt, there is not one solution for this challenge. Here is the core of my graph extraction prompt, which I based on Microsoft’s OSS implementation:
-Goal- Given a text document that is potentially relevant to this activity and a list of entity types, identify all entities of those types from the text and all relationships among the identified entities.
-Steps- 1. Identify all entities. For each identified entity, extract the following information: - entity_name: Name of the entity, capitalized - entity_type: One of the following types: [{entity_types}] - entity_description: Comprehensive description of the entity's attributes and activities Format each entity as ("entity"{tuple_delimiter}<entity_name>{tuple_delimiter}<entity_type>{tuple_delimiter}<entity_description>
2. From the entities identified in step 1, identify all pairs of (source_entity, target_entity) that are *clearly related* to each other. For each pair of related entities, extract the following information: - source_entity: name of the source entity, as identified in step 1 - target_entity: name of the target entity, as identified in step 1 - relationship_description: explanation as to why you think the source entity and the target entity are related to each other - relationship_strength: a numeric score indicating strength of the relationship between the source entity and target entity Format each relationship as ("relationship"{tuple_delimiter}<source_entity>{tuple_delimiter}<target_entity>{tuple_delimiter}<relationship_description>{tuple_delimiter}<relationship_strength>)
3. Return output in English as a single list of all the entities and relationships identified in steps 1 and 2. Use **{record_delimiter}** as the list delimiter.
The extraction step is responsible for which information will be reflected in your knowledge base. Thus you should use a rather powerful model such as Gemini 1.5 Pro. You can further increase the result robustness, use the multi-turn version Gemini 1.5 Pro, and query the model to improve its results n times. Here is how I implemented the graph extraction loop in graphrag-lite:
if "YES" not in completion_check: print( f"+++++ Complete with completion check after round {round_i} +++++") break
First I make an initial call to the multi-turn model to extract nodes and edges. Second I ask the model to improve the previous extraction results several times.
In the graphrag-lite implementation, the extraction model calls are made by the front-end client. If you want to reduce client load you could outsource the extraction queries to a microservice.
Graph Storage
Once you extract the nodes and edges from a document you need to store them in an accessible format. Graph Databases are one way to go, but they can also be cumbersome. For your knowledge graph, you might be looking for something a little more lightweight. I thought the same, because I did not find any knowledge graph native library I open sources graph2nosql. Graph2nosql is a simple knowledge graph native Python interface. It helps store and manage your knowledge graph in any NoSQL DB. All that without blowing up your tech stack with a graph db or needing to learn Cypher.
Graph2nosql is designed for knowledge graph retrieval with graph rag in mind. The library is designed around three major datatypes: EdgeData, NodeData, and CommunityData. Nodes are identified by an uid. Edges are identified by source and destination node uid and an edge uid. Given that uids can be freely designed, the graph2nosql data model leaves space for any size of the knowledge graph. You can even add text or graph embeddings. That allows embedding-based analytics, edge prediction, and additional text embedding retrieval (thinking hybrid RAG).
Graph2nosql is natively designed around Firestore.
@dataclass class NodeData: node_uid: str node_title: str node_type: str node_description: str node_degree: int document_id: str community_id: int | None = None # community id based on source document edges_to: list[str] = field(default_factory=list) edges_from: list[str] = field(default_factory=list) # in case of directed graph embedding: list[float] = field(default_factory=list) # text embedding representing node e.g. combination of title & description
@dataclass class CommunityData: title: str # title of comm, None if not yet computed community_nodes: set[str] = field(default_factory=set) # list of node_uid belonging to community summary: str | None = None # description of comm, None if not yet computed document_id: str | None = None # identifier for source knowlede base document for this entity community_uid: str | None = None # community identifier community_embedding: Tuple[float, ...] = field(default_factory=tuple) # text embedding representing community rating: int | None = None rating_explanation: str | None = None findings: list[dict] | None = None
To store your graph data via graph2nosql simply run the following code when parsing the results from your extraction step. Here is the graphrag-lite implementation.
from graph2nosql.graph2nosql.graph2nosql import NoSQLKnowledgeGraph from graph2nosql.databases.firestore_kg import FirestoreKG from graph2nosql.datamodel import data_model
With all relevant nodes and edges stored in your Graph DB, you can start building the abstraction layer. One way of doing that is finding nodes that describe similar concepts and describe how they are connected semantically. Graph2nosql offers inbuilt community detection, for example, based on Louvain communities.
Depending on your extraction result quality you will find zero-degree nodes in your knowledge graph. From experience, zero-degree nodes are often duplicates. Graphrag-lite uses graph communities as a major abstraction layer thus you should drop the nodes without any edges. Thus it would make sense to think about another duplicate/merge step and/or a node prediction step based on description and graph embeddings to add edges that might have been missed in the extraction step. In graphrag-lite I currently simply drop all zero-degree nodes.
# clean graph off all nodes without any edges
fskg.clean_zerodegree_nodes()

# generate communities based on cleaned graph
comms = kg.get_louvain_communities()
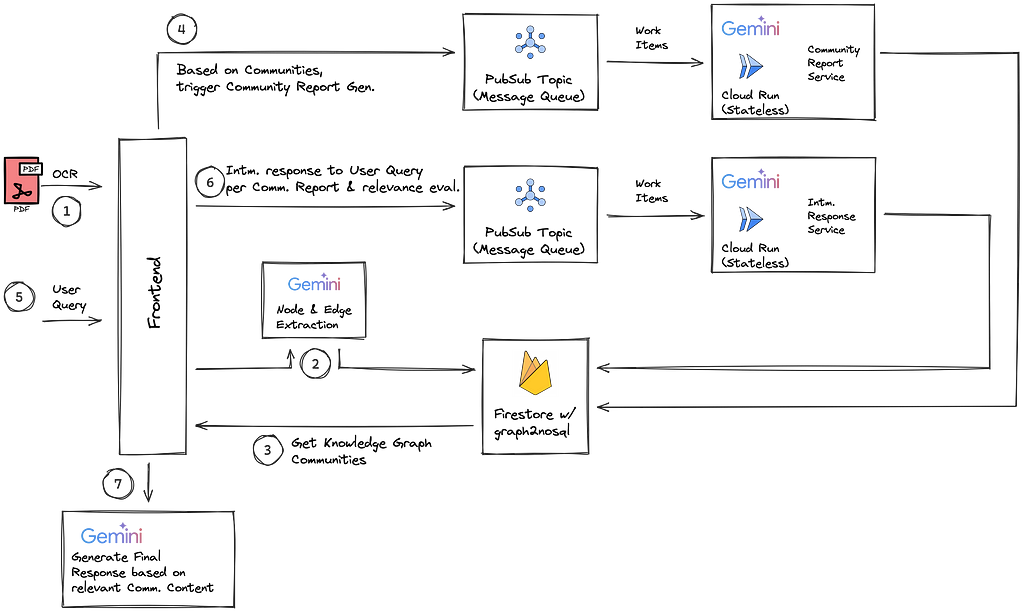
The GraphRAG pipeline mentioned above takes numerous LLM calls per document ingestion and user query. For example, to generate multiple community reports for every newly indexed document, or to generate intermediate responses for multiple communities at query time. If processed concurrently an awful user experience will be the result. Especially at scale users will have to wait minutes to hours to receive a response to their query. Fortunately, if you frame your LLM prompts the right way you can design them as “stateless workers”. The power of stateless processing architectures is twofold. Firstly, they are easy to parallelize. Secondly, they are easy to implement as serverless infastructure. Combined with a parallelized and serverless architecture maximizes your throughput scalability and minimizes your cost for idle cluster setups.
In the graphrag-lite architecture I host both the community report generation and the intermediate query generation as serverless Cloud Run microservice workers. These are fed with messages via GCP’s serverless messaging queue PubSub.
graphrag-lite’s serverless and distributed ingestion & query pipeline — Image by author
Community report generation
After running the community detection you now know multiple sets of community member nodes. Each of these sets represents a semantic topic within your knowledge graph. The community reporting step needs to abstract across these concepts that originated in different documents within your knowledge base. I again built on the Microsoft implementation and added a function call for easily parsable structured output.
You are an AI assistant that helps a human analyst to perform general information discovery. Information discovery is the process of identifying and assessing relevant information associated with certain entities (e.g., organizations and individuals) within a network.

# Goal
Write a comprehensive report of a community, given a list of entities that belong to the community as well as their relationships and optional associated claims. The report will be used to inform decision-makers about information associated with the community and their potential impact. The content of this report includes an overview of the community's key entities, their legal compliance, technical capabilities, reputation, and noteworthy claims.

# Report Structure

The report should include the following sections:

- TITLE: community's name that represents its key entities - title should be short but specific. When possible, include representative named entities in the title.
- SUMMARY: An executive summary of the community's overall structure, how its entities are related to each other, and significant information associated with its entities.
- IMPACT SEVERITY RATING: a float score between 0-10 that represents the severity of IMPACT posed by entities within the community.  IMPACT is the scored importance of a community.
- RATING EXPLANATION: Give a single sentence explanation of the IMPACT severity rating.
- DETAILED FINDINGS: A list of 5-10 key insights about the community. Each insight should have a short summary followed by multiple paragraphs of explanatory text grounded according to the grounding rules below. Be comprehensive.
The community report generation also demonstrated the biggest challenge around knowledge graph retrieval. Theoretically, any document could add a new node to every existing community in the graph. In the worst-case scenario, you re-generate every community report in your knowledge base for each new document added. In practice it is crucial to include a detection step that identifies which communities have changed after a document upload, resulting in new report generation for only the adjusted communities.
As you need to re-generate multiple community reports for every document upload we are also facing significant latency challenges if running these requests concurrently. Thus you should outsource and parallelize this work to asynchronous workers. As mentioned before, graphrag-lite solved this using a serverless architecture. I use PubSub as a message queue to manage work items and ensure processing. Cloud Run comes on top as a compute platform hosting stateless workers calling the LLM. For generation, they use the prompt as shown above.
Finally, you reached query time. To generate your final response to the user, you generate a set of intermediate responses (one per community report). Each intermediate response takes the user query and one community report as input. You then rate these intermediate queries by their relevance. Finally, you use the most relevant community reports and additional information such as node descriptions of the relevant member nodes as the final query context. Given a high number of community reports at scale, this again poses a challenge of latency and cost. Similar to previously you should also parallelize the intermediate response generation (map-step) across serverless microservices. In the future, you could significantly improve efficiency by adding a filter layer to pre-determine the relevance of a community report for a user query.
response_schema = { "type": "object", "properties": { "response": { "type": "string", "description": "The response to the user question as raw string.", }, "score": { "type": "number", "description": "The relevance score of the given community report context towards answering the user question [0.0, 10.0]", }, }, "required": ["response", "score"], }
The map-step microservice uses the following prompt:
---Role---
You are an expert agent answering questions based on context that is organized as a knowledge graph.
You will be provided with exactly one community report extracted from that same knowledge graph.


---Goal---
Generate a response consisting of a list of key points that responds to the user's question, summarizing all relevant information in the given community report.

You should use the data provided in the community description below as the only context for generating the response.
If you don't know the answer or if the input community description does not contain sufficient information to provide an answer respond "The user question cannot be answered based on the given community context.".

Your response should always contain following elements:
- Query based response: A comprehensive and truthful response to the given user query, solely based on the provided context.
- Importance Score: An integer score between 0-10 that indicates how important the point is in answering the user's question. An 'I don't know' type of response should have a score of 0.

The response should be JSON formatted as follows:
{{"response": "Description of point 1 [Data: Reports (report ids)]", "score": score_value}}

---Context Community Report---
{context_community_report}

---User Question---
{user_question}

---JSON Response---
The json response formatted as follows:
{{"response": "Description of point 1 [Data: Reports (report ids)]", "score": score_value}}

response:
Reduce-step for final user response
For a successful reduce-step, you need to store the intermediate response for access at query time. With graphrag-lite, I use Firestore as a shared state across microservices. After triggering the intermediate response generations, the client also periodically checks for the existence of all expected entries in the shared state. The following code extract from graphrag-lite shows how I submit every community report to the PubSub queue. After, I periodically query the shared state to check whether all intermediate responses have been processed. Finally, the end response towards the user is generated using the top-scoring community reports as context to respond to the user query.
class KGraphGlobalQuery: def __init__(self) -> None: # initialized with info on mq, knowledge graph, shared nosql state pass
# orchestration method taking natural language user query to produce and return final answer to client comm_report_list = self._get_comm_reports()
# pair user query with existing community reports query_msg_list = self._context_builder( user_query=user_query, comm_report_list=comm_report_list)
# send pairs to pubsub queue for work scheduling for msg in query_msg_list: self._send_to_mq(message=msg) print("int response request sent to mq")
# periodically query shared state to check for processing compeltion & get intermediate responses intermediate_response_list = self._check_shared_state( user_query=user_query)
# based on helpfulness build final context sorted_final_responses = self._filter_and_sort_responses(intermediate_response_list=intermediate_response_list)
# get full community reports for the selected communities comm_report_list = self._get_communities_reports(sorted_final_responses)
# generate & return final response based on final context community repors and nodes. final_response_system = prompts.GLOBAL_SEARCH_REDUCE_SYSTEM.format( response_type="Detailled and wholistic in academic style analysis of the given information in at least 8-10 sentences across 2-3 paragraphs.")
Once all entries are found the client triggers the final user response generation given the selected community context.
Final Thoughts
Graph RAG is a powerful technique every ML Engineer should add to their toolbox. Every Q&A type of application will eventually arrive at the point that purely extractive, “local” queries don’t cut it anymore. With graphrag-lite, you now have a lightweight, cloud-native, and serverless implementation that you can rapidly replicate.
Despite these strengths, please note that in the current state Graph RAG still consumes significantly more LLM input tokens than in the text2emb RAG. That usually comes with considerably higher latency and cost for queries and document indexing. Nevertheless, after experiencing the improvement in result quality I am convinced that in the right use cases, Graph RAG is worth the time and money.
RAG applications will ultimately move in a hybrid direction. Extractive queries can be handled efficiently and correctly by text2emb RAG. Global abstractive queries might need a knowledge graph as an alternative retrieval layer. Finally, both methods underperform with quantitative and analytical queries. Thus a third text2sql retrieval layer would add massive value. To complete the picture, user queries could initially be classified between the three retrieval methods. Like this, every query could be grounded most efficiently with the right amount and depth of information.
I cannot wait to see where else this is going. Which alternative retrieval methods have you been working with?
We use cookies on our website to give you the most relevant experience by remembering your preferences and repeat visits. By clicking “Accept”, you consent to the use of ALL the cookies.
This website uses cookies to improve your experience while you navigate through the website. Out of these, the cookies that are categorized as necessary are stored on your browser as they are essential for the working of basic functionalities of the website. We also use third-party cookies that help us analyze and understand how you use this website. These cookies will be stored in your browser only with your consent. You also have the option to opt-out of these cookies. But opting out of some of these cookies may affect your browsing experience.
Necessary cookies are absolutely essential for the website to function properly. These cookies ensure basic functionalities and security features of the website, anonymously.
Cookie
Duration
Description
cookielawinfo-checkbox-analytics
11 months
This cookie is set by GDPR Cookie Consent plugin. The cookie is used to store the user consent for the cookies in the category "Analytics".
cookielawinfo-checkbox-functional
11 months
The cookie is set by GDPR cookie consent to record the user consent for the cookies in the category "Functional".
cookielawinfo-checkbox-necessary
11 months
This cookie is set by GDPR Cookie Consent plugin. The cookies is used to store the user consent for the cookies in the category "Necessary".
cookielawinfo-checkbox-others
11 months
This cookie is set by GDPR Cookie Consent plugin. The cookie is used to store the user consent for the cookies in the category "Other.
cookielawinfo-checkbox-performance
11 months
This cookie is set by GDPR Cookie Consent plugin. The cookie is used to store the user consent for the cookies in the category "Performance".
viewed_cookie_policy
11 months
The cookie is set by the GDPR Cookie Consent plugin and is used to store whether or not user has consented to the use of cookies. It does not store any personal data.
Functional cookies help to perform certain functionalities like sharing the content of the website on social media platforms, collect feedbacks, and other third-party features.
Performance cookies are used to understand and analyze the key performance indexes of the website which helps in delivering a better user experience for the visitors.
Analytical cookies are used to understand how visitors interact with the website. These cookies help provide information on metrics the number of visitors, bounce rate, traffic source, etc.
Advertisement cookies are used to provide visitors with relevant ads and marketing campaigns. These cookies track visitors across websites and collect information to provide customized ads.