The crypto market is heating up as we approach the year’s final quarter. Certain altcoins, like PeiPei Coin and Bitgert, have maintained prominence among the top options on investors’ cards. Thanks to
The cryptocurrency market, with a bull run on the way, is looking great for investors right now. Bitcoin has hit the $65K mark and altcoins are also showing potential for growth. In this backdrop, whi
In an exciting collaboration, GPT Protocol has joined forces with ApeBond to introduce the first-ever AI-focused decentralized exchange (DEX): Neuraswap. This partnership is set to redefine the intersection of artificial intelligence (AI) and decentralized finance (DeFi), enabling seamless access to AI data and tokenized value and transforming the landscape of AI computing and blockchain technology. […]
Using OpenCV to auto-detect puzzle and redraw the final answer
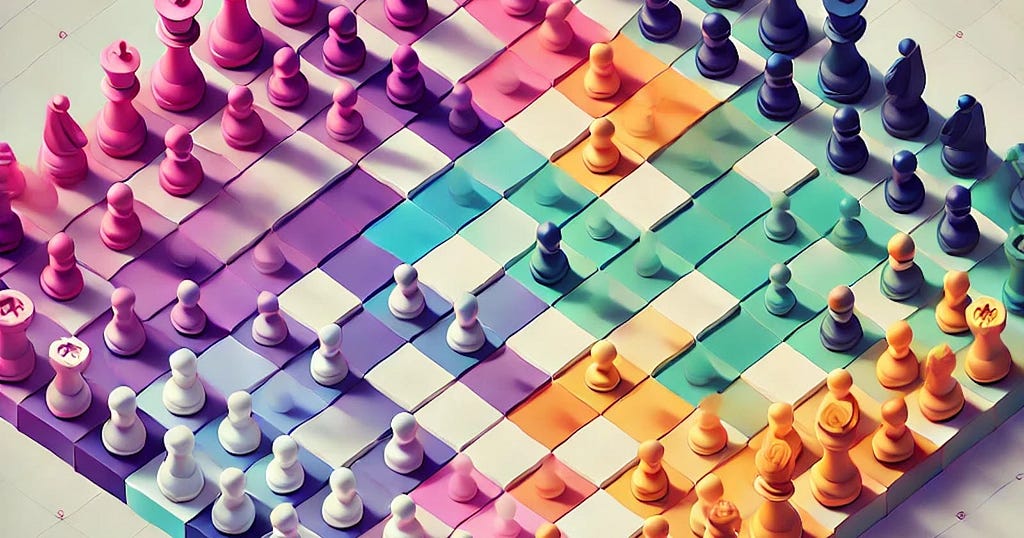
LinkedIn introduced a games feature recently, encouraging busy professionals to take a moment out of their day and do something mentally stimulating yet completely relaxing. These games offer a quick break from work and help you reset your mind and return to tasks with even more focus. With these games, LinkedIn aims to foster creativity, improve problem-solving skills, and reignite relationships at work.
In their own words:
Games? On LinkedIn?
Yep. That’s right.
Every year, we study the world’s best workplaces. Turns out, one of the best ways to deepen and reignite relationships at work is simply by having fun together.
So we’re excited to roll out three thinking-oriented games — Pinpoint, Queens, and Crossclimb — that allow you to do just that.
Compete with your connections, spark conversations, and break the ice. Games forge relationships, and relationships are at the heart of everything we do.
The feature initially has got mixed reactions some saying it is swaying away from its core purpose and overall objective, later parts of the reviews have all been positive. Recent articles from The Verge and TechCrunch highlight that games give an escape from the daily grind for a few moments and games in general help develop new neural pathways. Unlike other game apps or sites that push you to constantly keep engaging, LinkedIn games are much simpler and prompt you for attention just once a day.
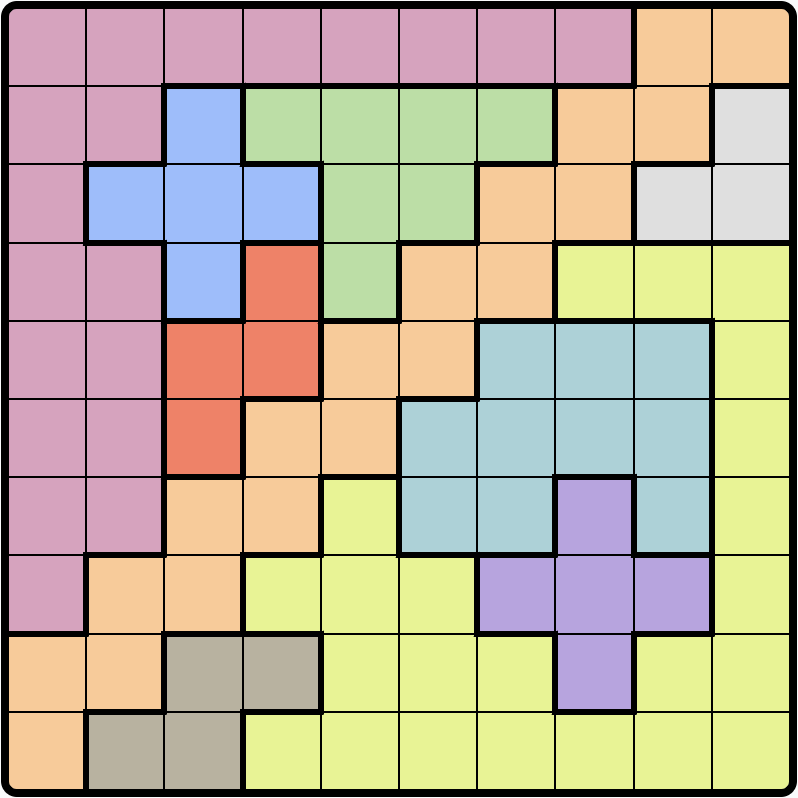
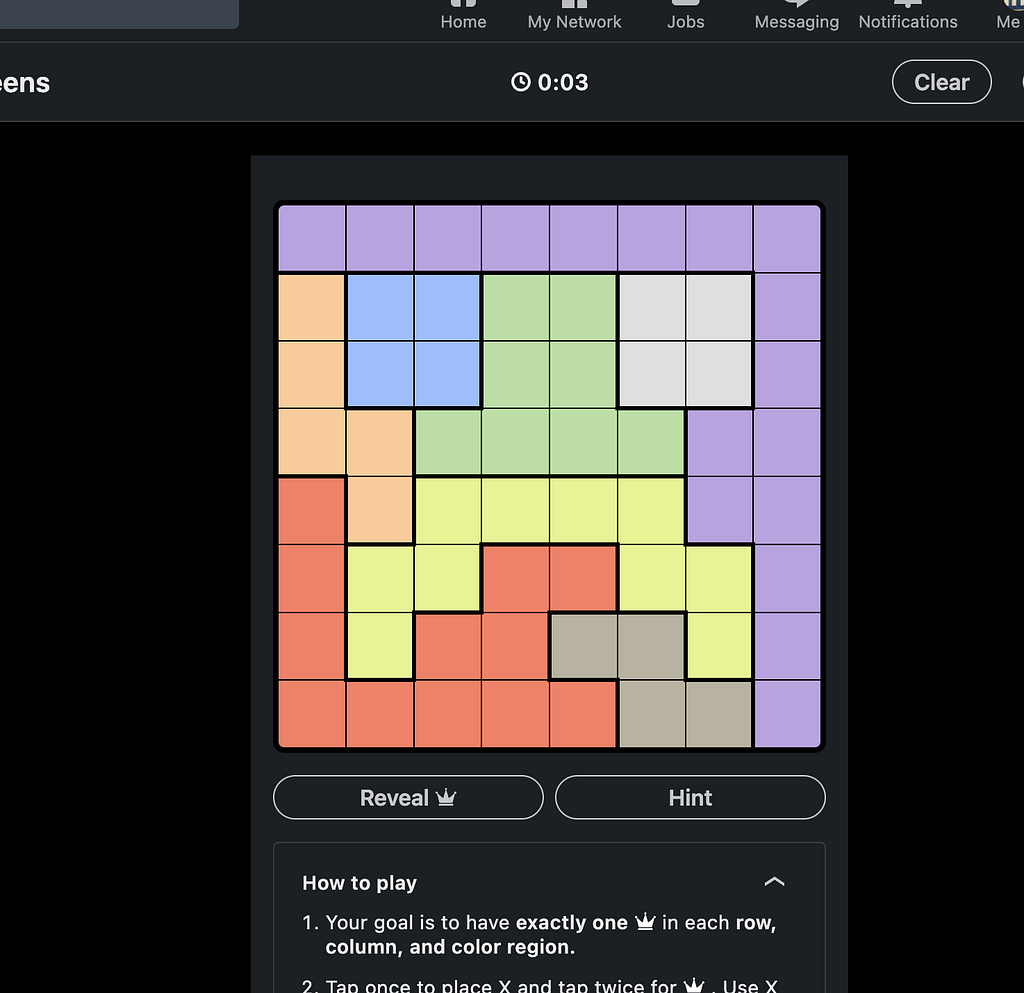
Goal: Place exactly one Q in each row, column, and color region.
Rule: Two Qs cannot touch each other — horizontally, vertically or diagonally
As a weekend project I thought it would be fun to solve Queens game programmatically. The initial idea was to make an LLM solve it, and give us the reasons why it chose a particular cell to place a Q or an X , but thats a topic for another article. In this article, we will explore how to detect a puzzle grid from a screenshot using OpenCV, convert it to a 2D array, and finally solve it using classic, vanilla backtracking, since LinkedIn ensures that there will always be a solution, it means we solve can guarantee that our code will also generate a solution every time.
Final Demo
The idea was:
Take a screenshot containing the puzzle
Our code should automatically detect the puzzle grid
Crop or rebuild the puzzle cleanly
Convert the puzzle to a 2D array
Solve the classic n-queens problem using backtracking
Add/Modify the Queens constraints to the N Queens problem
Use the solution to regenerate the image with Queens placed correctly
Enter OpenCV: Detecting and Processing the Puzzle Image
Original screenshot, detected puzzle grid and grayscale of the puzzle
OpenCV (short forOpen Source Computer Vision) is a library for Computer Vision, Machine Learning, and Image Processing. It can be used to identify patterns in an image, extract features, and perform mathematical operations on it. The first step is to process the puzzle screenshot using OpenCV, lets have a quick refresher on basics of OpenCV image processing.
Install the OpenCV python package
pip install opencv-python
How to load an image
cv.imreadreads an image file and converts it to an OpenCV matrix. If the image cannot be read because the file may be missing or in a format that OpenCV can’t understand an empty matrix is returned. The OpenCV matrix can be converted to an image back using cv.imshow function.
import cv2 as cv
import numpy as np

# Reading an image
original = cv.imread("<file_name">)
cv.imshow("original", original)
How to draw a line, circle, rectangle, text on the same image
Once we detect the grid, we need to recreate it using lines and place Qusing text. Let’s look at a short snippet to draw a line, circle, rectangle, and text on the above read matrix.
# Drawing a line
line = cv.line(original, (original.shape[1]//2, original.shape[0]//2), (0,0) , (0,255,0), thickness=2)
cv.imshow("line", line)

# Drawing other shapes
circle = cv.circle(line, (line.shape[1]//2, line.shape[0]//2), 50, (0,0,255), thickness=2)
rect = cv.rectangle(circle, (10,10), (circle.shape[1]//2, circle.shape[0]//2), (255,0,0), thickness=2)
text = cv.putText(rect, "Hi", (rect.shape[1]//2, rect.shape[0]//2), cv.FONT_HERSHEY_SIMPLEX, 1, (255,255,255), thickness=2)

cv.imshow("all shapes", text)
How to detect contours
Contours are simply a shape joining all points of similar color and intensity at a continuous boundary. These are useful when detecting shapes and object outline analysis. We will draw our puzzle grid by detecting the individual cells.
# Its best to convert image to grayscale
# and add a bit of blur for better contour detections
# since our image is mostly a grid we dont need blur

# by default OpenCV reads images as BGR
# as opposed to traditional RGB
gray = cv.cvtConvert(original, cv.COLOR_BGR2GRAY)
contours, _ = cv.findContours(gray, cv.RETR_TREE, cv.CHAIN_APPROX_NONE)
By default, OpenCV reads images as BGR, as opposed to traditional RGB
Cropping an image
For us to eliminate unnecessary areas from screenshots and reduce noise, once we’ve detected our contours
# its essentially selecting the pixels we need from the entire image
cropped = original[0:original.shape[1]//2, 0:original.shape[0]//2]
cv.imshow("cropped", cropped)
Combining the basics
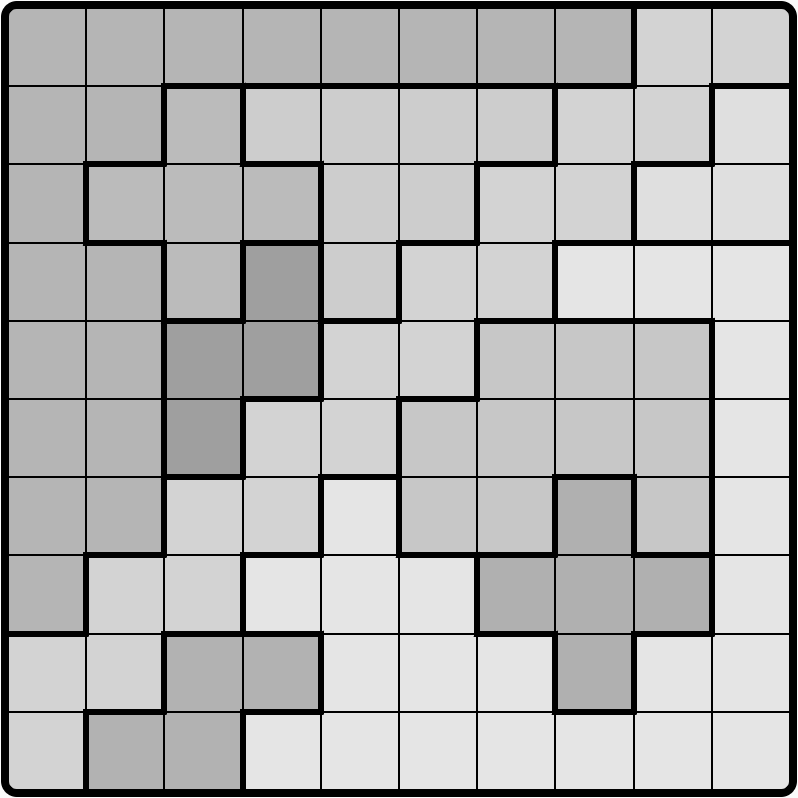
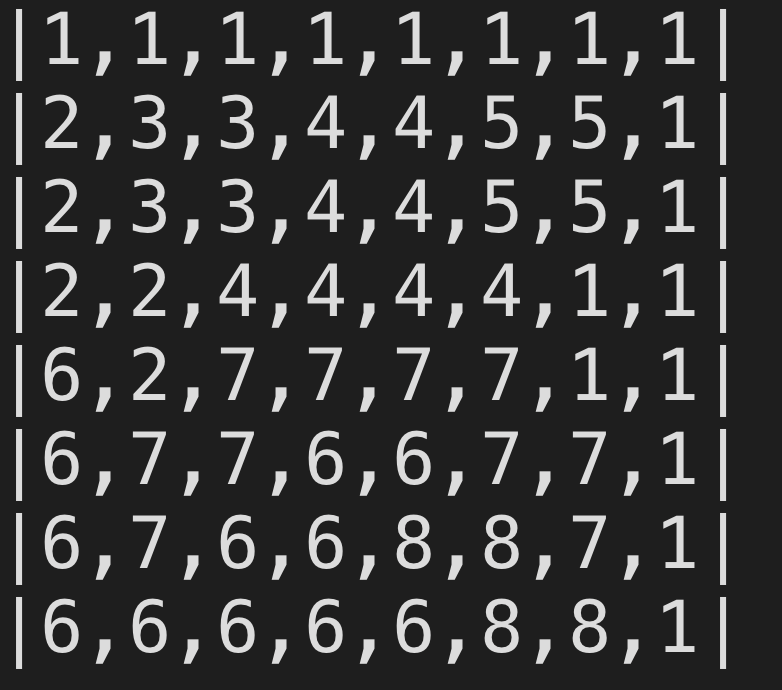
First, we begin by loading the image into memory and converting it into Grayscale. This helps in simplifying contour detection, a general step that is always followed since it reduces the image complexity. Next, we find contours, sort them, and select the largest one. Typically, the first contour is the bound box of the original image, so we use the second largest contour to isolate the puzzle grid. Then, we crop the image just to get the grid and nothing else. We again find contours, since now the noise is reduced, it will detect the grid better. We determine the number of cells within the grid and iterate over each cell, take the average color, and assign a number of each color, which gives us the 2D array of our puzzle
# Read the input image and save the original original = cv.imread(file_name) cv.imwrite("solution/original.png", original)
# Convert the image to grayscale gray = cv.cvtColor(original, cv.COLOR_BGR2GRAY)
# Find contours in the grayscale image and sort them by area contours, _ = cv.findContours(gray, cv.RETR_TREE, cv.CHAIN_APPROX_NONE) contours = sorted(contours, key=cv.contourArea, reverse=True)
# Extract the bounding box of the puzzle grid (using the second largest contour) x, y, w, h = cv.boundingRect(contours[1])
# Crop the grid area from the original image grid = original[y:y+h, x:x+w] cv.imwrite("solution/grid.png", grid)
# Convert the cropped grid to grayscale gray = cv.cvtColor(grid, cv.COLOR_BGR2GRAY) cv.imwrite("solution/gray-grid.png", gray)
# Find contours again in the cropped grayscale grid contours, _ = cv.findContours(gray, cv.RETR_TREE, cv.CHAIN_APPROX_NONE) contours = sorted(contours, key=cv.contourArea)
# Determine the total number of cells in the grid total_cells = len(contours) - 2 grid_size = int(math.sqrt(total_cells))
# Check if the detected cells form a complete square grid if total_cells != grid_size**2: print("Unable to detect full grid! Aborting")
# Calculate individual cell dimensions cell_width = w // grid_size cell_height = h // grid_size
# Iterate through each cell in the grid for i in range(grid_size): row = [] for j in range(grid_size): # Calculate cell coordinates with padding cell_x = j * cell_width cell_y = i * cell_height padding = 15 cell = grid[cell_y+padding:cell_y+cell_height-padding, cell_x+padding:cell_x+cell_width-padding]
# Get the average color of the cell avg_color = cell.mean(axis=0).mean(axis=0) avg_color = avg_color.astype(int) avg_color = tuple(avg_color)
# Map the color to a unique index if not already mapped if avg_color not in color_map: color_map[avg_color] = str(color_index) reverse_color_map[str(color_index)] = avg_color color_index += 1
# Add the color index to the row row.append(color_map[avg_color])
# Add the row to the board board.append(row)
Original screenshot vs detected 2d-array
N-Queen problem
From the Eight Queen wiki
The eight queens puzzle is the problem of placing eight chess queens on an 8×8 chessboard so that no two queens threaten each other; thus, a solution requires that no two queens share the same row, column, or diagonal. There are 92 solutions. The problem was first posed in the mid-19th century. In the modern era, it is often used as an example problem for various computer programming techniques.
This can be solved simply by Backtracking. Here is intuition:
Starting from the leftmost column, we place a Queen on each row, checking for any conflicts with other Queens, if there is a conflict, we move to the previous column, place it in the next row, and continue with the current column. Once we reach the last column and there can be a valid answer, we will find a solution satisfying all conditions. Here is the solution to the classic N Queen (or Eight Queens) problem using backtracking
def is_safe(board, row, col, n):
    # Check this row on the left side for any queens
    for i in range(col):
        if board[row][i] == 'Q':
            return False

    # Check the upper diagonal on the left side for any queens
    for i, j in zip(range(row, -1, -1), range(col, -1, -1)):
        if board[i][j] == 'Q':
            return False

    # Check the lower diagonal on the left side for any queens
    for i, j in zip(range(row, n), range(col, -1, -1)):
        if board[i][j] == 'Q':
            return False

    # If no queens are found in conflict positions, it's safe to place a queen here
    return True

def solve_nqueens_util(board, col, n):
    # If all queens are placed successfully, return True
    if col >= n:
        return True

    # Try placing a queen in each row of the current column
    for i in range(n):
        # Check if placing a queen at (i, col) is safe
        if is_safe(board, i, col, n):
            # Place the queen at (i, col)
            board[i][col] = 'Q'

            # Recur to place queens in the next column
            if solve_nqueens_util(board, col + 1, n):
                return True

            # If placing queen at (i, col) doesn't lead to a solution, remove the queen (backtrack)
            board[i][col] = '.'

    # If no placement is possible in this column, return False
    return False

def solve_nqueens(n):
    # Initialize the board with empty cells represented by '.'
    board = [['.' for _ in range(n)] for _ in range(n)]

    # Start solving from the first column
    if not solve_nqueens_util(board, 0, n):
        return "No solution exists"

    # Return the board with queens placed if a solution is found
    return board

def print_board(board):
    # Print the board in a readable format
    for row in board:
        print(" ".join(row))

# Example usage: Solve the N-Queens problem for an 8x8 board
n = 8
solution = solve_nqueens(n)
if solution != "No solution exists":
    print_board(solution)
else:
    print(solution)
Constraints for LinkedIn Queens
Taking the above code as a starting point, we modify our is_safe method, so there will be at most one Q in a color group. Our new is_safe method becomes:
def is_safe(original_board, board, row, col, queens_in_colors, n):
    # Check the left side of the current row for any queens
    for i in range(col):
        if board[row][i] == 'Q':
            return False

    # Check the upper diagonal on the left side for any queens
    if col - 1 >= 0 and row - 1 >= 0:
        if board[row-1][col-1] == "Q":
            return False

    # Check the lower diagonal on the left side for any queens
    if col - 1 >= 0 and row + 1 < n:
        if board[row+1][col-1] == "Q":
            return False

    # Check the column above the current row for any queens
    for i in range(row):
        if board[i][col] == "Q":
            return False

    # Check if the current color already has a queen
    current_color = original_board[row][col]
    if queens_in_colors[current_color]:
        return False

    # Return True if all checks are passed and it's safe to place a queen
    return True
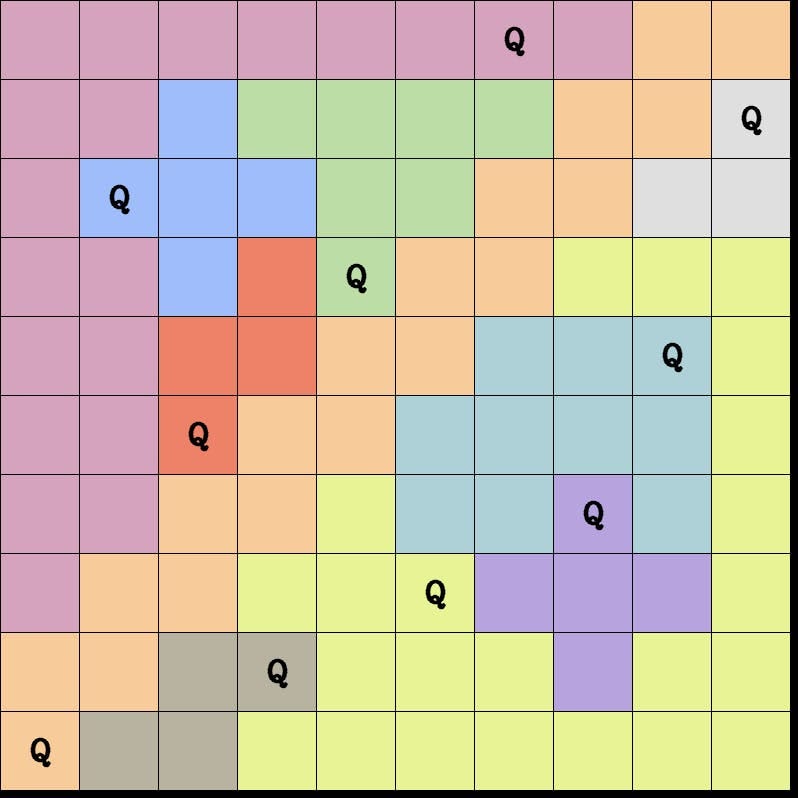
Re-generating the Image with the Solution
Finally, time to visualize the solution by re-generating the image with Queens correctly placed. This involves drawing rectangles for cells, lines for boundaries, and text for Queens.
# Solve the N-Queens problem on the given board solved_board = solve_n_queens(board)
# Check if the number of detected colors matches the grid size; abort if mismatched if len(color_map) != grid_size: print("Too many colors detected! Aborting")
# Initialize an empty output image to recreate the grid output_image = np.ones((h, w, 3), dtype="uint8")
# Set border and letter sizes for visual elements border_size = 1 letter_height = 10
# Iterate through each cell of the grid for i in range(grid_size): for j in range(grid_size): # Calculate the position of the current cell cell_x = j * cell_width cell_y = i * cell_height
# Retrieve the color for the current cell from the reverse color map color_pick = reverse_color_map.get(board[i][j]) color = (int(color_pick[0]), int(color_pick[1]), int(color_pick[2]))
# Draw the cell with the appropriate color output_image = cv.rectangle( output_image, (cell_x + border_size, cell_y + border_size), (cell_x + cell_width - border_size, cell_y + cell_height - border_size), color, thickness=-1 )
# If a queen is placed in this cell, draw the letter "Q" at the center of the cell if solved_board[i][j] == "Q": output_image = cv.putText( output_image, "Q", (cell_x + cell_width // 2 - letter_height, cell_y + cell_height // 2 + letter_height), cv.FONT_HERSHEY_COMPLEX, 1, (0, 0, 0), lineType=cv.LINE_AA, thickness=2 )
# Save the output image with the solved board displayed cv.imwrite("solution/solve.png", output_image)
final output
Conclusion
We explored programmatically solving LinkedIn’s Queens game using the classic backtracking approach, by first preprocessing the puzzle grid, detecting the gird and converting it to a 2D array using OpenCV and then implementing the solution to classing N-Queen problem and finally modifying the constraints of the N-Queen solution to fit our needs. Finally, we re-generated the puzzle image to visually present the solution using OpenCV.
Virtual modeling, analytics, and the Internet of Things have created a new way for businesses to use data to improve their operations: the digital twin.
Join Sam’s Club for $15 – the lowest price we’ve seen. Here’s how
Originally appeared here:
Join Sam’s Club for $15 – the lowest price we’ve seen. Here’s how
We use cookies on our website to give you the most relevant experience by remembering your preferences and repeat visits. By clicking “Accept”, you consent to the use of ALL the cookies.
This website uses cookies to improve your experience while you navigate through the website. Out of these, the cookies that are categorized as necessary are stored on your browser as they are essential for the working of basic functionalities of the website. We also use third-party cookies that help us analyze and understand how you use this website. These cookies will be stored in your browser only with your consent. You also have the option to opt-out of these cookies. But opting out of some of these cookies may affect your browsing experience.
Necessary cookies are absolutely essential for the website to function properly. These cookies ensure basic functionalities and security features of the website, anonymously.
Cookie
Duration
Description
cookielawinfo-checkbox-analytics
11 months
This cookie is set by GDPR Cookie Consent plugin. The cookie is used to store the user consent for the cookies in the category "Analytics".
cookielawinfo-checkbox-functional
11 months
The cookie is set by GDPR cookie consent to record the user consent for the cookies in the category "Functional".
cookielawinfo-checkbox-necessary
11 months
This cookie is set by GDPR Cookie Consent plugin. The cookies is used to store the user consent for the cookies in the category "Necessary".
cookielawinfo-checkbox-others
11 months
This cookie is set by GDPR Cookie Consent plugin. The cookie is used to store the user consent for the cookies in the category "Other.
cookielawinfo-checkbox-performance
11 months
This cookie is set by GDPR Cookie Consent plugin. The cookie is used to store the user consent for the cookies in the category "Performance".
viewed_cookie_policy
11 months
The cookie is set by the GDPR Cookie Consent plugin and is used to store whether or not user has consented to the use of cookies. It does not store any personal data.
Functional cookies help to perform certain functionalities like sharing the content of the website on social media platforms, collect feedbacks, and other third-party features.
Performance cookies are used to understand and analyze the key performance indexes of the website which helps in delivering a better user experience for the visitors.
Analytical cookies are used to understand how visitors interact with the website. These cookies help provide information on metrics the number of visitors, bounce rate, traffic source, etc.
Advertisement cookies are used to provide visitors with relevant ads and marketing campaigns. These cookies track visitors across websites and collect information to provide customized ads.