Coding the connectors yourself? Think very carefully
Creating and maintaining a data platform is a hard challenge. Not only do you have to make it scalable and useful, but every architectural decision builds up over time. Data connectors are an essential part of such a platform. Of course, how else are we going to get the data? And building them yourself from scratch gives you full control of how you want them to behave. But beware, with ever-increasing data sources in your platform, that can only mean the following:
Creating large volumes of code for every new connector.
Maintaining complex code for every single data connector.
Functions and definitions between classes may diverge over time, resulting in even more complex maintenance.
Of course, all three can be mitigated with well-defined practices in object-oriented programming. But even still, it will take many hours of coding that could be used in later stages to serve your data consumers faster.
Other options still give you the flexibility to define what data you want to ingest and how with no to very little code involved. With this option, you get:
Connectors with standardized behavior given the extraction methodology: No divergent classes for two connectors that use REST APIs at their core, for instance.
Simple, but powerful user interfaces to build connections between sources and destinations.
Connectors that are maintained by the teams building the tools and the community.
These benefits allow you to build data connections in minutes, instead of hours.
Nevertheless, I am not trying to sell you these tools; if and when you need highly customizable logic for data ingestion, you are going to need to implement it. So, do what is best for your application.
The exercise: Airbyte with ADLS Gen2
Let’s jump right into it. I am using Azure for this tutorial. You can sign up and get $200 worth of services for free to try the platform.
We are going to deploy Airbyte Open Source using an Azure Kubernetes cluster and use Azure Storage (ADLS) Gen 2 for cloud storage.
Creating the infrastructure
First, create the following resources:
Resource group with the name of your choosing.
Azure Kubernetes Services. To avoid significant costs, set a single node pool with one node. However, that node needs enough resources. Otherwise, the Airbyte syncs won’t start. An appropriate node size is Standard_D4s_v3.
Azure Storage Account. While creating git, turn on the hierarchical namespace feature so the storage account becomes ADLS Gen2. Now create a storage container with any name you like.
Production Tip: Why the hierarchical namespace? Object stores by default have a flat storage environment. This has the benefit of infinite scalability, with an important downside. For analytics workloads, this results in additional overhead when reading, modifying, or moving files as the whole container has to be scanned. Enabling this features brings hierarchical directories from filesystems to scalable object storage.
Deploying Airbyte to Kubernetes
You need to install a few things on your shell first:
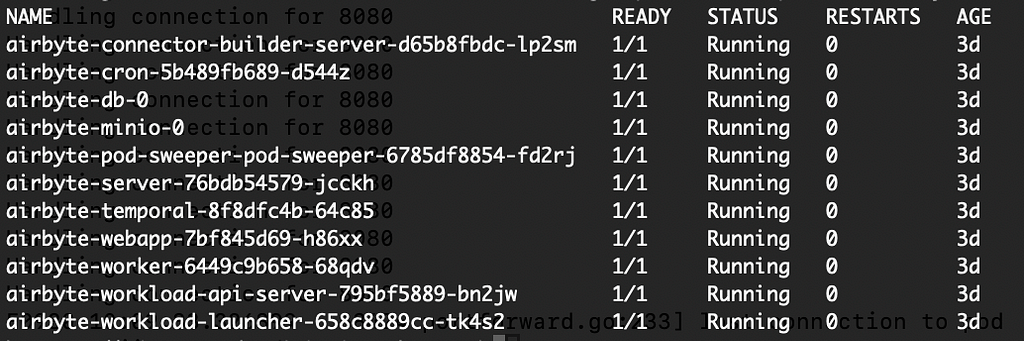
Wait a few minutes until the deployment is completed. Run the following command to check if the pods are running:
kubectl get pods --namespace dev-airbyte
Airbyte pods ready! Screen capture taken by me.
Accessing the Airbyte web app locally
After Airbyte is deployed you can get the container and port, and then run a port forwarding command to map a port in your local machine to the port in the Kubernetes web app pod. This will allow us to access the application using localhost.
export POD_NAME=$(kubectl get pods - namespace dev-airbyte -l "app.kubernetes.io/name=webapp" -o jsonpath="{.items[0].metadata.name}")
export CONTAINER_PORT=$(kubectl get pod - namespace dev-airbyte $POD_NAME -o jsonpath="{.spec.containers[0].ports[0].containerPort}")
kubectl - namespace dev-airbyte port-forward $POD_NAME 8080:$CONTAINER_PORT
echo "Visit http://127.0.0.1:8080 to use your application"
If you go to 127.0.0.1:8080 on your machine, you should see the application. Now, we can start adding data connectors!
Production Tip: Port forwarding works only for your local machine and must be done every time the shell is started. However, for data teams in real scenarios, Kubernetes allows you to expose your application throughout a virtual private network. For that, you will need to switch to Airbyte Self-managed enterprise which provides Single Sign-On with Cloud identity providers like Azure Active Directory to secure your workspace.
Setting up the data source
The provider for the data in this exercise is called Tiingo, which serves very valuable information from the companies in the stock market. They offer a free license that will give you access to the end-of-day prices endpoint for any asset and fundamental analysis for companies in the DOW 30. Be mindful that with the free license, their data are for your eyes only. If you want to share your creations based on Tiingo, you must pay for a commercial license. For now, I will use the free version and guide you through the tutorial without showing their actual stock data to remain compliant with their rules.
Create the account. Then, copy the API key provided to you. We are now ready to set up the source in Airbyte.
Creating a data source in Airbyte
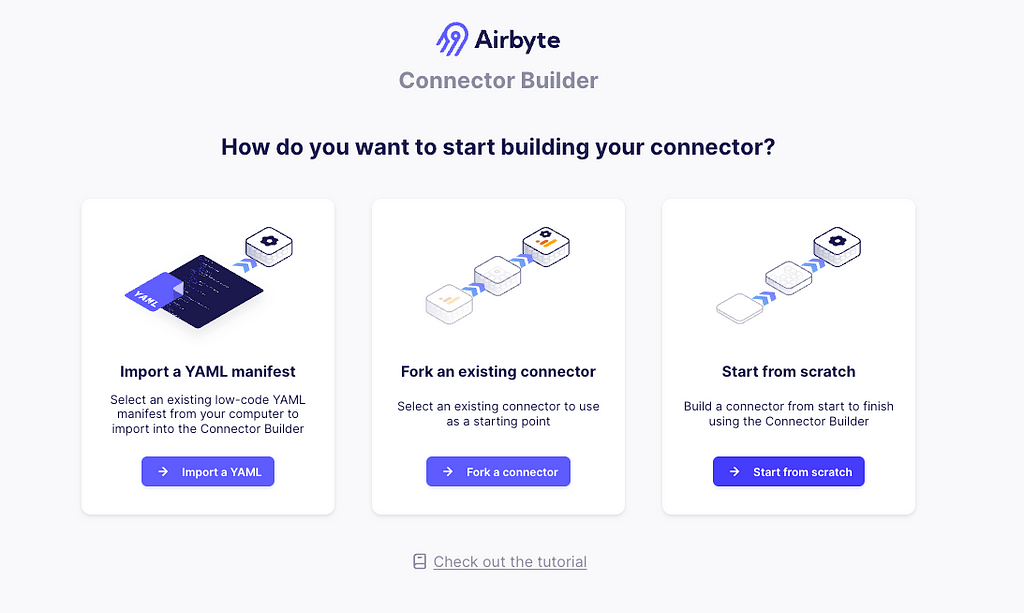
In the Airbyte app, go to Builder > Start from Scratch.
Airbyte connector builder screen. Image captured by me.
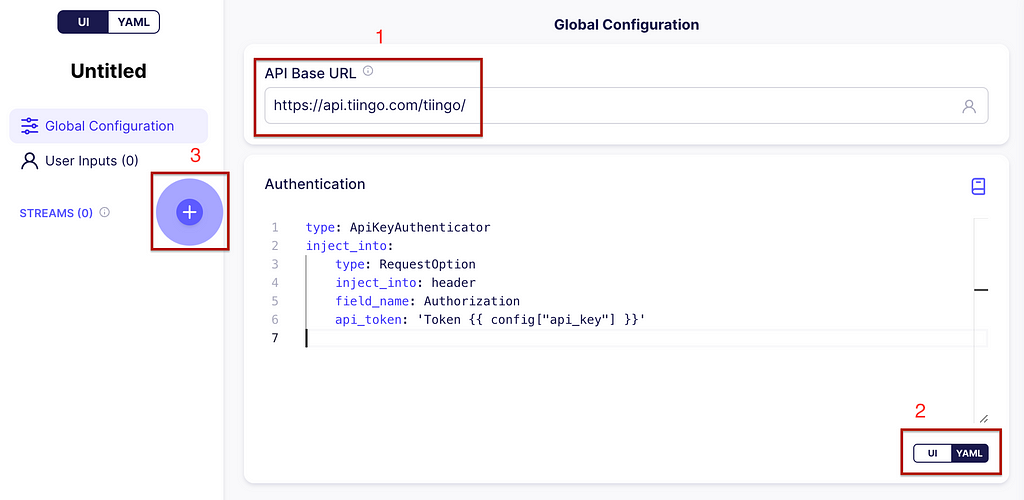
In the API Base URL write https://api.tiingo.com/tiingo/and for the configuration click on the YAML button. Enter the following:
This will allow the API token to be inserted in the header of every request. Now, let’s add your first stream by clicking on the plus icon (+) on the left. See the image below for guidance.
Building the data source. Global Configuration. Image captured by me.
URL and stream partitioning
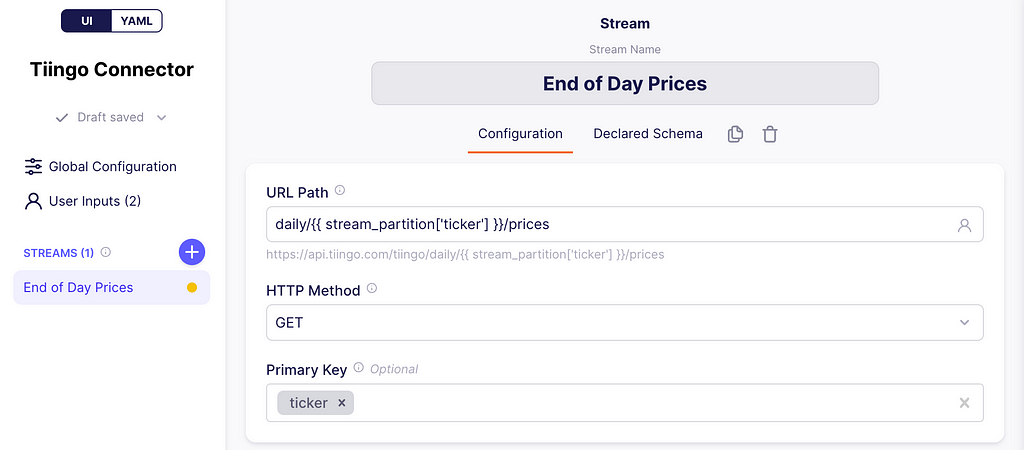
At the top write End of Day Prices. This will be our stream name and the URL path will be:
daily/{{ stream_partition['ticker'] }}/prices
What is this placeholder between {{}}? These are variables filled by Airbyte at runtime. In this case, Airbyte supports what they call stream partitioning, which allows the connector to make as many requests as the number of values you have on your partition array.
Defining URL path and primary key. Image captured by me.
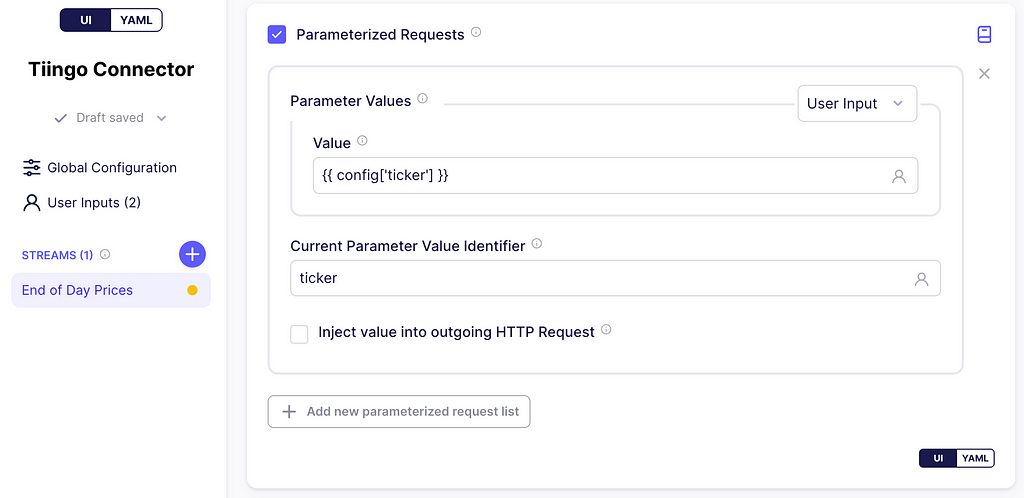
Scroll down to parameterized requests, and check the box. In the parameter values dropdown, click User Input, and on the value textbox enter:
{{ config['tickers_arr'] }}
Notice that the config variable used here is also referenced in the API Key in the global configuration. This variable holds the user inputs. Moreover, the user input tickers_arr will hold an array of stock IDs.
Next, on the Current Parameter Value Identifier textbox enter ticker. This is the key that is added to the stream_partition variable and references a single stock ID from the array tickers_arr for a single HTTP request. Below you can find screenshots of this process.
Defining the parameterized requests. Image captured by me.
We are going to test it with 4 stock tickers:
BA for Boeing Corp
CAT for Caterpillar
CVX for Chevron Corp
KO for Coca-Cola
With the stream partitioning set up, the connector will make 4 requests to the Tiingo server as follows:
Production Tip: Airbyte supports a parent stream, which allows us to get the list for the partitioning using a request to some other endpoint, instead of issuing the array elements ourselves. We are not doing that in this exercise, but you can check it out here.
Incremental Sync
Airbyte supports syncing data in Incremental Append mode i.e.: syncing only new or modified data. This prevents re-fetching data that you have already replicated from a source. If the sync is running for the first time, it is equivalent to a Full Refresh since all data will be considered as new.
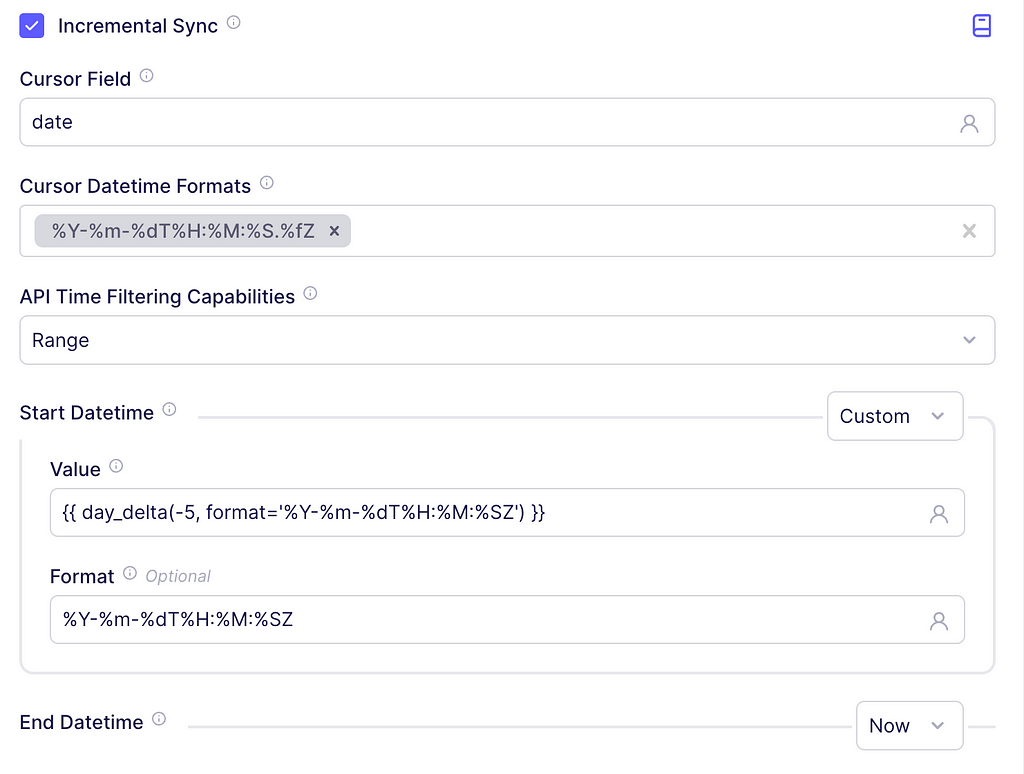
To implement this in our connector, scroll to Incremental Sync and check the box. In the cursor field textbox write date since, according to the documentation, that is the name of the date field indicating when the asset was updated. For the cursor DateTime Formats, enter
%Y-%m-%dT%H:%M:%S.%fZ
This is the output format suggested by the API docs.
In the Start DateTime dropdown click Custom and on the textbox enter the following:
{{ day_delta(-1, format='%Y-%m-%dT%H:%M:%SZ') }}
It will tell Airbyte to insert the date corresponding to yesterday. For the End Datetime leave the dropdown in Now to get data from the start date, up until today. The screenshot below depicts these steps.
Adding Incremental Start Datetime and End Datetime. Image captured by me.
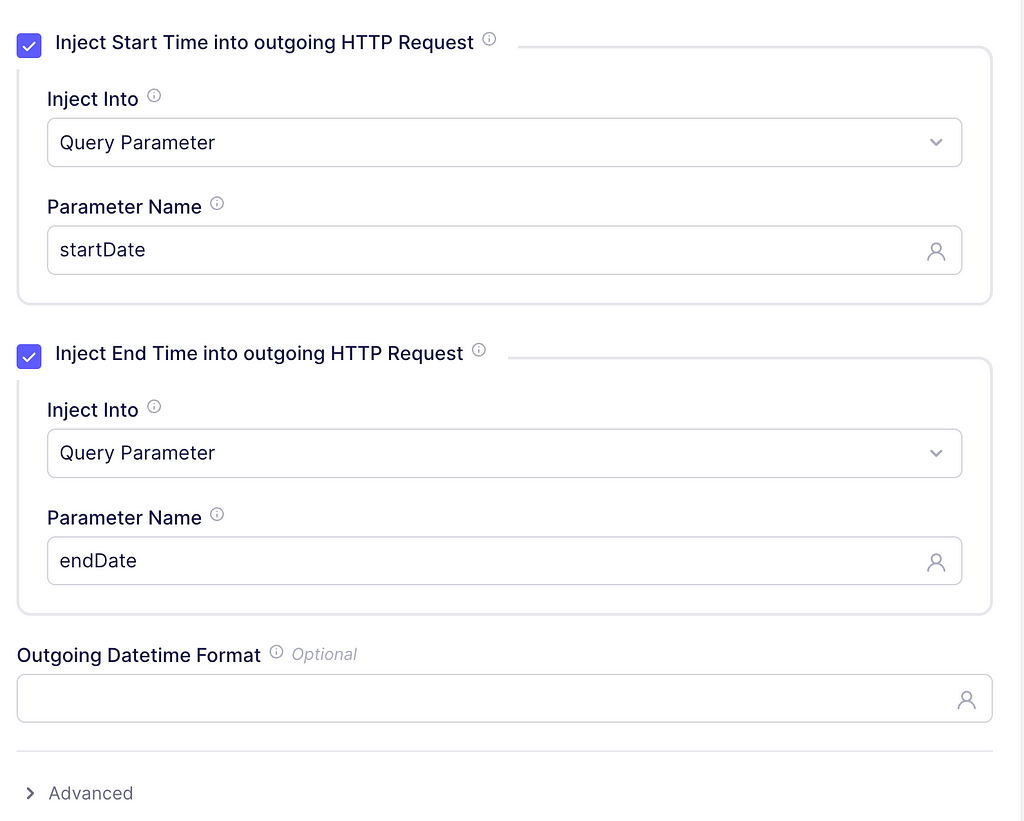
Finally, check the boxes to inject the start and end time into the outgoing HTTP request. The parameter names should be startDate and endDate, respectively. These parameter names come from Tiingo documentation as well. An example request will now look like:
Start and End Time parameters for our incremental loads. Image captured by me.
Control Fields
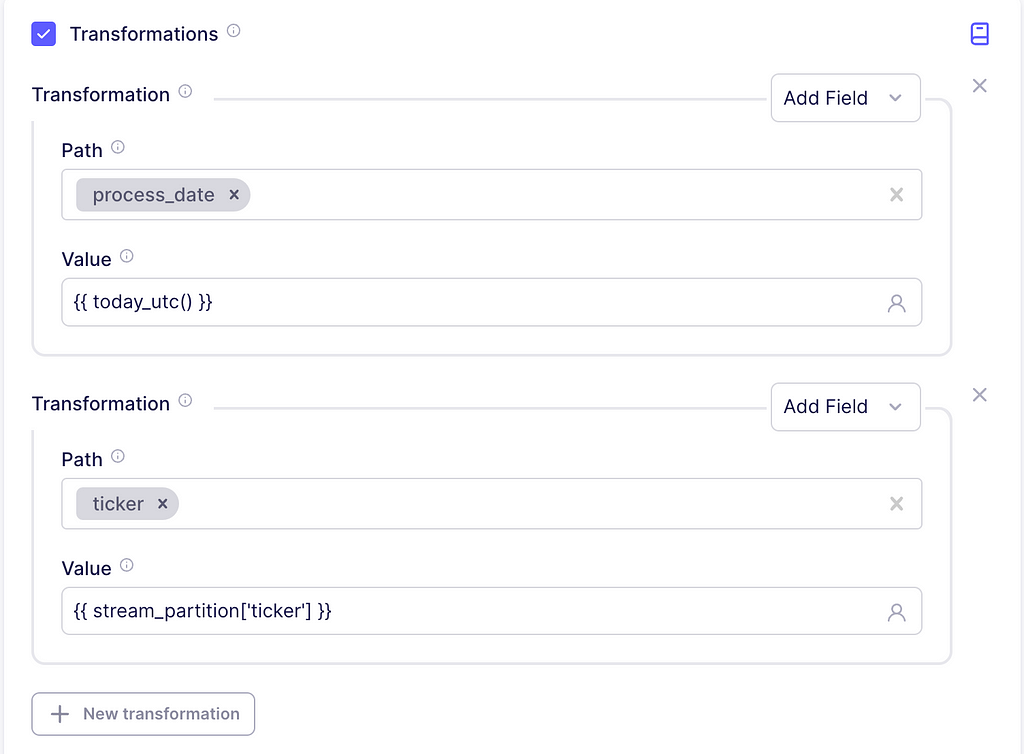
We are going to insert some information to enrich the data. For this, scroll to the transformations section and check the box. Inside the transformation dropdown, click on Add Field. The path is just the column name to be added, write process_date with the value {{ today_utc() }}. This will just indicate the timestamp for which the records were ingested into our system.
Now, according to the documentation, the ticker of the asset is not returned in the response, but we can easily add it using an additional transformation. So, for path, write ticker and the value should be {{ stream_partition[‘ticker’] }}. This will add the ticker value of the current stream partition as a column.
Adding our control fields to the API response. Image captured by me.
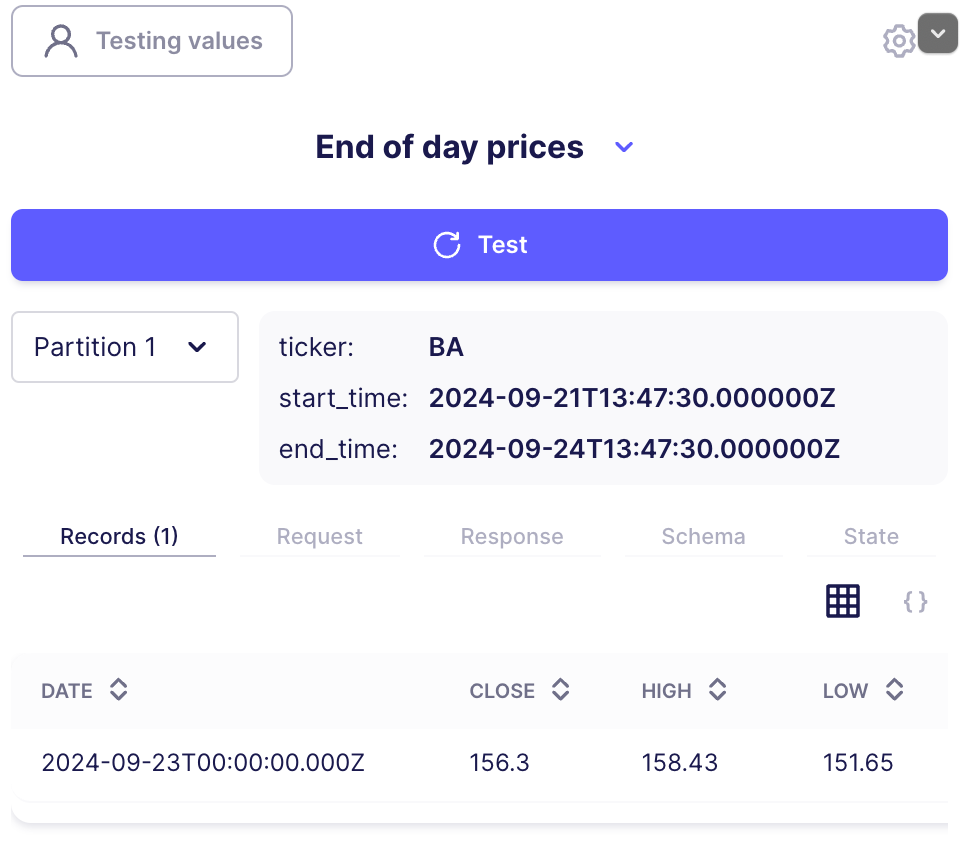
Testing
On the Testing values button, enter the list of tickers. A comma separates each ticker: BA, CAT, CVX, KO.
You should see something similar to the following image.
Notice the two example partitions. These are two separate, parameterized requests that Airbyte performed. You can also get information about the actual content in your request, the generated schema of the data, and state information.
Go to the top right corner and click publish to save this connector. Give it any name you want, I just called it Tiingo Connector.
Connecting Airbyte to the object store
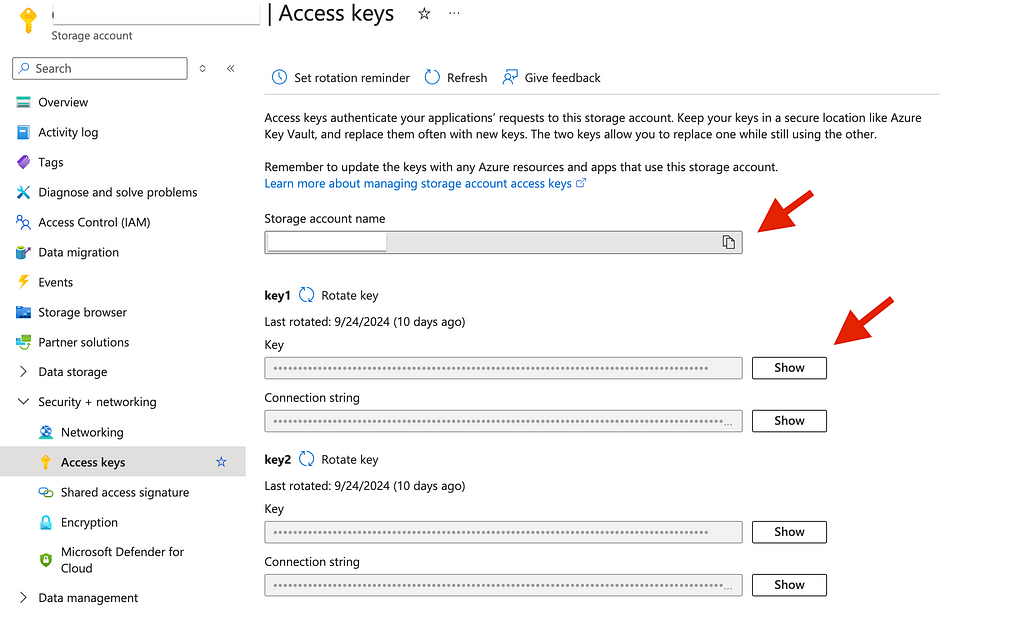
Let’s return to our storage service, go to Security + Networking > Access keys. Copy the account name and one of the access keys. Note: we need the access key, not the connection string.
Getting the access keys for the azure storage account. Image captured by me.
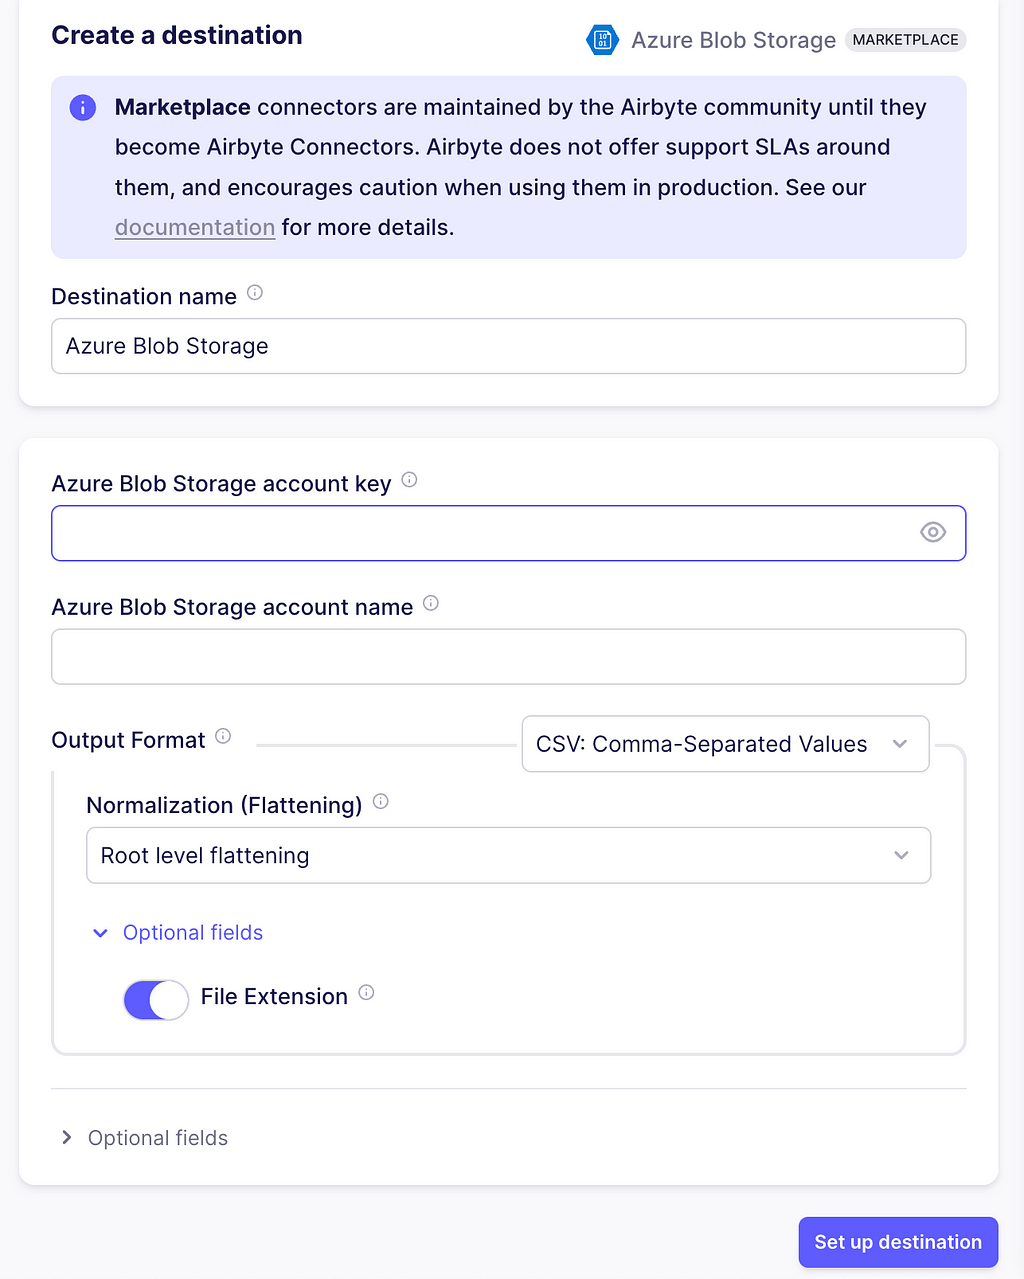
Next, go to your Airbyte app, select Destinations> Marketplace, and click Azure Blob Storage. Enter the account name, account key, and leave the other configurations as in the image. Additionally, in the Optional fields, enter the name of the container you created. Next, click on Set up destination.
Setting up the destination in Airbyte. Image captured by me.
Production Tip: Data assets from your organization need to be secured so that the individuals or teams have access to only the files they need. You can set up role-based access control at the storage account level with the Access Control (IAM) button, and also set Access Control Lists (ACLs) when right clicking folders, containers, or files.
Creating a connection from source to destination
There are four steps to build a connection in Airbyte and it will use the Tiingo Connector and the Azure Storage.
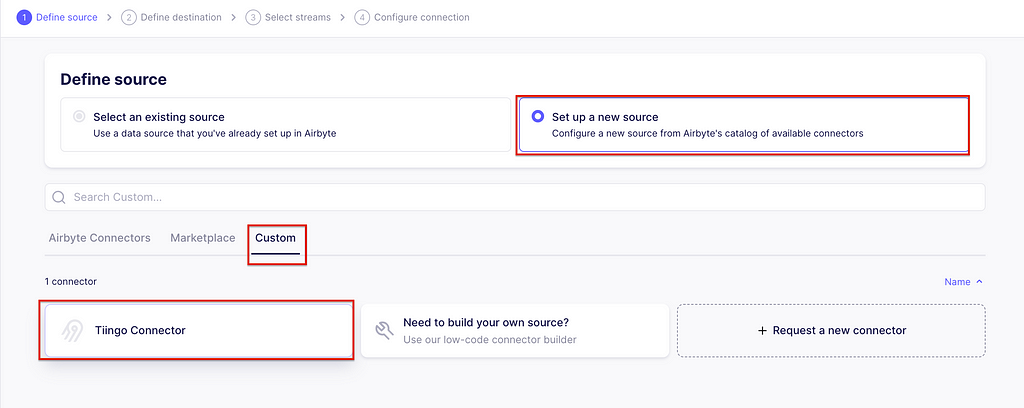
Defining the source
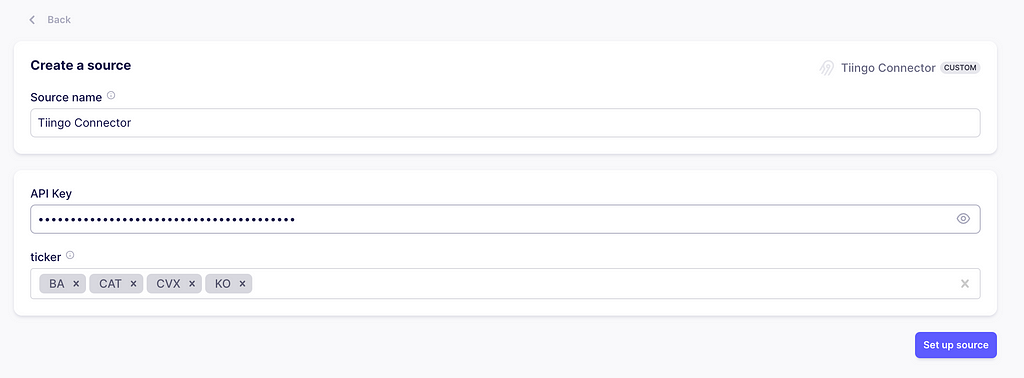
In the Airbyte app, go to connections and create one. The first step is to set up the source. Click Set up a new source. Then, on the Custom tab, select the Tiingo connector we just created.
Creating a source for the connection. Image captured by me.
It will prompt you to enter the API Keys and stock tickers. Just copy the ones you used while testing the source. Now click on Set up source. It will test the connector with your configuration.
Adding user inputs for the source. Image captured by me.
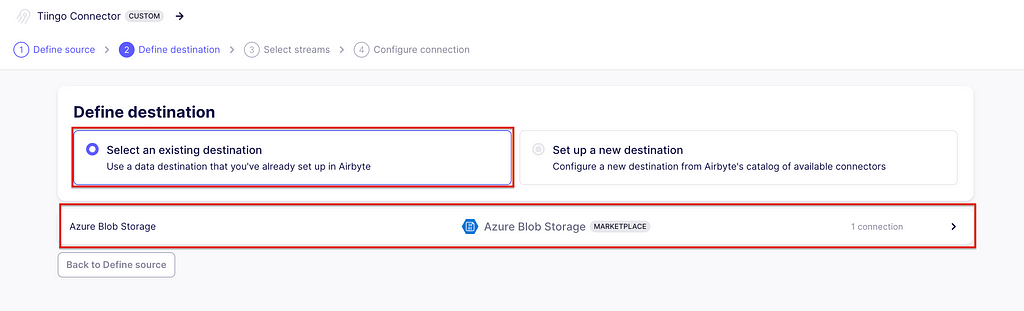
Defining the destination
Once it has passed, we will set up the destination, which is the one created in the above section. At this time, Airbyte will also test the destination.
Adding the destination for the connection. Image captured by me.
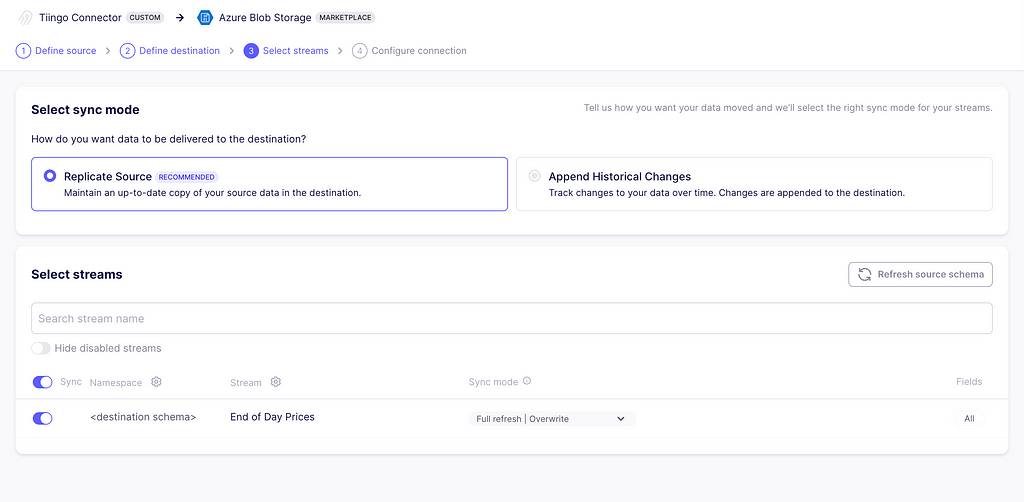
Defining streams
The third step is to select the streams and the sync mode. As we only defined one stream called End of Day Prices, this is the only one available. As for the sync modes, these are the options available for this exercise:
Full Refresh | Overwrite: This mode will retrieve all the data and replace any existing data in the destination.
Full Refresh | Append: This mode will also retrieve all of the data, but it will append the new data to the destination. You must deduplicate or transform your data properly to suit your needs afterward.
Incremental | Append: This mode requests data given the incremental conditions we defined while building the connector. Then, it will append the data to the destination.
You can read more about synch modes here. For now, choose Incremental | Append.
Selecting the streams to ingest. Image captured by me.
Final connection configurations
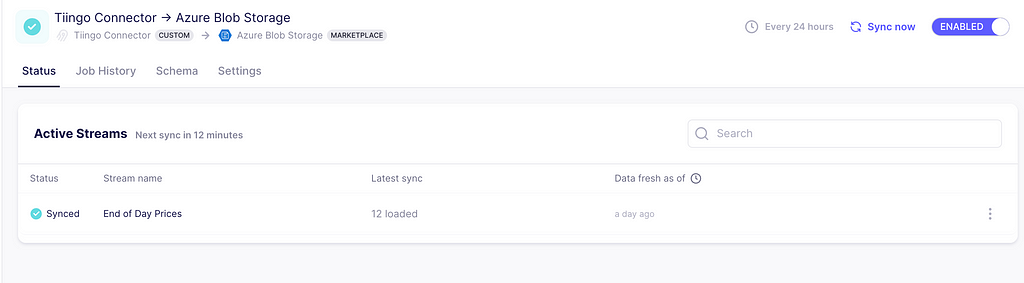
Here you can define the schedule you want, plus other additional settings. Click finish and sync to prompt your first data extraction and ingestion.
Running the first synching process. Image captured by me.
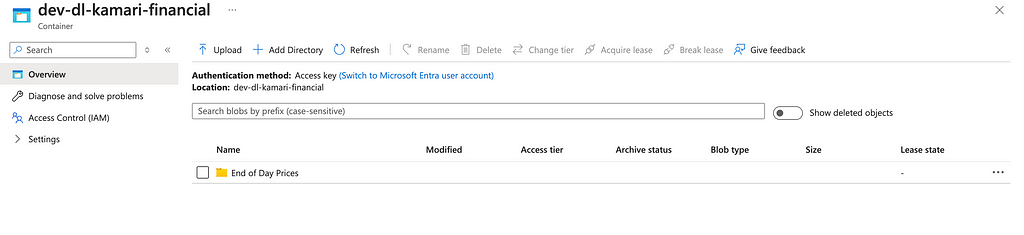
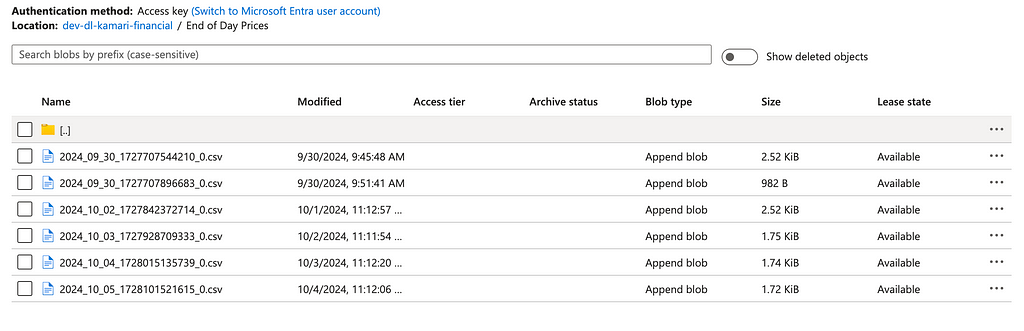
And that’s it! The data is now ingested. Head back to the storage container and you will see a new folder with one CSV file. With the append mode chosen, whenever a sync is triggered, a new file appears in the folder.
A new folder with the name of the stream is created. Image captured by me.Data files as a result of multiple syncs in Airbyte. Image captured by me.
Conclusion
You can clearly see the power of these kinds of tools. In this case, Airbyte allows you to get started with ingesting critical data in a matter of minutes with production-grade connectors, without the need to maintain large amounts of code. In addition, it allows incremental and full refresh modes with append or overwrite capabilities. In this exercise, only the Rest API sources were demonstrated, but there are many other source types, such as traditional databases, data warehouses, object stores, and many other platforms. Finally, it also offers a variety of destinations where your data can land and be analyzed further, greatly speeding up the development process and allowing you to take your products to market faster!
Thank you for reading this article! If you enjoyed it, please give it a clap and share. I do my best to write about the things I learn in the data world as an appreciation for this community that has taught me so much.
The Whisker Litter-Robot 4 automates what’s typically a messy job and even manages your cat’s health. Plus, you can still save on the Litter-Robot 4 bundle as October Prime Day comes to an end.
Apple’s AirPods Pro 2 consistently ranks amongst the most premium earbuds on the market thanks to its H2 chip and pioneering features. Before Amazon’s Big Prime Deals Day 2 ends, you can save $80 on the earbuds.
October Prime Day has come and gone but, as to be expected, there are still a few deals floating around on the internet. This year’s fall Prime Day brought a slew of deals across all categories, including tech, and some of those deals haven’t expired just yet. There’s a chance we see some of these sale prices return in a month when Black Friday comes around, but if you’re keen on getting some of your holiday shopping done now, you still have a bit more time. Here are the best Prime Day deals you can still get today.
Best Prime Day Apple deals
Billy Steele / Engadget
Apple deals can be hit or miss during Amazon Prime Day, but we saw a number of good ones this time and many of them are still available. Whether you’ve been on the hunt for a new Apple device for yourself or you know you want to pick one up as a gift, you can save a bit of cash if you do so now.
Apple AirPods Pro for $169 ($80 off): Apple’s most powerful wireless earbuds have excellent ANC, a good sound profile and decent battery life, and thanks to a software update, they just got new features like voice isolation and Siri interactions (hearing aid features are coming soon).
Apple AirPods Max for $395 ($154 off): These expensive cans are a much better buy when on sale, and they boast excellent sound quality, good ANC, a luxe design and a solid battery life. They’re available in Lightning or USB-C.
Apple Watch SE (2nd gen, GPS) for $170 ($79 off): The entry-level Apple Watch remains a fine choice for first-time smartwatch buyers, so long as you can live without the larger always-on display and more advanced health features of the pricier Series 10. This is another one of the lowest prices we’ve tracked for the 40mm model; the larger 44mm variant is similarly discounted at $200.
Apple 10th-gen iPad for $299 ($50 off): The new, baseline iPad updates a familiar device with a fresh design, improved performance, USB-C charging and a better battery life.
Apple 9th-gen iPad for $199 ($130 off): This model is on its way out, but $200 for an iPad is a solid sale price. This slab has a 10.2-inch display, an A13 Bionic chip and 64GB of storage — plus the antiquated physical Home button.
Apple 13-inch MacBook Air M2 for $749 ($250 off): Despite having a slightly older chipset, the M2 MacBook Air remains a great budget option for most anyone, save those who regularly push their daily driver to the limit with activities like video editing.
One can never have too many charging accessories, be they cables, wireless charging pads or power banks. Anker makes some of our favorites across all those categories, and you’ll find deep discounts on Anker gear even now after Prime Day has ended.
Anker MagGo 3-in-1 charging stand for $72 ($28 off): This stand supports an iPhone, Apple Watch and AirPods simultaneously, and it comes with a 40W wall charger and a USB-C to C cable which which to connect all the necessary pieces together.
A number of Lego sets are still on sale post October Prime Day. Some of our favorites come from the Star Wars, Super Mario and Harry Potter lineups, and you’ll find savings up to 41 percent on those.
Yes, Black Friday is right around the corner, but it would be unwise to sleep on these Prime Day tech deals that you can still get today. We’re seeing steep discounts on headphones, TVs, streaming devices, gaming gear and more, making it a good time to pick up something for yourself or cross a few items off your holiday shopping list early.
Dyson V15 Detect Plus cordless vacuum cleaner for $570 ($180 off): This version of our top pick in our best cordless vacuum cleaner guide has superior suction power and can handle pet hair without breaking a sweat, plus it has 60 minutes of run time and comes with a number of cleaner-head accessories.
Dyson Airwrap for $500 ($100 off): Dyson’s immensely popular hair styling tool uses the Coanda effect to help create waves and curls without excess heat.
LG 55-inch C4 evo OLED smart TV for $1,297 ($700 off): LG’s midrange OLED sets, the C4 family includes upgraded Alpha 9 Gen 7 chip, improved brightness and a 144Hz max refresh rate. Most sizes are discounted at the moment.
Shark AI Ultra robot vacuum cleaner for $280 ($139 off): Shark’s robo-vac can clean both carpet and hard floors well and maps your home while it cleans so you can more easily send it to specific rooms and areas when you want. Its self-emptying base can also hold up to 60 days worth of debris.
Dyson V15 Detect Plus cordless vacuum cleaner for $570 ($180 off): This version of our top pick in our best cordless vacuum cleaner guide has superior suction power and can handle pet hair without breaking a sweat, plus it has 60 minutes of run time and comes with a number of cleaner-head accessories.
SanDisk Ultra microSD card (1.5TB) for $89 ($61 off): If you don’t care about performance so much and just want a big chunk of space for as little cash as possible, this deal should work. You’ll have to deal with slower transfer speeds, but the discount takes roughly $20 off this 1.5TB card’s typical going rate in recent months.
Crucial X9 Pro portable SSD (1TB) for $85 ($10 off): The X9 Pro is the top pick in our guide to the best portable SSDs, combining dependable performance with a rugged compact design. We’ve seen this 1TB model go for much less in previously sales, but it’s sat in the $90 to $100 range for almost all of the past year. This discount marks the lowest price we’ve seen since January.
Sonos Era 100 for $199 ($50 off): This is one of our favorite smart speakers thanks to its excellent sound quality, Trueplay tuning and Bluetooth support. Plus, if you have two of them, you can pair them for a stellar stereo sound experience.
Roku Ultra (2024) for $79 ($21 off): The brand new Ultra is 30 percent faster than the previous model, and it supports Dolby Atmos, Dolby Vision and Wi-Fi 6.
Elgato Stream Deck+ for $170 ($30 off): This upgraded version of the popular streaming controller includes eight programmable buttons, four dials and a touch strip, all of which work together to let you build the ultimate controller for your gaming or productivity setup.
Ninja DualZone air fryer for $168 ($32 off): This 8-quart model of one of our favorite air fryers can cook two totally different foods at the same time, and you can set it up for both foods to be done cooking at the same time. The larger, 10-quart model is $50 off and down to $200.
Cosori 9-in-1 air fryer for $85.49 ($33.51 off): This newer air fryer from Cosori has nine preset cooking modes and a six-quart capacity that makes it just the right size to cook a good amount of food without taking up too much space on most countertops.
Follow @EngadgetDeals on Twitter for the latest tech deals and buying advice, and stay tuned to Engadget.com for all of the best tech deals coming out of October Prime Day 2024.
This article originally appeared on Engadget at https://www.engadget.com/the-best-prime-day-deals-you-can-still-get-after-the-october-big-deal-days-sale-apple-sony-anker-and-more-040010842.html?src=rss
In August, Kamala Harris’ campaign launched a Twitch account in an effort to reach young people and some of the “hardest-to-reach voters” out there. It debuted with a stream of Harris’ acceptance speech at the Democratic National Convention, which is perhaps what one could expect from an account owned by a presidential campaign. On the evening of October 9, though, the channel streamed live gameplay for the first time — along with a live feed of Vice Presidential nominee Tim Waltz’s speech in Arizona.
As Wired notes, Twitch creator Preheat kicked things off by playing World of Warcraft on the channet at 6:30PM ET. Preheat, who told Wired that they volunteered for the task because of Harris’ platforms, also provided commentary about the game and encouraged viewers to vote. “GOP is the opposite of POG,” they said at one point during the stream. A spokesperson told the publication that the campaign is hoping to reach young male votes that make up most of Twitch’s userbase by streaming the rally alongside WoW gameplay.
Harris isn’t the first politician to use Twitch to reach voters. Joe Biden’s administration streamed his inauguration on the website, while Donald Trump’s camp had been streaming rallies and speeches on the platform since 2019. The former president’s account was suspended following the January 6 US Capitol riot, but it was reinstated in July this year. Alexandria Ocasio-Cortez is on Twitch, as well, and streamed herself a few times while playing Among Us.
This article originally appeared on Engadget at https://www.engadget.com/entertainment/streaming/kamala-harris-twitch-account-streamed-tim-waltz-rally-alongside-live-wow-gameplay-021612716.html?src=rss
The Bitcoin Protocol reached nearly 24,000 BTC locked, totaling around $1.5 billion in value.
Bitcoin ranks third in NFT sales volume, with nearly $15 million in sales over seven days.
We use cookies on our website to give you the most relevant experience by remembering your preferences and repeat visits. By clicking “Accept”, you consent to the use of ALL the cookies.
This website uses cookies to improve your experience while you navigate through the website. Out of these, the cookies that are categorized as necessary are stored on your browser as they are essential for the working of basic functionalities of the website. We also use third-party cookies that help us analyze and understand how you use this website. These cookies will be stored in your browser only with your consent. You also have the option to opt-out of these cookies. But opting out of some of these cookies may affect your browsing experience.
Necessary cookies are absolutely essential for the website to function properly. These cookies ensure basic functionalities and security features of the website, anonymously.
Cookie
Duration
Description
cookielawinfo-checkbox-analytics
11 months
This cookie is set by GDPR Cookie Consent plugin. The cookie is used to store the user consent for the cookies in the category "Analytics".
cookielawinfo-checkbox-functional
11 months
The cookie is set by GDPR cookie consent to record the user consent for the cookies in the category "Functional".
cookielawinfo-checkbox-necessary
11 months
This cookie is set by GDPR Cookie Consent plugin. The cookies is used to store the user consent for the cookies in the category "Necessary".
cookielawinfo-checkbox-others
11 months
This cookie is set by GDPR Cookie Consent plugin. The cookie is used to store the user consent for the cookies in the category "Other.
cookielawinfo-checkbox-performance
11 months
This cookie is set by GDPR Cookie Consent plugin. The cookie is used to store the user consent for the cookies in the category "Performance".
viewed_cookie_policy
11 months
The cookie is set by the GDPR Cookie Consent plugin and is used to store whether or not user has consented to the use of cookies. It does not store any personal data.
Functional cookies help to perform certain functionalities like sharing the content of the website on social media platforms, collect feedbacks, and other third-party features.
Performance cookies are used to understand and analyze the key performance indexes of the website which helps in delivering a better user experience for the visitors.
Analytical cookies are used to understand how visitors interact with the website. These cookies help provide information on metrics the number of visitors, bounce rate, traffic source, etc.
Advertisement cookies are used to provide visitors with relevant ads and marketing campaigns. These cookies track visitors across websites and collect information to provide customized ads.