No GPU, No Party : Fine-Tune BERT for Sentiment Analysis with Vertex AI Custom jobs
Speed up the training process with serverless jobs

TL;DR: How to launch a training job with Pytorch with GPUs on Vertex. Code with examples.
In my previous article, I mentioned the fact that training locally huge models is not always a good practice when you have limited resources. Sometimes you just don’t have a choice, but sometimes you have at your disposal a Cloud provider such as Google Cloud Platform which can significantly speed up your trainings by:
- Providing you cutting-edge machines with custom configurations (memory, GPUs, etc.)
- Allowing you to launch several jobs simultaneously and choose the best model in the end
Not to mention that offloading the training to the cloud will relieve your personal machine. I already saw the battery melt after leaving my personal laptop train a model for 1 week. Back from holidays, my touchpad was literally popping out.
In this article, we will take a concrete use case where we will fine-tune a BERT model on social media comments to perform sentiment analysis. As we will see, training this kind of model on a CPU is very cumbersome and not optimal. We will therefore see how we can leverage Google Cloud Platform to speed up the process by using a GPU for only 60 cents.
Summary
- What is BERT
- What is Sentiment Analysis
- Get and prepare the data
- Use a small BERT pretrained model
- Create the dataloaders
- Write the main script to train the model
- Dockerize the script
- Build and push an image to Google Cloud
- Create a job on Vertex AI
What is BERT ?
BERT stands for Bidirectional Encoder Representations from Transformers and was open-sourced by Google in 2018. It is mainly used for NLP tasks as it was trained to capture semantics in sentences and provide rich word embeddings (representations). The difference with other models such as Word2Vec and Glove lies in the fact that it uses Transformers to process text. Transformers (refer to my previous article if you want to know more) are a family of neural networks which, a little bit like RNNs, have the ability to process sequences in both directions, therefore able to capture context around a word for example.
What is Sentiment Analysis ?
Sentiment Analysis is a specific task within the NLP domain which objective is to classify text into categories related to the tonality of it. Tonality is often expressed as positive, negative, or neutral. It is very commonly used to analyze verbatims, posts on social media, product reviews, etc.
Fine-tuning a BERT model on social media data
Getting and preparing the data
The dataset we will use comes from Kaggle, you can download it here : https://www.kaggle.com/datasets/farisdurrani/sentimentsearch (CC BY 4.0 License). In my experiments, I only chose the datasets from Facebook and Twitter.
The following snippet will take the csv files and save 3 splits (training, validation, and test) to where you want. I recommend saving them in Google Cloud Storage.
You can run the script with:
python make_splits --output-dir gs://your-bucket/
import pandas as pd
import argparse
import numpy as np
from sklearn.model_selection import train_test_split


def make_splits(output_dir):
    df=pd.concat([
        pd.read_csv("data/farisdurrani/twitter_filtered.csv"),
        pd.read_csv("data/farisdurrani/facebook_filtered.csv")
    ])
    df = df.dropna(subset=['sentiment'], axis=0)
    df['Target'] = df['sentiment'].apply(lambda x: 1 if x==0 else np.sign(x)+1).astype(int)

    df_train, df_ = train_test_split(df, stratify=df['Target'], test_size=0.2)
    df_eval, df_test = train_test_split(df_, stratify=df_['Target'], test_size=0.5)

    print(f"Files will be saved in {output_dir}")
    df_train.to_csv(output_dir + "/train.csv", index=False)
    df_eval.to_csv(output_dir + "/eval.csv", index=False)
    df_test.to_csv(output_dir + "/test.csv", index=False)

    print(f"Train : ({df_train.shape}) samples")
    print(f"Val : ({df_eval.shape}) samples")
    print(f"Test : ({df_test.shape}) samples")


if __name__ == '__main__':
    parser = argparse.ArgumentParser()
    parser.add_argument('--output-dir')
    args, _ = parser.parse_known_args()
    make_splits(args.output_dir)
The data should look roughly like this:

Using a small BERT pretrained model
For our model, we will use a lightweight BERT model, BERT-Tiny. This model has already been pretrained on vasts amount of data, but not necessarily with social media data and not necessarily with the objective of doing Sentiment Analysis. This is why we will fine-tune it.
It contains only 2 layers with a 128-units dimension, the full list of models can be seen here if you want to take a larger one.
Let’s first create a main.py file, with all necessary modules:
import pandas as pd
import argparse
import tensorflow as tf
import tensorflow_hub as hub
import tensorflow_text as text
import logging
import os
os.environ["TFHUB_MODEL_LOAD_FORMAT"] = "UNCOMPRESSED"

def train_and_evaluate(**params):
    pass
    # will be updated as we go
Let’s also write down our requirements in a dedicated requirements.txt
transformers==4.40.1
torch==2.2.2
pandas==2.0.3
scikit-learn==1.3.2
gcsfs
We will now load 2 parts to train our model:
- The tokenizer, which will take care of splitting the text inputs into tokens that BERT has been trained with.
- The model itself.
You can obtain both from Huggingface here. You can also download them to Cloud Storage. That is what I did, and will therefore load them with:
# Load pretrained tokenizers and bert model
tokenizer = BertTokenizer.from_pretrained('models/bert_uncased_L-2_H-128_A-2/vocab.txt')
model = BertModel.from_pretrained('models/bert_uncased_L-2_H-128_A-2')
Let’s now add the following piece to our file:
class SentimentBERT(nn.Module):
    def __init__(self, bert_model):
        super().__init__()
        self.bert_module = bert_model
        self.dropout = nn.Dropout(0.1)
        self.final = nn.Linear(in_features=128, out_features=3, bias=True)

        # Uncomment the below if you only want to retrain certain layers.
        # self.bert_module.requires_grad_(False)
        # for param in self.bert_module.encoder.parameters():
        #     param.requires_grad = True

    def forward(self, inputs):
        ids, mask, token_type_ids = inputs['ids'], inputs['mask'], inputs['token_type_ids']
        # print(ids.size(), mask.size(), token_type_ids.size())
        x = self.bert_module(ids, mask, token_type_ids)
        x = self.dropout(x['pooler_output'])
        out = self.final(x)
        return out
A little break here. We have several options when it comes to reusing an existing model.
- Transfer learning : we freeze the weights of the model and use it as a “feature extractor”. We can therefore append additional layers downstream. This is frequently used in Computer Vision where models like VGG, Xception, etc. can be reused to train a custom model on small datasets
- Fine-tuning : we unfreeze all or part of the weights of the model and retrain the model on a custom dataset. This is the preferred approach when training custom LLMs.
More details on Transfer learning and Fine-tuning here:
In the model, we have chosen to unfreeze all the model, but feel free to freeze one or more layers of the pretrained BERT module and see how it influences the performance.
The key part here is to add a fully connected layer after the BERT module to “link” it to our classification task, hence the final layer with 3 units. This will allow us to reuse the pretrained BERT weights and adapt our model to our task.
Creating the dataloaders
To create the dataloaders we will need the Tokenizer loaded above. The Tokenizer takes a string as input, and returns several outputs amongst which we can find the tokens (‘input_ids’ in our case):

The BERT tokenizer is a bit special and will return several outputs, but the most important one is the input_ids: they are the tokens used to encode our sentence. They might be words, or parts or words. For example, the word “looking” might be made of 2 tokens, “look” and “##ing”.
Let’s now create a dataloader module which will handle our datasets :
class BertDataset(Dataset):
    def __init__(self, df, tokenizer, max_length=100):
        super(BertDataset, self).__init__()
        self.df=df
        self.tokenizer=tokenizer
        self.target=self.df['Target']
        self.max_length=max_length

    def __len__(self):
        return len(self.df)

    def __getitem__(self, idx):

        X = self.df['bodyText'].values[idx]
        y = self.target.values[idx]

        inputs = self.tokenizer.encode_plus(
            X,
            pad_to_max_length=True,
            add_special_tokens=True,
            return_attention_mask=True,
            max_length=self.max_length,
        )
        ids = inputs["input_ids"]
        token_type_ids = inputs["token_type_ids"]
        mask = inputs["attention_mask"]

        x = {
            'ids': torch.tensor(ids, dtype=torch.long).to(DEVICE),
            'mask': torch.tensor(mask, dtype=torch.long).to(DEVICE),
            'token_type_ids': torch.tensor(token_type_ids, dtype=torch.long).to(DEVICE)
            }
        y = torch.tensor(y, dtype=torch.long).to(DEVICE)

        return x, y
Writing the main script to train the model
Let us define first and foremost two functions to handle the training and evaluation steps:
def train(epoch, model, dataloader, loss_fn, optimizer, max_steps=None):
    model.train()
    total_acc, total_count = 0, 0
    log_interval = 50
    start_time = time.time()

    for idx, (inputs, label) in enumerate(dataloader):
        optimizer.zero_grad()
        predicted_label = model(inputs)

        loss = loss_fn(predicted_label, label)
        loss.backward()
        optimizer.step()

        total_acc += (predicted_label.argmax(1) == label).sum().item()
        total_count += label.size(0)

        if idx % log_interval == 0:
            elapsed = time.time() - start_time
            print(
                "Epoch {:3d} | {:5d}/{:5d} batches "
                "| accuracy {:8.3f} | loss {:8.3f} ({:.3f}s)".format(
                    epoch, idx, len(dataloader), total_acc / total_count, loss.item(), elapsed
                )
            )
            total_acc, total_count = 0, 0
            start_time = time.time()

        if max_steps is not None:
            if idx == max_steps:
                return {'loss': loss.item(), 'acc': total_acc / total_count}

    return {'loss': loss.item(), 'acc': total_acc / total_count}


def evaluate(model, dataloader, loss_fn):
    model.eval()
    total_acc, total_count = 0, 0

    with torch.no_grad():
        for idx, (inputs, label) in enumerate(dataloader):
            predicted_label = model(inputs)
            loss = loss_fn(predicted_label, label)
            total_acc += (predicted_label.argmax(1) == label).sum().item()
            total_count += label.size(0)

    return {'loss': loss.item(), 'acc': total_acc / total_count}
We are getting closer to getting our main script up and running. Let’s stitch pieces together. We have:
- A BertDataset class to handle the loading of the data
- A SentimentBERT model which takes our Tiny-BERT model and adds an additional layer for our custom use case
- train() and eval() functions to handle those steps
- A train_and_eval() functions that bundles everything
We will use argparse to be able to launch our script with arguments. Such arguments are typically the train/eval/test files to run our model with any datasets, the path where our model will be stored, and parameters related to the training.
import pandas as pd
import time
import torch.nn as nn
import torch
import logging
import numpy as np
import argparse

from torch.utils.data import Dataset, DataLoader
from transformers import BertTokenizer, BertModel

logging.basicConfig(format='%(asctime)s [%(levelname)s]: %(message)s', level=logging.DEBUG)
logging.getLogger().setLevel(logging.INFO)

# --- CONSTANTS ---
BERT_MODEL_NAME = 'small_bert/bert_en_uncased_L-2_H-128_A-2'

if torch.cuda.is_available():
    logging.info(f"GPU: {torch.cuda.get_device_name(0)} is available.")
    DEVICE = torch.device('cuda')
else:
    logging.info("No GPU available. Training will run on CPU.")
    DEVICE = torch.device('cpu')

# --- Data preparation and tokenization ---
class BertDataset(Dataset):
    def __init__(self, df, tokenizer, max_length=100):
        super(BertDataset, self).__init__()
        self.df=df
        self.tokenizer=tokenizer
        self.target=self.df['Target']
        self.max_length=max_length

    def __len__(self):
        return len(self.df)

    def __getitem__(self, idx):

        X = self.df['bodyText'].values[idx]
        y = self.target.values[idx]

        inputs = self.tokenizer.encode_plus(
            X,
            pad_to_max_length=True,
            add_special_tokens=True,
            return_attention_mask=True,
            max_length=self.max_length,
        )
        ids = inputs["input_ids"]
        token_type_ids = inputs["token_type_ids"]
        mask = inputs["attention_mask"]

        x = {
            'ids': torch.tensor(ids, dtype=torch.long).to(DEVICE),
            'mask': torch.tensor(mask, dtype=torch.long).to(DEVICE),
            'token_type_ids': torch.tensor(token_type_ids, dtype=torch.long).to(DEVICE)
            }
        y = torch.tensor(y, dtype=torch.long).to(DEVICE)

        return x, y

# --- Model definition ---
class SentimentBERT(nn.Module):
    def __init__(self, bert_model):
        super().__init__()
        self.bert_module = bert_model
        self.dropout = nn.Dropout(0.1)
        self.final = nn.Linear(in_features=128, out_features=3, bias=True)

    def forward(self, inputs):
        ids, mask, token_type_ids = inputs['ids'], inputs['mask'], inputs['token_type_ids']
        x = self.bert_module(ids, mask, token_type_ids)
        x = self.dropout(x['pooler_output'])
        out = self.final(x)
        return out

# --- Training loop ---
def train(epoch, model, dataloader, loss_fn, optimizer, max_steps=None):
    model.train()
    total_acc, total_count = 0, 0
    log_interval = 50
    start_time = time.time()

    for idx, (inputs, label) in enumerate(dataloader):
        optimizer.zero_grad()
        predicted_label = model(inputs)

        loss = loss_fn(predicted_label, label)
        loss.backward()
        optimizer.step()

        total_acc += (predicted_label.argmax(1) == label).sum().item()
        total_count += label.size(0)

        if idx % log_interval == 0:
            elapsed = time.time() - start_time
            print(
                "Epoch {:3d} | {:5d}/{:5d} batches "
                "| accuracy {:8.3f} | loss {:8.3f} ({:.3f}s)".format(
                    epoch, idx, len(dataloader), total_acc / total_count, loss.item(), elapsed
                )
            )
            total_acc, total_count = 0, 0
            start_time = time.time()

        if max_steps is not None:
            if idx == max_steps:
                return {'loss': loss.item(), 'acc': total_acc / total_count}

    return {'loss': loss.item(), 'acc': total_acc / total_count}

# --- Validation loop ---
def evaluate(model, dataloader, loss_fn):
    model.eval()
    total_acc, total_count = 0, 0

    with torch.no_grad():
        for idx, (inputs, label) in enumerate(dataloader):
            predicted_label = model(inputs)
            loss = loss_fn(predicted_label, label)
            total_acc += (predicted_label.argmax(1) == label).sum().item()
            total_count += label.size(0)

    return {'loss': loss.item(), 'acc': total_acc / total_count}

# --- Main function ---
def train_and_evaluate(**params):

    logging.info("running with the following params :")
    logging.info(params)

    # Load pretrained tokenizers and bert model
    # update the paths to whichever you are using
    tokenizer = BertTokenizer.from_pretrained('models/bert_uncased_L-2_H-128_A-2/vocab.txt')
    model = BertModel.from_pretrained('models/bert_uncased_L-2_H-128_A-2')

    # Training parameters
    epochs = int(params.get('epochs'))
    batch_size = int(params.get('batch_size'))
    learning_rate = float(params.get('learning_rate'))

    #  Load the data
    df_train = pd.read_csv(params.get('training_file'))
    df_eval = pd.read_csv(params.get('validation_file'))
    df_test = pd.read_csv(params.get('testing_file'))

    # Create dataloaders
    train_ds = BertDataset(df_train, tokenizer, max_length=100)
    train_loader = DataLoader(dataset=train_ds,batch_size=batch_size, shuffle=True)
    eval_ds = BertDataset(df_eval, tokenizer, max_length=100)
    eval_loader = DataLoader(dataset=eval_ds,batch_size=batch_size)
    test_ds = BertDataset(df_test, tokenizer, max_length=100)
    test_loader = DataLoader(dataset=test_ds,batch_size=batch_size)

    # Create the model
    classifier = SentimentBERT(bert_model=model).to(DEVICE)
    total_parameters = sum([np.prod(p.size()) for p in classifier.parameters()])
    model_parameters = filter(lambda p: p.requires_grad, classifier.parameters())
    params = sum([np.prod(p.size()) for p in model_parameters])
    logging.info(f"Total params : {total_parameters} - Trainable : {params} ({params/total_parameters*100}% of total)")

    # Optimizer and loss functions
    optimizer = torch.optim.Adam([p for p in classifier.parameters() if p.requires_grad], learning_rate)
    loss_fn = nn.CrossEntropyLoss()

    # If dry run we only
    logging.info(f'Training model with {BERT_MODEL_NAME}')
    if args.dry_run:
        logging.info("Dry run mode")
        epochs = 1
        steps_per_epoch = 1
    else:
        steps_per_epoch = None

    # Action !
    for epoch in range(1, epochs + 1):
        epoch_start_time = time.time()
        train_metrics = train(epoch, classifier, train_loader, loss_fn=loss_fn, optimizer=optimizer, max_steps=steps_per_epoch)
        eval_metrics = evaluate(classifier, eval_loader, loss_fn=loss_fn)

        print("-" * 59)
        print(
            "End of epoch {:3d} - time: {:5.2f}s - loss: {:.4f} - accuracy: {:.4f} - valid_loss: {:.4f} - valid accuracy {:.4f} ".format(
                epoch, time.time() - epoch_start_time, train_metrics['loss'], train_metrics['acc'], eval_metrics['loss'], eval_metrics['acc']
            )
        )
        print("-" * 59)

    if args.dry_run:
        # If dry run, we do not run the evaluation
        return None

    test_metrics = evaluate(classifier, test_loader, loss_fn=loss_fn)

    metrics = {
        'train': train_metrics,
        'val': eval_metrics,
        'test': test_metrics,
    }
    logging.info(metrics)

    # save model and architecture to single file
    if params.get('job_dir') is None:
        logging.warning("No job dir provided, model will not be saved")
    else:
        logging.info("Saving model to {} ".format(params.get('job_dir')))
        torch.save(classifier.state_dict(), params.get('job_dir'))
    logging.info("Bye bye")


if __name__ == '__main__':
    # Create arguments here
    parser = argparse.ArgumentParser()
    parser.add_argument('--training-file', required=True, type=str)
    parser.add_argument('--validation-file', required=True, type=str)
    parser.add_argument('--testing-file', type=str)
    parser.add_argument('--job-dir', type=str)
    parser.add_argument('--epochs', type=float, default=2)
    parser.add_argument('--batch-size', type=float, default=1024)
    parser.add_argument('--learning-rate', type=float, default=0.01)
    parser.add_argument('--dry-run', action="store_true")

    # Parse them
    args, _ = parser.parse_known_args()

    # Execute training
    train_and_evaluate(**vars(args))
This is great, but unfortunately, this model will take a long time to train. Indeed, with around 4.7M parameters to train, one step will take around 3s on a 16Gb Macbook Pro with Intel chip.

3s per step can be quite long when you have 1238 steps to go and 10 epochs to complete…
No GPU, no party.
How to use Vertex AI and start the party?
Short answer : Docker and gcloud.
If you do not have a powerful GPU on your laptop (as most of us do), and/or want to avoid burning your laptop’s cooling fan, you may want to move your script on a Cloud platform such as Google Cloud (disclaimer: I use Google Cloud at my job).
The nice thing about Google is it offers 300$ in credits when you open your own project with your Gmail account.
And as always, when it comes to transferring your code to somewhere else, Docker is usually the go-to solution.
Dockerizing the script
Let’s write a Docker image with GPU enabled. There are a lot of Docker images you can find on the official Docker repository, I chose the pytorch/pytorch:2.2.2-cuda11.8-cudnn8-runtime as I use a Pytorch 2.2.2 version. Be sure to select a version with CUDA, otherwise you will have to install it yourself in your Dockerfile, and trust me, you don’t want to do that, except if you really have to.
This Dockerfile will preinstall necessary CUDA dependencies and drivers and ensure we can use them in a custom training job, and run your python main.py file with the arguments that you will pass once you call the image.
FROM pytorch/pytorch:2.2.2-cuda11.8-cudnn8-runtime

WORKDIR /src
COPY . .
RUN pip install --upgrade pip && pip install -r requirements.txt

ENTRYPOINT ["python", "main.py"]
Building and pushing an image to Google Cloud
Once our image is ready to be built, we need to build it and push it to a registry. It can be on any registry you like, but Google Cloud offers a service for that called Artefact Registry. You will therefore be able to store your images on Google Cloud very easily.
Write this little file at the root of your directory, and be sure that the Dockerfile is at the same level:
# build.sh

export PROJECT_ID=<your-project-id>
export IMAGE_REPO_NAME=pt_bert_sentiment
export IMAGE_TAG=dev
export IMAGE_URI=eu.gcr.io/$PROJECT_ID/$IMAGE_REPO_NAME:$IMAGE_TAG

gcloud builds submit --tag $IMAGE_URI .
Run the build.sh file, and after waiting a couple of minutes for the image to build, you should see something like:
eu.gcr.io/<your-project-id>/pt_bert_sentiment:dev SUCCESS
Creating a job on Vertex AI
Once your image has been built and pushed to Artefact Registry, we will now be able to tell Vertex AI to run this image on any machine we want, including ones with powerful GPUs ! Google offers a $300 credit when you create your own GCP project, it will be largely sufficient to run our model.
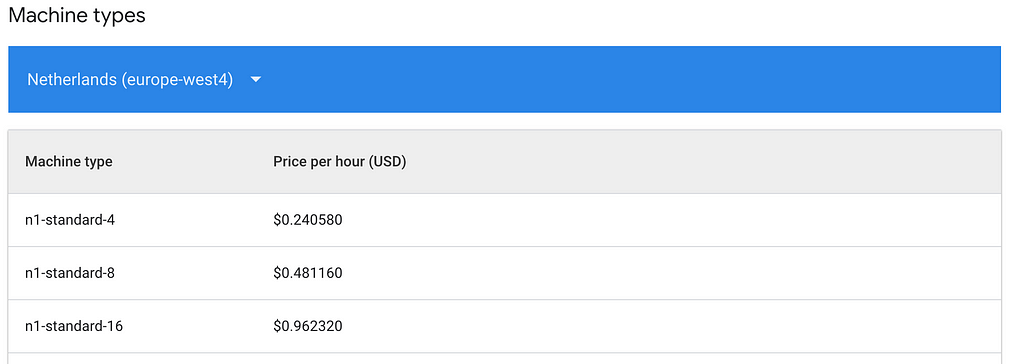
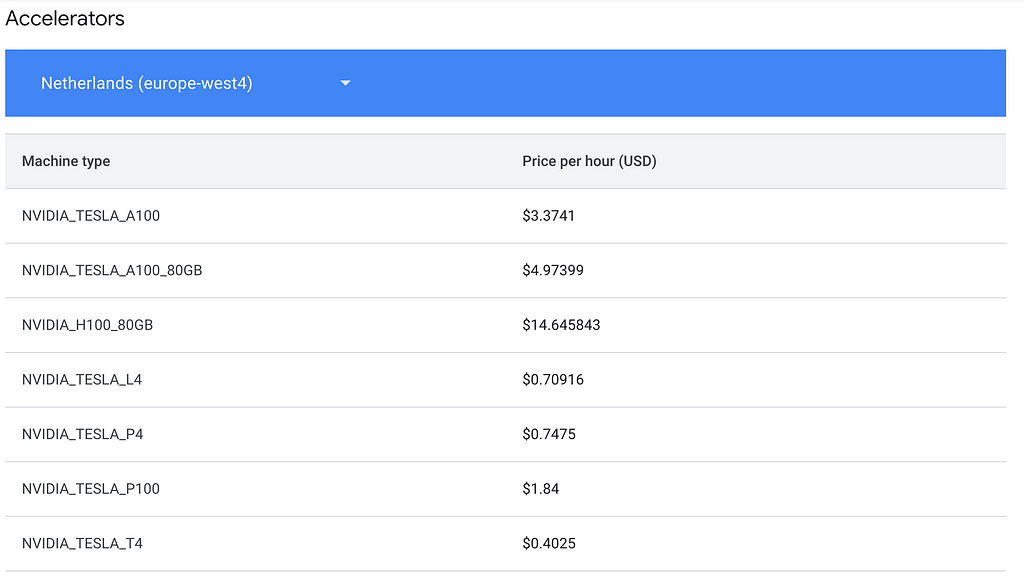
Costs are available here. In our case, we will take the n1-standard-4 machine at $0.24/hr, and attach a NVIDIA T4 GPU at $0.40/hr.


Create a job.sh file as follows, by specifying which region you are in and what kind of machine you use. Refer to the link above if you are in a different region as costs may vary.
You’ll also need to pass arguments to your training script. The syntax for the gcloud ai custom-jobs create consists of 2 parts:
– the arguments related to the job itself : –region , –display-name , –worker-pool-spec , –service-account , and –args
– the arguments related to the training : –training-file , –epochs , etc.
The latter needs to be preceded by the –args to indicate that all following arguments are related to the training Python script.
Ex: supposing our script takes 2 arguments x and y, we would have:
–args=x=1,y=2
# job.sh

export PROJECT_ID=<your-project-id>
export BUCKET=<your-bucket-id>
export REGION="europe-west4"
export SERVICE_ACCOUNT=<your-service-account>
export JOB_NAME="pytorch_bert_training"
export MACHINE_TYPE="n1-standard-4"  # We can specify GPUs here
export ACCELERATOR_TYPE="NVIDIA_TESLA_T4"
export IMAGE_URI="eu.gcr.io/$PROJECT_ID/pt_bert_sentiment:dev"


gcloud ai custom-jobs create
--region=$REGION
--display-name=$JOB_NAME
--worker-pool-spec=machine-type=$MACHINE_TYPE,accelerator-type=$ACCELERATOR_TYPE,accelerator-count=1,replica-count=1,container-image-uri=$IMAGE_URI
--service-account=$SERVICE_ACCOUNT
--args=
--training-file=gs://$BUCKET/data/train.csv,
--validation-file=gs://$BUCKET/data/eval.csv,
--testing-file=gs://$BUCKET/data/test.csv,
--job-dir=gs://$BUCKET/model/model.pt,
--epochs=10,
--batch-size=128,
--learning-rate=0.0001
Running the job on Vertex AI
Launch the script, and navigate to your GCP project, in the Training section under the Vertex menu .

Launch the script, and navigate to the console. You should see the job status as “Pending”, and then “Training”.
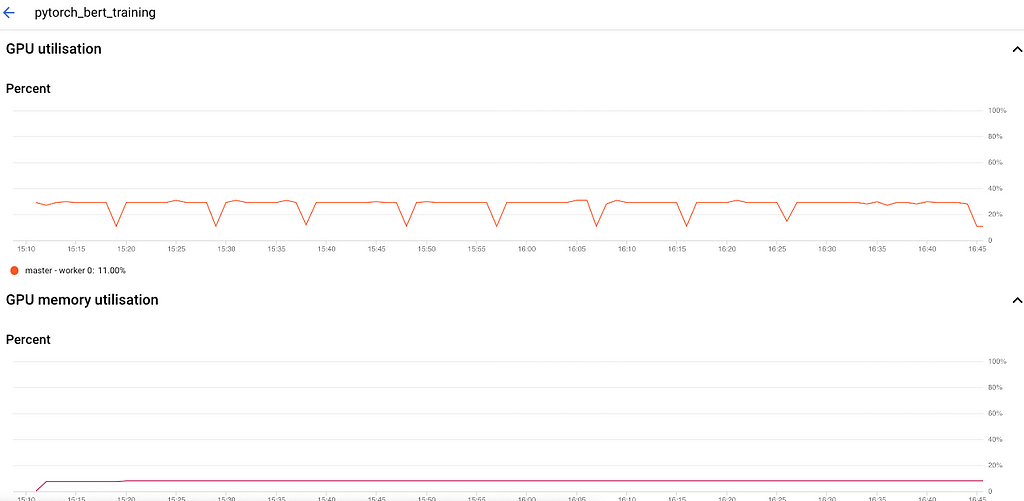
To ensure the GPU is being used, you can check the job and its ressources :

This indicates that we are training with a GPU, we should therefore expect a significant speed-up now ! Let’s have a look at the logs:

Less than 10 minutes to run 1 epoch, vs 1hr/epoch on CPU ! We have offloaded the training to Vertex and accelerated the training process. We could decide to launch other jobs with different configurations, without overloading our laptop’s capabilities.
What about the final accuracy of the model ? Well after 10 epochs, it is around 94–95%. We could let it run even longer and see if the score improves (we can also add an early stopping callback to avoid overfitting)

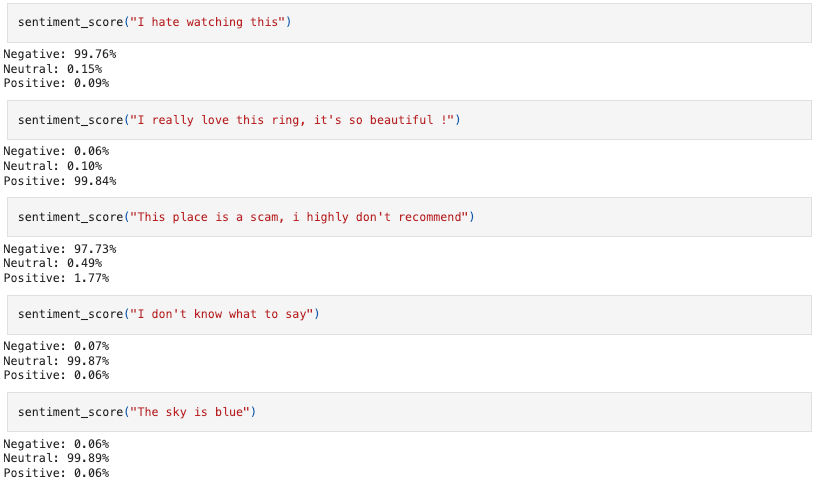
How does our model perform ?

Time to party !
No GPU, No Party : Fine-Tune BERT for Sentiment Analysis with Vertex AI Custom jobs was originally published in Towards Data Science on Medium, where people are continuing the conversation by highlighting and responding to this story.
Originally appeared here:
No GPU, No Party : Fine-Tune BERT for Sentiment Analysis with Vertex AI Custom jobs