
A guide on accelerating inference performance

Intro
Open-source large language models have lived up to the hype. Many companies that use GPT-3.5 or GPT-4 in production have realized that these models are simply not scalable from a cost perspective. Because of this, enterprises are looking for good open-source alternatives. Recent models like Mixtral and Llama 2 have shown stellar results when it comes to output quality. But, scaling these models to support thousands of concurrent users still remains a challenge.
While frameworks such as vLLM and TGI are a great starting point for boosting inference, they lack some optimizations, making it difficult to scale them in production.
This is where TensorRT-LLM comes in. TensorRT-LLM is an open-source framework designed by Nvidia to boost the performance of large language models in a production environment. Most of the big shots such as Anthropic, OpenAI, Anyscale, etc. are already using this framework to serve LLMs to millions of users.
Understanding TensorRT-LLM
Unlike other inference techniques, TensorRT LLM does not serve the model using raw weights. Instead, it compiles the model and optimizes the kernels to enable efficient serving on an Nvidia GPU. The performance benefits of running a compiled model are far greater than running it raw. This is one of the main reasons why TensorRT LLM is blazing fast.
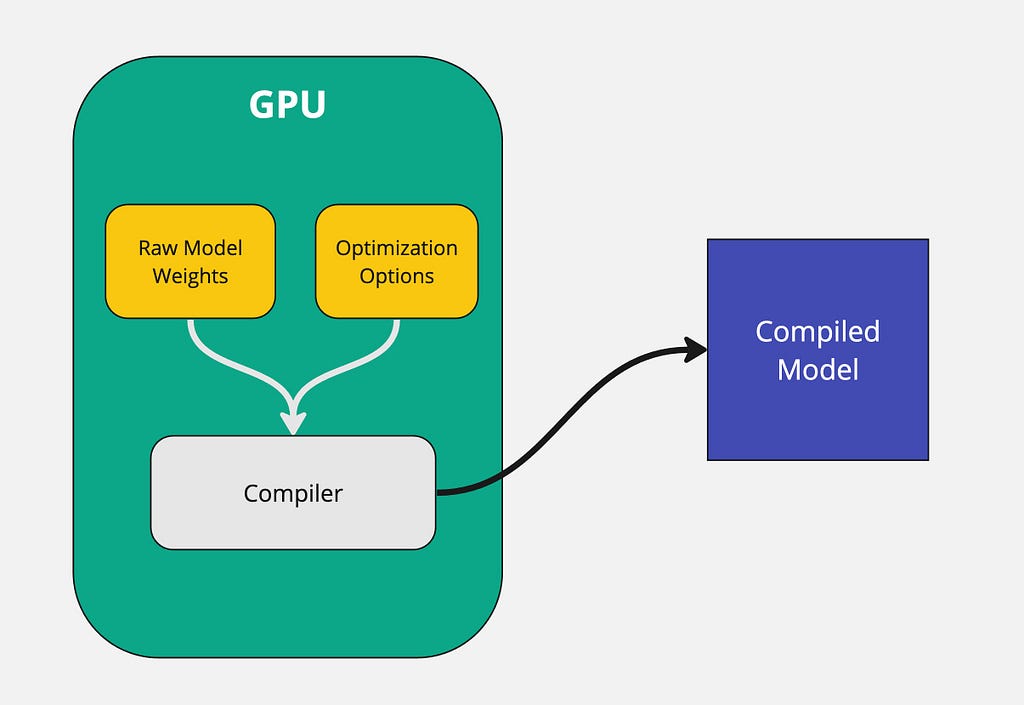
The raw model weights along with optimization options such as quantization level, tensor parallelism, pipeline parallelism, etc. get passed to the compiler. The compiler then takes that information and outputs a model binary that is optimized for the specific GPU.
An important thing to note is that the entire model compilation process MUST take place on a GPU. The compiled model that gets generated is optimized specifically on the GPU that it is run on. For example, if you compile the model on a A40 GPU, you won’t be able to run it on an A100 GPU. So whatever GPU is used during compilation, the same GPU must get used for inference.
TensorRT LLM does not support all large language models out of the box. The reason is that each model architecture is different and TensorRT does deep graph level optimizations. With that being said, most of the popular models such as Mistral, Llama, and Qwen are supported. If you’re curious about the full list of supported models you can check the TensorRT LLM Github repository.
Benefits Of Using TensorRT-LLM
The TensorRT LLM python package allows developers to run LLMs at peak performance without having to know C++ or CUDA. On top of that, it comes with handy features such as token streaming, paged attention, and KV cache. Let’s dig a bit deeper into a few of these topics.
- Paged Attention
Large language models require a lot of memory to store the keys and values for each token. This memory usage grows very large as the input sequence gets longer.
With regular attention, the keys and values for a sequence have to be stored contiguously. So even if you free up space in the middle of the sequence’s memory allocation, you can’t use that space for other sequences. This causes fragmentation and waste.
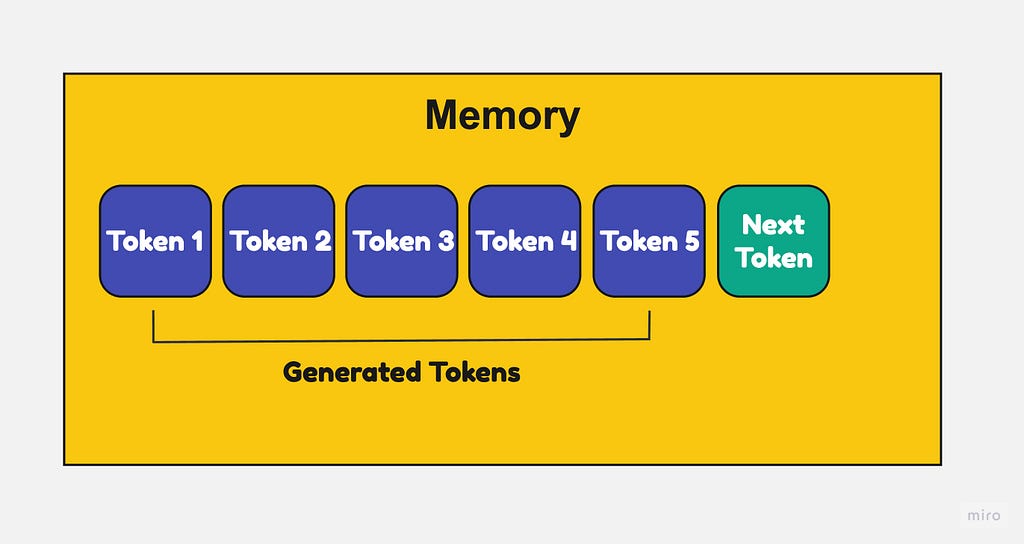
With paged attention, each page of keys/values can be placed anywhere in memory, non-contiguous. So if you free up some pages in the middle, that space can now be reused for other sequences.
This prevents fragmentation and allows higher memory utilization. Pages can be allocated and freed dynamically as needed when generating the output sequence.

2. Efficient KV Caching
KV caches stand for “key-value caches” and are used to cache parts of large language models (LLMs) to improve inference speed and reduce memory usage.
LLMs have billions of parameters, making them slow and memory- intensive to run inferences on. KV caches help address this by caching the layer outputs and activations of the LLM so they don’t need to be recomputed for every inference.
Here’s how it works:
- During inference, as the LLM executes each layer, the outputs are cached to a key-value store with a unique key.
- When subsequent inferences use the same layer inputs, instead of recomputing the layer, the cached outputs are retrieved using the key.
- This avoids redundant computations and reduces activation memory, improving inference speed and memory efficiency.
Alright, enough with the theory. Let’s deploy a model for real!
Hands-On Python Tutorial
There are two steps to deploy a model using TensorRT-LLM:
- Compile the model
- Deploy the compiled model as a REST API endpoint
Step 1: Compiling the model
For this tutorial, we will be working with Mistral 7B Instruct v0.2. As mentioned earlier, the compilation phase requires a GPU. I found the easiest way to compile a model is on a Google Colab notebook.
TensorRT LLM is primarily supported on high end Nvidia GPUs. I ran the google colab on an A100 40GB GPU and will use the same GPU for deployment as well.
!git clone https://github.com/NVIDIA/TensorRT-LLM.git
%cd TensorRT-LLM/examples/llama
- Clone the TensorRT-LLM git repo. This repo contains all of the modules and scripts we need to compile the model.
!pip install tensorrt_llm -U --pre --extra-index-url https://pypi.nvidia.com
!pip install huggingface_hub pynvml mpi4py
!pip install -r requirements.txt
- Install the necessary Python dependencies.
from huggingface_hub import snapshot_download
from google.colab import userdata


snapshot_download(
    "mistralai/Mistral-7B-Instruct-v0.2",
    local_dir="tmp/hf_models/mistral-7b-instruct-v0.2",
    max_workers=4
)
- Download the Mistral 7B Instruct v0.2 model weights from hugging face and store them in a local directory at tmp/hf_models/mistral-7b-instruct-v0.2
- If you look inside the tmp/hf_models directory in Colab you should see the model weights there.
!python convert_checkpoint.py --model_dir ./tmp/hf_models/mistral-7b-instruct-v0.2
                             --output_dir ./tmp/trt_engines/1-gpu/
                             --dtype float16
- The raw model weights cannot be compiled. Instead, they have to get converted into a specific tensorRT LLM format.
- The convert_checkpoint.py script takes the raw Mistral weights and converts them into a compatible format.
- The –model_dir is the path to the raw model weights.
- The –output_dir is the path to the converted weights.
!trtllm-build --checkpoint_dir ./tmp/trt_engines/1-gpu/
            --output_dir ./tmp/trt_engines/compiled-model/
            --gpt_attention_plugin float16
            --gemm_plugin float16
            --max_input_len 32256
- The trtllm-build command compiles the model. At this stage, you can pass in various optimization flags as well. To keep things simple, I have not used any additional optimizations.
- The –checkpoint_dir is the path to the converted model weights.
- The –output_dir is where the compiled model gets saved.
- Mistral 7B Instruct v0.2 supports a 32K context length. I’ve set that context length using the–max_input_length flag.
Note: Compiling the model can take 15–30 minutes
Once the model is compiled, you can upload your compiled model to hugging face hub. In order the upload files to hugging face hub you will need a valid access token that has WRITE access.
import os
from huggingface_hub import HfApi

for root, dirs, files in os.walk(f"tmp/trt_engines/compiled-model", topdown=False):
    for name in files:
        filepath = os.path.join(root, name)
        filename = "/".join(filepath.split("/")[-2:])
        print("uploading file: ", filename)
        api = HfApi(token=userdata.get('HF_WRITE_TOKEN'))
        api.upload_file(
            path_or_fileobj=filepath,
            path_in_repo=filename,
            repo_id="<your-repo-id>/mistral-7b-v0.2-trtllm"
        )
- This code uploads the compiled model, the .engine file, to hugging face under your user id.
- Replace the <your-repo-id> in the code with your hugging face repo which is usually your hugging face user id.
Awesome! That finishes the model compilation part. Onto the deployment step.
Step 2: Deploying the compiled model
There are a lot of ways to deploy this compiled model. You can use a simple tool like FastAPI or something more complex like the triton inference server.
When using a tool like FastAPI, the developer has to set up the API server, write the Dockerfile, and configure CUDA correctly. Managing these things can be a real pain and it ruins the overall developer experience.
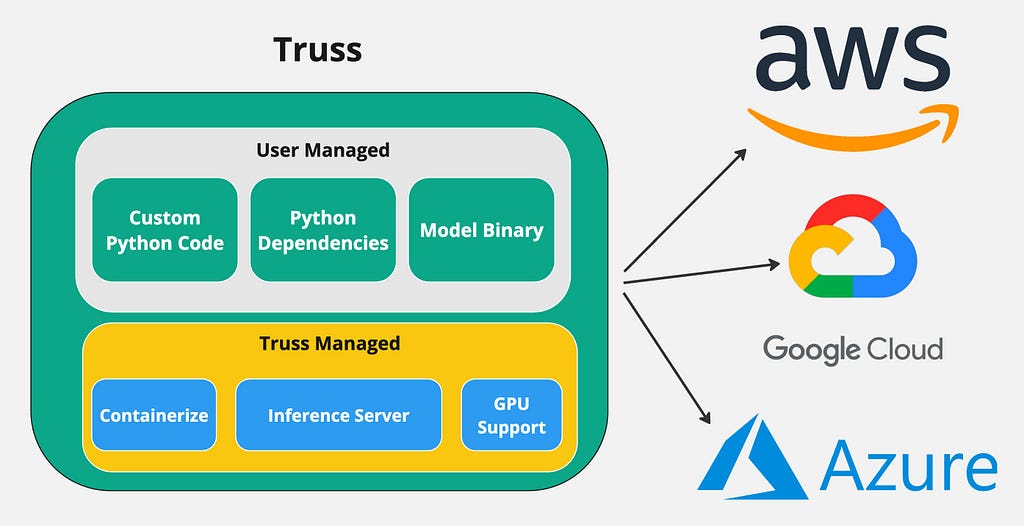
To avoid these issues, I’ve decided to use a simple open-source tool called Truss. Truss allows developers to easily package their models with GPU support and run them on any cloud environment. It has a ton of great features that make containerizing models a breeze:
- GPU support out of the box. No need to deal with CUDA.
- Automatic Dockerfile creation. No need to write it yourself.
- Production ready API server
- Simple python interface
The main benefit of using Truss is that you can easily containerize a model with GPU support and deploy it to any cloud environment.
Creating the Truss
Create or open a python virtual environment with python version ≥ 3.8 and install the following dependency:
pip install --upgrade truss
(Optional) If you want to create your Truss project from scratch you can run the command:
truss init mistral-7b-tensort-llm
You will be prompted to give your model a name. Any name such as Mistral 7B Tensort LLM will do. Running the command above auto generates the required files to deploy a Truss.
To speed the process up a bit, I have a Github repository that contains the required files. Please clone the Github repository below:
GitHub – htrivedi99/mistral-7b-tensorrt-llm-truss
This is what the directory structure should look like for mistral-7b-tensorrt-llm-truss :
├── mistral-7b-tensorrt-llm-truss
│   ├── config.yaml
│   ├── model
│   │   ├── __init__.py
│   │   └── model.py
|   |   └── utils.py
|   ├── requirements.txt
Here’s a quick breakdown of what the files above are used for:
- The config.yaml is used to set various configurations for your model, including its resources, dependencies, environmental variables, and more. This is where we can specify the model name, which Python dependencies to install, as well as which system packages to install.
2. The model/model.py is the heart of Truss. It contains the Python code that will get executed on the Truss server. In the model.py there are two main methods: load() and predict() .
- The load method is where we’ll download the compiled model from hugging face and initialize the TensorRT LLM engine.
- The predict method receives HTTP requests and calls the model.
3. The model/utils.py contains some helper functions for the model.py file. I did not write the utils.py file myself, I took it directly from the TensorRT LLM repository.
4. The requirements.txt contains the necessary Python dependencies to run our compiled model.
Deeper Code Explanation:
The model.py contains the main code that gets executed, so let’s dig a bit deeper into that file. Let’s first take a look at the load function.
import subprocess
subprocess.run(["pip", "install", "tensorrt_llm", "-U", "--pre", "--extra-index-url", "https://pypi.nvidia.com"])

import torch
from model.utils import (DEFAULT_HF_MODEL_DIRS, DEFAULT_PROMPT_TEMPLATES,
                   load_tokenizer, read_model_name, throttle_generator)

import tensorrt_llm
import tensorrt_llm.profiler
from tensorrt_llm.runtime import ModelRunnerCpp, ModelRunner
from huggingface_hub import snapshot_download

STOP_WORDS_LIST = None
BAD_WORDS_LIST = None
PROMPT_TEMPLATE = None

class Model:
    def __init__(self, **kwargs):
        self.model = None
        self.tokenizer = None
        self.pad_id = None
        self.end_id = None
        self.runtime_rank = None
        self._data_dir = kwargs["data_dir"]

    def load(self):
        snapshot_download(
            "htrivedi99/mistral-7b-v0.2-trtllm",
            local_dir=self._data_dir,
            max_workers=4,
        )

        self.runtime_rank = tensorrt_llm.mpi_rank()

        model_name, model_version = read_model_name(f"{self._data_dir}/compiled-model")
        tokenizer_dir = "mistralai/Mistral-7B-Instruct-v0.2"

        self.tokenizer, self.pad_id, self.end_id = load_tokenizer(
            tokenizer_dir=tokenizer_dir,
            vocab_file=None,
            model_name=model_name,
            model_version=model_version,
            tokenizer_type="llama",
        )


        runner_cls = ModelRunner
        runner_kwargs = dict(engine_dir=f"{self._data_dir}/compiled-model",
                             lora_dir=None,
                             rank=self.runtime_rank,
                             debug_mode=False,
                             lora_ckpt_source="hf",
                            )

        self.model = runner_cls.from_dir(**runner_kwargs)
What’s happening here:
- At the top of the file we import the necessary modules, specifically tensorrt_llm
- Next, inside the load function, we download the compiled model using the snapshot_download function. My compiled model is at the following repo id: htrivedi99/mistral-7b-v0.2-trtllm . If you uploaded your compiled model elsewhere, update this value accordingly.
- Then, we download the tokenizer for the model using the load_tokenizer function that comes with model/utils.py .
- Finally, we use TensorRT LLM to load our compiled model using the ModelRunner class.
Cool, let’s take a look at the predict function as well.
def predict(self, request: dict):

        prompt = request.pop("prompt")
        max_new_tokens = request.pop("max_new_tokens", 2048)
        temperature = request.pop("temperature", 0.9)
        top_k = request.pop("top_k",1)
        top_p = request.pop("top_p", 0)
        streaming = request.pop("streaming", False)
        streaming_interval = request.pop("streaming_interval", 3)

        batch_input_ids = self.parse_input(tokenizer=self.tokenizer,
                                      input_text=[prompt],
                                      prompt_template=None,
                                      input_file=None,
                                      add_special_tokens=None,
                                      max_input_length=1028,
                                      pad_id=self.pad_id,
                                      )
        input_lengths = [x.size(0) for x in batch_input_ids]

        outputs = self.model.generate(
            batch_input_ids,
            max_new_tokens=max_new_tokens,
            max_attention_window_size=None,
            sink_token_length=None,
            end_id=self.end_id,
            pad_id=self.pad_id,
            temperature=temperature,
            top_k=top_k,
            top_p=top_p,
            num_beams=1,
            length_penalty=1,
            repetition_penalty=1,
            presence_penalty=0,
            frequency_penalty=0,
            stop_words_list=STOP_WORDS_LIST,
            bad_words_list=BAD_WORDS_LIST,
            lora_uids=None,
            streaming=streaming,
            output_sequence_lengths=True,
            return_dict=True)

        if streaming:
            streamer = throttle_generator(outputs, streaming_interval)

            def generator():
                total_output = ""
                for curr_outputs in streamer:
                    if self.runtime_rank == 0:
                        output_ids = curr_outputs['output_ids']
                        sequence_lengths = curr_outputs['sequence_lengths']
                        batch_size, num_beams, _ = output_ids.size()
                        for batch_idx in range(batch_size):
                            for beam in range(num_beams):
                                output_begin = input_lengths[batch_idx]
                                output_end = sequence_lengths[batch_idx][beam]
                                outputs = output_ids[batch_idx][beam][
                                          output_begin:output_end].tolist()
                                output_text = self.tokenizer.decode(outputs)

                                current_length = len(total_output)
                                total_output = output_text
                                yield total_output[current_length:]
            return generator()
        else:
            if self.runtime_rank == 0:
                output_ids = outputs['output_ids']
                sequence_lengths = outputs['sequence_lengths']
                batch_size, num_beams, _ = output_ids.size()
                for batch_idx in range(batch_size):
                    for beam in range(num_beams):
                        output_begin = input_lengths[batch_idx]
                        output_end = sequence_lengths[batch_idx][beam]
                        outputs = output_ids[batch_idx][beam][
                                  output_begin:output_end].tolist()
                        output_text = self.tokenizer.decode(outputs)
                        return {"output": output_text}
What’s happening here:
- The predict function accepts a few model inputs such as the prompt , max_new_tokens , temperature , etc. We extract all of these values at the top of the function using the request.pop method.
- Next, we format the prompt into the required format for TensorRT LLM using the self.parse_input helper function.
- Then, we call our LLM model to generate the outputs using the self.model.generate function. The generate function accepts a variety of arguments that help control the output of the LLM.
- I’ve also added some code to enable streaming by producing a generator object. If streaming is disabled, the tokenizer simply decodes the output of the LLM and returns it as a JSON object.
Awesome! That covers the coding portion. Let’s containerize it.
Containerizing the model:
In order to run our model in the cloud we need to containerize it. Truss will take care of creating the Dockerfile and packaging everything for us, so we don’t have to do much.
Outside of the mistral-7b-tensorrt-llm-truss directory create a file called main.py . Paste the following code inside it:
import truss
from pathlib import Path

tr = truss.load("./mistral-7b-tensorrt-llm-truss")
command = tr.docker_build_setup(build_dir=Path("./mistral-7b-tensorrt-llm-truss"))
print(command)
Run the main.py file and look inside the mistral-7b-tensorrt-llm-truss directory. You should see a bunch of files get auto-generated. We don’t need to worry about what these files mean, it’s just Truss doing its magic.
Next, let’s build our container using docker. Run the commands below sequentially:
docker build mistral-7b-tensorrt-llm-truss -t mistral-7b-tensorrt-llm-truss:latest
docker tag mistral-7b-tensorrt-llm-truss <docker_user_id>/mistral-7b-tensorrt-llm-truss
docker push <docker_user_id>/mistral-7b-tensorrt-llm-truss
Sweet! We’re ready to deploy the model in the cloud!
Deploying the model in GKE
For this section, we’ll be deploying the model on Google Kubernetes Engine. If you recall, during the model compilation step we ran the Google Colab on an A100 40GB GPU. For TensorRT LLM to work, we need to deploy the model on the exact same GPU for inference.
I won’t go super deep into how to set up a GKE cluster as it’s not in the scope of this article. But, I will provide the specs I used for the cluster. Here are the specs:
- 1 node, standard kubernetes cluster (not autopilot)
- 1.28.5 gke kubernetes version
- 1 Nvidia A100 40GB GPU
- a2-highgpu-1g machine (12 vCPU, 85 GB memory)
- Google managed GPU Driver installation (Otherwise we need to install Cuda driver manually)
- All of this will run on a spot instance
Once the cluster is configured, we can launch it and connect to it. After the cluster is active and you’ve successfully connected to it, create the following kubernetes deployment:
apiVersion: apps/v1
kind: Deployment
metadata:
  name: mistral-7b-v2-trt
  namespace: default
spec:
  replicas: 1
  selector:
    matchLabels:
      component: mistral-7b-v2-trt-layer
  template:
    metadata:
      labels:
        component: mistral-7b-v2-trt-layer
    spec:
      containers:
      - name: mistral-container
        image: htrivedi05/mistral-7b-v0.2-trt:latest
        ports:
          - containerPort: 8080
        resources:
          limits:
            nvidia.com/gpu: 1
      nodeSelector:
        cloud.google.com/gke-accelerator: nvidia-tesla-a100
---
apiVersion: v1
kind: Service
metadata:
  name: mistral-7b-v2-trt-service
  namespace: default
spec:
  type: ClusterIP
  selector:
    component: mistral-7b-v2-trt-layer
  ports:
  - port: 8080
    protocol: TCP
    targetPort: 8080
This is a standard kubernetes deployment that runs a container with the image htrivedi05/mistral-7b-v0.2-trt:latest . If you created your own image in the previous section, go ahead and use that. Feel free to use mine otherwise.
You can create the deployment by running the command:
kubectl create -f mistral-deployment.yaml
It takes a few minutes for the kubernetes pod to be provisioned. Once the pod is running, the load function we wrote earlier will get executed. You can check the logs of the pod by running the command:
kubectl logs <pod-name>
Once the model is loaded, you will see something like Completed model.load() execution in 449234 ms in the pod logs. To send a request to the model via HTTP we need to port-forward the service. You can use the command below to do that:
kubectl port-forward svc/mistral-7b-v2-trt-service 8080
Great! We can finally start sending requests to the model! Open up any Python script and run the following code:
import requests

data = {"prompt": "What is a mistral?"}
res = requests.post("http://127.0.0.1:8080/v1/models/model:predict", json=data)
res = res.json()
print(res)
You will see an output like the following:
{"output": "A Mistral is a strong, cold wind that originates in the Rhone Valley in France. It is named after the Mistral wind system, which is associated with the northern Mediterranean region. The Mistral is known for its consistency and strength, often blowing steadily for days at a time. It can reach speeds of up to 130 kilometers per hour (80 miles per hour), making it one of the strongest winds in Europe. The Mistral is also known for its clear, dry air and its role in shaping the landscape and climate of the Rhone Valley."}
The performance of TensorRT LLM can be visibly noticed when the tokens are streamed. Here’s an example of how to do that:
data = {"prompt": "What is mistral wind?", "streaming": True, "streaming_interval": 3}
res = requests.post("http://127.0.0.1:8080/v1/models/model:predict", json=data, stream=True)

for content in res.iter_content():
    print(content.decode("utf-8"), end="", flush=True)
This mistral model has a fairly large context window, so feel free to try it out with different prompts.
Performance Benchmarks
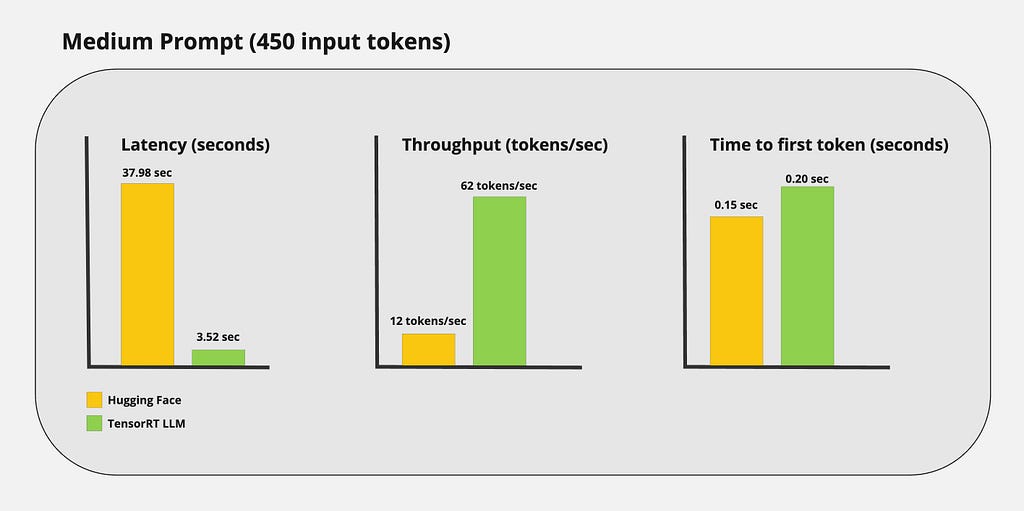
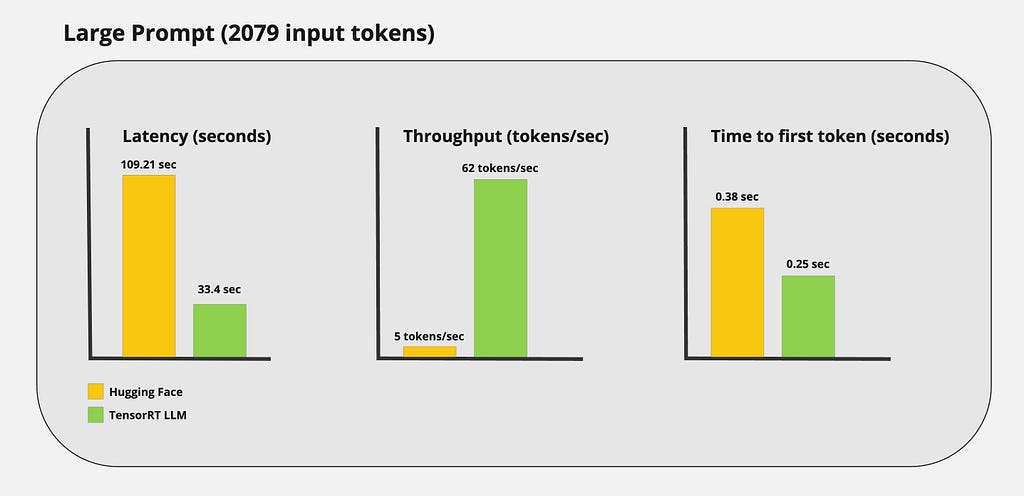
Just by looking at the tokens being streamed, you can probably tell TensorRT LLM is really fast. However, I wanted to get real numbers to capture the performance gains of using TensorRT LLM. I ran some custom benchmarks and got the following results:
Small Prompt:

Medium prompt:
Large prompt:
Conclusion
In this blog post, my goal was to demonstrate how state-of-the-art inference can be achieved using TensorRT LLM. We covered everything from compiling an LLM to deploying the model in production.
While TensorRT LLM is more complex than other inferencing optimizers, the performance speaks for itself. This tool provides state-of-the-art LLM optimizations while being completely open-source and is designed for commercial use. This framework is still in the early stages and is under active development. The performance we see today will only improve in the coming years.
I hope you found something valuable in this article. Thanks for reading!
Enjoyed This Story?
Consider subscribing for free.
Get an email whenever Het Trivedi publishes.
Images
If not otherwise stated, all images are created by the author.
Deploying LLMs Into Production Using TensorRT LLM was originally published in Towards Data Science on Medium, where people are continuing the conversation by highlighting and responding to this story.
Originally appeared here:
Deploying LLMs Into Production Using TensorRT LLM
Go Here to Read this Fast! Deploying LLMs Into Production Using TensorRT LLM
