New Mexico is joining states like California and Ohio in supporting digital driver’s licenses and state IDs in Apple Wallet and Google Wallet. New Mexico residents are still required by law to carry their physical IDs for law enforcement and age-verification use, but at businesses and TSA checkpoints that have adopted New Mexico’s NM Verifier app, you’ll be able to tap your smartphone rather than pull out a card.
Digital licenses can be added to Apple and Google’s apps now by scanning the front and back of your physical ID, capturing a scan of your face and submitting your digital application to be verified. Once added, digital IDs can be pulled up and used in the same way you’d pay with a digital payment card. Google has published a video on how to add your card to Google Wallet and Apple has a detailed support article on how to add IDs to Apple Wallet, if you’re looking for tips.
The New Mexico Motor Vehicle Division first proposed legislation to “offer electronic credentials to customers at no additional cost” in January 2024. The rollout of digital IDs continues to be a complex process, with the TSA listing 12 states currently offering some form of digital identification, but only Arizona, California, Colorado, Georgia, Maryland, and New Mexico currently offering IDs for both Google and Apple’s apps. To make things more confusing, some states like Ohio, Hawaii, and Iowa offer IDs for Apple Wallet but not Google’s app.
The shift to an exclusively digital wallet isn’t without potential risks, as well. The American Civil Liberties Union has criticized states’ quick adoption of digital driver’s licenses without putting in place additional protections for cardholders. Those include things like preventing ID issuers and verifiers from tracking the usage of digital cards and preserving the right to not use a digital card for anyone who doesn’t own or can’t afford a smartphone. Apple and Google’s solutions offer privacy protections in terms of encrypting information and keeping your device locked even after you’ve presented your ID, but they don’t totally account for how state or federal governments could access these new digital systems.
This article originally appeared on Engadget at https://www.engadget.com/apps/new-mexico-state-ids-can-now-be-added-to-digital-wallets-211549853.html?src=rss
Brendan Greene is largely credited with making the iconicPlayerUnknown’s Battlegrounds, also known as PUBG, and inventing the entire battle royale genre. We knew he left PUBG’s publisher to form an independent studio back in 2021, but now we know what he’s been working on the past few years.
His studio, PlayerUnknown Productions, is prepping a handful of titles, which it refers to as “an ambitious three-game plan.” First up, there’s Prologue: Go Wayback!, which is described as “a single-player open-world emergent game within the survival genre.” It uses the developer’s “in-house machine-learning-driven terrain generation technology” to create “millions of maps.” These maps are also easy on the eyes, as seen below.
PlayerUnknown Productions
We don’t know much about the gameplay, beyond the description and the aforementioned terrain generation technology. However, it’s available to wishlist right now on Steam. The company says it’ll launch as an early access title sometime in the first half of next year, following a series of playtests.
There’s also a nifty-looking tech demo called Preface: Undiscovered World. It’s free and available to download right now. This demo is being released to showcase the company’s in-house game engine, called Melba. Preface allows players to explore an “Earth-scale world generated in real-time.”
PlayerUnknown Productions
Greene says that this “digital planet is still quite empty for now, but every person who enters it and shares their feedback, contributes to its future development.” To that end, the Melba engine will be used to develop other games in the future.
One such future game is called Artemis, which is described as a “massive multiplayer sandbox experience.” We don’t know a whole lot about the title, except that it’s likely years away. Greene says that his company will be releasing two unannounced games after Prologue: Go Wayback! that will each address “critical technical challenges” that will help with the development of the more ambitious Artemis. In any event, it looks like PlayerUnknown Productions is certainly off to a promising start.
This article originally appeared on Engadget at https://www.engadget.com/gaming/pc/pubg-creator-brendan-greene-just-announced-a-handful-of-new-games-210053256.html?src=rss
Get ready to have that Will Smith song stuck in your head for the rest of the day because the autonomous taxi company Waymo is going to Miami. Yeah, sorry about that.
Waymo announced its plans to Miami on its official Waypoint blog. The expansion will start early next year as the company gets its fleet of self-driving Jaguar I-PACE EVs familiar with Miami’s streets and intersections. Then in 2026, Waymo plans to start offering rides to customers through the Waymo One app.
Waymo is also partnering with the African startup Moove as part of its expansion plans. Moove provides vehicles for ride-sharing services. Waymo wants Moove to manage its “fleet operations, facilities and charging infrastructure” first in Phoenix and eventually in Miami.
The Waymo One app currently operates in parts of San Francisco, Phoenix, Los Angeles and Austin, according to Google support. Waymo secured $5.6 billion in funding in October to expand to Austin and Atlanta by the early part of next year.
This article originally appeared on Engadget at https://www.engadget.com/transportation/waymo-announces-its-expanding-to-miami-204504533.html?src=rss
Threads’ latest test could help creators and others understand more about how their posts are performing on the platform. The company is testing an expanded version of its analytics feature, which will show users stats for specific posts, Adam Mosseri said in an update.
Up to now, Threads has had an “insights” feature, but it showed aggregated stats for all posts, so it was hard to discern which posts were performing well. Now, insights will be able to surface detailed metrics around specific posts, including views and interactions. It will also break down performance among followers and non-followers.
“Now that your posts will be shown to more people who follow you, it’s especially important to understand what’s resonating with your existing audience,” Mosseri wrote. Threads recently updated its highly criticized “for you” algorithm to surface more posts from accounts you follow, rather than random unconnected accounts.
The change could also address criticism from creators on Threads, who have said they often don’t understand how the app’s algorithm works. More detailed analytics could also help Meta entice more brands to the app as the company reportedly is gearing up to begin running ads on the service as soon as next month.
This article originally appeared on Engadget at https://www.engadget.com/social-media/threads-is-testing-post-analytics-203548697.html?src=rss
It’s embarrassing how much time I spend thinking about my fantasy football team.
Managing a squad means processing a firehose of information — injury reports, expert projections, upcoming bye weeks, and favorable matchups. And it’s not just the volume of data, but the ephermerality— if your star RB tweaks a hamstring during Wednesday practice, you better not be basing lineup decisions off of Tuesday’s report.
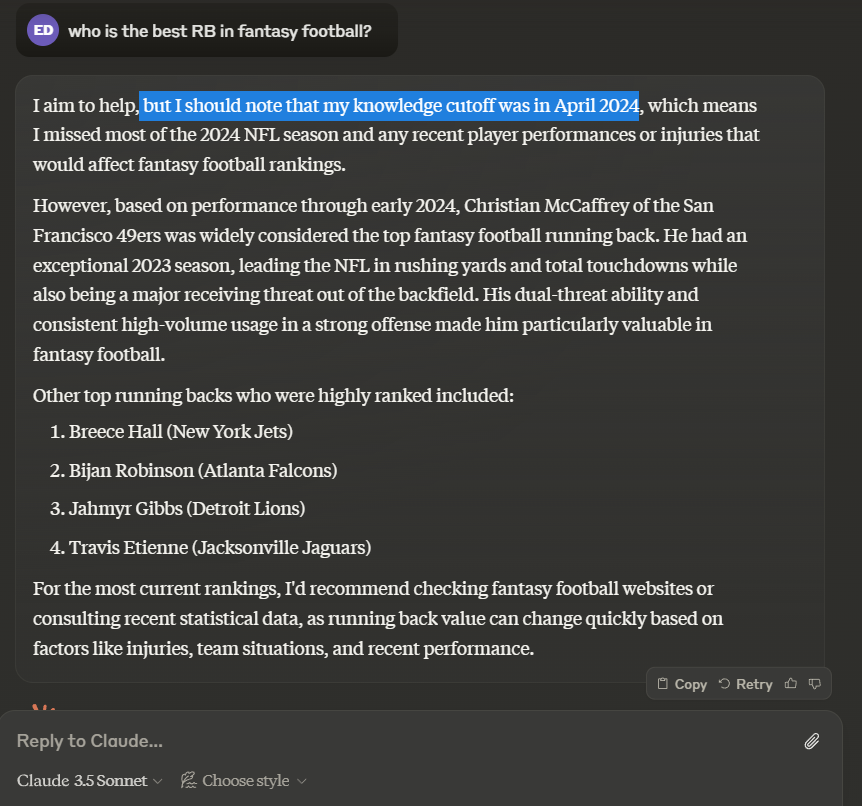
This is why general-purpose chatbots like Anthropic’s Claude and OpenAI’s ChatGPT are essentially useless for fantasy football recommendations, as they are limited to a static training corpus that cuts off months, even years ago.
For instance, if we ask Claude Sonnet 3.5 who the current best running back is, we see names like Christian McCaffrey, Breece Hall, and Travis Etienne, who have had injury-ridden or otherwise disappointing seasons thus far in 2024. There is no mention of Saquon Barkley or Derrick Henry, the obvious frontrunners at this stage. (Though to Claude’s credit, it discloses its limitations.)
Apps like Perplexity are more accurate because they do access a search engine with up-to-date information. However, it of course has no knowledge of my entire roster situation, the state of our league’s playoff picture, or the nuances of our keeper rules.
There is an opportunity to tailor a fantasy football-focused Agent with tools and personalized context for each user.
Let’s dig into the implementation.
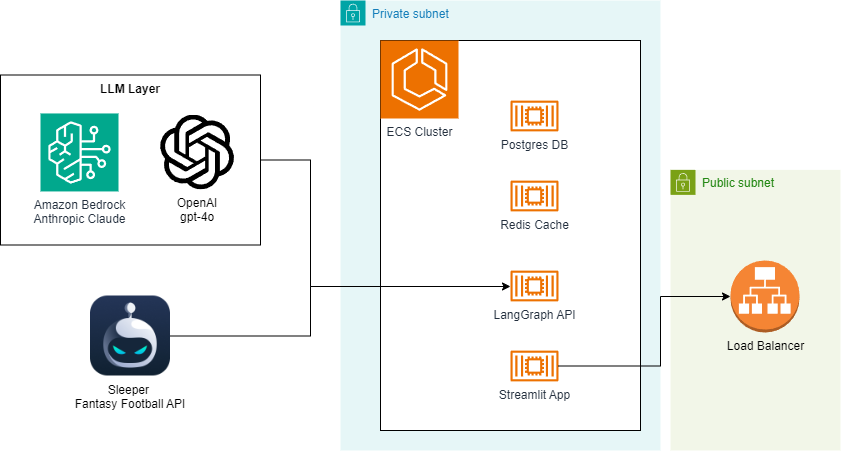
Architecture Overview
The heart of the chatbot will be a LangGraph Agent based on the ReAct framework. We’ll give it access to tools that integrate with the Sleeper API for common operations like checking the league standings, rosters, player stats, expert analysis, and more.
In addition to the LangGraph API server, our backend will include a small Postgres database and Redis cache, which are used to manage state and route requests. We’ll use Streamlit for a simple, but effective UI.
For development, we can run all of these components locally via Docker Compose, but I’ll also show the infrastructure-as-code (IaC) to deploy a scalable stack with AWS CDK.
Sleeper API Integration
Sleeper graciously exposes a public, read-only API that we can tap into for user & league details, including a full list of players, rosters, and draft information. Though it’s not documented explicitly, I also found some GraphQL endpoints that provide critical statistics, projections, and — perhaps most valuable of all — recent expert analysis by NFL reporters.
I created a simple API client to access the various methods, which you can find here. The one trick that I wanted to highlight is the requests-cache library. I don’t want to be a greedy client of Sleeper’s freely-available datasets, so I cache responses in a local Sqlite database with a basic TTL mechanism.
Not only does this lessen the amount redundant API traffic bombarding Sleeper’s servers (reducing the chance that they blacklist my IP address), but it significantly reduces latency for my clients, making for a better UX.
Setting up and using the cache is dead simple, as you can see in this snippet —
import requests_cache from urllib.parse import urljoin from typing import Union, Optional from pathlib import Path
class SleeperClient: def __init__(self, cache_path: str = '../.cache'):
first checks the local Sqlite cache for an unexpired response that particular request. If it’s found, we can skip the API call and just read from the database.
Defining the Tools
I want to turn the Sleeper API client into a handful of key functions that the Agent can use to inform its responses. Because these functions will effectively be invoked by the LLM, I find it important to annotate them clearly and ask for simple, flexible arguments.
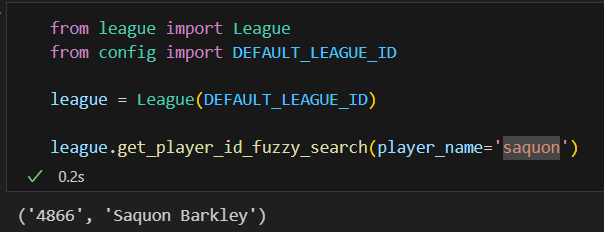
For example, Sleeper’s API’s generally ask for numeric player id’s, which makes sense for a programmatic interface. However, I want to abstract that concept away from the LLM and just have it input player names for these functions. To ensure some additional flexibility and allow for things like typos, I implemented a basic “fuzzy search” method to map player name searches to their associated player id.
# file: fantasy_chatbot/league.py

def get_player_id_fuzzy_search(self, player_name: str) -> tuple[str, str]:
  # will need a simple search engine to go from player name to player id without needing exact matches. returns the player_id and matched player name as a tuple
  nearest_name = process.extract(query=player_name, choices=self.player_names, scorer=fuzz.WRatio, limit=1)[0]
  return self.player_name_to_id[nearest_name[0]], self.player_names[nearest_name[2]]

# example usage in a tool
def get_player_news(self, player_name: Annotated[str, "The player's name."]) -> str:
    """
    Get recent news about a player for the most up-to-date analysis and injury status.
    Use this whenever naming a player in a potential deal, as you should always have the right context for a recommendation.
    If sources are provided, include markdown-based link(s)
    (e.g. [Rotoballer](https://www.rotoballer.com/player-news/saquon-barkley-has-historic-night-sunday/1502955) )
    at the bottom of your response to provide proper attribution
    and allow the user to learn more.
    """
    player_id, player_name = self.get_player_id_fuzzy_search(player_name)
    # news
    news = self.client.get_player_news(player_id, limit=3)
    player_news = f"Recent News about {player_name}nn"
    for n in news:
        player_news += f"**{n['metadata']['title']}**n{n['metadata']['description']}"
        if analysis := n['metadata'].get('analysis'):
            player_news += f"nnAnalysis:n{analysis}"
        if url := n['metadata'].get('url'):
            # markdown link to source
            player_news += f"n[{n['source'].capitalize()}]({url})nn"

   return player_news
This is better than a simple map of name to player id because it allows for misspellings and other typos, e.g. saquon → Saquon Barkley
I created a number of useful tools based on these principles:
Get League Status (standings, current week, no. playoff teams, etc.)
Get Roster for Team Owner
Get Player News (up-to-date articles / analysis about the player)
Get Player Stats (weekly points scored this season with matchups)
Get Player Current Owner (critical for proposing trades)
Get Best Available at Position (the waiver wire)
Get Player Rankings (performance so far, broken down by position)
You can probably think of a few more functions that would be useful to add, like details about recent transactions, league head-to-heads, and draft information.
LangGraph Agent
The impetus for this entire project was an opportunity to learn the LangGraph ecosystem, which may be becoming the de facto standard for constructing agentic workflows.
I’ve hacked together agents from scratch in the past, and I wish I had known about LangGraph at the time. It’s not just a thin wrapper around the various LLM providers, it provides immense utility for building, deploying, & monitoring complex workflows. I’d encourage you to check out the Introduction to LangGraph course by LangChain Academy if you’re interested in diving deeper.
As mentioned before, the graph itself is based on the ReAct framework, which is a popular and effective way to get LLM’s to interact with external tools like those defined above.
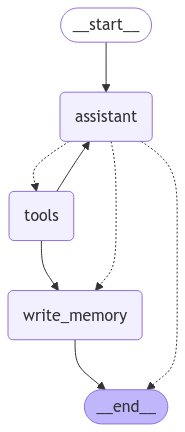
I’ve also added a node to persist long-term memories about each user, so that information can be persisted across sessions. I want our agent to “remember” things like users’ concerns, preferences, and previously-recommended trades, as this is not a feature that is implemented particularly well in the chatbots I’ve seen. In graph form, it looks like this:
Pretty simple right? Again, you can checkout the full graph definition in the code, but I’ll highlight the write_memory node, which is responsible for writing & updating a profile for each user. This allows us to track key interactions while being efficient about token use.
def write_memory(state: MessagesState, config: RunnableConfig, store: BaseStore): """Reflect on the chat history and save a memory to the store."""
# get the username from the config username = config["configurable"]["username"]
# retrieve existing memory if available namespace = ("memory", username) existing_memory = store.get(namespace, "user_memory")
# format the memories for the instruction if existing_memory and existing_memory.value: memory_dict = existing_memory.value formatted_memory = ( f"Team Name: {memory_dict.get('team_name', 'Unknown')}n" f"Current Concerns: {memory_dict.get('current_concerns', 'Unknown')}" f"Other Details: {memory_dict.get('other_details', 'Unknown')}" ) else: formatted_memory = None
# invoke the model to produce structured output that matches the schema new_memory = llm_with_structure.invoke([SystemMessage(content=system_msg)] + state['messages'])
# overwrite the existing user profile key = "user_memory" store.put(namespace, key, new_memory)
These memories are surfaced in the system prompt, where I also gave the LLM basic details about our league and how I want it to handle common user requests.
Streamlit UI and Demo
I’m not a frontend developer, so the UI leans heavily on Streamlit’s components and familiar chatbot patterns. Users input their Sleeper username, which is used to lookup their available leagues and persist memories across threads.
I also added a couple of bells and whistles, like implementing token streaming so that users get instant feedback from the LLM. The other important piece is a “research pane”, which surfaces the results of the Agent’s tool calls so that user can inspect the raw data that informs each response.
Here’s a quick demo.
Deployment
For development, I recommend deploying the components locally via the provided docker-compose.yml file. This will expose the API locally at http://localhost:8123 , so you can rapidly test changes and connect to it from a local Streamlit app.
I have also included IaC for an AWS CDK-based deployment that I use to host the app on the internet. Most of the resources are defined here. Notice the parallels between the docker-compose.yml and the CDK code related to the ECS setup:
Snippet from docker-compose.yml for the LangGraph API container:
Aside from some subtle differences, it’s effectively a 1:1 translation, which is always something I look for when comparing local environments to “prod” deployments. The DockerImageAsset is a particularly useful resource, as it handles building and deploying (to ECR) the Docker image during synthesis.
Note: Deploying the stack to your AWS account via npm run cdk deploy WILL incur charges. In this demo code I have not included any password protection on the Streamlit app, meaning anyone who has the URL can use the chatbot! I highly recommend adding some additional security if you plan to deploy it yourself.
Takeaways
You want to keep your tools simple. This app does a lot, but is still missing some key functionality, and it will start to break down if I simply add more tools. In the future, I want to break up the graph into task-specific sub-components, e.g. a “News Analyst” Agent and a “Statistician” Agent.
Traceability and debugging are more important with Agent-based apps than traditional software. Despite significant advancements in models’ ability to produce structured outputs, LLM-based function calling is still inherently less reliable than conventional programs. I used LangSmith extensively for debugging.
In an age of commoditized language models, there is no replacement for reliable reporters. We’re at a point where you can put together a reasonable chatbot in a weekend, so how do products differentiate themselves and build moats? This app (or any other like it) would be useless without access to high-quality reporting from analysts and experts. In other words, the Ian Rapaport’s and Matthew Berry’s of the world are more valuable than ever.
It’s embarrassing how much time I spend thinking about my fantasy football team.
Managing a squad means processing a firehose of information — injury reports, expert projections, upcoming bye weeks, and favorable matchups. And it’s not just the volume of data, but the ephermerality— if your star RB tweaks a hamstring during Wednesday practice, you better not be basing lineup decisions off of Tuesday’s report.
This is why general-purpose chatbots like Anthropic’s Claude and OpenAI’s ChatGPT are essentially useless for fantasy football recommendations, as they are limited to a static training corpus that cuts off months, even years ago.
For instance, if we ask Claude Sonnet 3.5 who the current best running back is, we see names like Christian McCaffrey, Breece Hall, and Travis Etienne, who have had injury-ridden or otherwise disappointing seasons thus far in 2024. There is no mention of Saquon Barkley or Derrick Henry, the obvious frontrunners at this stage. (Though to Claude’s credit, it discloses its limitations.)
Apps like Perplexity are more accurate because they do access a search engine with up-to-date information. However, it of course has no knowledge of my entire roster situation, the state of our league’s playoff picture, or the nuances of our keeper rules.
There is an opportunity to tailor a fantasy football-focused Agent with tools and personalized context for each user.
Let’s dig into the implementation.
Architecture Overview
The heart of the chatbot will be a LangGraph Agent based on the ReAct framework. We’ll give it access to tools that integrate with the Sleeper API for common operations like checking the league standings, rosters, player stats, expert analysis, and more.
In addition to the LangGraph API server, our backend will include a small Postgres database and Redis cache, which are used to manage state and route requests. We’ll use Streamlit for a simple, but effective UI.
For development, we can run all of these components locally via Docker Compose, but I’ll also show the infrastructure-as-code (IaC) to deploy a scalable stack with AWS CDK.
Sleeper API Integration
Sleeper graciously exposes a public, read-only API that we can tap into for user & league details, including a full list of players, rosters, and draft information. Though it’s not documented explicitly, I also found some GraphQL endpoints that provide critical statistics, projections, and — perhaps most valuable of all — recent expert analysis by NFL reporters.
I created a simple API client to access the various methods, which you can find here. The one trick that I wanted to highlight is the requests-cache library. I don’t want to be a greedy client of Sleeper’s freely-available datasets, so I cache responses in a local Sqlite database with a basic TTL mechanism.
Not only does this lessen the amount redundant API traffic bombarding Sleeper’s servers (reducing the chance that they blacklist my IP address), but it significantly reduces latency for my clients, making for a better UX.
Setting up and using the cache is dead simple, as you can see in this snippet —
import requests_cache from urllib.parse import urljoin from typing import Union, Optional from pathlib import Path
class SleeperClient: def __init__(self, cache_path: str = '../.cache'):
first checks the local Sqlite cache for an unexpired response that particular request. If it’s found, we can skip the API call and just read from the database.
Defining the Tools
I want to turn the Sleeper API client into a handful of key functions that the Agent can use to inform its responses. Because these functions will effectively be invoked by the LLM, I find it important to annotate them clearly and ask for simple, flexible arguments.
For example, Sleeper’s API’s generally ask for numeric player id’s, which makes sense for a programmatic interface. However, I want to abstract that concept away from the LLM and just have it input player names for these functions. To ensure some additional flexibility and allow for things like typos, I implemented a basic “fuzzy search” method to map player name searches to their associated player id.
# file: fantasy_chatbot/league.py

def get_player_id_fuzzy_search(self, player_name: str) -> tuple[str, str]:
  # will need a simple search engine to go from player name to player id without needing exact matches. returns the player_id and matched player name as a tuple
  nearest_name = process.extract(query=player_name, choices=self.player_names, scorer=fuzz.WRatio, limit=1)[0]
  return self.player_name_to_id[nearest_name[0]], self.player_names[nearest_name[2]]

# example usage in a tool
def get_player_news(self, player_name: Annotated[str, "The player's name."]) -> str:
    """
    Get recent news about a player for the most up-to-date analysis and injury status.
    Use this whenever naming a player in a potential deal, as you should always have the right context for a recommendation.
    If sources are provided, include markdown-based link(s)
    (e.g. [Rotoballer](https://www.rotoballer.com/player-news/saquon-barkley-has-historic-night-sunday/1502955) )
    at the bottom of your response to provide proper attribution
    and allow the user to learn more.
    """
    player_id, player_name = self.get_player_id_fuzzy_search(player_name)
    # news
    news = self.client.get_player_news(player_id, limit=3)
    player_news = f"Recent News about {player_name}nn"
    for n in news:
        player_news += f"**{n['metadata']['title']}**n{n['metadata']['description']}"
        if analysis := n['metadata'].get('analysis'):
            player_news += f"nnAnalysis:n{analysis}"
        if url := n['metadata'].get('url'):
            # markdown link to source
            player_news += f"n[{n['source'].capitalize()}]({url})nn"

   return player_news
This is better than a simple map of name to player id because it allows for misspellings and other typos, e.g. saquon → Saquon Barkley
I created a number of useful tools based on these principles:
Get League Status (standings, current week, no. playoff teams, etc.)
Get Roster for Team Owner
Get Player News (up-to-date articles / analysis about the player)
Get Player Stats (weekly points scored this season with matchups)
Get Player Current Owner (critical for proposing trades)
Get Best Available at Position (the waiver wire)
Get Player Rankings (performance so far, broken down by position)
You can probably think of a few more functions that would be useful to add, like details about recent transactions, league head-to-heads, and draft information.
LangGraph Agent
The impetus for this entire project was an opportunity to learn the LangGraph ecosystem, which may be becoming the de facto standard for constructing agentic workflows.
I’ve hacked together agents from scratch in the past, and I wish I had known about LangGraph at the time. It’s not just a thin wrapper around the various LLM providers, it provides immense utility for building, deploying, & monitoring complex workflows. I’d encourage you to check out the Introduction to LangGraph course by LangChain Academy if you’re interested in diving deeper.
As mentioned before, the graph itself is based on the ReAct framework, which is a popular and effective way to get LLM’s to interact with external tools like those defined above.
I’ve also added a node to persist long-term memories about each user, so that information can be persisted across sessions. I want our agent to “remember” things like users’ concerns, preferences, and previously-recommended trades, as this is not a feature that is implemented particularly well in the chatbots I’ve seen. In graph form, it looks like this:
Pretty simple right? Again, you can checkout the full graph definition in the code, but I’ll highlight the write_memory node, which is responsible for writing & updating a profile for each user. This allows us to track key interactions while being efficient about token use.
def write_memory(state: MessagesState, config: RunnableConfig, store: BaseStore): """Reflect on the chat history and save a memory to the store."""
# get the username from the config username = config["configurable"]["username"]
# retrieve existing memory if available namespace = ("memory", username) existing_memory = store.get(namespace, "user_memory")
# format the memories for the instruction if existing_memory and existing_memory.value: memory_dict = existing_memory.value formatted_memory = ( f"Team Name: {memory_dict.get('team_name', 'Unknown')}n" f"Current Concerns: {memory_dict.get('current_concerns', 'Unknown')}" f"Other Details: {memory_dict.get('other_details', 'Unknown')}" ) else: formatted_memory = None
# invoke the model to produce structured output that matches the schema new_memory = llm_with_structure.invoke([SystemMessage(content=system_msg)] + state['messages'])
# overwrite the existing user profile key = "user_memory" store.put(namespace, key, new_memory)
These memories are surfaced in the system prompt, where I also gave the LLM basic details about our league and how I want it to handle common user requests.
Streamlit UI and Demo
I’m not a frontend developer, so the UI leans heavily on Streamlit’s components and familiar chatbot patterns. Users input their Sleeper username, which is used to lookup their available leagues and persist memories across threads.
I also added a couple of bells and whistles, like implementing token streaming so that users get instant feedback from the LLM. The other important piece is a “research pane”, which surfaces the results of the Agent’s tool calls so that user can inspect the raw data that informs each response.
Here’s a quick demo.
Deployment
For development, I recommend deploying the components locally via the provided docker-compose.yml file. This will expose the API locally at http://localhost:8123 , so you can rapidly test changes and connect to it from a local Streamlit app.
I have also included IaC for an AWS CDK-based deployment that I use to host the app on the internet. Most of the resources are defined here. Notice the parallels between the docker-compose.yml and the CDK code related to the ECS setup:
Snippet from docker-compose.yml for the LangGraph API container:
Aside from some subtle differences, it’s effectively a 1:1 translation, which is always something I look for when comparing local environments to “prod” deployments. The DockerImageAsset is a particularly useful resource, as it handles building and deploying (to ECR) the Docker image during synthesis.
Note: Deploying the stack to your AWS account via npm run cdk deploy WILL incur charges. In this demo code I have not included any password protection on the Streamlit app, meaning anyone who has the URL can use the chatbot! I highly recommend adding some additional security if you plan to deploy it yourself.
Takeaways
You want to keep your tools simple. This app does a lot, but is still missing some key functionality, and it will start to break down if I simply add more tools. In the future, I want to break up the graph into task-specific sub-components, e.g. a “News Analyst” Agent and a “Statistician” Agent.
Traceability and debugging are more important with Agent-based apps than traditional software. Despite significant advancements in models’ ability to produce structured outputs, LLM-based function calling is still inherently less reliable than conventional programs. I used LangSmith extensively for debugging.
In an age of commoditized language models, there is no replacement for reliable reporters. We’re at a point where you can put together a reasonable chatbot in a weekend, so how do products differentiate themselves and build moats? This app (or any other like it) would be useless without access to high-quality reporting from analysts and experts. In other words, the Ian Rapaport’s and Matthew Berry’s of the world are more valuable than ever.
Automating scientific code documentation: a GPT-powered POC for streamlined workflows.
Illustration picture. Generated by ChatGPT.
Introduction
Working on scientific papers often involves translating algorithms into scientific formulas, typically formatted in LaTeX. This process can be tedious and time-consuming, especially in large projects, as it requires constant back-and-forth between the code repository and the LaTeX document.
While working on a large repository of algorithms, I began exploring ways to streamline this workflow. My motivation arose from the inefficiency of manually converting complex algorithms into LaTeX-compatible formulas. A particular challenge was ensuring consistency across multiple documents, especially in projects where formulas required frequent updates. This led me to explore how automation could streamline repetitive tasks while improving accuracy.
For the remainder of this document, I will use both the term “algorithm” and “scientific code.” All images in this article, except for the cover image, were created by the author.
Goal
My goal was to transition from scientific code to a comprehensive document that introduces the purpose of the code, defines variables, presents scientific formulas, includes a generated example plot, and demonstrates the calculations for a specific example. The document would follow a predefined framework, combining static and dynamic elements to ensure both consistency and adaptability.
The framework I designed included the following structure:
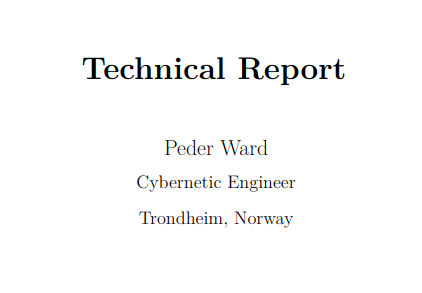
Front Page A visually appealing cover with key details such as the title and author.
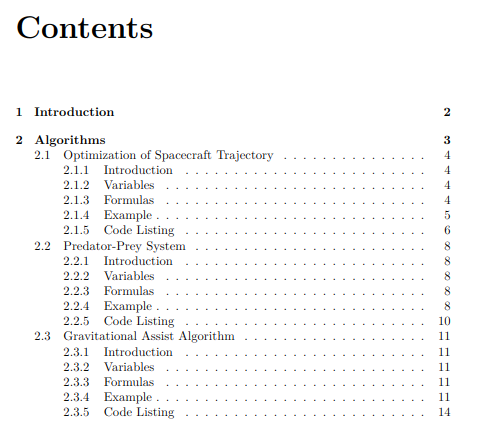
Table of Contents Automatically generated to provide an overview of the document’s content.
Brief Description of the Document An introduction outlining the purpose and scope of the document.
Algorithms A section dedicated to documenting each algorithm in detail. For each algorithm, the following subsections would be included: – Introduction: A brief overview of the algorithm’s purpose and context. – Variables: A clear definition of all variables used in the algorithm. – Formulas: A presentation of the key formulas derived from the algorithm. – Example: A worked example to illustrate the algorithm’s application, complete with a generated plot. – Code: The corresponding code snippet to support reproducibility.
This structure was designed to dynamically adapt based on the number of algorithms being documented, ensuring a consistent and professional presentation regardless of the document’s size or complexity.
Structuring the Repository
To achieve this goal, a well-organized repository was essential for enabling a scalable and efficient solution. The algorithm calculations were grouped into a dedicated folder, with files named using a consistent snake_case convention that matched the algorithm names.
To ensure clarity and support reuse, initial values for examples and the generated plots were stored in separate folders. These folders followed the same naming convention as the algorithms but with distinct suffixes to differentiate their purpose. This structure ensured that all components were easy to find and consistent with the overall framework of the project.
Leveraging GPT for Automation
At the core of this project is the use of GPT models to automate the conversion of algorithms into LaTeX. GPT’s strength lies in its ability to interpret the structure of generic, variable-rich code and transform it into human-readable explanations and precisely formatted scientific formulas. This automation significantly reduces the manual effort required, ensuring both accuracy and consistency across documents.
For this project, I will leverage OpenAI’s ChatGPT-4o model, renowned for its advanced ability to comprehend and generate structured content. To interact with OpenAI’s API, you must have an OPENAI_KEY set in your environment. Below is a simple Python function I use to fetch responses from the GPT model:
import os from openai import OpenAI from dotenv import load_dotenv
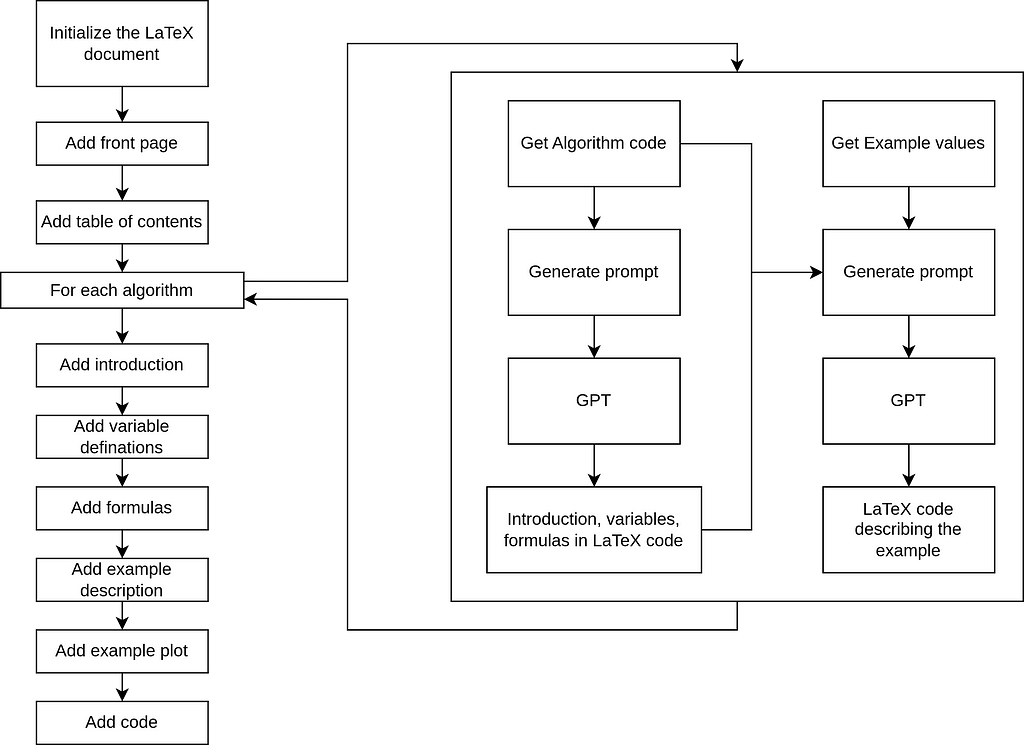
Overview of What the Code Does This code automates the generation of structured LaTeX documentation for Python algorithms, complete with examples, plots, and Python code listings. Here’s an overview:
Flowchart of how the LaTeX Document is dynamically built. Made by author.
Prompt Creation for GPT
This section describes custom functions designed to generate detailed prompts for GPT, enabling the automated creation of LaTeX documentation:
make_algo_doc_gpt_prompt: A function that creates prompts instructing GPT to generate LaTeX sections, including introductions, variable descriptions, formulas, and example subsections.
make_algo_example_gpt_prompt: A function that generates prompts for creating LaTeX example sections, incorporating plots and example calculations.
Document Generation
These functions are responsible for processing the GPT-generated content and saving it as LaTeX files:
make_algo_doc: A function that uses GPT outputs to generate LaTeX documentation for each algorithm and saves it as a .tex file.
make_algo_example: A function that creates .tex files for example sections, including plots and example calculations.
LaTeX Assembly
Uses the pylatex library to programmatically create a full LaTeX document.
Adds a title page, metadata, and a table of contents.
Includes an introduction section with an overview of the algorithms and their purpose.
Creates a chapter for each algorithm with sections from make_algo_doc and make_algo_example, example plots, and Python code listings.
# Create and structure the LaTeX document programmatically doc = Document(documentclass="report")
# Include preamble and metadata doc.preamble.append(NoEscape(r'input{algo_docs/init.tex}')) # Custom preamble doc.append(NoEscape(r'input{algo_docs/title_page.tex}')) # Title page doc.append(NoEscape(r'tableofcontents')) # Table of contents
# Add Introduction Chapter with doc.create(Chapter('Introduction')): doc.append( 'This document provides an overview of various algorithms, exploring their design, analysis, and application in computational problem-solving. ' 'The aim is to facilitate understanding of their mechanisms and significance across different domains.' )
# Add Algorithms Chapter with doc.create(Chapter('Algorithms')): doc.append( 'This chapter presents detailed analyses of various algorithms, highlighting their theoretical foundations, use cases, and practical insights. ' 'Each algorithm is accompanied by examples and visualizations to illustrate its functionality and potential limitations.' )
# Process each Python file in the 'python_code' directory python_code_dir = "python_code/" output_folder = "algo_docs/" plot_folder = "plots/"
for filename in os.listdir(python_code_dir): if filename.endswith(".py"): # Process only Python files algorithm_name = filename.replace(".py", "") formatted_name = algorithm_name.replace("_", " ").title()
# Insert plot directly after example subsection if os.path.exists(plot_path): with doc.create(Figure(position='H')) as figure: figure.add_image(plot_path, width=NoEscape(r'textwidth')) figure.add_caption(f'Example plot for {formatted_name}.')
# Add a subsection for the Python code listing with doc.create(Subsection('Code Listing')): doc.append(NoEscape(rf'lstinputlisting[language=Python]{{{python_code_path}}}'))
# Add a page break for clarity doc.append(NoEscape(r'clearpage'))
# Generate the LaTeX file tex_file = "programmatic_report" doc.generate_tex(tex_file)
# Compile the LaTeX file to a PDF subprocess.run(["pdflatex", f"{tex_file}.tex"])
PDF Compilation
The assembled document is saved and compiled into a polished PDF using pdflatex.
Simple front page.Table of Contents.
Crafting Effective Prompts: The Core Challenge
One of the most challenging aspects of this project was designing and refining the prompts used to interact with GPT. The success of the entire process depended on the quality of the GPT-generated output, making the creation of effective prompts a critical task that required extensive time and experimentation.
The prompts needed to strike a delicate balance:
Clarity: Precisely guiding GPT to produce structured LaTeX content, including sections, subsections, and mathematical equations, while leaving no ambiguity about the desired format.
Adaptability: Ensuring the prompts could handle a wide variety of algorithms, ranging from simple calculations to complex implementations.
Consistency: Achieving reliable, well-formatted, and accurate output, even for edge cases or unconventional code structures.
To address these challenges, I implemented dynamic prompting. This approach involved programmatically generating prompts tailored to the contents of each file. By providing GPT with relevant context and specific instructions, dynamic prompting ensured the output was both accurate and contextually appropriate for the given algorithm.
Through numerous iterations, the prompts evolved to become precise and flexible, forming the foundation of the automation process. Example of a prompt for generating LaTeX code from a algorithm:
Generate LaTeX code from the provided Python code. Follow these guidelines:

1. **Document Structure**:
- Start with `\section{}` for the algorithm title.
- Add a `\subsection{Introduction}` for a brief overview of the algorithm.
- Include a `\subsection{Variables}` section that lists all variables with descriptions, using subscript notation (e.g., `v_{\text{earth}}`).
- Add a `\subsection{Formulas}` section presenting the code's logic as LaTeX formulas. Use subscripted symbols for variable names instead of copying Python variable names directly.

2. **Formatting Rules**:
- Ensure that the output includes **only** the LaTeX content, without `\documentclass`, `\usepackage`, `\begin{document}`, `\end{document}`, or any unrelated text.
- Do **not** include the triple backticks (e.g., ```latex or ```).
- Properly close all LaTeX environments (e.g., `\begin{align*}...\end{align*}`).
- Ensure all brackets, parentheses, and braces are matched correctly.
- Maintain consistent subscript notation for all variables.

3. **Important Notes**:
- **Do not** include any text or explanations outside the LaTeX code.
- Only the relevant LaTeX content for the `\section`, `\subsection`, `\begin{align*}`, and `\end{align*}` parts should be generated.
- Ensure no extra or unrelated LaTeX sections are added.
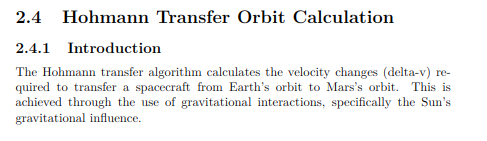
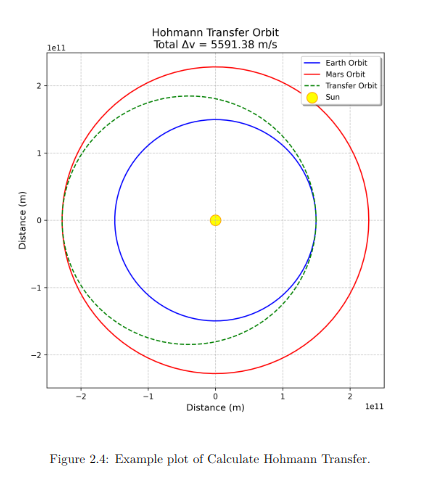
Example: Hohmann Transfer Orbit Calculation
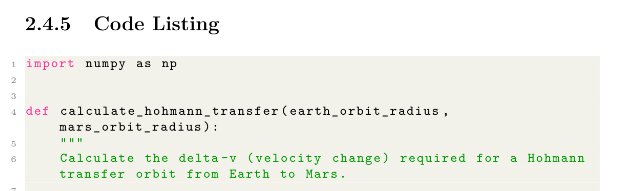
The following demonstrates how the Hohmann Transfer Orbit Calculation algorithm is documented using GPT-generated LaTeX code. This algorithm calculates the velocity changes (delta-v) required to transfer a spacecraft from Earth’s orbit to Mars’s orbit. Below is the Python implementation of the algorithm:
def calculate_hohmann_transfer(earth_orbit_radius, mars_orbit_radius):
    # Gravitational constant for the Sun
    mu_sun = 1.32712440018e20

    # Orbital velocities of Earth and Mars
    v_earth = np.sqrt(mu_sun / earth_orbit_radius)
    v_mars = np.sqrt(mu_sun / mars_orbit_radius)

    # Semi-major axis of the transfer orbit
    transfer_orbit_semi_major_axis = (earth_orbit_radius + mars_orbit_radius) / 2

    # Transfer orbit velocities at Earth and Mars
    v_transfer_at_earth = np.sqrt(2 * mu_sun / earth_orbit_radius - mu_sun / transfer_orbit_semi_major_axis)
    v_transfer_at_mars = np.sqrt(2 * mu_sun / mars_orbit_radius - mu_sun / transfer_orbit_semi_major_axis)

    # Delta-v at Earth and Mars
    delta_v_earth = v_transfer_at_earth - v_earth
    delta_v_mars = v_mars - v_transfer_at_mars

    # Total delta-v for the transfer
    total_delta_v = abs(delta_v_earth) + abs(delta_v_mars)

    return delta_v_earth, delta_v_mars, total_delta_v
Using the GPT prompt with this code, I generated LaTeX subsections for the documentation. Below are the components created:
Introduction to the Algorithm GPT generated a LaTeX explanation of the algorithm’s purpose, detailing how it calculates velocity changes for an efficient interplanetary transfer.
Introduction to the algorithm. LaTeX code generated by GPT model.
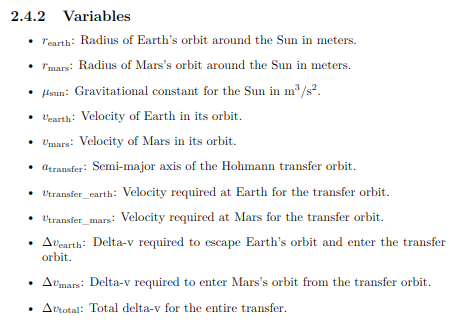
Variable Definitions GPT provided a clear explanation of all variables used in the algorithm.
Variable definitions for the algorithm. LaTeX code generated by GPT model.
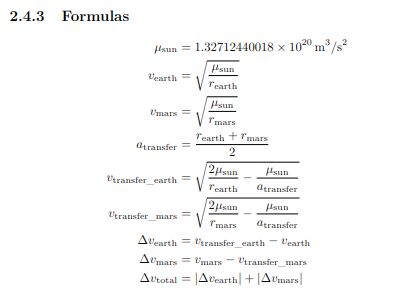
Formulas The key formulas used in the algorithm were formatted into LaTeX by GPT.
Formulas used in the algorithm. LaTeX code generated by GPT model.
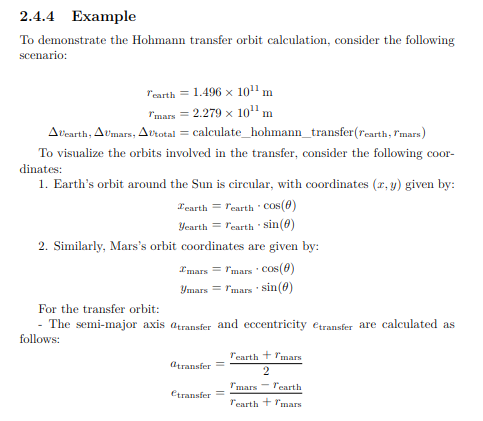
Example Section Using example values, GPT generated LaTeX code for a worked example.
Snip of the Example using example values and the algorithm as input. LaTeX code generated by GPT model.
Plot Generation A plot of the transfer orbit was generated using the example values and included in the LaTeX document.
Plot generated by the code and example values. Inserted in the LaTeX dokument.
Code Listing The algorithm’s source code was appended to the document for completeness at the end.
Code listings at the end of the chapter (partial view).
Results and Challenges
Initial experiments with this system have been promising. Using Python and GPT-4, I successfully automated the conversion of several algorithms into LaTeX documents. The results of this proof of concept (POC) can be explored in my GitHub repository, where all aspects of the project are available for review.
The repository includes the complete Python codebase, showcasing the custom functions used to generate LaTeX documentation and create GPT prompts. It also contains the detailed prompts themselves, illustrating how the system guides GPT in producing structured and accurate LaTeX content. Additionally, the repository features the final outputs, including both the LaTeX source files and the compiled PDF documents.
While the initial results have been promising, the process has not been without its challenges and valuable insights along the way::
Formatting Challenges: Occasionally, GPT would produce incorrect LaTeX formatting, leading to errors during the PDF conversion process. Although this issue was rare, I experimented with a solution: resubmitting the LaTeX code to GPT and asking it to fix the formatting. While this approach was consistently successful, it was not implemented as part of the workflow.
Code Comments: Adding clear comments within the code helped GPT understand the context better and generate more accurate LaTeX outputs.
Inconsistent Results: GPT occasionally produced varying outputs for the same code and prompt, emphasizing its inherent variability and the importance of careful testing.
Crafting Effective Prompts: Writing effective prompts was challenging. Overloading the prompt with too much detail, like examples, often caused GPT to miss smaller elements such as formatting or structure. I discovered that breaking down instructions step by step and using very small, focused examples helped GPT perform better. Keeping prompts concise and structured with bullet points ensured that each key instruction was clearly understood and executed.
Domain-Specific Terminology: Fine-tuning GPT for specialized terms is an area requiring further improvement to enhance accuracy.
Variable Definitions: Keeping LaTeX variable definations in algorithm and examples consistent was challenging. Adding GPT-generated variable definitions to later prompts helped maintain uniformity.
Despite its imperfections, the workflow has drastically reduced the time spent on documentation by automating much of the process. While minor reviews and adjustments are still needed, they represent only a fraction of the effort previously required. This proof of concept demonstrates the potential to generate polished documents without writing LaTeX manually, though further refinement is needed to enhance consistency, scalability, and adaptability. The results so far highlight the significant promise of this approach.
Improvements
Develop Validation Mechanisms Implement cross-referencing of generated formulas against known standards or benchmarks to ensure accuracy and consistency.
Expand Use Cases Test the workflow on larger, more diverse datasets to improve scalability and adaptability for various scientific domains.
Enhance Visual Documentation Incorporate additional visual elements, such as flowcharts, by using GPT to generate XML documents or similar formats.
Generate Plots and Examples with GPT Extend GPT’s functionality to create example plots directly, reducing the reliance on external plotting tools.
Experiment with Different GPT Models Thus far, I have primarily used ChatGPT-4 due to its accessibility, but further research is needed to identify the optimal model for this task. Exploring models tailored for technical content or incorporating a Retrieval-Augmented Generation (RAG) approach with a database of diverse scientific papers could improve accuracy and relevance.
Transition from Proof of Concept (POC) to Minimum Viable Product (MVP) Evolve the project from a proof of concept to a minimum viable product by adding robust error handling, scalability features, and user-focused refinements.
Conclusion
This project has proven the potential of GPT models to automate the creation of structured LaTeX documentation, significantly reducing the manual effort involved. It successfully generated professional-quality outputs, including formulas, plots, and structured examples. However, challenges such as inconsistent results, formatting issues, and variability in GPT’s output highlighted the need for refinement. Strategies like dynamic prompting, better code commenting, and iterative validation have helped address these issues, but some manual oversight remains necessary.
Despite these challenges, the workflow has shown clear benefits, streamlining the documentation process and saving considerable time. While the solution is not yet perfect, it represents a significant step toward automating complex documentation tasks, paving the way for future improvements in accuracy.
We use cookies on our website to give you the most relevant experience by remembering your preferences and repeat visits. By clicking “Accept”, you consent to the use of ALL the cookies.
This website uses cookies to improve your experience while you navigate through the website. Out of these, the cookies that are categorized as necessary are stored on your browser as they are essential for the working of basic functionalities of the website. We also use third-party cookies that help us analyze and understand how you use this website. These cookies will be stored in your browser only with your consent. You also have the option to opt-out of these cookies. But opting out of some of these cookies may affect your browsing experience.
Necessary cookies are absolutely essential for the website to function properly. These cookies ensure basic functionalities and security features of the website, anonymously.
Cookie
Duration
Description
cookielawinfo-checkbox-analytics
11 months
This cookie is set by GDPR Cookie Consent plugin. The cookie is used to store the user consent for the cookies in the category "Analytics".
cookielawinfo-checkbox-functional
11 months
The cookie is set by GDPR cookie consent to record the user consent for the cookies in the category "Functional".
cookielawinfo-checkbox-necessary
11 months
This cookie is set by GDPR Cookie Consent plugin. The cookies is used to store the user consent for the cookies in the category "Necessary".
cookielawinfo-checkbox-others
11 months
This cookie is set by GDPR Cookie Consent plugin. The cookie is used to store the user consent for the cookies in the category "Other.
cookielawinfo-checkbox-performance
11 months
This cookie is set by GDPR Cookie Consent plugin. The cookie is used to store the user consent for the cookies in the category "Performance".
viewed_cookie_policy
11 months
The cookie is set by the GDPR Cookie Consent plugin and is used to store whether or not user has consented to the use of cookies. It does not store any personal data.
Functional cookies help to perform certain functionalities like sharing the content of the website on social media platforms, collect feedbacks, and other third-party features.
Performance cookies are used to understand and analyze the key performance indexes of the website which helps in delivering a better user experience for the visitors.
Analytical cookies are used to understand how visitors interact with the website. These cookies help provide information on metrics the number of visitors, bounce rate, traffic source, etc.
Advertisement cookies are used to provide visitors with relevant ads and marketing campaigns. These cookies track visitors across websites and collect information to provide customized ads.