For years and years, we joked about robots taking our jobs one day. “It’s coming,” some warned. Fast-forward to a few years ago when AI exploded seemingly overnight. “It’s here,” those same people said.
Enter budget cuts, mass lay-offs, and software developers the world over echoing a similar sentiment: “What now?”
Here’s the good news: Brands are finding that swapping humans for AI might’ve been premature. Here’s the tricky part: Software developers still must choose to evolve or drown.
How to Make Yourself Invaluable as a Software Developer
Some of us have learned, perhaps the hard way, that while AI is incredible and will only get better, there are some things that will simply turn out better if a human being manages them.
However, we’d also be foolish to deny that things have changed tremendously.
I work with developers every single day, and I wanted to better understand what this evolution has meant for them. What can software engineers do to make themselves irreplaceable in the age of AI?
I did my homework and also spoke with Luce Carter, Developer Advocate at MongoDB and Microsoft MVP, who first told me, “AI is not going away, especially with tools like Copilot. One of the best things you can do is learn a skill called prompt engineering, knowing the best and most effective way to ask the AI for what you want that will produce the most useful results.”
Here’s what else I’ve learned.
1. Solve a Problem
We’ve seen that AI is sometimes great for taking over monotonous, manual tasks — for instance, sifting through or generating code.
But you, the software developer, still have an upper hand: You see the bigger picture. The end goal in mind. The target you’re aiming for. This is a skill unique to you.
There are countless examples of how this can work. One way I’ve seen my teammates elevate the application development process using AI is via vector search, which understands the meaning and context of unstructured data, which it then transforms into numbers.
How does this solve a problem? Well, it allows them (and/or their users) to more efficiently query data.
This is a great example of humans and AI working together in harmony for the greater good. Remember, AI technology might sound cool but is a total moot point if we don’t use it to solve a problem and make people’s lives easier.
If you’re not sure if your work is solving a problem, take a step back, look at what you’re doing, and ask yourself, “So what?” If you can’t come up with a clear answer, there’s more work to be done.
2. Make Way for Strategy
Alright, you’re using AI, in some capacity, to solve a problem. You’ve found ways to leverage the technology to save you time. Now, you’re going to use that newly freed up time for… what, exactly?
Scrolling on TikTok!
Amazon shopping!
Getting a snack!
No, no, and yes because snacks are life, but then get back to work.
We’ve established that AI might be sufficient for repetitive tasks we used to do, so your employer might not need you to do that stuff anymore. What do they need you for, then?
Strategy — one of those fluffy, corporate-y buzzwords we love to throw around without assigning any real meaning to it. So, let’s assign meaning!
Here’s one example. Part of my team’s strategy is to get people on our YouTube channel. This has entailed trying various types of videos to see what gains the most traction. In particular, shorts and long-form evergreen videos perform well for us.
AI might instantly improve our audio, make editing easier, and do some of the heavy lifting for creating thumbnails.
Strategy, however, is about finding out what works and what doesn’t, doubling down on the former and shelving the latter.
3. Humanize Your Work
There’s a little thing called AI fatigue that is creeping in. AI fatigue is exactly what it sounds like: Some folks are becoming tired and suspicious of the technology. For example, 70% of American consumers would rather watch a TV show or movie written by a human, according to Deloitte’s 18th annual Digital Media Trends survey.
There’s something so impersonal, so hollow about a piece of content that was created by AI. There’s no life behind it. No energy. To make matters worse, sometimes, it’s painfully obvious that the brains behind a piece of work was artificial intelligence.
For instance, as an editor, if an article comes across my desk that is one long list of bullet points, I almost know with certainty that it was written by AI. What writers often do is give ChatGPT prompts like, “Give me 5 reasons why,” “Tell me 3 examples,” or “Give me a list of benefits,” and then use the results for the article. Overused phrases like “delving into” are another dead giveaway.
If I can pick out AI content, others can as well, and it’s not always favorably received.
It’s funny, if you think about it: When we all realized how we could use AI to scale our efforts, our work became about doing more, faster. But then we ended up drowning in apps, blogs, videos, games, and more. Search engines are flooded, social media news feeds are beyond cramped, and app marketplaces are packed to the brim.
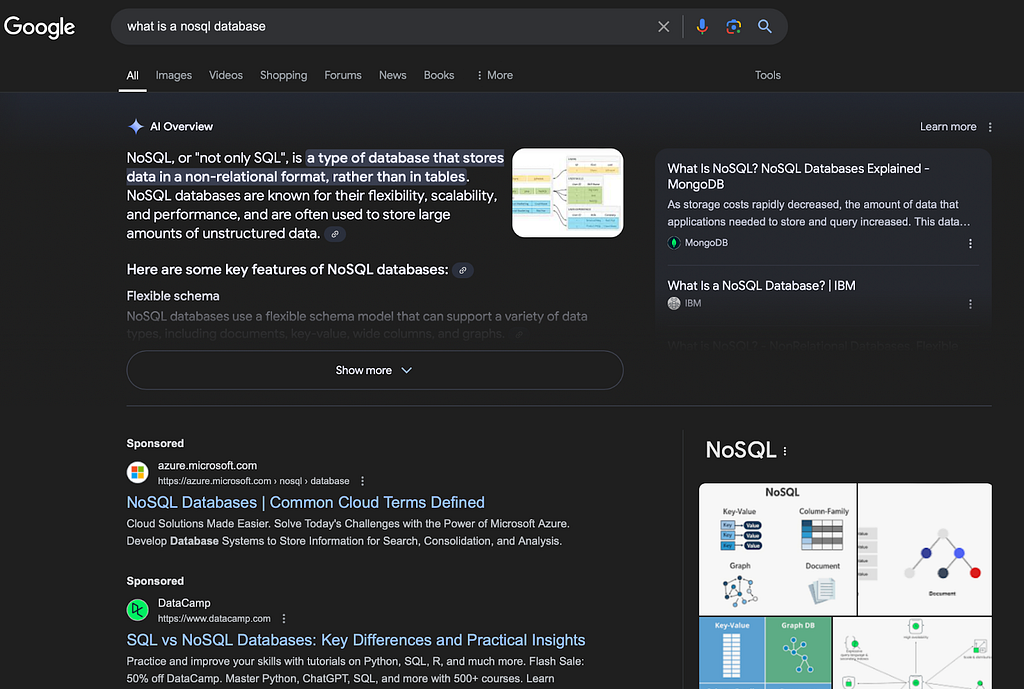
Here’s one example, as a side note. Google’s AI Overview has pushed organic search results even further down. Combine that with sponsored posts and other features, and organic results are well below the fold.
Screenshot provided by author
Now, it’s flip-flopped: One of the best things you can do to stand out in the crowd is make something that’s unique, personal, and has the human touch.
4. Get Specific About What You Do for a Living
It used to be enough to say, “I work in tech.” Then, that became too broad, so we opted for, “I work in Developer Relations” (or something like that). Now, even that isn’t specific enough. For software developers to stay relevant and in demand, they need to be more clear on their position and the value they bring to their organization — or an organization they’re applying to.
I’m thinking of some of the folks I work with in DevRel who specialize in a language community, framework, or technology. Some specialize in the types of content/projects they work on. We no longer do a little bit of everything. We’ve made very clear our priorities, and then fill in the gaps from there.
Why? Because we know that a high-level approach will no longer suffice. This industry is far past that point.
An Opportunity to Be Better
“What I love about technology is that it’s boring and stable,” said no software developer ever.
I’d like to think that one thing that draws us to this industry is that it’s ever-evolving. This can feel like a double-edged sword sometimes because change can be hard and scary.
However, change also gives us an opportunity to be better than we were before, and that’s how I believe we should approach AI and how it’s changing the landscape of our careers. Solve a problem, prioritize strategy, humanize your work, and be specific with your role, and you and AI can work together as friends.
It’s now easier than ever to train your own computer vision models on custom datasets using Python, the command line, or Google Colab.
Image created by author using ChatGPT Auto.
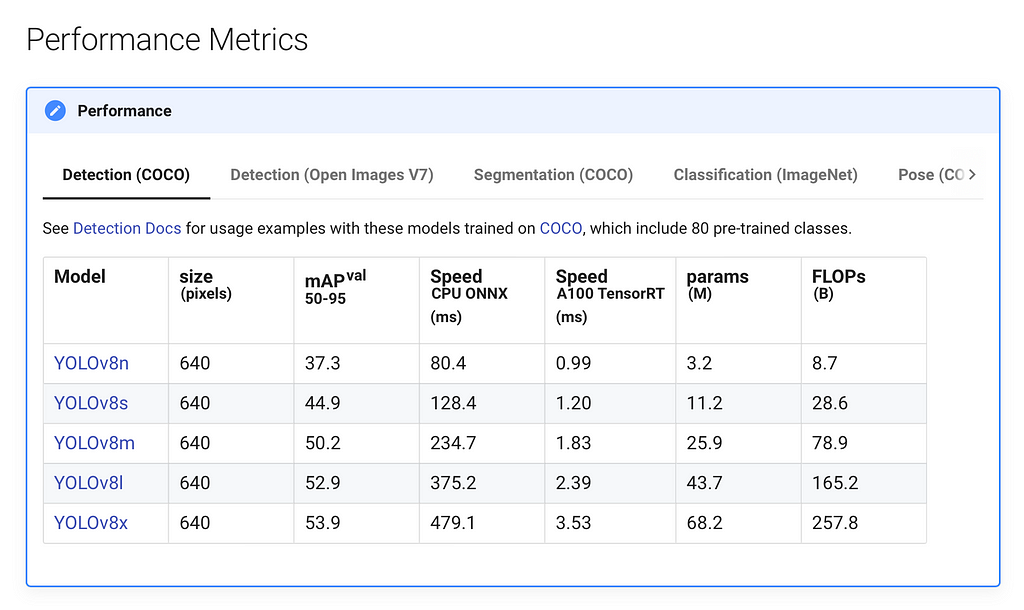
Ultralytics’ cutting-edge YOLOv8 model is one of the best ways to tackle computer vision while minimizing hassle. It is the 8th and latest iteration of the YOLO (You Only Look Once) series of models from Ultralytics, and like the other iterations uses a convolutional neural network (CNN) to predict object classes and their bounding boxes. The YOLO series of object detectors has become well known for being accurate and quick, and provides a platform built on top of PyTorch that simplifies much of the process of creating models from scratch.
Importantly, YOLOv8 is also a very flexible model. That is, it can be trained on a variety of platforms, using any dataset of your choice, and the prediction model can be ran from many sources. This guide will act as a comprehensive tutorial covering the many different ways to train and run YOLOv8 models, as well as the strengths and limitations of each method that will be most relevant in helping you choose the most appropriate procedure depending on your hardware and dataset.
Note: all images that were used in the creation of this example dataset were taken by the author.
Environment
To get started with training our YOLOv8 model, the first step is to decide what kind of environment we want to train our model in (keep in mind that training and running the model are separate tasks).
The environments that are available for us to choose can largely be broken down into two categories: local-based and cloud-based.
With local-based training, we are essentially running the process of training directly on our system, using the physical hardware of the device. Within local-based training, YOLOv8 provides us with two options: the Python API and the CLI. There is no real difference in the results or speed of these two options, because the same process is being run under the hood; the only difference is in how the training is setup and run.
On the other hand, cloud-based training allows you to take advantage of the hardware of cloud servers. By using the Internet, you can connect to cloud runtimes and execute code just as you would on your local machine, except now it runs on the cloud hardware.
By far, the most popular cloud platform for machine learning has been Google Colab. It uses a Jupyter notebook format, which allows users to create “cells” in which code snippets can be written and run, and offers robust integrations with Google Drive and Github.
Which environment you decide to use will largely depend on the hardware that is available to you. If you have a powerful system with a high-end NVIDIA GPU, local-based training will likely work well for you. If your local machine’s hardware isn’t up to spec for machine learning, or if you just want more computation power than you have locally, Google Colab may be the way to go.
One of the greatest benefits of Google Colab is that it offers some computing resources for free, but also has a simple upgrade path that allows you to leverage faster computing hardware. Even if you already have a powerful system, you could consider using Google Colab if the faster GPUs offered in their higher tier plans represent a significant performance improvement over your existing hardware. With the free plan, you are limited to the NVIDIA T4, which performs roughly equivalent to an RTX 2070. With higher tier plans, the L4 (about the performance of a 4090) and A100 (about the performance of 2 4090s) are available. Keep in mind when comparing GPUs that the amount of VRAM is the primary determinant of machine learning performance.
Dataset
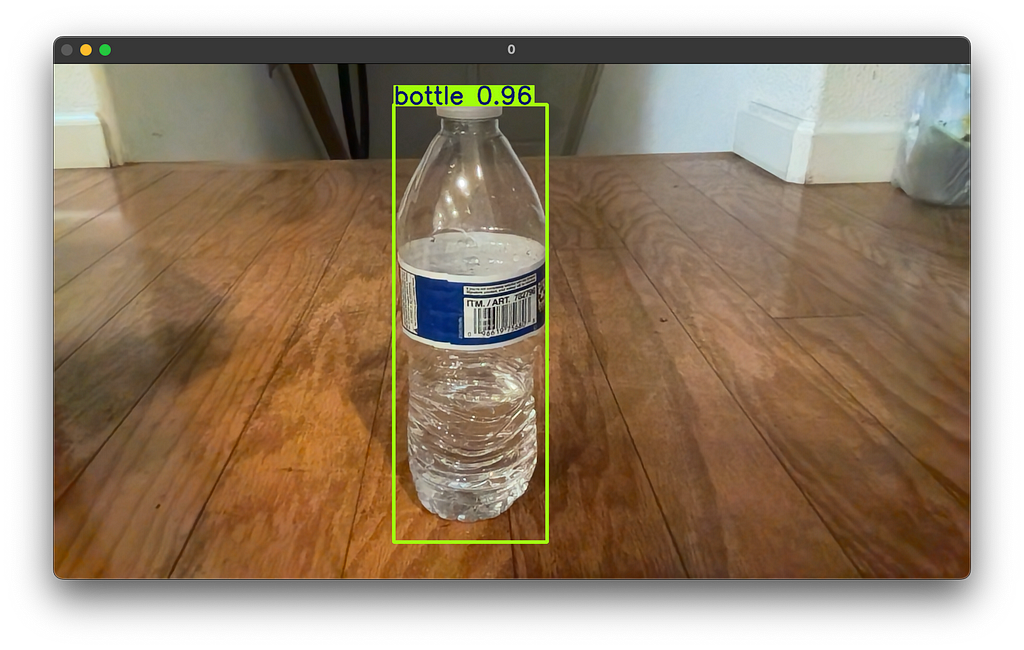
In order to start training a model, you need lots of data to train it on. Object detection datasets normally consist of a collection of images of various objects, in addition to a “bounding box” around the object that indicates its location within the image.
Example of a bounding box around a detected object. Image by author.
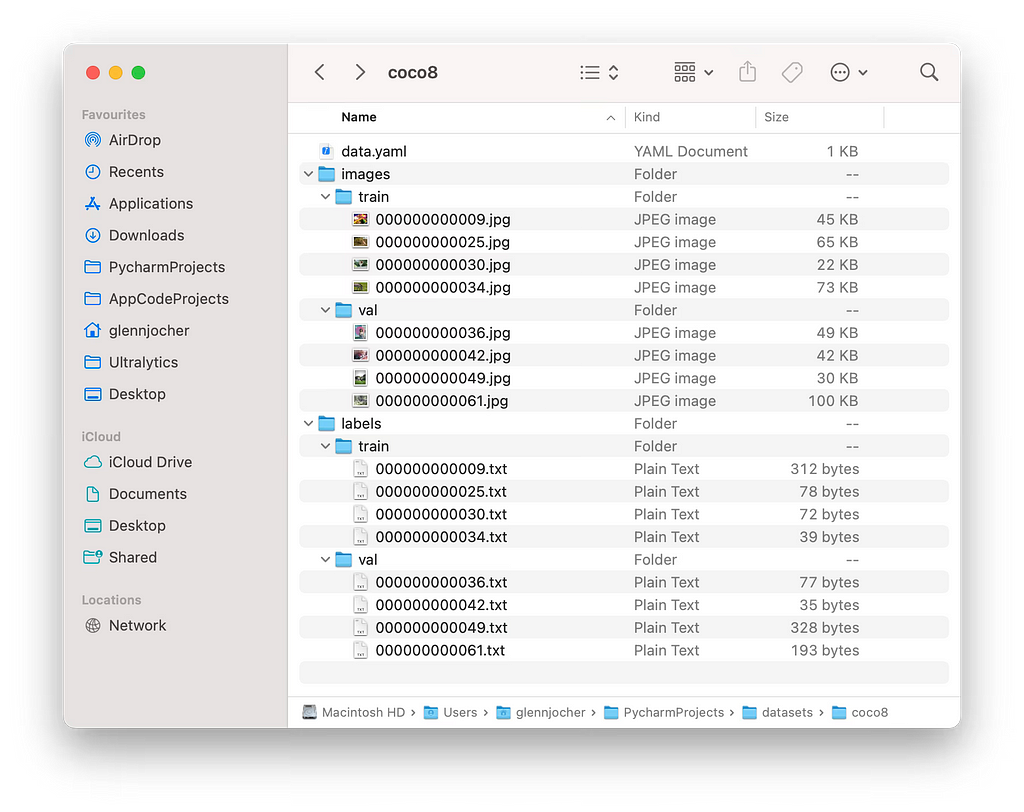
YOLOv8-compatible datasets have a specific structure. They are primarily divided into valid, train, and test folders, which are used for validation, training, and testing of the model respectively (the difference between validation and testing is that during validation, the results are used to tune the model to increase its accuracy, whereas during testing, the results are only used to provide a measure of the model’s real-world accuracy).
Within each of these folders the dataset is further divided into two folders: the images and labels folders. The content of these two folders are closely linked with each other.
The images folder, as its name suggests, contains all of the object images of the dataset. These images usually have a square aspect ratio, a low resolution, and a small file size.
The labels folder contains the data of the bounding box’s position and size within each image as well as the type (or class) of object represented by each image. For example:
Each line represents an individual object that is present in the image. Within each line, the first numberrepresents the object’s class, the second and third numbers represent the x- and y-coordinates of the center of the bounding box, and the fourth and fifth numbers represent the width and height of the bounding box.
The data within the images and labels folders are linked together by file names. Every image in the images folder will have a corresponding file in the labels folder with the same file name, and vice versa. Within the dataset, there will always be matching pairs of files within the images and labels folders with the same file name, but with different file extensions; .jpg is used for the images whereas .txt is used for the labels. The data for the bounding box(es) for each object in a .jpg picture is contained in the corresponding .txt file.
There are several ways to obtain a YOLOv8-compatible dataset to begin training a model. You can create your own dataset or use a pre-configured one from the Internet. For the purposes of this tutorial, we will use CVAT to create our own dataset and Kaggle to find a pre-configured one.
CVAT
CVAT (cvat.ai) is a annotation tool that lets you create your own datasets by manually adding labels to images and videos.
After creating an account and logging in, the process to start annotating is simple. Just create a project, give it a suitable name, and add the labels for as many types/classes of objects as you want.
Creating a new project and label on cvat.ai. Video by author.
Create a new task and upload all the images you want to be part of your dataset. Click “Submit & Open”, and a new task should be created under the project, with one job.
Creating a new task and job on cvat.ai. Video by author.
Opening this job will allow you to start the annotation process. Use the rectangle tool to create bounding boxes and labels for each of the images in your dataset.
Using the rectangle tool on cvat.ai to create bounding boxes. Video by author.
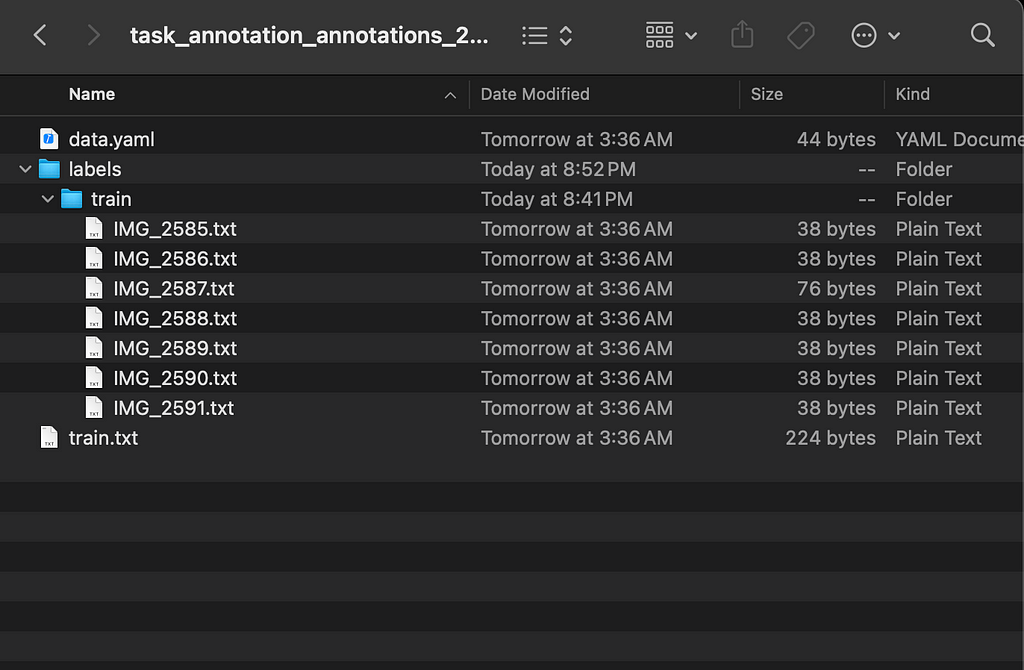
After annotating all your images, go back to the task and select Actions → Export task dataset, and choose YOLOv8 Detection 1.0 as the Export format. After downloading the task dataset, you will find that it only contains the labels folder and not the images folder (unless you selected the “Save images” option while exporting). You will have to manually create the images folder and move your images there (you may want to first compress your images to a lower resolution e.g. 640×640). Remember to not change the file names as they must match the file names of the .txt files in the labels folder. You will also need to decide how to allocate the images between valid, train, and test (train is the most important out of these).
Example dataset exported from cvat.ai. Image by author.
Your dataset is completed and ready to use!
Kaggle
Kaggle (kaggle.com) is one of the largest online data science communities and one of the best websites to explore datasets. You can try finding a dataset you need by simply searching their website, and unless you are looking for something very specific, chances are you will find it. However, many datasets on Kaggle are not in a YOLOv8-compatible format and/or are unrelated to computer vision, so you may want to include “YOLOv8” in your query to refine your search.
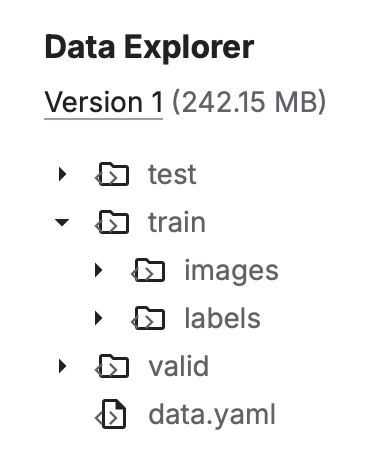
You can tell if a dataset is YOLOv8-compatible by the file structure in the dataset’s Data Explorer (on the right side of the page).
Example of a YOLOv8-compatible dataset on Kaggle. Image by author.
If the dataset is relatively small (a few MB) and/or you are training locally, you can download the dataset directly from Kaggle. However, if you are planning on training with a large dataset on Google Colab, it is better to retrieve the dataset from the notebook itself (more info below).
Training
The training process will differ depending on if you are training locally or on the cloud.
Local
Create a project folder for all the training files. For this tutorial we will call it yolov8-project. Move/copy the dataset to this folder.
Set up a Python virtual environment with required YOLOv8 dependencies:
Create a file named config.yaml. This is where important dataset information for training will be specified:
path: /Users/oliverma/yolov8-project/dataset/ # absolute path to dataset
test: test/images # relative path to test images
train: train/images # relative path to training images
val: val/images # relative path to validation images

# classes
names:
  0: bottle
In path put the absolute file path to the dataset’s root directory. You can also use a relative file path, but that will depend on the relative location of config.yaml.
In test, train, and val, put the locations of the images for testing, training, and validation (if you only have train images, just use train/images for all 3).
Under names, specify the name of each class. This information can usually be found in the data.yaml file of any YOLOv8 dataset.
As previously mentioned, both the Python API or the CLI can be used for local training.
Python API
Create another file named main.py. This is where the actual training will begin:
from ultralytics import YOLO

model = YOLO("yolov8n.yaml")

model.train(data="config.yaml", epochs=100)
By initializing our model as YOLO(“yolov8n.yaml”) we are essentially creating a new model from scratch. We are using yolov8n because it is the fastest model, but you may also use other models depending on your use case.
Finally, we train the model and pass in the config file and the number of epochs, or rounds of training. A good baseline is 300 epochs, but you may want to tweak this number depending on the size of your dataset and the speed of your hardware.
There are a few more helpful settings that you may want to include:
imgsz: resizes all images to the specified amount. For example, imgsz=640 would resize all images to 640×640. This is useful if you created your own dataset and did not resize the images.
device: specifies which device to train on. By default, YOLOv8 tries to train on GPU and uses CPU training as a fallback, but if you are training on an M-series Mac, you will have to use device=”mps” to train with Apple’s Metal Performance Shaders (MPS) backend for GPU acceleration.
Your project directory should now look similar to this:
Example file structure of the project directory. Image by author.
We are finally ready to start training our model. Open a terminal in the project directory and run:
python3 main.py
The terminal will display information about the training progress for each epoch as the training progresses.
Training progress for each epoch displayed in the terminal. Image by author.
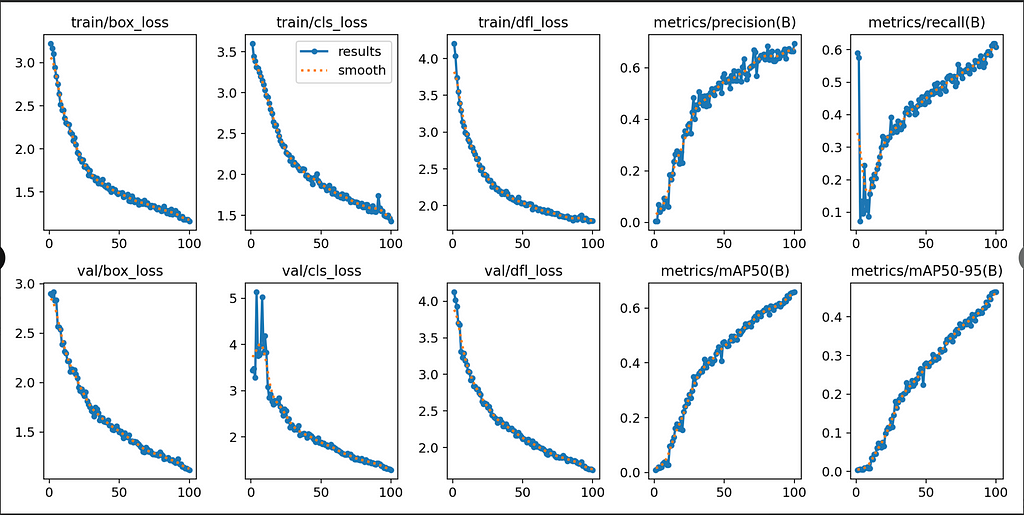
The training results will be saved in runs/detect/train (or train2, train3, etc.). This includes the weights (with a .pt file extension), which will be important for running the model later, as well as results.png which shows many graphs containing relevant training statistics.
Example graphs from results.png. Image by Author.
CLI
Open a new terminal in the project directory and run this command:
Before training, make sure you are connected to a GPU runtime by selecting Change runtime type in the upper-right corner. Training will be extremely slow on a CPU runtime.
Changing the notebook runtime from CPU to T4 GPU. Video by author.
Before we can begin any training on Google Colab, we first need to import our dataset into the notebook. Intuitively, the simplest way would be to upload the dataset to Google Drive and import it from there into our notebook. However, it takes an exceedingly long amount of time to upload any dataset that is larger than a few MB. The workaround to this is to upload the dataset onto a remote file hosting service (like Amazon S3 or even Kaggle), and pull the dataset directly from there into our Colab notebook.
Import from Kaggle
Here are instructions on how to import a Kaggle dataset directly into a Colab notebook:
In Kaggle account settings, scroll down to API and select Create New Token. This will download a file named kaggle.json.
Run the following in a notebook cell:
!pip install kaggle
from google.colab import files
files.upload()
Upload the kaggle.json file that was just downloaded, then run the following:
The dataset will download as a zip archive. Use the unzip command to extract the contents:
!unzip dataset.zip -d dataset
Start Training
Create a new config.yaml file in the notebook’s file explorer and configure it as previously described. The default working directory in a Colab notebook is /content/, so the absolute path to the dataset will be /content/[dataset folder]. For example:
path: /content/dataset/ # absolute path to dataset
test: test/images # relative path to test images
train: train/images # relative path to training images
val: val/images # relative path to validation images

# classes
names:
  0: bottle
Make sure to check the file structure of your dataset to make sure the paths specified in config.yaml are accurate. Sometimes datasets will be nestled within multiple levels of folders.
Run the following as cells:
!pip install ultralytics
import os
from ultralytics import YOLOmodel = YOLO("yolov8n.yaml")
The previously mentioned arguments used to modify local training settings also apply here.
Similar to local training, results, weights, and graphs will be saved in runs/detect/train.
Running
Regardless of whether you trained locally or on the cloud, predictions must be run locally.
After a model has completed training, there will be two weights located in runs/detect/train/weights, named best.pt and last.pt, which are the weights for the best epoch and the latest epoch, respectively. For this tutorial, we will use best.pt to run the model.
If you trained locally, move best.pt to a convenient location (e.g. our project folder yolov8-project) for running predictions. If you trained on the cloud, download best.pt to your device. On Google Colab, right-click on the file in the notebook’s file explorer and select Download.
Downloading weights on Google Colab. Video by author.
Similar to local training, predictions can be run either through the Python API or the CLI.
Python API
In the same location as best.pt, create a new file named predict.py:
The arguments are the same as with the Python API.
Implementation
We have now been able to successfully run our model on a live webcam feed, but so what? How can we actually use this model and integrate it into a project?
Let’s think about it in terms of input and output. In order for this model to be of any use for us in an external application, it must be able to accept useful inputs and produce useful outputs. Thankfully, the flexibility of the YOLOv8 model makes it possible to integrate a model into a variety of use cases.
We used source=0 to set the webcam as the input source for our predictions. However, YOLOv8 models can utilize many more input sources than just this. Below are several examples:
results = model(source="path/to/image.jpg", show=True, conf=0.25, save=True) # static image
results = model(source="screen", show=True, conf=0.25, save=True) # screenshot of current screen
results = model(source="https://ultralytics.com/images/bus.jpg", show=True, conf=0.25, save=True) # image or video URL
results = model(source="path/to/file.csv", show=True, conf=0.25, save=True) # CSV file
results = model(source="path/to/video.mp4", show=True, conf=0.25, save=True) # video file
results = model(source="path/to/dir", show=True, conf=0.25, save=True) # all images and videos within directory
results = model(source="path/to/dir/**/*.jpg", show=True, conf=0.25, save=True) # glob expression
results = model(source="https://www.youtube.com/watch?v=dQw4w9WgXcQ", show=True, conf=0.25, save=True) # YouTube video URL
Whenever we run a prediction, YOLOv8 returns huge amounts of valuable data in the form of a list of Results objects, which includes information about the bounding boxes, segmentation masks, keypoints, class probabilities, and oriented bounding boxes (OBBs) of a prediction.
Since we assigned the results of the prediction to the results variable in our code, we can use it to retrieve information about the prediction:
This was only a very basic example of what you can do with the outputs of a YOLOv8 model, and there are countless ways you could potentially apply a model to a project of your own.
Conclusion
Congratulations for making it all the way to the end!
In this article, we were able to start from scratch and make our own YOLOv8-compatible dataset, import datasets from Kaggle, train a model using multiple environments including Python API, CLI, and Google Colab, run our model locally, and discover many input/output methods that enable us to leverage YOLOv8 models in our own projects.
Please keep in mind that the objective of this tutorial is to act as a starting point or introduction to YOLOv8 or computer vision. We have barely scratched the surface of the intricacies of the YOLOv8 model, and as you become more experienced with YOLOv8 and computer vision in general, it is definitely wise to take a deeper dive into the topic. There are plenty of articles on the Internet and here on Medium that work great for this very purpose.
That being said, if you have followed along with this tutorial and made it to the end, that is nevertheless a great accomplishment. I hope that this article has helped you to gain a basic understanding of machine learning, computer vision, and the YOLOv8 model. Perhaps you have even found a passion for the subject, and will continue to learn more as you progress to more advanced topics in the future.
I’m sure lots of you reading this have heard about the recent controversy where LinkedIn apparently began silently using user personal data for training LLMs without notifying users or updating their privacy policy to allow for this. As I noted at the time over there, this struck me as a pretty startling move, given what we increasingly know about regulatory postures around AI and general public concern. In more recent news, online training platform Udemy has done something somewhat similar, where they quietly offered instructors a small window for opting out of having their personal data and course materials used in training AI, and have closed that window, allowing no more opting out. In both of these cases, businesses have chosen to use passive opt-in frameworks, which can have pros and cons.
To explain what happened in these cases, let’s start with some level setting. Social platforms like Udemy and LinkedIn have two general kinds of content related to users. There’s personal data, meaning information you provide (or which they make educated guesses about) that could be used alone or together to identify you in real life. Then, there’s other content you create or post, including things like comments or Likes you put on other people’s posts, slide decks you create for courses, and more. Some of that content is probably not qualified as personal data, because it would not have any possibility of identifying you individually. This doesn’t mean it isn’t important to you, however, but data privacy doesn’t usually cover those things. Legal protections in various jurisdictions, when they exist, usually cover personal data, so that’s what I’m going to focus on here.
The LinkedIn Story
LinkedIn has a general and very standard policy around the rights to general content (not personal data), where they get non-exclusive rights that permit them to make this content visible to users, generally making their platform possible.
However, a separate policy governs data privacy, as it relates to your personal data instead of the posts you make, and this is the one that’s been at issue in the AI training situation. Today (September 30, 2024), it says:
How we use your personal data will depend on which Services you use, how you use those Services and the choices you make in your settings. We may use your personal data to improve, develop, and provide products and Services, develop and train artificial intelligence (AI) models, develop, provide, and personalize our Services, and gain insights with the help of AI, automated systems, and inferences, so that our Services can be more relevant and useful to you and others. You can review LinkedIn’s Responsible AI principles here and learn more about our approach to generative AI here. Learn more about the inferences we may make, including as to your age and gender and how we use them.
Of course, it didn’t say this back when they started using your personal data for AI model training. The earlier version from mid-September 2024 (thanks to the Wayback Machine) was:
How we use your personal data will depend on which Services you use, how you use those Services and the choices you make in your settings. We use the data that we have about you to provide and personalize our Services, including with the help of automated systems and inferences we make, so that our Services (including ads) can be more relevant and useful to you and others.
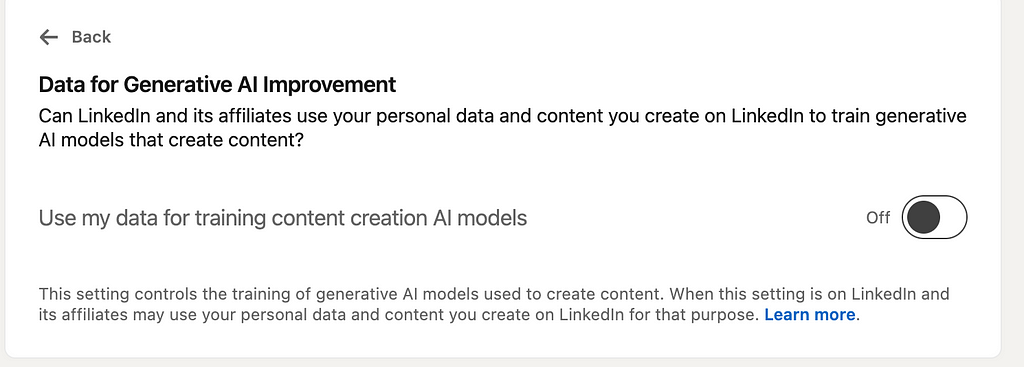
In theory, “with the help of automated systems and inferences we make” could be stretched in some ways to include AI, but that would be a tough sell to most users. However, before this text was changed on September 18, people had already noticed that a very deeply buried opt-out toggle had been added to the LinkedIn website that looks like this:
Screenshot by the author from linkedin.com
(My toggle is Off because I changed it, but the default is “On”.)
This suggests strongly that LinkedIn was already using people’s personal data and content for generative AI development before the terms of service were updated. We can’t tell for sure, of course, but lots of users have questions.
The Udemy Story
For Udemy’s case, the facts are slightly different (and new facts are being uncovered as we speak) but the underlying questions are similar. Udemy teachers and students provide large quantities of personal data as well as material they have written and created to the Udemy platform, and Udemy provides the infrastructure and coordination to allow courses to take place.
Udemy published an Instructor Generative AI policy in August, and this contains quite a bit of detail about the data rights they want to have, but it is very short on detail about what their AI program actually is. From reading the document, I’m very unclear as to what models they plan to train or are already training, or what outcomes they expect to achieve. It doesn’t distinguish between personal data, such as the likeness or personal details of instructors, and other things like lecture transcripts or comments. It seems clear that this policy covers personal data, and they’re pretty open about this in their privacy policy as well. Under “What We Use Your Data For”, we find:
Improve our Services and develop new products, services, and features (all data categories), including through the use of AI consistent with the Instructor GenAI Policy (Instructor Shared Content);
Account Data: username, password, but for instructors also “government ID information, verification photo, date of birth, race/ethnicity, and phone number” if you provide it
Profile Data: “photo, headline, biography, language, website link, social media profiles, country, or other data.”
System Data: “your IP address, device type, operating system type and version, unique device identifiers, browser, browser language, domain and other systems data, and platform types.”
Approximate Geographic Data: “country, city, and geographic coordinates, calculated based on your IP address.”
But all of these categories can contain personal data, sometimes even PII, which is protected by comprehensive data privacy legislation in a number of jurisdictions around the world.
The generative AI move appears to have been rolled out quietly starting this summer, and like with LinkedIn, it’s an opt-out mechanism, so users who don’t want to participate must take active steps. They don’t seem to have started all this before changing their privacy policy, at least so far as we can tell, but in an unusual move, Udemy has chosen to make opt-out a time limited affair, and their instructors have to wait until a specified period each year to make changes to their involvement. This has already begun to make users feel blindsided, especially because the notifications of this time window were evidently not shared broadly. Udemy was not doing anything new or unexpected from an American data privacy perspective until they implemented this strange time limit on opt-out, provided they updated their privacy policy and made at least some attempt to inform users before they started training on the personal data.
(There’s also a question of the IP rights of teachers on the platform to their own creations, but that’s a question outside the scope of my article here, because IP law is very different from privacy law.)
Ethics
With these facts laid out, and inferring that LinkedIn was in fact starting to use people’s data for training GenAI models before notifying them, where does that leave us? If you’re a user of one of these platforms, does this matter? Should you care about any of this?
I’m going suggest there are a few important reasons to care about these developing patterns of data use, independent of whether you personally mind having your data included in training sets generally.
Your personal data creates risk.
Your personal data is valuable to these companies, but it also constitutes risk. When your data is out there being moved around and used for multiple purposes, including training AI, the risk of breach or data loss to bad actors is increased as more copies are made. In generative AI there is also a risk that poorly trained LLMs can accidentally release personal information directly in their output. Every new model that uses your data in training is an opportunity for unintended exposure of your data in these ways, especially because lots of people in machine learning are woefully unaware of the best practices for protecting data.
The principle of informed consent should be taken seriously.
Informed consent is a well known bedrock principle in biomedical research and healthcare, but it doesn’t get as much attention in other sectors. The idea is that every individual has rights that should not be abridged without that individual agreeing, with full possession of the pertinent facts so they can make their decision carefully. If we believe that protection of your personal data is part of this set of rights, then informed consent should be required for these kinds of situations. If we let companies slide when they ignore these rights, we are setting a precedent that says these violations are not a big deal, and more companies will continue behaving the same way.
Dark patterns can constitute coercion.
In social science, there is quite a bit of scholarship about opt-in and opt-out as frameworks. Often, making a sensitive issue like this opt-out is meant to make it hard for people to exercise their true choices, either because it’s difficult to navigate, or because they don’t even realize they have an option. Entities have the ability to encourage and even coerce behavior in the direction that benefits business by the way they structure the interface where people assert their choices. This kind of design with coercive tendencies falls into what we call dark patterns of user experience design online. When you add on the layer of Udemy limiting opt-out to a time window, this becomes even more problematic.
This is about images and multimedia as well as text.
This might not occur to everyone immediately, but I just want to highlight that when you upload a profile photo or any kind of personal photographs to these platforms, that becomes part of the data they collect about you. Even if you might not be so concerned with your comment on a LinkedIn post being tossed in to a model training process, you might care more that your face is being used to train the kinds of generative AI models that generate deepfakes. Maybe not! But just keep this in mind when you consider your data being used in generative AI.
What to do?
At this time, unfortunately, affected users have few choices when it comes to reacting to these kinds of unsavory business practices.
If you become aware that your data is being used for training generative AI and you’d prefer that not happen, you can opt out, if the business allows it. However, if (as in the case of Udemy) they limit that option, or don’t offer it at all, you have to look to the regulatory space. Many Americans are unlikely to have much recourse, but comprehensive data privacy laws like CCPA often touch on this sort of thing a bit. (See the IAPP tracker to check your state’s status.) CCPA generally permits opt-out frameworks, where a user taking no action is interpreted as consent. However, CCPA does require that opting out is not made outlandishly difficult. For example, you can’t require opt-outs be sent as a paper letter in the mail when you are able to give affirmative consent by email. Companies must also respond in 15 days to an opt-out request. Is Udemy limiting the opt-out to a specific timeframe once a year going to fit the bill?
But let’s step back. If you have no awareness that your data is being used to train AI, and you find out after the fact, what do you do then? Well, CCPA lets the consent be passive, but it does require that you be informed about the use of your personal data. Disclosure in a privacy policy is usually good enough, so given that LinkedIn didn’t do this at the outset, that might be cause for some legal challenges.
Notably, EU residents likely won’t have to worry about any of this, because the laws that protect them are much clearer and more consistent. I’ve written before about the EU AI Act, which has quite a bit of restriction on how AI can be applied, but it doesn’t really cover consent or how data can be used for training. Instead, GDPR is more likely to protect people from the kinds of things that are happening here. Under that law, EU residents must be informed and asked to positively affirm their consent, not just be given a chance to opt out. They must also have the ability to revoke consent for use of their personal data, and we don’t know if a time limited window for such action would pass muster, because the GDPR requirement is that a request to stop processing someone’s personal data must be handled within a month.
Lessons Learned
We don’t know with clarity what Udemy and LinkedIn are actually doing with this personal data, aside from the general idea that they’re training generative AI models, but one thing I think we can learn from these two news stories is that protecting individuals’ data rights can’t be abdicated to corporate interests without government engagement. For all the ethical businesses out there who are careful to notify customers and make opt-out easy, there are going to be many others that will skirt the rules and do the bare minimum or less unless people’s rights are protected with enforcement.
Consent in Training AI was originally published in Towards Data Science on Medium, where people are continuing the conversation by highlighting and responding to this story.
Why Your Service Engineers Need a Chatbot: The Future of Troubleshooting
As part of the AI Sprint 2024, I built a multimodal chatbot with Gemini 1.5 and here’s how it can revolutionize appliance support
Across industries, effective troubleshooting is crucial for maintaining smooth operations, ensuring customer satisfaction, and optimizing the efficiency of service processes. However, troubleshooting appliances on-site can be a challenging task. With various models and countless potential issues, service engineers often find themselves sifting through manuals or searching online for solutions, an approach that can be both frustrating and time-consuming.
This is where chatbots equipped with comprehensive servicing knowledge and access to the latest troubleshooting manuals can transform the experience. While one might assume that Retrieval-Augmented Generation (RAG) would be an ideal solution for such tasks, it often falls short in this scenario. This is because these handbooks often contain elements such as tables, images, and diagrams, which are difficult to extract and summarization may miss the knotty details typically found in them, making it unfit for production rollout.
In this article, we will work towards building a chatbot using Gemini to help onsite service engineers find the right information in a faster, more intuitive manner. We will also explore the advanced features offered by Gemini, such as context caching and File API integration for multimodal prompting. In the end, we will wrap this chatbot in a Streamlit interface, for easier interaction.
Before you Begin
To build the chatbot, we’ll be using Gemini, Python 3, and Streamlit. Start by installing Streamlit on your local machine by running the below command:
pip install streamlit
For the database, we’ll rely on SQLite which comes preinstalled with Python. We will also need a Gemini API key to run inferences using Gemini 1.5 Flash. If you don’t have an API key yet, you can create one for free from this link. Once you have set up your key, install the Google AI Python SDK by running:
pip install google-generativeai
You can find the source code & additional resources on my GitHub repo here
Acknowledgement: Google Cloud credits are provided for this project, as part of #AISprint 2024
Architecture
Before the implementation, let us examine the system architecture in detail. The process begins by fetching the required product manual from a database and passing it to Gemini. This acts as the knowledge base for our chatbot, providing essential troubleshooting information for the selected appliance.
Image by Author
Once the documents are loaded, we leverage Gemini’s multimodal document processing capabilities to extract the required information from the product manual. Now, when a user interacts with the chatbot, the model combines the uploaded service manual data, chat history, and other contextual cues to deliver precise and insightful responses to the user’s queries.
To enhance performance, we’ll implement context caching, which optimizes response time for recurring queries. Finally, we’ll wrap this architecture in a simple yet intuitive Streamlit web application, allowing service engineers to seamlessly engage with the chat agent and access the information they need.
Loading Service Manuals into the Database
To begin building the chatbot, the first step is to load the troubleshooting guides into our database for reference. Since these files are unstructured in nature, we can’t store them directly in our database. Instead, we store their filepaths:
class ServiceGuides: def __init__(self, db_name="database/persistent/general.db"): self.conn = sqlite3.connect(db_name) self.create_table()
def fetch_guides_by_model_number(self, model_number): cursor = self.conn.cursor() cursor.execute( """SELECT guide_url FROM service_guides WHERE model = ?""", (model_number,), ) return cursor.fetchone()
In this project, we’ll store the manuals in a local directory, and save their file paths in a SQLite database. For better scalability however, its recommended to use an object storage service, such as Google Cloud Storage to store these files & maintain URLs to the files in a database service like Google Cloud SQL
Building the Conversational Agent with Gemini
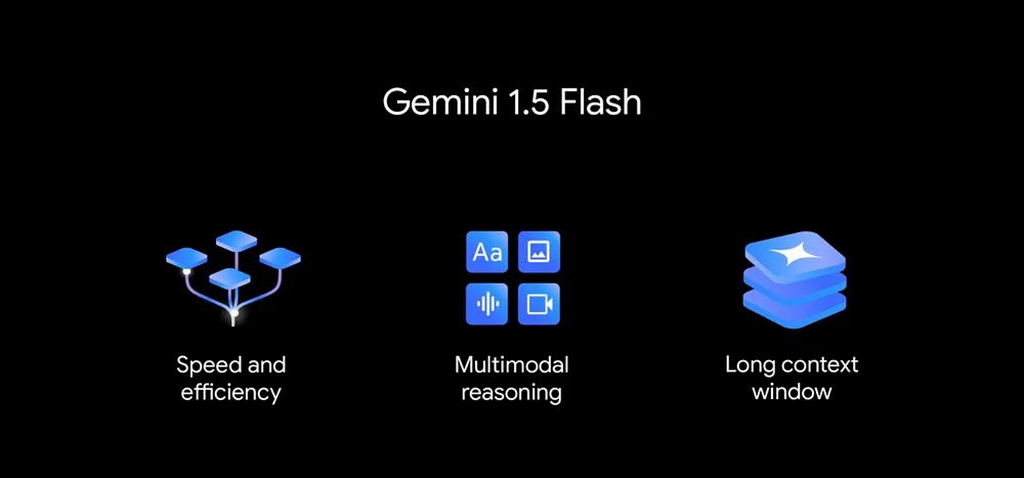
Once the product manual is loaded into the database, the next step is to build the agent using 1.5 Flash. This lightweight model is part of the Gemini family and has been fine-tuned through a process known as “distillation,” where the most essential knowledge and skills from a larger model are transferred to a smaller, more efficient model to support various high-volume tasks at scale.
Optimized for speed and operational efficiency, the 1.5 Flash model is highly proficient in multimodal reasoning and features a context window of up to 1 million tokens, making it the ideal choice for our service engineer’s use case.
Multimodal Document Processing with 1.5 Flash
To run inference on our service manuals, we first need to upload the files to Gemini. The Gemini API supports uploading media files separately from the prompt input, enabling us to reuse files across multiple requests. The File API supports up to 20 GB of files per project, with a maximum of 2 GB per file:
class ServiceEngineerChatbot: def __init__(self): genai.configure(api_key=st.secrets["GEMINI_API_KEY"])
while service_guide.state.name == 'PROCESSING': print('Waiting for file to be processed.') time.sleep(2) service_guide = genai.get_file(service_guide.name)
return service_guide
To upload a file, we use the upload_file() method, which takes as parameter the path (path to the file to be uploaded), name (filename in the destination, defaulting to a system-generated ID), mime_type (specifying the MIME type of the document, which’ll be inferred if unspecified), and the display_name.
Before proceeding, we need to verify that the API has successfully stored the uploaded file by checking its metadata. If the file’s state is PROCESSING, it cannot yet be used for inference. Once the state changes to ACTIVE, the file is ready for use. A FAILED state, indicates file processing was unsuccessful.
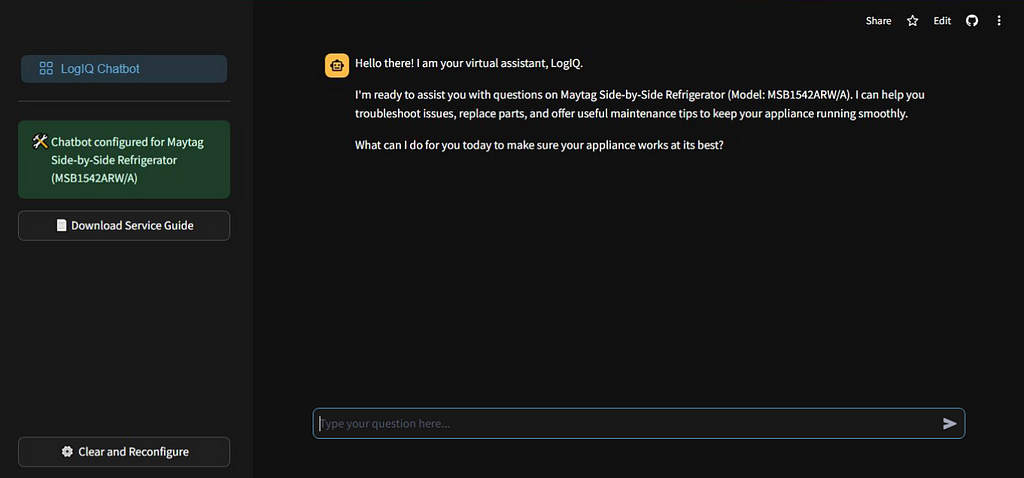
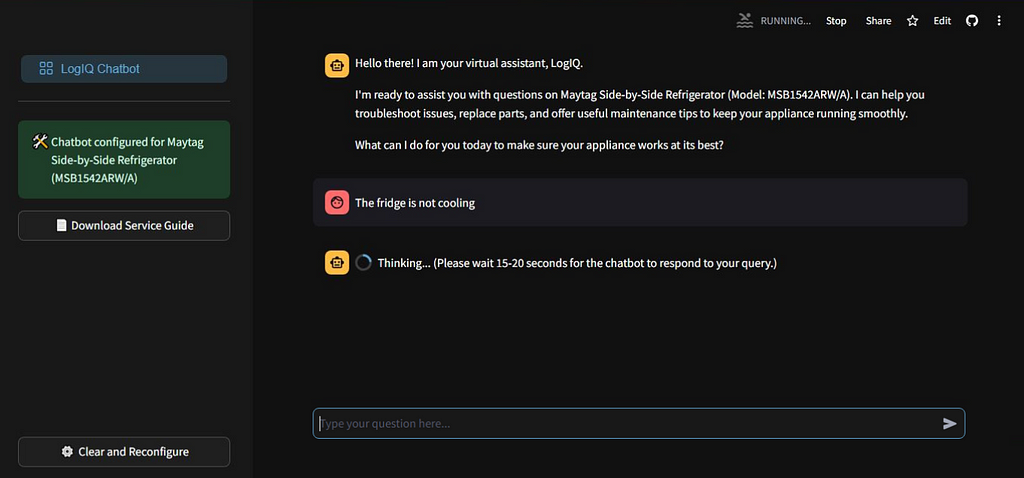
Conversational Response Generation
After uploading the service manual, the next step is to leverage Gemini 1.5’s multimodal document processing capabilities for response generation. The chat feature of the API allows us to collect multiple rounds of questions and responses, facilitating in-depth analysis of issues & step-by-step resolution.
Image by Author
When initializing the model, it’s important to provide specific guidelines and context to shape the chatbot’s behavior throughout the interaction. This is done by supplying system instruction to the model. System instructions help maintain context, guide the style of interaction, ensure consistency, and set boundaries for the chatbot’s responses, while trying to prevent hallucination.
class ServiceEngineerChatbot: def __init__(self): genai.configure(api_key=st.secrets["GEMINI_API_KEY"])
def construct_flash_model(self, brand, sub_category, model_number): model_system_instruction = f""" Add your detailed system instructions here. These instructions should define the chatbot's behavior, tone, and provide any necessary context. For example, you might include guidelines about how to respond to queries, the structure of responses, or information about what the chatbot should and should not do. Checkout my repo for this chatbot's system instructions. """
model = genai.GenerativeModel( model_name="gemini-1.5-flash", system_instruction=model_system_instruction, generation_config=model_generation_cofig, ) return model
We can further control the model’s response generation by tuning the model parameters through the GenerationConfig class. In our application, we’ve set the max_output_tokens to 1500, defining the maximum token limit for each response, and the temperature to 0.4, to maintain determinism in the response.
Long context optimization with Context Caching
In many cases, especially with recurring queries against the same document, we end up sending the same input tokens repeatedly to the model. While this approach may work, it’s not optimal for large-scale, production-level rollouts
This is where Gemini’s context caching feature becomes essential, offering a more efficient solution by reducing both costs and latency for high-token workloads. With context caching, instead of sending same input tokens with every request, we can refer to the cached tokens for the subsequent requests
Image by Author
In this project, we cache both the system instruction and the service manual file. At scale, using cached tokens significantly reduces the cost compared to repeatedly passing the same data. By default the Time-to-Live (TTL) for these cached tokens is 1 hour, though it can be adjusted as required. Once the TTL expires, the cached tokens are automatically removed from Gemini’s context
It’s important to note that context caching is only available for an input token count of 32,768 or more. If token count is below this threshold, you’ll need to rely on the standard multimodal prompting capabilities of Gemini 1.5 Flash.
Integrating Chatbot with Streamlit
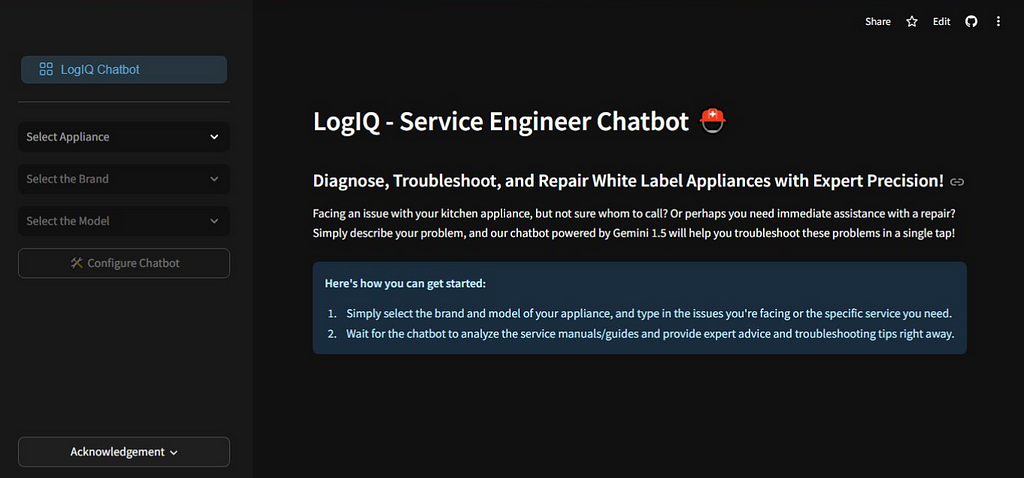
With our chatbot’s response generation capabilities in place, the final step is to wrap it in a Streamlit app to create an intuitive user interface for the users.
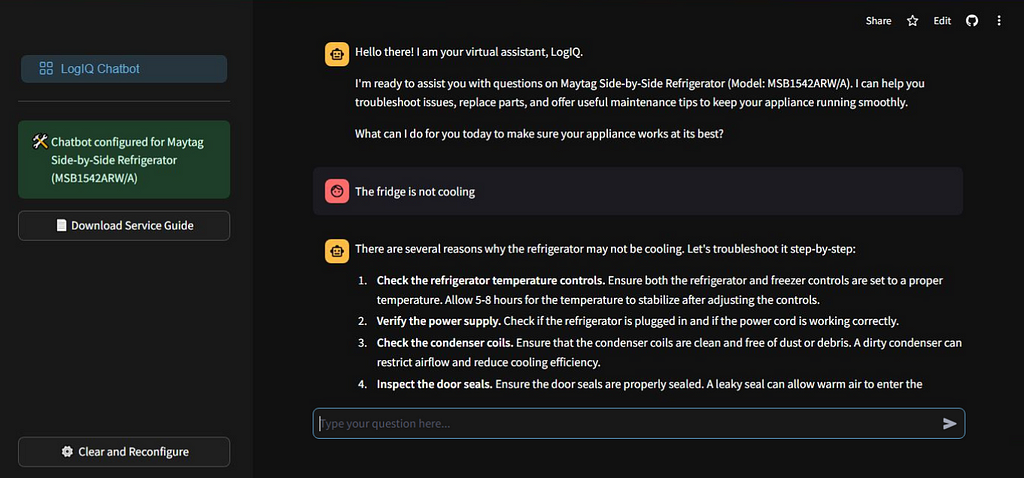
Image by Author
The interface features a dropdown where the users can select the brand, and model of the appliance they are working with. After making the selection & clicking the “Configure chatbot” button, the app will post the corresponding service manual to Gemini and present the chat interface. From thereon, the engineer can enter their queries & the chatbot will provide relevant response
Future Scope
Looking ahead, there are several promising directions to explore. The future iterations of the chatbot could integrate voice support, allowing engineers to communicate more naturally with the chatbot to get their queries addressed.
Additionally, expanding the system to incorporate predictive diagnostics can enable engineers to preemptively identify potential issues before they lead to equipment failures. By continuing to evolve this tool, the goal is to create a comprehensive support system for service engineers, ultimately improving the customer experience, thus transforming the troubleshooting eco-system
With that, we have reached the end of this article. If you have any questions or believe I have made any mistake, please feel free to reach out to me! You can get in touch with me via Email or LinkedIn. Until then, happy learning!
Framework to meet practical real-world requirements
Source: Generated with the help of AI (OpenAI’s Dall-E model)
Abstract
Ever since OpenAI’s ChatGPT took the world by storm in November 2022, Large Language Models (LLMs) have revolutionized various applications across industries, from natural language understanding to text generation. However, their performance needs rigorous and multidimensional evaluation metrics to ensure they meet the practical, real-world requirements of accuracy, efficiency, scalability, and ethical considerations. This article outlines a broad set of metrics and methods to measure the performance of LLM-based applications, providing insights into evaluation frameworks that balance technical performance with user experience and business needs.
This is not meant to be a comprehensive guide on all metrics to measure the performance of LLM applications, but it provides a view into key dimensions to look at and some examples of metrics. This will help you understand how to build your evaluation criterion, the final choice will depend on your actual use case.
Even though this article focuses on LLM based applications, this could be extrapolated to other modalities as well.
1. Introduction
1.1. LLM-Based Applications: Definition and Scope
There is no dearth of Large Language Models(LLMs) today. LLMs such as GPT-4, Meta’s LLaMA, Anthropic’s Claude 3.5 Sonnet, or Amazon’s Titan Text Premier, are capable of understanding and generating human-like text, making them apt for multiple downstream applications like customer facing chatbots, creative content generation, language translation, etc.
1.2. Importance of Performance Evaluation
LLMs are non-trivial to evaluate, unlike traditional ML models, which have pretty standardized evaluation criteria and datasets. The black box nature of LLMs, as well as the multiplicity of downstream use cases warrants a multifaceted performance measurement across multiple considerations. Inadequate evaluation can lead to cost overruns, poor user experience, or risks for the organization deploying them.
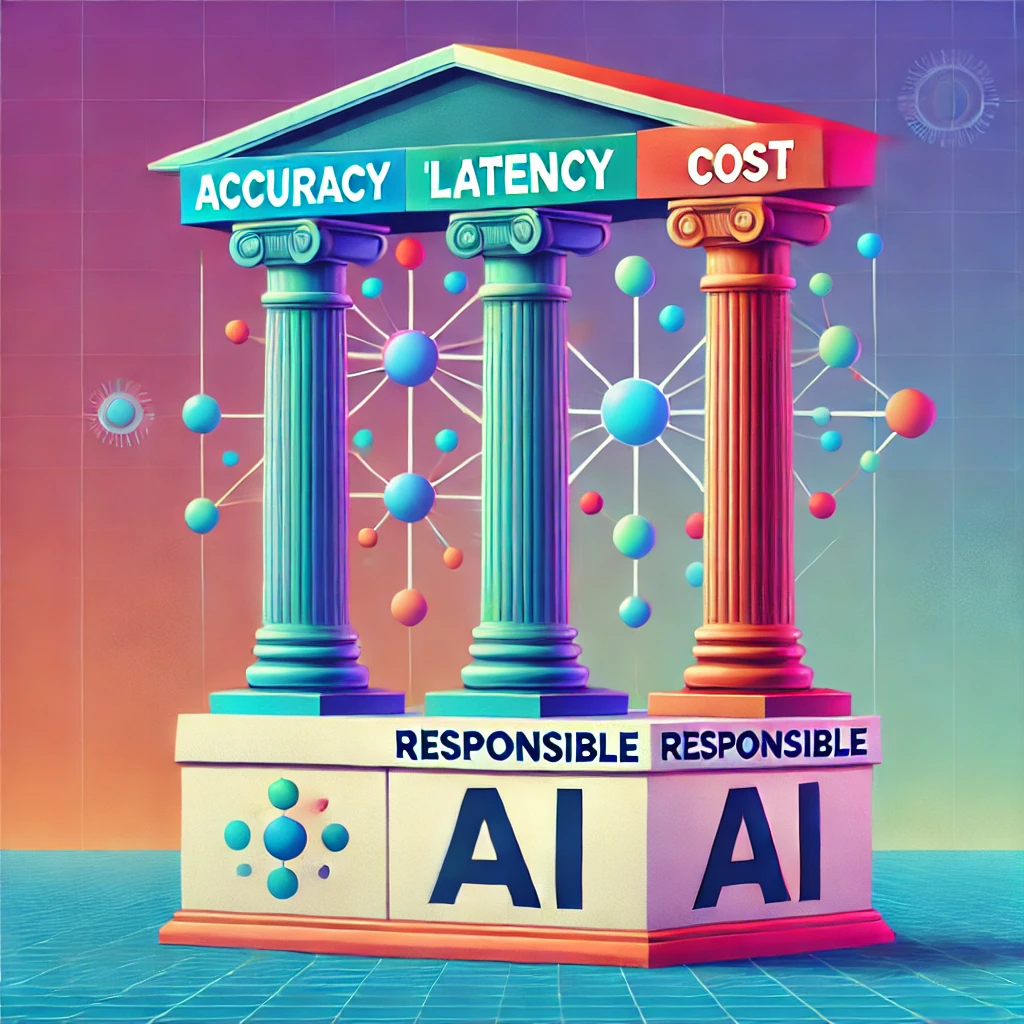
2. The four key dimensions of LLM Performance
Source: Generated with the help of AI (OpenAI’s Dall-E model)
There are 3 key ways to look at the performance of LLM based applications- namely accuracy, cost, and latency. It is additionally critical to make sure to have a set of criteria for Responsible AI to ensure the application is not harmful.
Just like the bias vs. variance tradeoff we have in classical Machine Learning applications, for LLMs we have to consider the tradeoff between accuracy on one side and cost + latency on the other side. In general, it will be a balancing act, to create an application that is “accurate”(we will define what this means in a bit) while being fast enough and cost effective. The choice of LLM as well as the supporting application architecture will heavily depend on the end user experience we aim to achieve.
2.1. Accuracy
I use the term “Accuracy” here rather loosely, as it has a very specific meaning, but gets the point across if used as an English word rather than a mathematical term.
Accuracy of the application depends on the actual use case- whether the application is doing a classification task, if it’s creating a blob of text, or if it is being used for specialized tasks like Named Entity Recognition (NER), Retrieval Augmented Generation (RAG).
2.1.1. Classification use cases
For classification tasks like sentiment analysis (positive/negative/neutral), topic modelling and Named Entity Recognition classical ML evaluation metrics are appropriate. They measure accuracy in terms of various dimensions across the confusion matrix. Typical measures include Precision, Recall, F1-Score etc.
2.1.2. Text generation use cases — including summarization and creative content
BLEU, ROUGE and METEOR scores are common metrics used to evaluate text generation tasks, particularly for translation and summarization. To simplify, people also use F1 scores by combining BLEU and ROUGE scores. There are additional metrics like Perplexity which are particularly useful for evaluating LLMs themselves, but less useful to measure the performance of full blown applications. The biggest challenge with all the above metrics is that they focus on text similarity and not semantic similarity. Depending on the use case, text similarity may not be enough, and one should also use measures of semantic proximity like SemScore.
2.1.3. RAG use cases — including summarization and creative content
In RAG based applications, evaluation requires advanced metrics to capture performance across retrieval as well as generation steps. For retrieval, one may use recall and precision to compare relevant and retrieved documents. For generation one may use additional metrics like Perplexity, Hallucination Rate, Factual Accuracy or Semantic coherence. This Article describes the key metrics that one might want to include in their evaluation.
2.2. Latency (and Throughput)
In many situations, latency and throughput of an application determine its end usability, or use experience. In today’s generation of lightning fast internet, users do not want to be stuck waiting for a response, especially when executing critical jobs.
The lower the latency, the better the user experience in user-facing applications which require real time response. This may not be as important for workloads that execute in batches, e.g. transcription of customer service calls for later use. In general, both latency and throughput can be improved by horizontal or vertical scaling, but latency may still fundamentally depend on the way the overall application is architected, including the choice of LLM. A nice benchmark to use speed of different LLM APIs is Artificial Analysis. This complements other leaderboards that focus on the quality of LLMs like LMSYS Chatbot Arena, Hugging Face open LLM leaderboards, and Stanford’s HELM which focus more on the quality of the outputs.
Latency is a key factor that will continue to push us towards Small Language Models for applications that require fast response time, where deployment on edge devices might be a necessity.
2.3. Cost
We are building LLM applications to solve business problems and create more efficiencies, with the hope of solving customer problems, as well as creating bottom line impact for our businesses. All of this comes at a cost, which could add up quickly for generative AI applications.
In my experience, when people think of the cost of LLM applications, there is a lot of discussion about the cost of inference (which is based on #tokens), the cost of find tuning, or even the cost of pre-training a LLM. There is however limited discussion on the total cost of ownership, including infrastructure and personnel costs.
The cost can vary based on the type of deployment (cloud, on-prem, hybrid), the scale of usage, and the architecture. It also varies a lot depending on the lifecycle of the application development.
Infrastructure costs — includes inference, tuning costs, or potentially pre-training costs as well as the infrastructure — memory, compute, networking, and storage costs associated with the application. Depending on where one is building the application, these costs may not need to be managed separately, or bundled into one if one if using managed services like AWS Bedrock.
Team and Personnel cost– we may sometimes need an army of people to build, monitor, and improve these applications. This includes the engineers to build this (Data Scientists and ML Engineers, DevOps and MLOps engineers) as well as the cross functional teams of product/project managers, HR, Legal and Risk personnel who are involved in the design and development. We may also have annotation and labelling teams to provide us with high quality data.
Other costs– which may include the cost of data acquisition and management, customer interviews, software and licensing costs, Operational costs (MLOps/LLMOps), Security, and Compliance.
2.4. Ethical and Responsible AI Metrics
LLM based applications are still novel, many being mere proof of concepts. At the same time, they are becoming mainstream- I see AI integrated into so many applications I use daily, including Google, LinkedIn, Amazon shopping app, WhatsApp, InstaCart, etc. As the lines between human and AI interaction become blurrier, it becomes more essential that we adhere to responsible AI standards. The bigger problem is that these standards don’t exist today. Regulations around this are still being developed across the world (including the Executive Order from the White House). Hence, it’s crucial that application creators use their best judgment. Below are some of the key dimensions to keep in mind:
Fairness and Bias: Measures whether the model’s outputs are free from biases and fairness related to race, gender, ethnicity, and other dimensions.
Toxicity: Measures the degree to which the model generates or amplifies harmful, offensive, or derogatory content.
Explainability: Assesses how explainable the model’s decisions are.
Hallucinations/Factual Consistency: Ensures the model generates factually correct responses, especially in critical industries like healthcare and finance.
Privacy: Measures the model’s ability to handle PII/PHI/other sensitive data responsibly, compliance with regulations like GDPR.
3. So are these metrics enough?
Well… not really! While the four dimensions and metrics we discussed are essential and a good starting point, they are not always enough to capture the context, or unique user preferences. Given that humans are typically end consumers of the outputs, they are best positioned to evaluate the performance of LLM based applications, especially in complex or unknown scenarios. There are two ways to take human input:
Direct via human-in-the-loop: Human evaluators provide qualitative feedback on the outputs of LLMs, focusing on fluency, coherence, and alignment with human expectations. This feedback is crucial for improving the human-like behaviour of models.
Indirect via secondary metrics: A|B testing from end users can compare secondary metrics like user engagement and satisfaction. E.g., we can compare the performance of hyper-personalized marketing using generative AI by comparing click through rates and conversion rates.
4. Conclusion
As a consultant, the answer to most questions is “It depends.”. This is true for evaluation criteria for LLM applications too. Depending on the use case/industry/function, one has to find the right balance of metrics across accuracy, latency, cost, and responsible AI. This should always be complemented by a human evaluation to make sure that we test the application in a real-world scenario. For example, medical and financial use cases will value accuracy and safety as well as attribution to credible sources, entertainment applications value creativity and user engagement. Cost will remain a critical factor while building the business case for an application, though the fast dropping cost of LLM inference might reduce barriers of entry soon. Latency is usually a limiting factor, and will require right model selection as well as infrastructure optimization to maintain performance.
All views in this article are the Author’s and don’t represent an endorsement of any products or services.
We use cookies on our website to give you the most relevant experience by remembering your preferences and repeat visits. By clicking “Accept”, you consent to the use of ALL the cookies.
This website uses cookies to improve your experience while you navigate through the website. Out of these, the cookies that are categorized as necessary are stored on your browser as they are essential for the working of basic functionalities of the website. We also use third-party cookies that help us analyze and understand how you use this website. These cookies will be stored in your browser only with your consent. You also have the option to opt-out of these cookies. But opting out of some of these cookies may affect your browsing experience.
Necessary cookies are absolutely essential for the website to function properly. These cookies ensure basic functionalities and security features of the website, anonymously.
Cookie
Duration
Description
cookielawinfo-checkbox-analytics
11 months
This cookie is set by GDPR Cookie Consent plugin. The cookie is used to store the user consent for the cookies in the category "Analytics".
cookielawinfo-checkbox-functional
11 months
The cookie is set by GDPR cookie consent to record the user consent for the cookies in the category "Functional".
cookielawinfo-checkbox-necessary
11 months
This cookie is set by GDPR Cookie Consent plugin. The cookies is used to store the user consent for the cookies in the category "Necessary".
cookielawinfo-checkbox-others
11 months
This cookie is set by GDPR Cookie Consent plugin. The cookie is used to store the user consent for the cookies in the category "Other.
cookielawinfo-checkbox-performance
11 months
This cookie is set by GDPR Cookie Consent plugin. The cookie is used to store the user consent for the cookies in the category "Performance".
viewed_cookie_policy
11 months
The cookie is set by the GDPR Cookie Consent plugin and is used to store whether or not user has consented to the use of cookies. It does not store any personal data.
Functional cookies help to perform certain functionalities like sharing the content of the website on social media platforms, collect feedbacks, and other third-party features.
Performance cookies are used to understand and analyze the key performance indexes of the website which helps in delivering a better user experience for the visitors.
Analytical cookies are used to understand how visitors interact with the website. These cookies help provide information on metrics the number of visitors, bounce rate, traffic source, etc.
Advertisement cookies are used to provide visitors with relevant ads and marketing campaigns. These cookies track visitors across websites and collect information to provide customized ads.