In this post, we walk you through a step-by-step process to create a social media content generator app using vision, language, and embedding models (Anthropic’s Claude 3, Amazon Titan Image Generator, and Amazon Titan Multimodal Embeddings) through Amazon Bedrock API and Amazon OpenSearch Serverless.
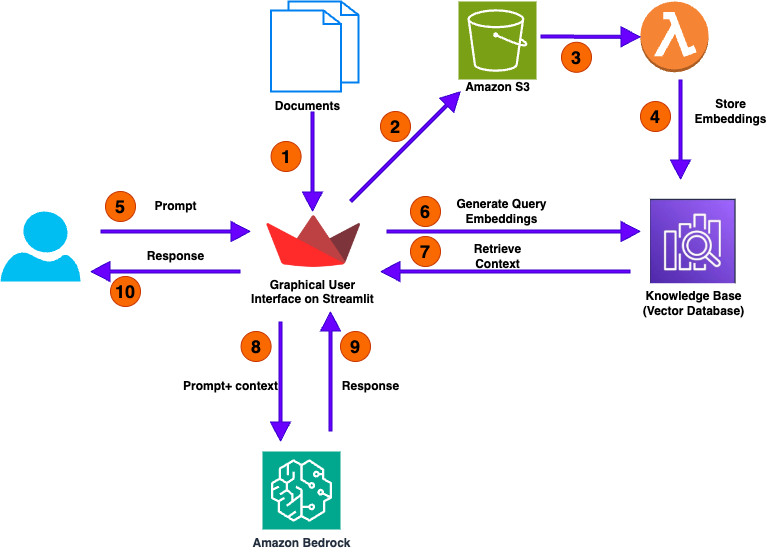
In this post, we discuss how Amazon Bedrock Knowledge Bases provides a powerful solution for numerical analysis on documents. You can deploy this solution in an AWS account and use it to analyze different types of documents.
OpenAI’s new o1-preview is way too expensive for how it performs on the results
Many of my customers ask for advice on which LLM (Large Language Model) to use for building products tailored to Dutch-speaking users. However, most available benchmarks are multilingual and don’t specifically focus on Dutch. As a machine learning engineer and PhD researcher into machine learning at the University of Amsterdam, I know how crucial benchmarks have been to the advancement of AI — but I also understand the risks when benchmarks are trusted blindly. This is why I decided to experiment and run some Dutch-specific benchmarking of my own.
In this post, you’ll find an in-depth look at my first attempt at benchmarking several large language models (LLMs) on real Dutch exam questions. I’ll guide you through the entire process, from gathering over 12,000 exam PDFs to extracting question-answer pairs and grading the models’ performance automatically using LLMs. You’ll see how models like o1-preview, o1-mini, GPT-4o, GPT-4o-mini, and Claude-3 performed across different Dutch educational levels, from VMBO to VWO, and whether the higher costs of certain models lead to better results. This is just a first go at the problem, and I may dive deeper with more posts like this in the future, exploring other models and tasks. I’ll also talk about the challenges and costs involved and share some insights on which models offer the best value for Dutch-language tasks. If you’re building or scaling LLM-based products for the Dutch market, this post will provide valuable insights to help guide your choices as of September 2024.
It’s becoming more common for companies like OpenAI to make bold, almost extravagant claims about the capabilities of their models, often without enough real-world validation to back them up. That’s why benchmarking these models is so important — especially when they’re marketed as solving everything from complex reasoning to nuanced language understanding. With such grand claims, it’s vital to run objective tests to see how well they truly perform, and more specifically, how they handle the unique challenges of the Dutch language.
I was surprised to find that there hasn’t been extensive research into benchmarking LLMs for Dutch, which is what led me to take matters into my own hands on a rainy afternoon. With so many institutions and companies relying on these models more and more, it felt like the right time to dive in and start validating these models. So, here’s my first attempt to start filling that gap, and I hope it offers valuable insights for anyone working with the Dutch-language.
Why Dutch-Specific Benchmarks Matter
Many of my customers work with Dutch-language products, and they need AI models that are both cost-effective and highly performant in understanding and processing Dutch. Although large language models (LLMs) have made impressive strides, most of the available benchmarks focus on English or multilingual capabilities, often neglecting the nuances of smaller languages like Dutch. This lack of focus on Dutch is significant because linguistic differences can lead to large performance gaps when a model is asked to understand non-English texts.
Five years ago, NLP — deep learning models for Dutch were far from mature (Like the first versions of BERT). At the time, traditional methods like TF-IDF paired with logistic regression often outperformed early deep-learning models on Dutch language tasks I worked on. While models (and datasets) have since improved tremendously, especially with the rise of transformers and multilingual pre-trained LLMs, it’s still critical to verify how well these advances translate to specific languages like Dutch. The assumption that performance gains in English carry over to other languages isn’t always valid, especially for complex tasks like reading comprehension.
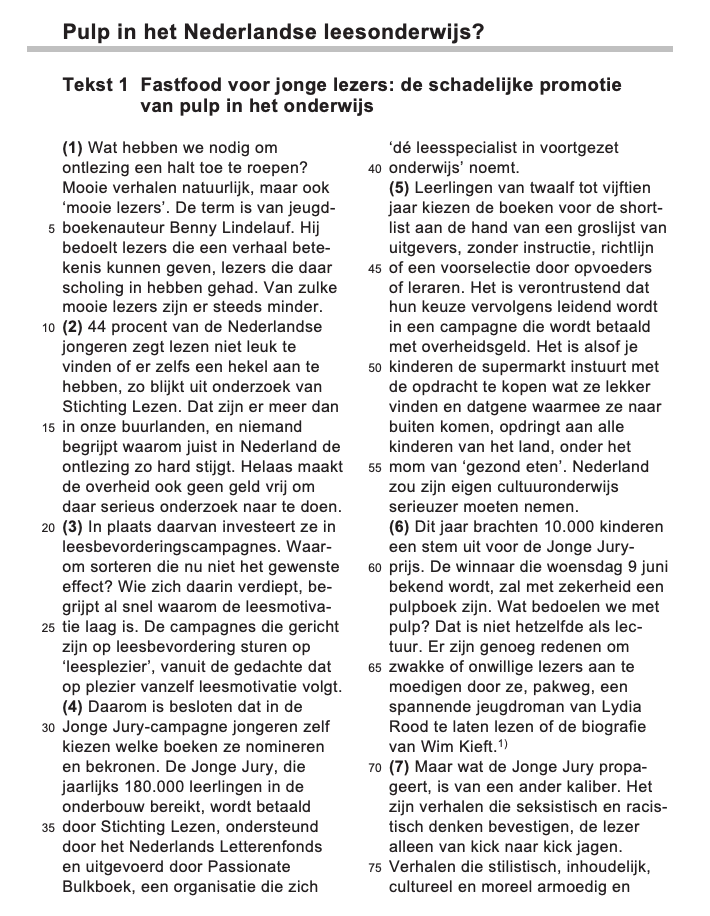
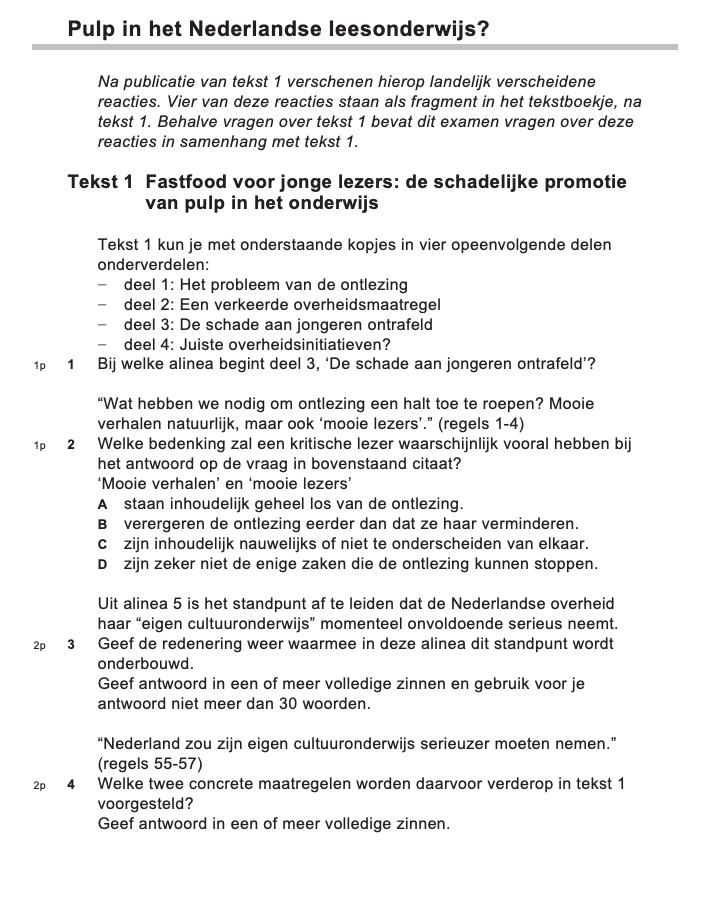
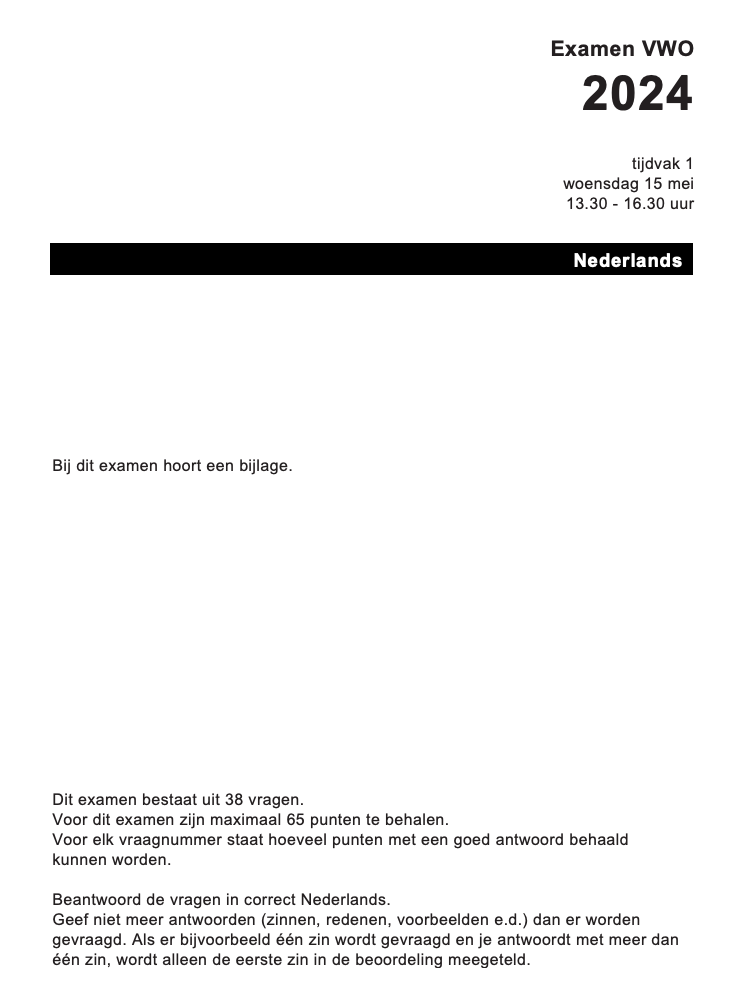
That’s why I focused on creating a custom benchmark for Dutch, using real exam data from the Dutch “Nederlands” exams (These exams enter the public domain after they have been published). These exams don’t just involve simple language processing; they test “begrijpend lezen” (reading comprehension), requiring students to understand the intent behind various texts and answer nuanced questions about them. This type of task is particularly important because it’s reflective of real-world applications, like processing and summarizing legal documents, news articles, or customer queries written in Dutch.
By benchmarking LLMs on this specific task, I wanted to gain deeper insights into how models handle the complexity of the Dutch language, especially when asked to interpret intent, draw conclusions, and respond with accurate answers. This is crucial for businesses building products tailored to Dutch-speaking users. My goal was to create a more targeted, relevant benchmark to help identify which models offer the best performance for Dutch, rather than relying on general multilingual benchmarks that don’t fully capture the intricacies of the language.
Examples of Dutch exams in the Netherlands, these exams enter the public domain after they have been published.
How the Benchmarking Works
Let me walk you through how I built and executed this benchmark:
PDF Collection: I began by collecting over 12,000 PDFs from Dutch state exams. These exams include reading passages and questions that test a student’s ability to comprehend and interpret written Dutch.
Data Extraction: Next, I extracted the relevant information from the PDFs using LLMs, turning the text into structured question-answer (Q&A) pairs. For example, a typical question from a PDF might look like this: “Wat is de hoofdgedachte van de schrijver in alinea 3 van tekst 2?” After extraction, this question becomes a structured Q&A pair like this: Question: What is the main idea of the author in paragraph 3? Correct Answer: The author argues that technological advancements bring both positive and negative consequences (2 points)
Model selection: The selection of models in this benchmark includes a mix of well-known LLMs, ranging from smaller, more cost-efficient models like o1-mini and gpt-4o-mini, to more expensive options like o1-preview. These models were tested on Dutch-language tasks to assess their ability to handle reading comprehension (“begrijpend lezen”) tasks from the Dutch “Nederlands” exam. Notably, Claude-3–5-sonnet and Claude-3-haiku were also included, providing insight into how AI models from Anthropic stack up against the GPT family. I selected several models to do this initial benchmark with, definitely not extensive enough yet. Let me know if you would want me to add more in the future!
Question answering: The fun part! I hooked up the APIs of the LLMs and gave them a question with corresponding texts and let them answer the questions. It became less fun when the more expensive models kicked in and my credit card started informing me it was not very excited about these endeavors. The lengths I go through for my readers!
Automated Grading: Using a prompt that knows the correct answer I ask for an objective decision if the required answer is in the answer given by the LLM. With this method, the LLM-generated answers are compared to the correct answers from the official answer sheets. Each question is scored based on how closely the model’s answer matches the correct one.
Scoring & Reporting: After grading, the models are evaluated on how many points they earned relative to the maximum possible points for each exam. This scoring gives a clear idea of which models perform well and which struggle with Dutch reading comprehension tasks.
It’s a bit surreal when you think about it — LLMs benchmarking other LLMs, graded by LLMs, without a human in sight (except me, writing the code to let them do this on a rainy afternoon). This method allows for scalable and automated comparisons, but it’s not without limitations. While this approach gives a strong basis for comparing models, it’s not the final word. Still, I wanted to put together something to gain insight into how these models perform in the context of the Dutch language specifically.
The API Cost Dilemma
Running these benchmarks came at a significant cost. Processing full-text exam questions with every request quickly consumed tokens, and I ended up spending over €100 in API fees just for this initial round of testing. This forced some limitations on how many questions I could process with the different models, but it was still enough to uncover some valuable insights.
If any Dutch institutions are interested in collaborating on more extensive benchmarking efforts, I’d be eager to work together to scale this project. By expanding the scope, we could dive deeper into a wider range of exams, significantly increase the number of questions answered, and benchmark a broader selection of models. This would provide even more comprehensive insights into model performance help refine our understanding of how various LLMs handle Dutch-language tasks across different educational levels and complexities and help companies pick the best LLM and not the best marketing.
I conducted two separate benchmarks: one with smaller, cheaper models, and another with larger, more expensive models until I hit my daily API limits. The number of exam questions used was 329 for the cheaper models and 104 for the more expensive “titans.” To put this in perspective, this would be equivalent to a human taking approximately 4 to 13 full exams.
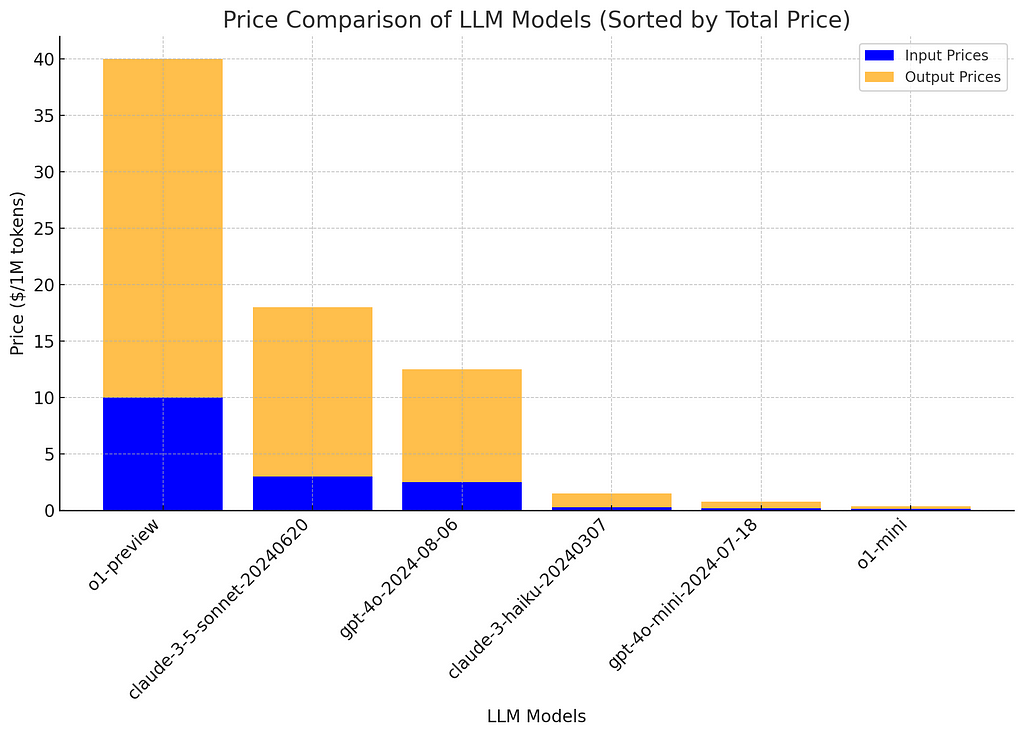
Here’s a breakdown of the model pricing (as of September 25th, via LLM Price Check):
“o1-preview” costs $10 per million tokens for input and $30 for output.
“o1-mini,” on the other hand, costs only $0.10 per million tokens for input and $0.25 for output.
This means “o1-preview” is approximately 114 times more expensive than “o1-mini.” The key question, then, is whether the extra cost translates into better performance, and if so, by how much. So, is it worth the extra cost?
Benchmarking the Models: Fast, Cheap, and… Better?
Since the launch of o1-preview, I’ve been skeptical about its performance, as it seemed slower and significantly more expensive compared to other models. So, I was eager to see how it would perform in this benchmark.
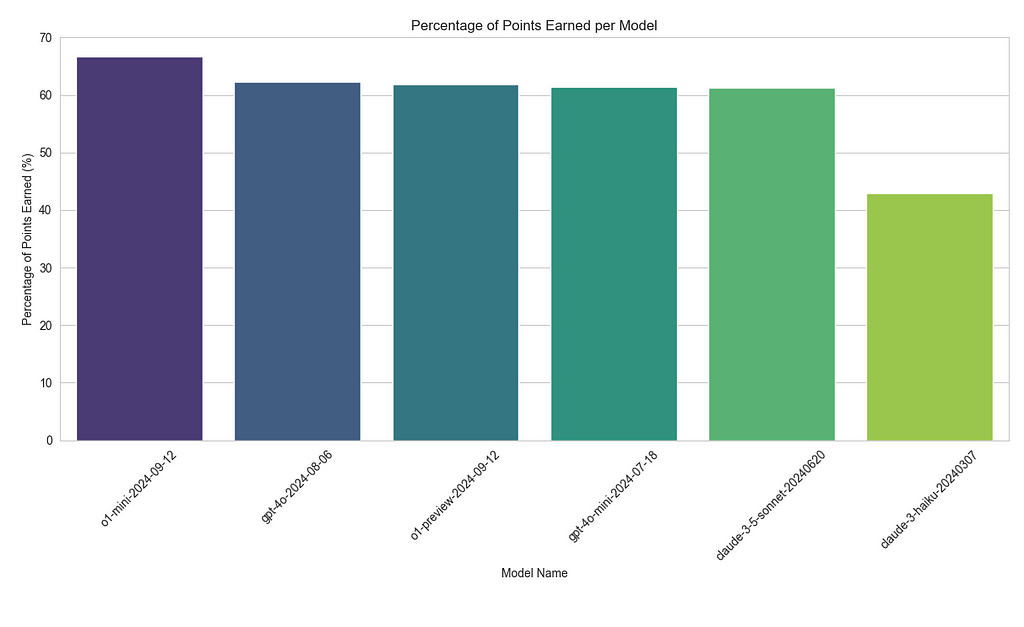
Interestingly, the o1-mini model actually outperformed more expensive options like GPT-4o and o1-preview. Specifically, o1-mini earned 66.75% of the possible points, compared to 62.32% for GPT-4O and 61.91% for o1-preview. Based on these results, I’m now considering shifting from GPT-4O-mini, which earned 61.36%, to o1-mini for Dutch language tasks, as it offers better performance at a significantly lower cost.
Here’s how the other models fared:
Claude-3–5-sonnet earned 61.28%, while
Claude-3-haiku lagged behind, with only 42.91%.
Seems like going for the Claude models will cause less performant products that are also more expensive.
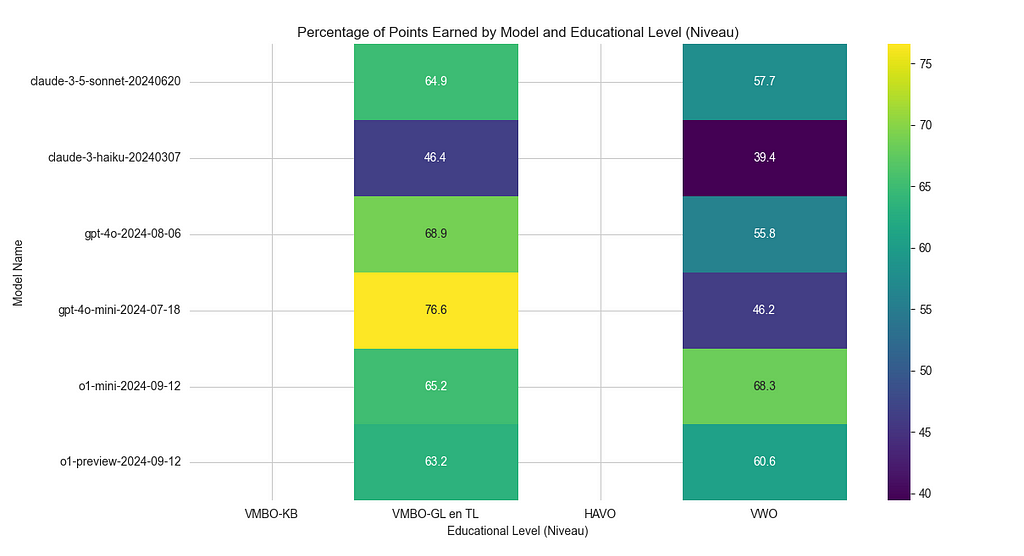
The performance breakdown also showed that all of these models handled VMBO-level exams more easily but struggled with the more complex VWO-level questions — something expected given the increasing difficulty of the exams. This highlights the value of using a more cost-effective model like o1-mini, which not only performs well across a variety of tasks but also delivers strong results on more advanced educational content.
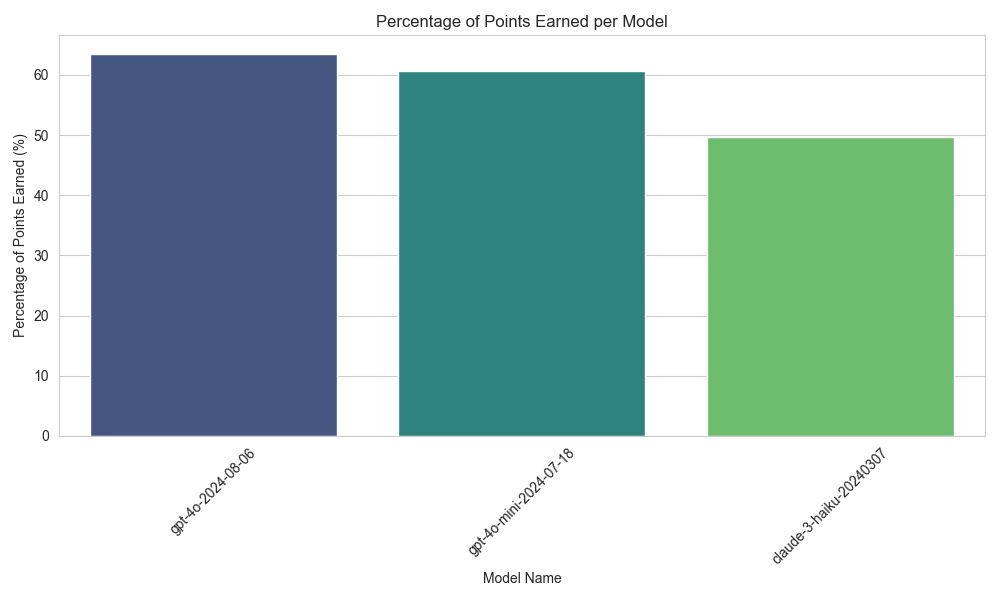
Results of 6 LLM‘s competing on answering 104 Dutch exam questions. Image by authorResults of 3 LLM’s competing on answering 329 Dutch exam questions. Image by author
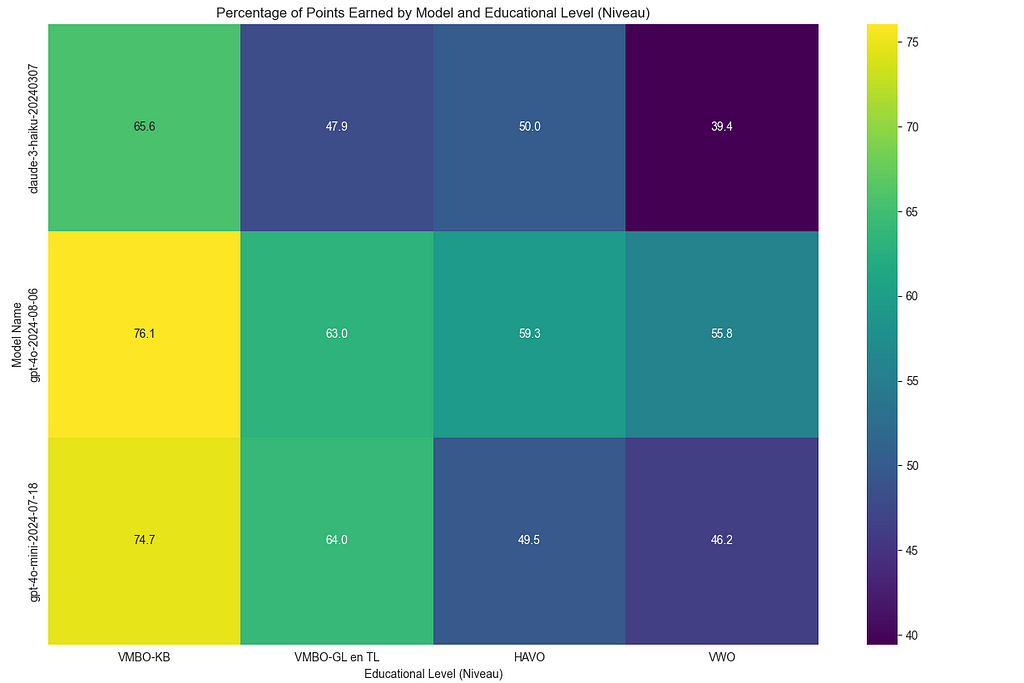
Handling Different Exam Levels: The exams are divided into different educational levels, such as VMBO, HAVO, and VWO. My system tracks how well models perform across these different levels. Unsurprisingly, the models did better on simpler VMBO-level questions and struggled more with complex VWO-level questions.
Comparison of eductional level and model performance between the six models. Image by authorThe percentage of points scored over all the different educational levels for the tree cheaper models. Image by author
Limitations and Next Steps
It’s important to mention that it’s possible some of these Dutch exam texts may have been part of the training data for certain LLMs, which could have impacted the results. However, these benchmarks still offer valuable insights for developers working on Dutch-language products.
That said, the number of questions processed so far is relatively low. In future iterations, I plan to run more comprehensive benchmarks to generate even deeper insights into the models’ performance.
This approach to benchmarking can be extended to other subjects, and I also filtered out pure-text questions. Setting up a benchmark for multimodal models, which can analyze images alongside text, would be particularly interesting since many exams, such as history and geography, involve visual elements like charts, maps, or diagrams.
In the future, this method could easily be applied to other Dutch courses such as Biologie, Natuurkunde, Scheikunde, Wiskunde A/B/C, Aardrijkskunde, Bedrijfseconomie, Economie, Filosofie, Geschiedenis, Maatschappijwetenschappen, Kunst, Muziek, Tehatex, and languages like Arabisch, Duits, Engels, Frans, Fries, Grieks, Latijn, Russisch, Spaans, and Turks. Extending this to subjects like Natuur- en scheikunde 1 & 2, Wiskunde, Maatschappijleer, and even the arts (e.g., Dans, Drama, Beeldende vakken) would provide a broad view of model performance across diverse disciplines.
If you’re interested in supporting this project, feel free to reach out or buy me a coffee! The code I’ve developed is scalable and can handle a much larger range of Dutch exams and topics with the right resources. Collaborating to explore these additional subjects and multimodal benchmarks would open up even deeper insights into how AI models can perform in Dutch education.
Final Thoughts
If you want help with building or scaling AI or machine learning products responsibly, or if you’re curious about which LLMs perform best in specific languages like Dutch, I’d be happy to help through my company, The AI Factory. Feel free to reach out! Feel free to contact me, and if you found this benchmarking useful, follow me on LinkedIn for updates on future AI and performance insights.
In this post, we show how you can discover and deploy the Llama 3.2 11B Vision model using SageMaker JumpStart. We also share the supported instance types and context for all the Llama 3.2 models available in SageMaker JumpStart.
This is the first time that the Llama models from Meta have been released with vision capabilities. These new capabilities expand the usability of Llama models from their traditional text-only applications. In this post, we demonstrate how you can use Llama 3.2 11B and 90B models for a variety of vision-based use cases.
In the recent months, we’ve have all heard about Agents and Multi-Agent frameworks. These AI agents have become the unsung heroes of automation and decision-making.
While pre-built frameworks like AutoGen and CrewAI offer tempting shortcuts, (and rightly so!) there’s an unparalleled thrill and depth of understanding that comes from building your own agent from the ground up.
It’s like choosing between instant ramen and crafting a gourmet meal — sure, the former is quick, but the latter? That’s where the real magic happens.
Today, we’re going to roll up our sleeves and dive into the nitty-gritty of creating AgentPro, our very own AI assistant. By the end of this article, you’ll have a foundational understanding of how AI agents tick, and you’ll be well on your way to creating a digital companion that can generate and execute code on demand.
It’s like teaching a robot to fish, except instead of fish, it’s pulling Python scripts out of the ether!
Caution: this code might not work in all cases but it should help you get started + indentation errors migh occur in code
Before we dive into the code, let’s outline the key components we’ll be constructing:
The 5 Stages of developing an Agent from Scratch (image by author)
Initialization: Setting up our agent’s “brain”
Code Generation: Teaching our agent to write Python scripts
Library Management: Enabling our agent to install necessary tools
Code Execution: Empowering our agent to run the code it generates
Command Center: Creating a central hub to manage all these functions
Now, let’s break down each of these steps and see how they come together to form our AI assistant.
Step 1: Initialization — Giving Our Agent Its First Spark of Life
Every great journey begins with a single step, and in the world of AI agents, that step is initialization. This is where we set up the basic structure of our agent and connect it to its primary source of intelligence — in this case, the OpenAI API.
from openai import OpenAI
import os
from google.colab import userdata
import base64
import requests
from PIL import Image
from io import BytesIO
import subprocess
import tempfile
import re
import importlib
import sys

os.environ["OPENAI_API_KEY"] = userdata.get('OPENAI_API_KEY')
class AgentPro:
    def __init__(self):
        # Future initialization code can go here
        pass
This snippet is the digital equivalent of giving life to our AI assistant. We’re importing necessary libraries, setting up our OpenAI API key, and creating the skeleton of our AgentPro class. It’s like providing a body for our AI — not very useful on its own, but essential for everything that follows.
Now that our agent has a “body,” let’s give it the ability to think — or in this case, to generate code. This is where things start to get exciting!
def generate_code(self, prompt):
    client = OpenAI()
    response = client.chat.completions.create(
    model="gpt-4o",
    messages=[
      {"role": "system", "content": "You are a Python code generator. Respond only with executable Python code, no explanations or comments except for required pip installations at the top."},
      {"role": "user", "content": f"Generate Python code to {prompt}. If you need to use any external libraries, include a comment at the top of the code listing the required pip installations."}
    ],
    max_tokens=4000,
    temperature=0.7,
    top_p=1,
    frequency_penalty=0,
    presence_penalty=0
    )
    code = re.sub(r'^```pythonn|^```n|```$', '', response.choices[0].message.content, flags=re.MULTILINE)
    code_lines = code.split('n')
    while code_lines and not (code_lines[0].startswith('import') or code_lines[0].startswith('from') or code_lines[0].startswith('#')):
        code_lines.pop(0)

    return 'n'.join(code_lines)
This method is the crown jewel of our agent’s capabilities. It’s using the OpenAI API to generate Python code based on a given prompt.
Think of it as giving our agent the ability to brainstorm and write code on the fly. We’re also doing some cleanup to ensure we get clean, executable Python code without any markdown formatting or unnecessary comments.
The parameters we’re using (like temperature and top_p) allow us to control the creativity and randomness of the generated code. It’s like adjusting the “inspiration” knob on our AI’s imagination!
Step 3: Library Management — Equipping Our Agent with the Right Tools
Every good coder knows the importance of having the right libraries at their disposal. Our AI assistant is no different. This next method allows AgentPro to identify and install any necessary Python libraries
def install_libraries(self, code):
    libraries = re.findall(r'#s*pip installs+([w-]+)', code)
    if libraries:
        print("Installing required libraries...")
        for lib in libraries:
            try:
                importlib.import_module(lib.replace('-', '_'))
                print(f"{lib} is already installed.")
            except ImportError:
                print(f"Installing {lib}...")
                subprocess.check_call([sys.executable, "-m", "pip", "install", lib])
        print("Libraries installed successfully.")
This method is like sending our agent on a shopping spree in the Python Package Index. It scans the generated code for any pip install comments, checks if the libraries are already installed, and if not, installs them. It’s ensuring our agent always has the right tools for the job, no matter what task we throw at it.
Step 4: Code Execution — Bringing the Code to Life
Generating code is great, but executing it is where the rubber meets the road. This next method allows our agent to run the code it has generated:
def execute_code(self, code): with tempfile.NamedTemporaryFile(mode='w', suffix='.py', delete=False) as temp_file: temp_file.write(code) temp_file_path = temp_file.name
This method is where the magic really happens. It takes the generated code, writes it to a temporary file, executes it, captures the output (or any errors), and then cleans up after itself. It’s like giving our agent hands to type out the code and run it, all in the blink of an eye.
Step 5: Command Center — Putting It All Together
Finally, we need a way to orchestrate all these amazing capabilities. Enter the run method:
if output: print("Output:") print(output) if error: print("Error:") print(error)
This is the command center of our AI assistant. It takes a prompt, generates the code, executes it, and reports back with the results or any errors. It’s like having a personal assistant who not only understands your requests but carries them out and gives you a full report.
Putting It All Together:
Now that we have all our components, let’s see how we can use our newly minted AI assistant:
if __name__ == "__main__":
    agent = AgentPro()
    agent.run("""make a detailed deck on the best forms of leadership with at
least 10 slides and save it to a pptx called leadership.pptx""")
With this simple command, we’re asking our agent to create a full presentation on leadership styles, complete with at least 10 slides, and save it as a PowerPoint file.
Our agent will generate the necessary Python code (likely using a library like python-pptx), install any required libraries, execute the code to create the presentation, and then report back with the results or any errors encountered.
We’ve just built the foundation of a powerful AI agent capable of generating and executing Python code on demand. From setting up its “brain” with the OpenAI API, to giving it the power to write and run code, to equipping it with the ability to install necessary tools, we’ve created a versatile digital assistant.
This is just the beginning of what’s possible with custom AI agents. In future installments, we’ll explore how to enhance AgentPro with web searching capabilities, image generation, and even more complex decision-making processes.
Remember, with great power comes great responsibility. Your new AI assistant is a powerful tool, but it’s up to you to guide it wisely. Use it to automate tedious tasks, explore new ideas, and push the boundaries of what’s possible with AI.
Just maybe don’t ask it to write your wedding vows or decide on your next career move — some things are still best left to human intuition!
Stay tuned for Part B, where we’ll teach our agent some new tricks and start to unlock its true potential. Until then, happy coding, and may your AI adventures be bug-free and endlessly exciting!
Follow for Part B!
If you are interested in learning more about this content, please subscribe. You can also connect with me on LinkedIn
About me
Hi! I am Hamza, and I’m thrilled to be your guide on this exciting journey into the world of AI agents. With a background as a Senior Research Scientist at Google and teaching experience at prestigious institutions like Stanford and UCLA, I’ve been at the forefront of AI development and education for years. My passion lies in demystifying complex AI concepts and empowering the next generation of AI practitioners.
Speaking of which, if you’ve enjoyed this deep dive into building AI agents from scratch, you might be interested in taking your LLM knowledge to the next level. I’ve recently developed a comprehensive course titled Enterprise RAG and Multi-Agent Applications on the MAVEN platform. This course is tailored for practitioners who want to push the boundaries of what’s possible with Large Language Models, especially in enterprise settings.
In Enterprise RAG and Multi-Agent Applications we explore cutting-edge techniques that go beyond the basics. From advanced Retrieval-Augmented Generation (RAG) solutions to the latest methods in model optimization and responsible AI practices, this course is designed to equip you with the skills needed to tackle real-world AI challenges.
Whether you’re looking to implement state-of-the-art LLM applications or dive deep into the intricacies of model fine-tuning and ethical AI deployment, this course has got you covered.
We use cookies on our website to give you the most relevant experience by remembering your preferences and repeat visits. By clicking “Accept”, you consent to the use of ALL the cookies.
This website uses cookies to improve your experience while you navigate through the website. Out of these, the cookies that are categorized as necessary are stored on your browser as they are essential for the working of basic functionalities of the website. We also use third-party cookies that help us analyze and understand how you use this website. These cookies will be stored in your browser only with your consent. You also have the option to opt-out of these cookies. But opting out of some of these cookies may affect your browsing experience.
Necessary cookies are absolutely essential for the website to function properly. These cookies ensure basic functionalities and security features of the website, anonymously.
Cookie
Duration
Description
cookielawinfo-checkbox-analytics
11 months
This cookie is set by GDPR Cookie Consent plugin. The cookie is used to store the user consent for the cookies in the category "Analytics".
cookielawinfo-checkbox-functional
11 months
The cookie is set by GDPR cookie consent to record the user consent for the cookies in the category "Functional".
cookielawinfo-checkbox-necessary
11 months
This cookie is set by GDPR Cookie Consent plugin. The cookies is used to store the user consent for the cookies in the category "Necessary".
cookielawinfo-checkbox-others
11 months
This cookie is set by GDPR Cookie Consent plugin. The cookie is used to store the user consent for the cookies in the category "Other.
cookielawinfo-checkbox-performance
11 months
This cookie is set by GDPR Cookie Consent plugin. The cookie is used to store the user consent for the cookies in the category "Performance".
viewed_cookie_policy
11 months
The cookie is set by the GDPR Cookie Consent plugin and is used to store whether or not user has consented to the use of cookies. It does not store any personal data.
Functional cookies help to perform certain functionalities like sharing the content of the website on social media platforms, collect feedbacks, and other third-party features.
Performance cookies are used to understand and analyze the key performance indexes of the website which helps in delivering a better user experience for the visitors.
Analytical cookies are used to understand how visitors interact with the website. These cookies help provide information on metrics the number of visitors, bounce rate, traffic source, etc.
Advertisement cookies are used to provide visitors with relevant ads and marketing campaigns. These cookies track visitors across websites and collect information to provide customized ads.