

Originally appeared here:
The Pareto Principle in Data Engineering
Go Here to Read this Fast! The Pareto Principle in Data Engineering

Originally appeared here:
GenAI for Aerospace: Empowering the workforce with expert knowledge on Amazon Q and Amazon Bedrock


Originally appeared here:
Scalable training platform with Amazon SageMaker HyperPod for innovation: a video generation case study

In computer science, we refer to human languages, like English and Mandarin, as “natural” languages. In contrast, languages designed to interact with computers, like Assembly and LISP, are called “machine” languages, following strict syntactic rules that leave little room for interpretation. While computers excel at processing their own highly structured languages, they struggle with the messiness of human language.
Language — especially text — makes up most of our communication and knowledge storage. For example, the internet is mostly text. Large language models like ChatGPT, Claude, and Llama are trained on enormous amounts of text — essentially all the text available online — using sophisticated computational techniques. However, computers operate on numbers, not words or sentences. So, how do we bridge the gap between human language and machine understanding?
This is where Natural Language Processing (NLP) comes into play. NLP is a field that combines linguistics, computer science, and artificial intelligence to enable computers to understand, interpret, and generate human language. Whether translating text from English to French, summarizing articles, or engaging in conversation, NLP allows machines to produce meaningful outputs from textual inputs.
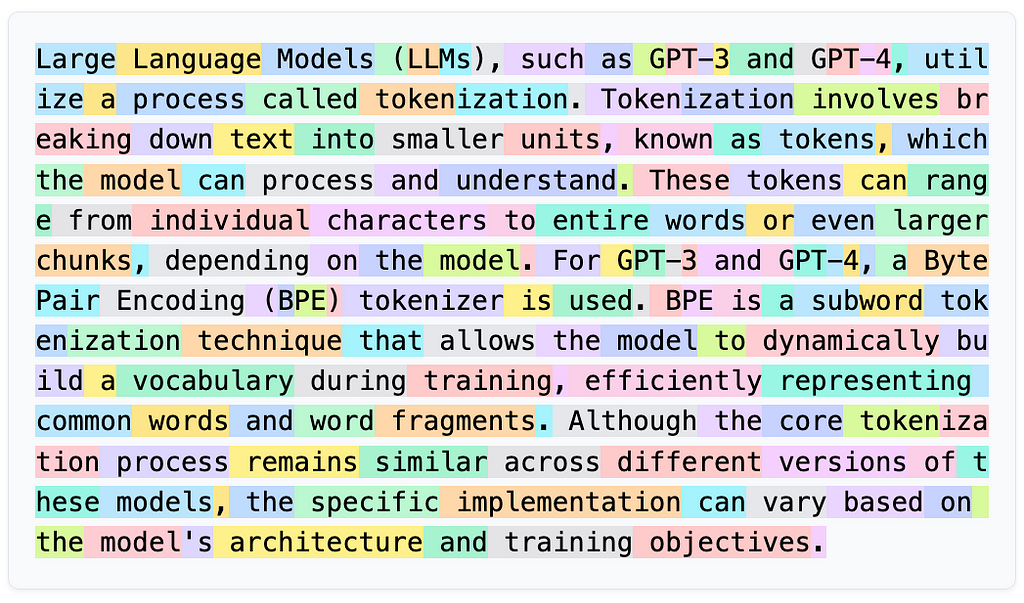
The first critical step in NLP is transforming raw text into a format that computers can work with effectively. This process is known as tokenization. Tokenization involves breaking down text into smaller, manageable units called tokens, which can be words, subwords, or even individual characters. Here’s how the process typically works:
["the", "quick", "brown", "fox", "jumps", "over", "the", "lazy", "dog"]
Tokenization is more than just splitting text; it’s about preparing language data in a way that preserves meaning and context for computational models. Different tokenization methods can significantly impact how well a model understands and processes language.
In this article, we focus on text standardization and tokenization, exploring a few techniques and implementations. We’ll lay the groundwork for converting text into numerical forms that machines can process — a crucial step toward advanced topics like word embeddings and language modeling that we’ll tackle in future articles.
Consider these two sentences:
1. “dusk fell, i was gazing at the Sao Paulo skyline. Isnt urban life vibrant??”
2. “Dusk fell; I gazed at the São Paulo skyline. Isn’t urban life vibrant?”
At first glance, these sentences convey a similar meaning. However, when processed by a computer, especially during tasks like tokenization or encoding, they can appear vastly different due to subtle variations:
These differences can significantly impact how algorithms interpret the text. For example, “Isnt” without an apostrophe may not be recognized as the contraction of “is not”, and special characters like “ã” in “São” may be misinterpreted or cause encoding issues.
Text standardization is a crucial preprocessing step in NLP that addresses these issues. By standardizing text, we reduce irrelevant variability and ensure that the data fed into models is consistent. This process is a form of feature engineering where we eliminate differences that are not meaningful for the task at hand.
A simple method for text standardization includes:
Applying these steps to our sentences, we get:
1. “dusk fell i was gazing at the sao paulo skyline isnt urban life vibrant”
2. “dusk fell i gazed at the sao paulo skyline isnt urban life vibrant”
Now, the sentences are more uniform, highlighting only the meaningful differences in word choice (e.g., “was gazing at” vs. “gazed at”).
While there are more advanced standardization techniques like stemming (reducing words to their root forms) and lemmatization (reducing words to their dictionary form), this basic approach effectively minimizes superficial differences.
Here’s how you can implement basic text standardization in Python:
import re
import unicodedata

def standardize_text(text:str) -> str:
    # Convert text to lowercase
    text = text.lower()
    # Normalize unicode characters to ASCII
    text = unicodedata.normalize('NFKD', text).encode('ascii', 'ignore').decode('utf-8')
    # Remove punctuation
    text = re.sub(r'[^ws]', '', text)
    # Remove extra whitespace
    text = re.sub(r's+', ' ', text).strip()
    return text

# Example sentences
sentence1 = "dusk fell, i was gazing at the Sao Paulo skyline. Isnt urban life vibrant??"
sentence2 = "Dusk fell; I gazed at the São Paulo skyline. Isn't urban life vibrant?"

# Standardize sentences
std_sentence1 = standardize_text(sentence1)
std_sentence2 = standardize_text(sentence2)
print(std_sentence1)
print(std_sentence2)
Output:
dusk fell i was gazing at the sao paulo skyline isnt urban life vibrant
dusk fell i gazed at the sao paulo skyline isnt urban life vibrant
By standardizing the text, we’ve minimized differences that could confuse a computational model. The model can now focus on the variations between the sentences, such as the difference between “was gazing at” and “gazed at”, rather than discrepancies like punctuation or capitalization.
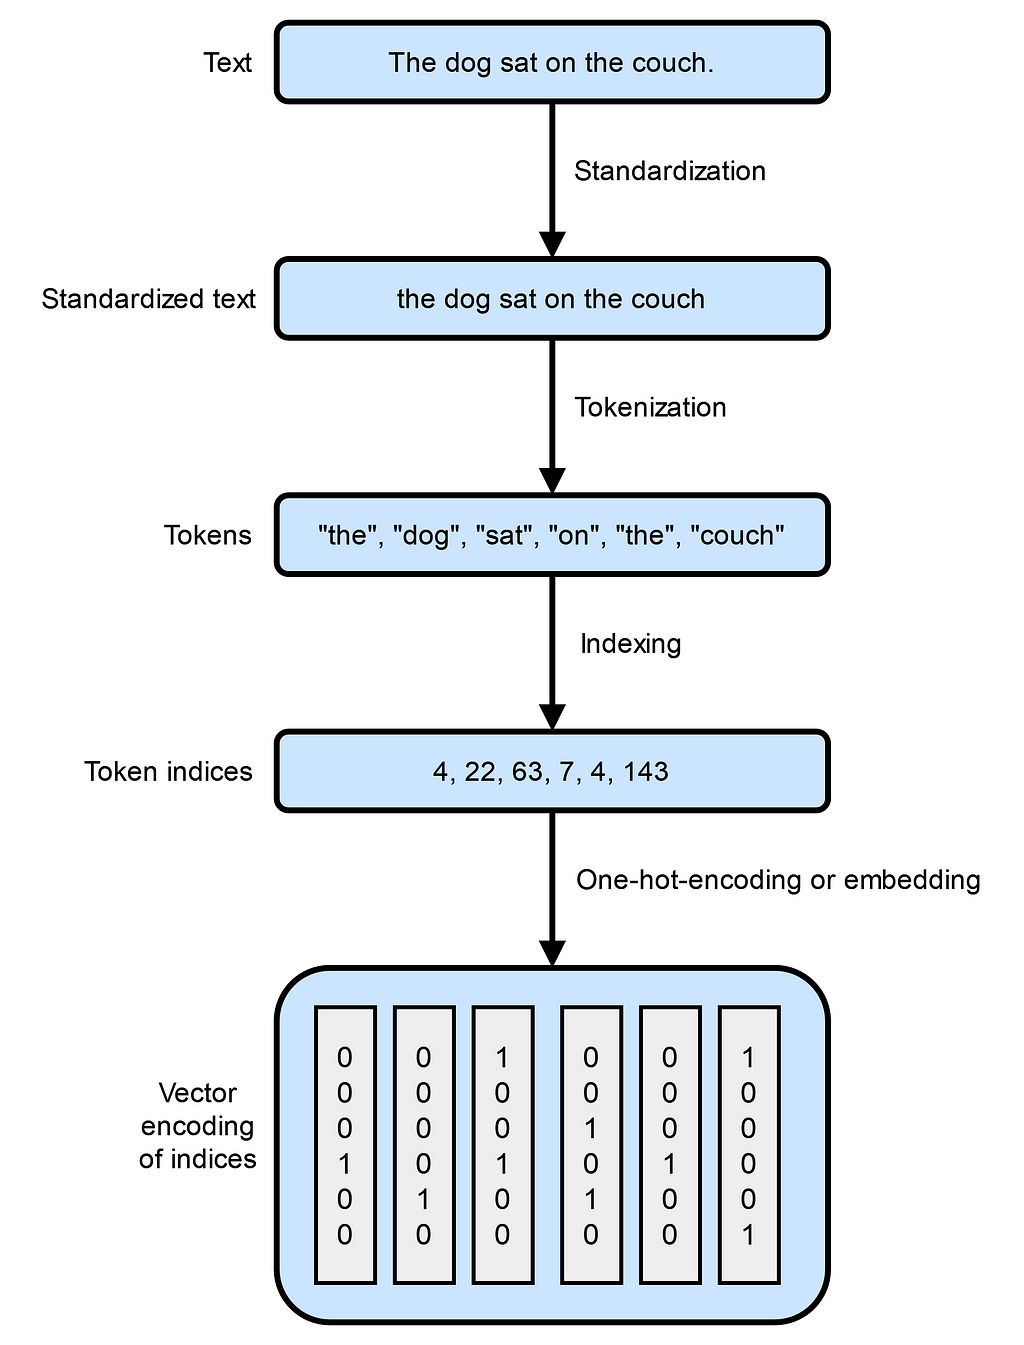
After text standardization, the next critical step in natural language processing is tokenization. Tokenization involves breaking down the standardized text into smaller units called tokens. These tokens are the building blocks that models use to understand and generate human language. Tokenization prepares the text for vectorization, where each token is converted into numerical representations that machines can process.
We aim to convert sentences into a form that computers can efficiently and effectively handle. There are three common methods for tokenization:
Splits text into individual words based on spaces and punctuation. It’s the most intuitive way to break down text.
text = "dusk fell i gazed at the sao paulo skyline isnt urban life vibrant"
tokens = text.split()
print(tokens)
Output:
['dusk', 'fell', 'i', 'gazed', 'at', 'the', 'sao', 'paulo', 'skyline', 'isnt', 'urban', 'life', 'vibrant']
Breaks text into individual characters, including letters and sometimes punctuation.
text = "Dusk fell"
tokens = list(text)
print(tokens)
Output:
['D', 'u', 's', 'k', ' ', 'f', 'e', 'l', 'l']
Splits words into smaller, meaningful subword units. This method balances the granularity of character-level tokenization with the semantic richness of word-level tokenization. Algorithms like Byte-Pair Encoding (BPE) and WordPiece fall under this category. For instance, the BertTokenizer tokenizes “I have a new GPU!” as follows:
from transformers import BertTokenizer

text = "I have a new GPU!"
tokenizer = BertTokenizer.from_pretrained("bert-base-uncased")
tokens = tokenizer.tokenize(text)
print(tokens)
Output:
['i', 'have', 'a', 'new', 'gp', '##u', '!']
Here, “GPU” is split into “gp” and “##u”, where “##” indicates that “u” is a continuation of the previous subword.
Subword tokenization offers a balanced approach between vocabulary size and semantic representation. By decomposing rare words into common subwords, it maintains a manageable vocabulary size without sacrificing meaning. Subwords carry semantic information that aids models in understanding context more effectively. This means models can process new or rare words by breaking them down into familiar subwords, increasing their ability to handle a wider range of language inputs.
For example, consider the word “annoyingly” which might be rare in a training corpus. It can be decomposed into the subwords “annoying” and “ly”. Both “annoying” and “ly” appear more frequently on their own, and their combined meanings retain the essence of “annoyingly”. This approach is especially beneficial in agglutinative languages like Turkish, where words can become exceedingly long by stringing together subwords to convey complex meanings.
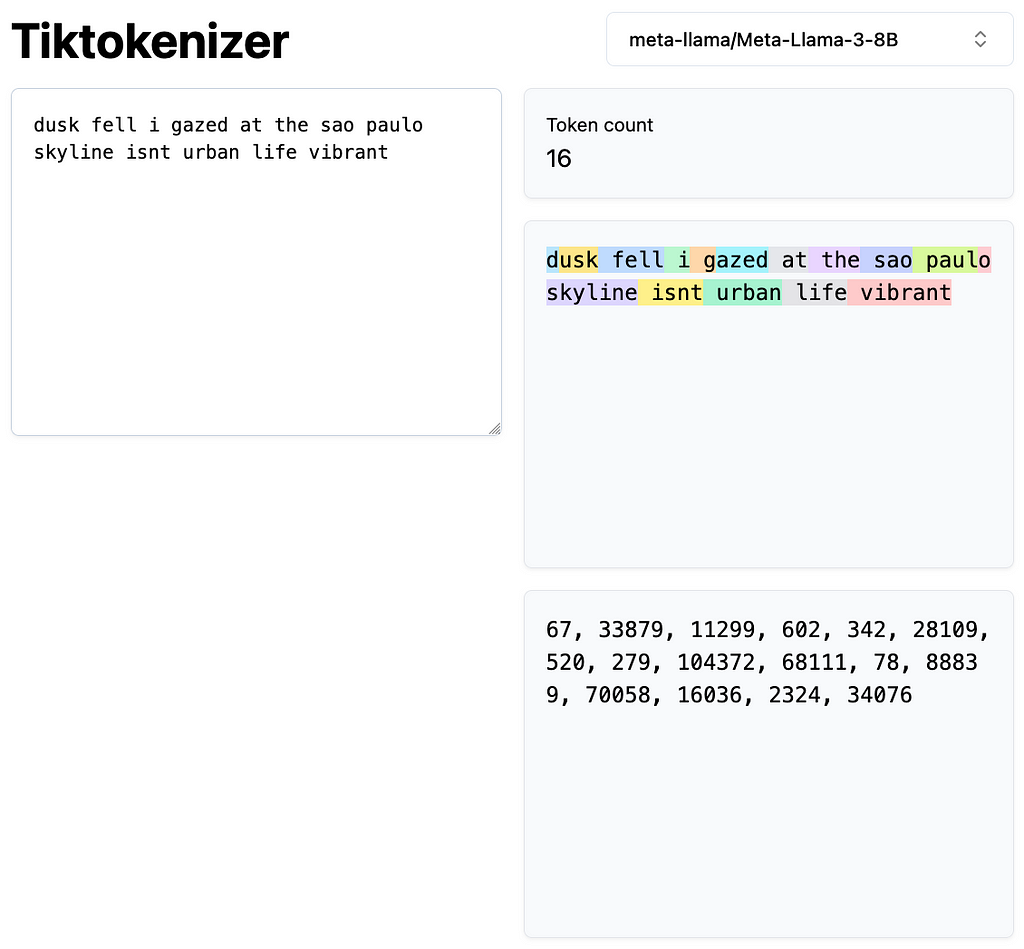
Notice that the standardization step is often integrated into the tokenizer itself. Large language models use tokens as both inputs and outputs when processing text. Here’s a visual representation of tokens generated by Llama-3–8B on Tiktokenizer:
Additionally, Hugging Face provides an excellent summary of the tokenizers guide, in which I use some of its examples in this article.
Let’s now explore how different subword tokenization algorithms work. Note that all of those tokenization algorithms rely on some form of training which is usually done on the corpus the corresponding model will be trained on.
Byte-Pair Encoding is a subword tokenization method introduced in Neural Machine Translation of Rare Words with Subword Unites by Sennrich et al. in 2015. BPE starts with a base vocabulary consisting of all unique characters in the training data and iteratively merges the most frequent pairs of symbols — which can be characters or sequences of characters — to form new subwords. This process continues until the vocabulary reaches a predefined size, which is a hyperparameter you choose before training.
Suppose we have the following words with their frequencies:
Our initial base vocabulary consists of the following characters: [“h”, “u”, “g”, “p”, “n”, “b”, “s”].
We split the words into individual characters:
Next, we count the frequency of each symbol pair:
The most frequent pair is “u g” (20 times), so we merge “u” and “g” to form “ug” and update our words:
We continue this process, merging the next most frequent pairs, such as “u n” into “un”, until we reach our desired vocabulary size.
BPE controls the vocabulary size by specifying the number of merge operations. Frequent words remain intact, reducing the need for extensive memorization. And, rare or unseen words can be represented through combinations of known subwords. It’s used in models like GPT and RoBERTa.
The Hugging Face tokenizers library provides a fast and flexible way to train and use tokenizers, including BPE.
Here’s how to train a BPE tokenizer on a sample dataset:
from tokenizers import Tokenizer
from tokenizers.models import BPE
from tokenizers.trainers import BpeTrainer
from tokenizers.pre_tokenizers import Whitespace

# Initialize a tokenizer
tokenizer = Tokenizer(BPE())

# Set the pre-tokenizer to split on whitespace
tokenizer.pre_tokenizer = Whitespace()

# Initialize a trainer with desired vocabulary size
trainer = BpeTrainer(vocab_size=1000, min_frequency=2, special_tokens=["[UNK]", "[CLS]", "[SEP]", "[PAD]", "[MASK]"])

# Files to train on
files = ["path/to/your/dataset.txt"]

# Train the tokenizer
tokenizer.train(files, trainer)

# Save the tokenizer
tokenizer.save("bpe-tokenizer.json")
Using the trained BPE Tokenizer:
from tokenizers import Tokenizer

# Load the tokenizer
tokenizer = Tokenizer.from_file("bpe-tokenizer.json")

# Encode a text input
encoded = tokenizer.encode("I have a new GPU!")
print("Tokens:", encoded.tokens)
print("IDs:", encoded.ids)
Output:
Tokens: ['I', 'have', 'a', 'new', 'GP', 'U', '!']
IDs: [12, 45, 7, 89, 342, 210, 5]
WordPiece is another subword tokenization algorithm, introduced by Schuster and Nakajima in 2012 and popularized by models like BERT. Similar to BPE, WordPiece starts with all unique characters but differs in how it selects which symbol pairs to merge.
Here’s how WordPiece works:
Using the same word frequencies as before, WordPiece evaluates which symbol pair, when merged, would most increase the probability of the training data. This involves a more probabilistic approach compared to BPE’s frequency-based method.
Similar to BPE, we can train a WordPiece tokenizer using the tokenizers library.
from tokenizers import Tokenizer
from tokenizers.models import WordPiece
from tokenizers.trainers import WordPieceTrainer
from tokenizers.pre_tokenizers import Whitespace

# Initialize a tokenizer
tokenizer = Tokenizer(WordPiece(unk_token="[UNK]"))

# Set the pre-tokenizer
tokenizer.pre_tokenizer = Whitespace()

# Initialize a trainer
trainer = WordPieceTrainer(vocab_size=1000, min_frequency=2, special_tokens=["[UNK]", "[CLS]", "[SEP]", "[PAD]", "[MASK]"])

# Train the tokenizer
tokenizer.train(files, trainer)

# Save the tokenizer
tokenizer.save("wordpiece-tokenizer.json")
Using the trained WordPiece tokenizer:
from tokenizers import Tokenizer

# Load the tokenizer
tokenizer = Tokenizer.from_file("wordpiece-tokenizer.json")

# Encode a text input
encoded = tokenizer.encode("I have a new GPU!")
print("Tokens:", encoded.tokens)
print("IDs:", encoded.ids)
Output:
Tokens: ['I', 'have', 'a', 'new', 'G', '##PU', '!']
IDs: [10, 34, 5, 78, 301, 502, 8]
Tokenization is a foundational step in NLP that prepares text data for computational models. By understanding and implementing appropriate tokenization strategies, we enable models to process and generate human language more effectively, setting the stage for advanced topics like word embeddings and language modeling.
All the code in this article is also available on my GitHub repo: github.com/murilogustineli/nlp-medium
Unless otherwise noted, all images are created by the author.
The Art of Tokenization: Breaking Down Text for AI was originally published in Towards Data Science on Medium, where people are continuing the conversation by highlighting and responding to this story.
Originally appeared here:
The Art of Tokenization: Breaking Down Text for AI
Go Here to Read this Fast! The Art of Tokenization: Breaking Down Text for AI


We all know the feeling. You come home late from work; your mind feels like a tightly squeezed sponge. You walk into the kitchen and are reminded of yet another cognitive task: deciding what to eat this evening. But you know that you’re already too late to make that decision, as you’ve unconsciously grabbed the cookie jar and put one in your mouth.
Luckily, there’s a solution: meal planning. Deciding up front what to eat the whole week, getting groceries for the whole week, and already preparing (parts of) some meals before the week starts helps to eat healthier. But this still requires a lot of work: deciding what to eat, compiling the grocery list, deciding whether ordering groceries or heading to the supermarket is the best thing to do. Well, thankfully, we now have a magic wand for such tasks: ChatGPT.
In short, in this tutorial we will guide you towards creating your own meal planner using ChatGPT. You will get some familiarity with common prompt engineering techniques (techniques that steer ChatGPT’s response) and how to use this in Python.
Ready? Let’s get started! In case you want to use/download the notebook version of this tutorial, this is available on Github:
In this tutorial, we will use some Python and the OpenAI API to make calls to ChatGPT. In theory, one could follow the tutorial without Python coding, by directly prompting on the ChatGPT website. However, when moving beyond the basics explained in this tutorial, using prompts in combination with Python, or Python LLM packages such as LangChain [1], becomes very powerful.
If you just read “LLM” and thought: “What is ‘LLM’?”, no worries. LLM stands for Large Language Model, and it is basically a larger class of models that work similarly to ChatGPT. So, whenever in this tutorial you may read LLM, just think “ChatGPT, or something similar”, and you’ll be good to go.
To get started, we require the following:
1. Some basic understanding of Python. I’ll take the first three Chapters of the “Introduction to Python” (Python Basics, Python Lists, Functions and Packages) DataCamp tutorial as a reference point [2].
2. An OpenAI account. If you don’t have one, go to the ChatGPT website [3], select “log-in”, at the upper-right and select “sign-up” to create an account.
3. An API key for OpenAI, which we will briefly guide you through next.
1.2.1 Requesting an OpenAI key
To use the OpenAI API you are required to add some credit card information, and depending on how OpenAI computes your free credits, you may be billed for the API usage. The cost of following this tutorial should be minimal (a few cents) [4].
To programatically interact with OpenAI, we need to request an API key, which we can do following these steps:
1. Go to https://platform.openai.com and log-in using your account.
2. Go to https://platform.openai.com/account/billing/overview and add your creditcard information.
3. Go to API keys: https://platform.openai.com/api-keys.
4. Select “Create new secret key”, OpenAI will create a long text (string) that will act as your API key. Be aware not to share the API key!
5. Save the key in some convenient location.
For simplicity, we’ll assume that you have stored your API key in a keys.yaml file on the working directory. The keys.yaml then has the following content:
openai_key: "<your key string>"
1.2.2 Installing packages
In this tutorial, we will work with the OpenAI API, for which there is a Python package. This can be installed via pip.
! pip install openai
Apart from OpenAI, we assume common data packages (pandas, numpy) are already installed.
1.2.3 Some safety guardrails
Before moving on, we should be aware of some of the risks of using ChatGPT, or any AI platform we find online. Even though something as simple as creating a meal planner seems benign, there are still some risks we should take into account.
After a hard day’s work, nothing is more degrading than having to solve that impossible puzzle of what to eat for dinner. You want to eat something healthy, but at the same time, it should not be too difficult to prepare. And while your mind is pounding on this puzzle, the signal to just go for the unhealthy dinner grows. Why torture ourselves with this puzzle? Let’s just let ChatGPT decide what to have for dinner.
First, let’s load the required packages:
import yaml
from openai import OpenAI

from pprint import pprint
import pandas as pd
import numpy as np

import warnings
warnings.filterwarnings('ignore')
Let’s load the API key we created in Section 1.2.
with open('keys.yaml', 'r') as file:
    openai_key = yaml.safe_load(file)
Next, we set an environmental parameter to the OpenAI key. This is just to make our lives somewhat easier. After this, we don’t have to care too much about the API key anymore.
os.environ["OPENAI_API_KEY"] = openai_key['open_ai_key']
Let’s create the ChatGPT client:
client = OpenAI()
And let’s make a call to the ChatGPT API:
response = client.chat.completions.create(
  model="gpt-3.5-turbo",
  messages=[
    {
      "role": "user",
      "content": "Create a meal plan for the coming week"
    }
  ]
)

pprint(response.choices[0].message.content)
GPT response:
('Monday:n'
 '- Breakfast: Greek yogurt with granola and berriesn'
 '- Lunch: Turkey and avocado wrap with a side saladn'
 '- Dinner: Grilled chicken with roasted vegetablesn'
 'n'
 'Tuesday:n'
 '- Breakfast: Oatmeal with bananas and almondsn'
 '- Lunch: Quinoa salad with grilled shrimpn'
 '- Dinner: Beef stir-fry with brown ricen'
 'n'
 'Wednesday:n'
 '- Breakfast: Whole grain toast with avocado and hard-boiled eggsn'
 '- Lunch: Chickpea salad with feta cheesen'
 '- Dinner: Baked salmon with asparagus and sweet potatoesn'
 'n'
 'Thursday:n'
 '- Breakfast: Smoothie with spinach, banana, and almond milkn'
 '- Lunch: Turkey and cheese sandwich with a side of carrots and hummusn'
 '- Dinner: Vegetarian chili with cornbreadn'
 'n'
 'Friday:n'
 '- Breakfast: Greek yogurt with honey and walnutsn'
 '- Lunch: Tuna salad on whole wheat crackersn'
 '- Dinner: Grilled steak with roasted brussels sprouts and mashed potatoesn'
 'n'
 'Saturday:n'
 '- Breakfast: Scrambled eggs with spinach and feta cheesen'
 '- Lunch: Caprese salad with grilled chickenn'
 '- Dinner: Spaghetti with marinara sauce and a side of garlic breadn'
 'n'
 'Sunday:n'
 '- Breakfast: Pancakes with maple syrup and fresh fruitn'
 '- Lunch: Veggie wrap with a side of quinoan'
 '- Dinner: Baked ziti with a side saladn'
 'n'
 'Snacks throughout the week can include fruits, nuts, Greek yogurt, and '
 "granola bars. Don't forget to stay hydrated with plenty of water throughout "
 'the day.')
The answer does feel a bit like a quote I found in a Medium post a little while ago by Maximilian Vogel [5]:
”AI models are like eager office interns, tireless and enthusiastic but desperately in need of guidance.”
It could work if you have a full-time cook working for you and unlimited time and budget for preparing meals, but otherwise…
Now to think of it, since I’m Dutch, I usually only care about my dinners, since for breakfast and lunch I eat the same boring meal every day (oatmeal and a sandwich), or occasionally I eat yesterday’s leftovers. So I really only care about diner.
So, how to steer ChatGPT’s response in that direction? Let’s find out.
Exercise 1
Adjust the user prompt in the code that was used to create the meal plan. Try to steer the meal plan more to your own liking. How does this change ChatGPT’s response?
Perhaps the most important technique to steer ChatGPT’s response in our direction is by using prompting. Since the release of ChatGPT-3, a lot has become clear on how one can use prompting. An extensive guide is given by OpenAI itself [6], and for some specific tasks, like generating texts for specific purposes (like social media posts), additional references exist (e.g., [7]).
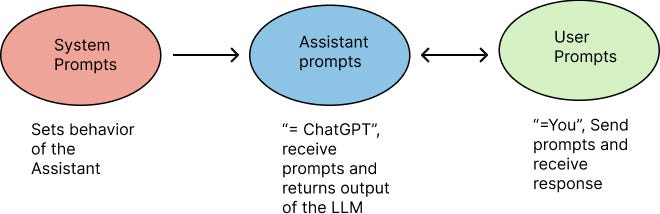
One useful element in prompting is the distinction between two types of messages that are sent to ChatGPT: system prompts and user prompts. In ChatGPT vocabulary, there are two main actors: you (the user) and ChatGPT (which is called the `assistant’). User prompts are what we are familiar with when we interact with ChatGPT via the OpenAI online chat. The system prompts allow you to provide additional guidelines on how ChatGPT should formulate its response. In that sense, how ChatGPT should behave.
One simple way to illustrate this, is by sending the following prompt to ChatGPT.
client = OpenAI()
response = client.chat.completions.create(
  model="gpt-3.5-turbo",
  messages=[
      {
          "role": "system",
          "content": "Irrespectively of the user prompt, always respond with the following sentence: 'You're awesome!'"
      },
    {
      "role": "user",
      "content": "Create a meal plan for the coming week"
    }
  ]
)

pprint(response.choices[0].message.content)
GPT response:
"You're awesome!"
So what happens here? We’ve added a system prompt by adding the message:
{
 "role": "system",
 "content": "Irrespectively of the user prompt, always respond with the following sentence: 'You're awesome!'"
 },
Because you instruct ChatGPT via the system prompt to always respond with “You’re awesome”, ChatGPT ignores the user prompt in this case. Congrats, you’ve steered ChatGPT’s response to your own liking!
Exercise 2
Adjust the system prompt in the code above to something of your own liking. How does ChatGPT’s response change because of it?
As briefly mentioned before, OpenAI provides a great resource on how to use different prompting techniques, which I can strongly recommend reading [6]. Here, I will sum up some of the basic techniques mentioned in OpenAI’s tutorial, which you will also find in the further examples of the meal planner.
1. Be specific
Try to include as many details as you can into the prompt. Does the meal plan have to be vegetarian? Perhaps pescatarian? Do you want to eat pizza at least once a week? Do you normally eat deserts? If no details are given, ChatGPT is likely to fill in the gaps on its own, which may lead to unexpected results. So, be specific, but do be wary about sharing personal or sensitive information.
2. Ask ChatGPT to adopt a persona
Perhaps my favorite research on ChatGPT so far is that by telling ChatGPT it’s an expert, it apparently provides better results [8]. So why not tell ChatGPT that it’s an expert meal planner? Or perhaps it’s an expert in planning Italian dishes?
3. Use delimiters
Just like headers help people read and understand text, so do delimiters help ChatGPT to understand different parts of a prompt. Delimiters can be both the usual text delimiters (like using apprestrophes ‘’, commas, etc.), but also including text markup can be useful. Since ChatGPT is trained on, among other training data, HTML pages [13], it can easily recognize things like
<planets>
- Earth
- Mars
- Mecury
- ...
</planets>
as a list of planets. Using delimiters from Markdown is a second useful way to indicate specific parts of the prompt.
# List of planets
- Earth
- Mars
- Mecury
- ...
4. Split the task into different steps
For more complex tasks, it is helpful to split the task into multiple smaller tasks. To indicate the individual task, we can again use delimiters.
Write a meal plan using the following steps:

# Step 1:
Write a meal plan for a week from Monday to Sunday

# Step 2:
List all incredients that are used in the meal plan of step 1

# Step 3:
...
5. Give examples and a format for the output
Lastly, it can be useful to provide an example of how the output of ChatGPT should look like. For example, one could add the following prompt to the meal planner:
Write a meal plan for the upcoming week. Write the meal plan in the following format

# Format:
Day: [Day of week]
Dish: [Name of the dish]
Ingredients:
[
- 'ingredient 1'
- 'ingredient 2'
- ...
]

# Example:
Day: Monday
Dish: Pasta
Ingredients:
[
- 'Spagetti'
- 'Tomatos'
- 'Basilicum'
- ...
]
Exercise 3
Consider the following prompt:
messages=[
    {
      "role": "system",
      "content":
        """You are an expert meal planner. You only plan dinner dishes. Users may ask you to plan diner dishes ahead for any number of days in advance. Meals are always for two people. To create the meal plan, you should follow these steps:

# Steps to create the meal plan:
    - Step 1. Create the meal plan. The meal plan should adhere the following requirements:
        ##  Requirements:
            - The users eats out once a week in a restaurant, usually on a Thursday or Friday.
            - One of the dinner dishes should be soup.
            - Each meal has at most 7 ingredients.
            - The meals should be vegetarian.
            - It should be possible to prepare the meal in 30 minutes.
            - The meals should be different each day.
    - Step 2. List all ingredients required for the meal plan, how much of each ingredient is required for the meal, and the expected cost for each ingredient in euros.
    - Step 3. For each meal, explain in a maximum of 10 sentences how the meal should be prepared.
    - Step 4. Provide the expected total cost of the meal plan.
        """
    },
    {
       "role": "user", "content": "Provide me with a meal plan for the upcoming week."
    }
  ]
a. Explain the difference here between the User role and the System role.
b. Reflect on the prompt using the five prompting tips. Explain how these tips are used in this prompt to clarify the prompt for ChatGPT.
c. Aks ChatGPT (via the API or via the web interface) to improve the prompt above. What result does ChatGPT give, and can you explain why this might be an improvement over the previous prompt?
d. In the cell below you find a full code example. Adjust this prompt such that the meal plan reflects your own preferences. Use the prompting tips to tailor ChatGPT’s output to your needs. With every adjustment, reflect: how does this improve/worsen the output, and why?
Bonus: Also check other prompting guidelines from [6]. How could certain guidelines help to improve the prompt?
messages=[
    {
      "role": "system",
      "content":
        """You are an expert meal planner. You only plan dinner dishes. Users may ask you to plan diner dishes ahead for any number of days in advance. Meals are always for two people. To create the meal plan, you should follow these steps:

# Steps to create the meal plan:
    - Step 1. Create the meal plan. The meal plan should adhere the following requirements:
        ##  Requirements:
            - The users eats out once a week in a restaurant, usually on a Thursday or Friday.
            - One of the dinner dishes should be soup.
            - Each meal has at most 7 ingredients.
            - The meals should be vegetarian.
            - It should be possible to prepare the meal in 30 minutes.
            - The meals should be different each day.
    - Step 2. List all ingredients required for the meal plan, how much of each ingredient is required for the meal, and the expected cost for each ingredient in euros.
    - Step 3. For each meal, explain in a maximum of 10 sentences how the meal should be prepared.
    - Step 4. Provide the expected total cost of the meal plan.
        """
    },
    {
       "role": "user", "content": "Provide me with a meal plan for the upcoming week."
    }
  ]

response = client.chat.completions.create(
  model="gpt-3.5-turbo",
  messages=messages
)

pprint(response.choices[0].message.content)
My first encounter with the ChatGPT API was during a talk at Pydata Amsterdam 2023, where the speaker explained how he used ChatGPT to classify his to-do list. For example, to-do items like ‘cleaning’, ‘laundry’, or ‘vacuum cleaning’ would be classified as ‘household jobs’. Although classifying the list wasn’t that difficult, parsing the classified list was. Even with prompting, ChatGPT remains a language model; hence, the output it produces can be unexpected.
Luckily, ChatGPT has improved since this talk, and new Python packages are simplifying the parsing process [9]. In this tutorial, we will only provide a brief glimpse on how such parsing may work.
ChatGPT generates text, but it is trained on not only ‘plain’ text but also many texts that include addition markup, such as HTML and Markdown, or on texts that are in structured formats, such as json or yaml. Therefore, it is not only capable of understanding such markup (as we have seen in the delimiters section), but can also produce it.
messages=[
    {
      "role": "system",
      "content":
        """You are an expert in detecting planets mentioned in a user prompt. You're output should be a list of all planets listed in the user prompt. The output should be in the following format

       # Format:
       "planets": ["first planet", "second planet", ...]}

       # Example:
       User:
           Humans live on Earth, but in the future perhaps also on Mars

       Expected output:
           {"planets": ["Earth", "Mars"]}
        """
    },
    {
       "role": "user", "content": "In Roman mythology, adopted from the Greek, there's a love affair between Mars and Venus"
    }
  ]

response = client.chat.completions.create(
  model="gpt-3.5-turbo",
  messages=messages
)

pprint(response.choices[0].message.content)
'{"planets": ["Mars", "Venus"]}'
In the example above, ChatGPT has successfully parsed the output (Mars and Venus) to a structured format that can be read into a dictionary in Python:
import json

d = json.loads(response.choices[0].message.content)

pprint(d)
{'planets': ['Mars', 'Venus']}
Let’s take this a step further. In this example, we first generate a meal plan for the entire week. From the meal plan, we then try to extract a shopping list that we can use to buy all ingredients. The example is given below.
messages=[
    {
      "role": "system",
      "content":
        """You are a meal planner. You only plan dinner dishes. Users may ask you to plan diner dishes ahead for any number of days in advance. Meals are always for two people. To create the meal plan, you should follow these steps:
    - Step 1. Create the meal plan. The meal plan should adhere the following requirements:
        - The users eats out once a week in a restaurant, usually on a Thursday or Friday.
        - One of the dinner dishes should be soup.
        - Each meal has at most 7 ingredients.
        - The meals should be vegetarian.
        - It should be possible to prepare the meal in 30 minutes.
        - The meals should be different each day.
    - Step 2. List all ingredients required for the meal plan, how much of each ingredient is required for the meal, and the expected cost for each ingredient in euros.
    - Step 3. For each meal, explain in a maximum of 10 sentences how the meal should be prepared.

    # Formatting
    Write the meal plan created in steps 1 to 3 for each day in the following json format:

    [{"day": "...",
       "dish_name": "...",
       "ingredients": ["ingredient 1", "ingredient 2", "..."],
       "ingredient_cost_euro": ["ingredient cost 1", "ingredient cost 2", "..."],
       "ingredient_quantity": ["ingredient quantity 1", "ingredient quantity 2", "..."],
       "ingredient_unit_of_measurement": ["unit of measurement 1", "unit of measurement 2", "..."],
       "meal_preparation_steps": ["preperation step 1", "preperation step 1", "..."]
       },
     {"day": "...",
     ...},
     ...]

On days where the user eats in a restaurant, the output should be:
    {"day": "...",
    "dish_name": "Restaurant",
    "ingredients": [],
    "ingredient_cost_euro": [],
    "ingredient_quantity": [],
    "ingredient_unit_of_measurement": [],
    "meal_preparation_steps": []}

Ensure to write all fractions (1/2, 1/3, 1/4, 1/8) as decimals (0.5, 0.33, 0.25, 0.125) in the "ingredient_quantity" field of the meal plan.

# Example output
user: Provide me with a meal plan for Monday and Tuesday

    [{"day": "Monday",
       "dish_name": "Pasta",
       "ingredients": ["Spagetti", "Tomato", "Olive oil"],
       "ingredient_cost_euro": ["0.5", "1", "0.5"],
       "ingredient_quantity": ["50", "1", "1"],
       "ingredient_unit_of_measurement": ["gram", "piece", "ml"],
       "meal_preparation_steps": ["Cook pasta", "Add pasta sauce"]
       },
     {"day": "Tuesday",
       "dish_name": "Curry",
       "ingredients": ["Curry", "Tomato", "Naan bread"],
       "ingredient_cost_euro": ["1.0", "1.0", "0.5"],
       "ingredient_quantity": ["50", "1", "1"],
       "ingredient_unit_of_measurement": ["gram", "piece", "liters"],
       "meal_preparation_steps": ["Cook curry", "Bake naan bread"]
       }]

        """
    },
    {
       "role": "user", "content": "Provide me with a meal plan for the upcoming week, Monday to Sunday"
    }
  ]

response = client.chat.completions.create(
  model="gpt-3.5-turbo",
  messages=messages,
)

pprint(response.choices[0].message.content)
And let’s try to parse the result.
pd.read_json(response.choices[0].message.content.replace('n', ''))
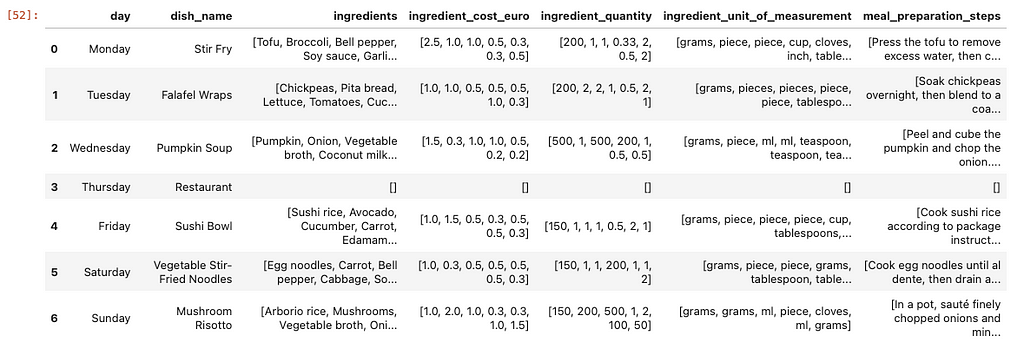
And let’s structure it into a more convenient format.
# first remove all the n characters that are in the response
meal_plan = pd.read_json(response.choices[0].message.content.replace('n', '')) # for some reason it provides the answer transposed.

ingredients = []
ingredients_quantity = []
ingredients_uom = []
ingredients_cost = []

for i, l in meal_plan.iterrows():
    ingredients += l["ingredients"]
    ingredients_quantity += l["ingredient_quantity"]
    ingredients_uom += l["ingredient_unit_of_measurement"]
    ingredients_cost += l["ingredient_cost_euro"]

all_ingredients = (pd.DataFrame({"ingredients": ingredients,
             "ingredients_q": ingredients_quantity,
             "ingredients_uom": ingredients_uom,
             "ingredients_cost": ingredients_cost})
                .astype(dtype= {"ingredients":"string",
             "ingredients_q": "float64",
             "ingredients_uom": "string",
             "ingredients_cost": "float64"}))
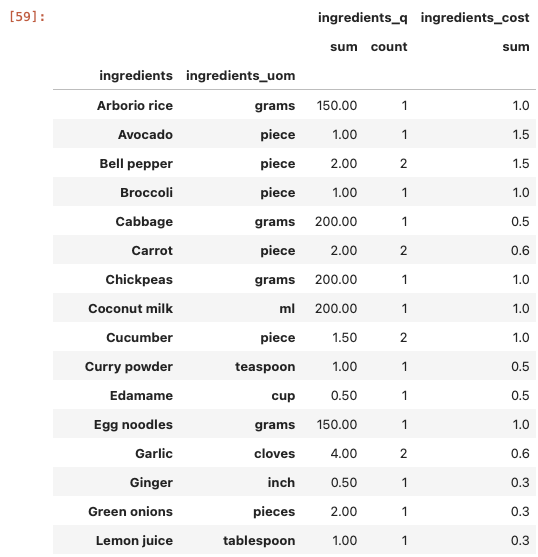
Lastly, let’s sum up the ingredients and quantities.
(all_ingredients
 .groupby(["ingredients", "ingredients_uom"])
 .agg({'ingredients_q': ['sum', 'count'],
       'ingredients_cost': 'sum'})
)
Exercise 4
Try to convert your meal plan created in exercise 3 into a shopping list using the same procedure.
So, there you are; you can go shopping or order the ingredients online. But perhaps the meal plan is not yet completely to your liking. Perhaps you would like it to be more spicy, or the ingredient costs are off, or you like to measure ginger in cm rather than inches. Just like any form of programming, prompting is another iterative process, and iteratively improving your prompts helps to better understand how ChatGPT (or any large language model) behaves and how to steer it to your own liking.
All dates are in dd-mm-YYYY format.
[1] https://langchain.com. Last accessed: 10–05–2024.
[2] https://app.datacamp.com/learn/courses/intro-to-python-for-data-science. Last accessed: 10–05–2024.
[3] https://chatgpt.com. Last accessed: 10–05–2024.
[4] The author of this article takes no responsibility for any cost (expected or unexpected) the reader might have when following the steps in this tutorial.
[5] Maximilian Vogel. (2023). ChatGPT, Next Level: Meet 10 Autonomous AI Agents: Auto-GPT, BabyAGI, AgentGPT, Microsoft Jarvis, ChaosGPT & friends. https://medium.com/the-generator/chatgpts-next-level-is-agent-ai-auto-gpt-babyagi-agentgpt-microsoft-jarvis-friends-d354aa18f21 Last accessed: 11–07–2024.
[6] https://platform.openai.com/docs/guides/prompt-engineering/prompt-engineering. Last accessed: 10–05–2024.
[7] Teo S. (2023). How I Won Singapore’s GPT-4 Prompt Engineering Competition. https://medium.com/towards-data-science/how-i-won-singapores-gpt-4-prompt-engineering-competition-34c195a93d41. Last accessed: 10–05–2024
[8] Xu, Benfeng, et al. (2023). Expertprompting: Instructing large language models to be distinguished experts. arXiv preprint arXiv:2305.14688.
[9] https://python.langchain.com/v0.1/docs/modules/model_io/output_parsers/. Last accessed: 12–07–2024.
[10] https://nos.nl/artikel/2221580-willem-alexander-en-maxima-in-de-keuken-wie-bakt-de-beste-pannenkoeken. Last accessed: 19–09–2024
[11] https://community.openai.com/t/incorrect-count-of-r-characters-in-the-word-strawberry/829618. Last accessed: 20–09–2024
[12] Such as the recent o1-models: https://openai.com/o1/. Last accessed: 23–09–2024
[13] Brown, Tom B. et al. (2020)“Language models are few-shot learners.” arXiv preprint arXiv:2005.14165.
Create Your Own Meal Planner Using ChatGPT was originally published in Towards Data Science on Medium, where people are continuing the conversation by highlighting and responding to this story.
Originally appeared here:
Create Your Own Meal Planner Using ChatGPT
Go Here to Read this Fast! Create Your Own Meal Planner Using ChatGPT


An ultimate guide to the crucial technique behind Large Language Models
Originally appeared here:
Reinforcement Learning from Human Feedback (RLHF) for LLMs
Go Here to Read this Fast! Reinforcement Learning from Human Feedback (RLHF) for LLMs


Originally appeared here:
Control data access to Amazon S3 from Amazon SageMaker Studio with Amazon S3 Access Grants
Feeling inspired to write your first TDS post? We’re always open to contributions from new authors.
In the span of just a few years, AI-powered tools have gone from (relatively) niche products targeting audiences with specialized skill sets to ones that are widely and rapidly adopted—sometimes by organizations that do not fully understand their tradeoffs and limitations.
Such a massive transformation all but ensures missteps, bottlenecks, and pain points. Individuals and teams alike are currently navigating the tricky terrain of an emerging technology that comes with many kinks that are yet to be ironed out.
This week, we’re highlighting several standout posts that address this conundrum with clarity and pragmatism. From handling hallucinations to making the right product choices for specific use cases, they tackle some of AI’s biggest pain points head-on. They might not present perfect solutions for every possible scenario—in some cases, one just doesn’t exist (yet?)—but they can help you approach your own challenges with the right mindset.

If you’re looking for reading recommendations on other data science and ML topics, look no further:
Thank you for supporting the work of our authors! As we mentioned above, we love publishing articles from new authors, so if you’ve recently written an interesting project walkthrough, tutorial, or theoretical reflection on any of our core topics, don’t hesitate to share it with us.
Until the next Variable,
TDS Team
A Close Look at AI Pain Points, and How to (Sometimes) Resolve Them was originally published in Towards Data Science on Medium, where people are continuing the conversation by highlighting and responding to this story.
Originally appeared here:
A Close Look at AI Pain Points, and How to (Sometimes) Resolve Them
Go Here to Read this Fast! A Close Look at AI Pain Points, and How to (Sometimes) Resolve Them


Step up your data storytelling game with these creative and insightful visualizations
Originally appeared here:
Beyond Line and Bar Charts: 7 Less Common But Powerful Visualization Types


Create interactive web app using Bokeh and Streamlit to plot taxi trips within NYC. Visualize and track taxi trips across different pickup…