
Originally appeared here:
Boost Your Python Code with CUDA
How to deliver outsized value on your data quality program
Originally appeared here:
Your Data Quality Checks Are Worth Less (Than You Think)
Go Here to Read this Fast! Your Data Quality Checks Are Worth Less (Than You Think)


This article is the second of a two part series where we use LangGraph and Tavily to build a simple research agent, which writes and refines short articles. To keep track of the plans, articles and comments it generates we add the ability to programmatically create and edit Google Docs. In the first article we built the agent. Now we will build the docs connection. You can find all the relevant code here.
In part 1 of this series we discussed agents, and used tools from LangGraph and Tavily to build a minimal agent that can research, write, review and revise short articles. This is great for a demo, but what if we actually want to read those articles outside of a notebook? Or, more ambitiously, what if we can to make this agent into a tool that might actually be useful to someone learning about a new subject? This has the potential to become a full stack project, but here I will focus on just one interesting element — giving out system the ability to upload essays to Google Docs. Recall that we also save the intermediate steps that the agent takes in getting to the final answer too — probably its worth making a record of those as well.
In response to a question or topic prompt, our agent produces a long list of output. At a minimum, we’d like to dump this into a Google Doc with a title, and timestamp. We’d also like to control where in Google Drive this doc is to be written, and preferably have the option to create and name a folders so that our essays can be stored logically. We won’t focus too much on formatting here — although this is certainly possible using the Google Docs API — we are more interested in just getting the text into a place where someone would actually read it. Formatting could be a follow up, or simply left to the preference of the reader.
Once we have a docs connection set up, there’s a whole host of more advanced things we could do with our essay — what about using an LLM to reformat them for a presentation and uploading that into a Google Slides deck? Or scraping some referenced data source and uploading that to Google Sheets? We could add this functionality as tools inside the control flow of our agent and have it decide what to do. Clearly there’s a lot of options here but its good to start small.
Let’s start by writing some code to interact with Google Docs in some basic ways. Some setup is required first: You will need a Google Cloud account and a new project. You will then need to enable the Google Drive and Google Docs APIs. To create some credentials for this project, we will be using a service account, which can be set up using the instructions here. This process will create a private key in a .json file, which you store on your local machine. Next, it’s a good idea to make a “master folder” for this project in your Google Drive. When that’s done, you can add your service account to this folder and give it write permissions. Now your service account has the authorization to programmatically interact with the contents of that folder.
from google.oauth2 import service_account
from abc import ABC, abstractmethod
from googleapiclient.discovery import build
# path to your .json credentials file
from research_assist.gsuite.base.config import CREDENTIALS
from typing import Any


class GSuiteService(ABC):
    """
    An abstract base class for G Suite services.

    This class defines the structure for any G Suite service implementation,
    requiring subclasses to specify the scopes and service creation logic.

    Attributes:
        credential_path (str): The path to the credentials file.
        SCOPES (list): The scopes required for the service.
    """

    def __init__(self) -> None:
        """
        Initializes the GSuiteService with the credential path and scopes.
        """
        # The name of the file containing your credentials
        self.credential_path = CREDENTIALS
        self.SCOPES = self.get_scopes()

    @abstractmethod
    def get_scopes(self) -> list[str]:
        """
        Retrieves the scopes required for the G Suite service.

        Returns:
            list[str]: A list of scopes required for the service.
        """
        raise NotImplementedError("Subclasses must implement this method.")

    @abstractmethod
    def get_service(self, credentials: Any) -> Any:
        """
        Creates and returns the service object for the G Suite service.

        Args:
            credentials (Any): The credentials to use for the service.

        Returns:
            Any: The service object for the G Suite service.
        """
        raise NotImplementedError("Subclasses must implement this method.")

    def build(self) -> Any:
        """
        Builds the G Suite service using the provided credentials.

        Returns:
            Any: The constructed service object.
        """
        # Get credentials into the desired format
        creds = service_account.Credentials.from_service_account_file(
            self.credential_path, scopes=self.SCOPES
        )

        service = self.get_service(creds)
        return service


class GoogleDriveService(GSuiteService):
    """
    A service class for interacting with Google Drive API.

    Inherits from GSuiteService and implements the methods to retrieve
    the required scopes and create the Google Drive service.

    Methods:
        get_scopes: Returns the scopes required for Google Drive API.
        get_service: Creates and returns the Google Drive service object.
    """

    def get_scopes(self) -> list[str]:
        """
        Retrieves the scopes required for the Google Drive service.

        Returns:
            list[str]: A list containing the required scopes for Google Drive API.
        """
        SCOPES = ["https://www.googleapis.com/auth/drive"]
        return SCOPES

    def get_service(self, creds: Any) -> Any:
        """
        Creates and returns the Google Drive service object.

        Args:
            creds (Any): The credentials to use for the Google Drive service.

        Returns:
            Any: The Google Drive service object.
        """
        return build("drive", "v3", credentials=creds, cache_discovery=False)
The code is set up like this because there are many GSuite APIs (drive, docs, sheets, slides etc) that we might want to use in future. They would all inherit from GSuiteService and have their get_service and get_scopes methods overwritten with the specific details of that API.
Once this is all set up, you’re ready to interact with drive. This is a great article showing some of the main ways of doing so.
In our implementation, the way we’ll interact with drive is via methods of GoogleDriveHelper , which creates an instance of GoogleDriveService on initialization. We start with giving it the name of our master folder
from research_assist.gsuite.drive.GoogleDriveHelper import GoogleDriveHelper

master_folder_name = ai_assistant_research_projects
drive_helper = GoogleDriveHelper(f"{master_folder_name}")
Now let’s say we want to create a project about the Voyager series of space probes, for example. We can get organized by setting up a folder for that inside the master folder:
project_folder_id = drive_helper.create_new_folder("voyager")
This creates the folder and returns its ID, which we can use to create a document there. There might be multiple versions of this project, so we can also make relevant subfolders
version_folder_id = drive_helper.create_new_folder(
  "v1",
  parent_folder_id=project_folder_id
)
Now we’re ready to make a blank document, which we can also do with the drive service
final_report_id = drive_helper.create_basic_document(
    "final report", parent_folder_id=version_folder_id
)
Under the hood, the drive helper is running the following code, which passes some metadata indicating that we want to make a document to the create method of googleapiclient.discovery.build (i.e. what comes out of running GoogleDriveService().build() )
document_metadata = {
            "name": document_name,
            "mimeType": "application/vnd.google-apps.document",
            "parents": [parent_folder_id],
}
# make the document
doc = (
  self.drive_service.files()
  .create(body=document_metadata, fields="id")
  execute()
)
doc_id = doc.get("id")
As you might imagine, the Google Drive API has a lot of different functionality and options that we’re not covering here. The most comprehensive python wrapper for it that I’ve found is this one, which would be a good starting point if you want to explore further.
Now that we’ve made a blank document, let’s fill it with the final essay! This is where the GoogleDocsService and GoogleDocsHelper come in. GoogleDocsService is very similar to GoogleDriveService , and also inherits from GSuiteService as we discussed in section 2. GoogleDocsHelper contains some tools to write text and images to Google Docs. They’re very basic right now, but thats all we need for this project.
We can first use the agent we built in part 1 to write an essay about Voyager
from research_assist.researcher.Agent import ResearchAgent, load_secrets
from langchain_openai import ChatOpenAI
from tavily import TavilyClient

secrets = load_secrets()
model = ChatOpenAI(
    model="gpt-4o-mini", temperature=0, api_key=secrets["OPENAI_API_KEY"]
)
tavily = TavilyClient(api_key=secrets["TAVILY_API_KEY"])

agent = ResearchAgent(llm, tavily)
agent.run_task(
    task_description="The Voyager missions: What did we learn?",
    max_revisions=3

)
Recall that the various outputs of the agent are stored in its memory, which can be explored with the following. In the code, you can see that we’re using “user_id = 1” as a placeholder here, but in an application that has multiple users this id would allow the model to access the correct memory store.
memories = agent.in_memory_store.search(("1", "memories"))
The final report text can be found here, with the key names corresponding to the AgentState that we discussed in part 1. It’s at index -3 because it’s followed by a call to the editor node (which said yes) and the accept node, which right now just returns “True”. The accept node could be easily be extended to actually write this report to a doc automatically.
final_essay = agent.in_memory_store.search(("1", "memories"))[-3].dict()["value"][
    "memory"
]["write"]["draft"]
Let’s see how we can put this text in a google doc. Recall that in section 2 we made a blank document with doc_id . There are two basic methods of GoogleDocsHelper which can do this. The first is designed to provide a title and basic metadata, which is just the date and time at which the document was written. The second will paste some text into the document.
The code shows how to control aspects of the position and formatting of the text, which can be a bit confusing. We define a list of requests containing instructions like insertText . When we insert text, we need to provide the index at which to start the insertion, which corresponds to a position in the document.
def create_doc_template_header(self, document_title: str, doc_id: str) -> int:
     """
     Creates a header template for the document,
     including the title and the current date.

     Args:
         document_title (str): The title of the document.
         doc_id (str): The ID of the document to update.

     Returns:
         int: The index after the inserted header.
     """
     # add template header
     title = f"""
     {document_title}
     """
     template = f"""
     Written on {datetime.date.today()} at {datetime.datetime.now().strftime("%H:%M:%S")}
     """
     requests: List[Dict[str, Any]] = [
            {
                "insertText": {
                    "location": {
                        "index": 1,
                    },
                    "text": template,
                }
            },
            {
                "insertText": {
                    "location": {
                        "index": 1,
                    },
                    "text": title,
                }
            },
            {
                "updateParagraphStyle": {
                    "range": {
                        "startIndex": 1,
                        "endIndex": len(title),
                    },
                    "paragraphStyle": {
                        "namedStyleType": "TITLE",
                        "spaceAbove": {"magnitude": 1.0, "unit": "PT"},
                        "spaceBelow": {"magnitude": 1.0, "unit": "PT"},
                    },
                    "fields": "namedStyleType,spaceAbove,spaceBelow",
                }
            },
            {
                "updateParagraphStyle": {
                    "range": {
                        "startIndex": len(title) + 1,
                        "endIndex": len(title) + len(template),
                    },
                    "paragraphStyle": {
                        "namedStyleType": "SUBTITLE",
                        "spaceAbove": {"magnitude": 1.0, "unit": "PT"},
                        "spaceBelow": {"magnitude": 1.0, "unit": "PT"},
                    },
                    "fields": "namedStyleType,spaceAbove,spaceBelow",
                }
            },
        ]
     result = (
            self.docs_service.documents()
            .batchUpdate(documentId=doc_id, body={"requests": requests})
            .execute()
     )
     end_index = len(title) + len(template) + 1
     return end_index

def write_text_to_doc(self, start_index: int, text: str, doc_id: str) -> int:
     """
     Writes text to the document at the specified index.

     Args:
         start_index (int): The index at which to insert the text.
         text (str): The text to insert.
         doc_id (str): The ID of the document to update.

     Returns:
         int: The index after the inserted text.
     """
     end_index = start_index + len(text) + 1

     requests: List[Dict[str, Any]] = [
            {
                "insertText": {
                    "location": {
                        "index": start_index,
                    },
                    "text": text,
                }
            },
            {
                "updateParagraphStyle": {
                    "range": {
                        "startIndex": start_index,
                        "endIndex": start_index + len(text),
                    },
                    "paragraphStyle": {
                        "namedStyleType": "NORMAL_TEXT",
                        "spaceAbove": {"magnitude": 1.0, "unit": "PT"},
                        "spaceBelow": {"magnitude": 1.0, "unit": "PT"},
                    },
                    "fields": "namedStyleType,spaceAbove,spaceBelow",
                }
            },
        ]

     result = (
            self.docs_service.documents()
            .batchUpdate(documentId=doc_id, body={"requests": requests})
            .execute()
        )

     return end_index
You can learn more about how indices are defined here. When multiple insertText calls, it appears to be easier to write the last piece of text first — for example in the code below template (which is the metadata that’s supposed to appear below the title) appears first in the list at index 1. Then we write title at index 1. This results in title appearing first in the document and template appearing below. Note how we also need to specify the startIndex and endIndex of the paragraphStyle blocks in order to change the formatting of the text.
Both methods in the code above return the end index of the current block of text so that it can be used as the start index of subsequent blocks to be appended. If you intend to get more creative with the style and formatting of documents, this guide will likely help.
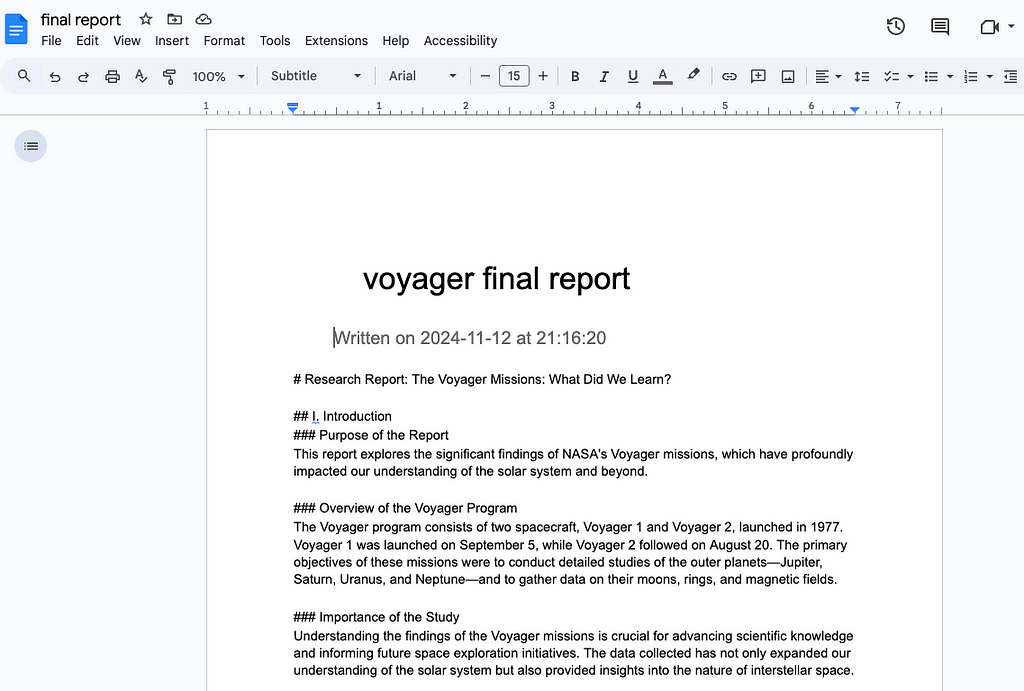
Now that we’ve seen the underlying code, we can call it to write our final report to a document.
from research_assist.gsuite.docs.GoogleDocsHelper import GoogleDocsHelper

docs_helper = GoogleDocsHelper()

# add the document title
title_end_index = docs_helper.create_doc_template_header(
    "voyager final report", doc_id
)

# add the text
doc_end_index = docs_helper.write_text_to_doc(
    start_index=title_end_index, text=final_essay, doc_id=doc_id
)
Great! Now we have all the tools of docs at our disposal to edit, format and share the report that our agent generated. Interestingly, the agent formatted the text as markdown which is supported by Google Docs, but I was unable to find a way to get the document to automatically recognize this and convert the markdown into nice headers and subheaders. No doubt there is a way to do that and it would make the reports look much nicer.
After running the code above, the doc should look something like this.
We should be able to write all the information thats stored in the agent memory to docs, which will allow us to easily browse through the results of each stage. A somewhat hacky way to do this is as follows:
memories = agent.in_memory_store.search(("1", "memories"))
# this is needed because we may call some nodes several times
# and we want to keep track of this so that we can make new documents
# for each call
seen_keys = set()
iterations = defaultdict(int)
# folder id where we want to write the documents
folder_id = f"{folder_id}"
for m in memories:
data = m.dict()["value"]["memory"]
available_keys = data.keys()
node_key = list(available_keys)[0]
unique_node_key = node_key + "_00"
if unique_node_key in seen_keys:
iterations[node_key] += 1
unique_node_key = unique_node_key.replace("_00", "") + "_{:02d}".format(
iterations[node_key]
)
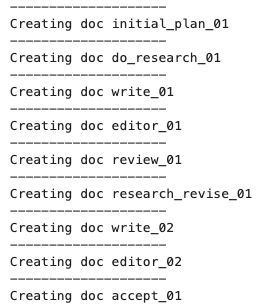
print("-" * 20)
print("Creating doc {}".format(unique_node_key))
# get the text
text = data[node_key][list(data[node_key].keys())[0]]
# the tavily research output is a list, so convert it to a string
if isinstance(text, List):
text = "nn".join(text)
# if anything else is not a string (e.g. the output of the accept node)
# convert it to a string
if not isinstance(text, str):
text = str(text)
# create document
report_id = drive_service.create_basic_document(
unique_node_key, parent_folder_id=folder_id
)
# create header
end_index = docs_helper.create_doc_template_header(unique_node_key, report_id)
# fill document
end_index = docs_helper.write_text_to_doc(
start_index=end_index, text=text, doc_id=report_id
)
seen_keys.add(unique_node_key)
This is going to make 7 documents, and we’ll take a look at some example screenshots below
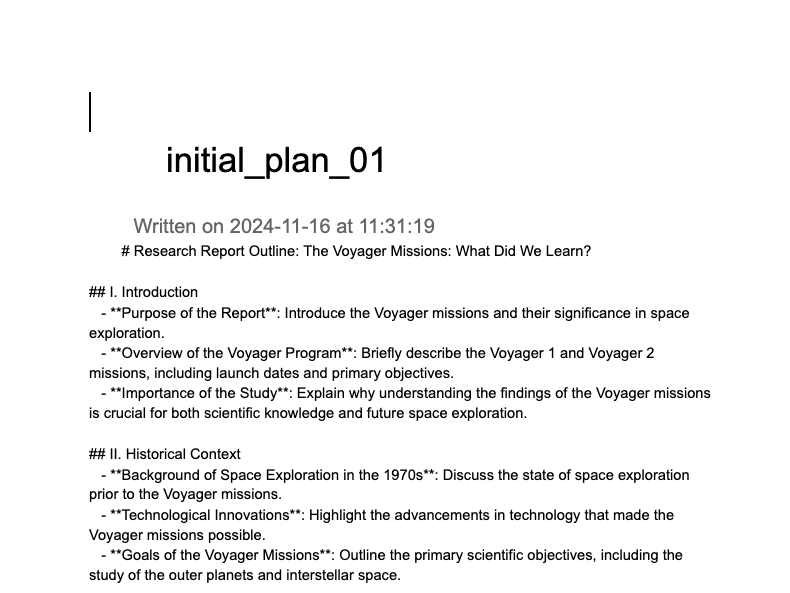
The initial plan outlines the structure of the report. It’s interesting that the model seems to favor lots of short sections, which I think is appropriate given the prompt request to make it concise and digestible to a general readership.
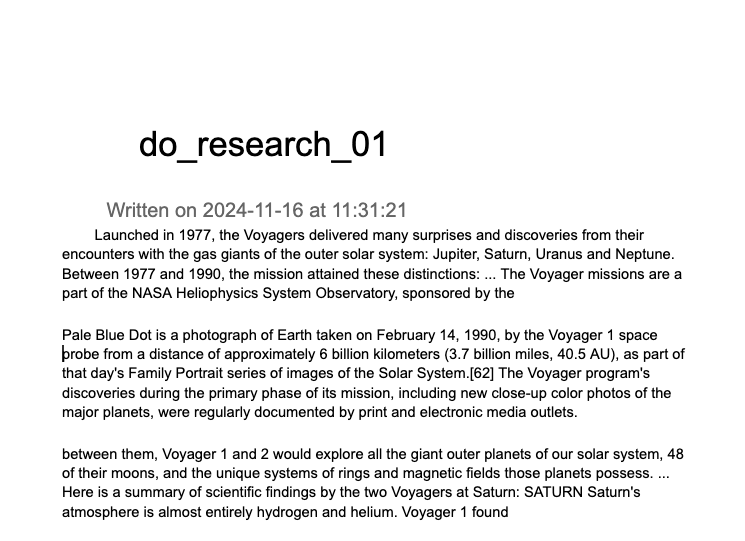
At the research phase, Tavily search is called and returns small chunks of nicely formatted text relevant to the queries that were used. Some of these chunks are truncated and this document is not especially readable, but it gives a good sense of the type of information that is passing from the research node to the write node.
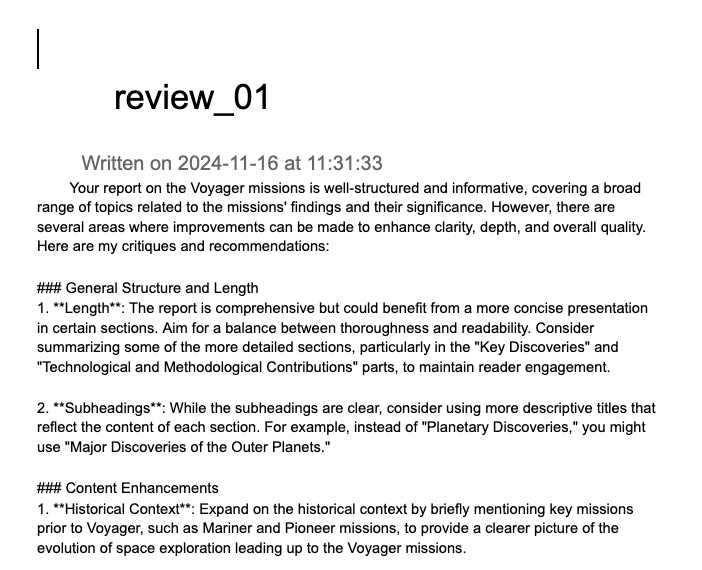
At the review phase, we get an eloquent criticism of the first version of the essay. Typically these reviews are structured similarly to the initial plan and make a lot of very general recommendations such as “consider using more descriptive titles” or “this section could be expanded to include more examples”. If we compare the actual reports before and after the reviews, we typically see only minor changes to the stucture and some additional details in each of the sections. The extent to which this actually improves the quality of the text is debatable, but from trying it out on a few examples I am convinced that it does help.
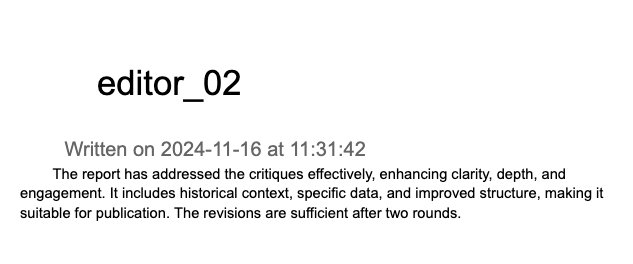
Finally, we get the editor’s judgement on the post-review draft. The prompt I am currently using makes the editor rather lenient, so it usually says something to the effect of whats shown here. With some prompt tweaks we could encourage it to send more reports back to review if desirable.
That’s it for this article and this mini series. Thanks for reading and I hope you find some of this useful for your own projects. There are lots of potential extensions here in terms of making the research agent more robust, a proper evaluation of its outputs and better integrations with Docs (or other GSuite APIs). Please let me know if you have any other cool ideas!
The author is unaffiliated with any of the tools discussed in this article.
Building a Research Assistant That Can Write to Google Docs (Part 2) was originally published in Towards Data Science on Medium, where people are continuing the conversation by highlighting and responding to this story.
Originally appeared here:
Building a Research Assistant That Can Write to Google Docs (Part 2)
Go Here to Read this Fast! Building a Research Assistant That Can Write to Google Docs (Part 2)


This article is the first of a two part series where we use LangGraph and Tavily to build a simple research agent, which writes and refines short articles. To keep track of the plans, articles and comments it generates we add the ability to programmatically create and edit Google Docs. In this article we focus on the agent, leaving the docs connection to the second article. You can find all the relevant code here.
Large Language Models (LLMs) are quickly finding use in all sorts of applications relevant to analysts and researchers, especially when it comes to the extraction, organization and summarization of text information. The community — both commercial and open source — is also making it increasingly easy to build and scale so-called “agentic” applications, in which the LLM assumes the role of a (hopefully) skilled analyst and makes semi-autonomous decisions. In a chatbot application, for example, if the user asks a complex or multi-step query the LLM might need to design a plan of action, correctly query multiple external tools — perhaps calculators, web searchers, vector databases etc — assemble the results and generate an answer.
Systems like this are often said to use the ReAct framework of prompt engineering, which stands for “Reasoning-Action”. Basically, the structure and sequence of prompts forces the LLM to answer the question in very methodical fashion, first by articulating a thought (typically a plan of attack), carrying out an action, then making an observation of the result. In agentic systems, this process can continue iteratively until the LLM decides that it’s come to an acceptable answer.
In this series of articles, we’ll use the LangGraph library and Tavily search tool to build a simple research assistant that demonstrates some of these concepts and might even be useful for those of us looking to generate quick, well written reports about any subject. Our agent will be inspired by the plan -> research -> write -> submit -> review -> revise cycle that happens in peer-reviewed research, and you can take a look at the prompts for these different sections here.
To make the system feel more complete, we’ll also add the ability to automatically add the material generated to a Google Doc, which is explored in part 2. This should be considered as more of an add-on than an integrated component of the agent, but it is interesting in its own right and so could also be read as a stand-alone article.
Before looking at how we can build this assistant and what it means for it to be “agentic”, we should think briefly about what we’d like it to do. The goal is to build a system that can plan and write short, informative articles about a given topic, then improve its own work through review and revision.
Why? Mainly this is just an exploration of technology, but the use of LLMs as semi-autonomous researchers is an active field of investigation and is yielding interesting projects such as GPT-researcher. They have the potential to speed up the work of analysts, students, authors and researchers — though of course if the goal is human learning, there is no substitute for careful reading, note taking and discussion, which AI cannot replace.
LLMs like GPT4, Anthropic Claude Sonnet, Meta Llama 3, Google Gemini Pro etc. can already write great articles out of the box with just a single prompt. However, these LLMs have knowledge cutoffs and so need access to additional tools in order to fetch the latest information, such as news about current events. There are plenty of services — notably tools like Perplexity, ChatGPT (now accessible via chat.com) and Google’s AI overview that already have this ability, but they are geared more towards providing quick summaries than polished research reports.
Here, we’re making the assumption that multiple iterations of review and revision will improve the quality of an article generated by an LLM. This is certainly how it works in human writing. Our assistant will have the following components, each with its own instruction prompt
In our implementation each of these components will be calling the same LLM, namely GPT4o-mini, but in a real application they could just as easily use different, more specialized models.
The output will be a well-written, informative report — preferably with references — that we can programmatically drop into a Google doc for safe keeping. It’s easy to modify the “personality” or our researcher by adapting the prompts. The editor is particularly important, because it’s the gatekeeper for the end of the process. If we make our editor very strict, the system might need to loop through many revisions to get accepted. To what extent will a stricter editor improve the quality of the result? That’s a very interesting question which, as they say, is beyond the scope of the current work!
Our research assistant is based heavily on the example described in this excellent short course about LangGraph. LangGraph is an LLM orchestration library that attempts to make it easier for us to design and build reliable agents. For an in-depth comparison of LangGraph and LangChain, I recommend this excellent article.
What exactly is an agent? It appears that the community has not yet settled on a definition, but at least broadly speaking we might say that an agent is a multi-step system where an LLM is allowed to make meaningful decisions about the outcome. This makes it more complex (and potentially more unpredictable) than a chain, which is just a predefined set of LLM calls one after the other.
In an agent framework, the LLM has some autonomy over how to solve the problem it’s given, perhaps by choosing the appropriate tool to call or deciding when to stop refining a solution once it’s good enough. In that sense the LLM becomes more of the brain of the system, acting more like a human analyst than just an API call. One interesting challenge here is that while agents might be free to make decisions, they are usually embedded within or interact with traditional software systems that require structured inputs and outputs. It’s therefore very important to force the agent to return its answers in the way that these other systems understand, regardless of the decision it makes.
For a more in-depth discussion of agents in the context of LangGraph, this documentation is very helpful. Our research agent will be quite a simple one (partly because I am still learning this material too!) but hopefully could be a stepping stone towards something more sophisticated.
In LangGraph we define the logic of our system as a graph, which consists of nodes and edges. Nodes are where LLM calls are made, and edges pass information from one node to the next. Edges can be conditional, meaning that they can direct information to different nodes depending on what decision is made. Information is passed between nodes in a structured format defined by a state.
Our research assistant has a single stage called AgentState and it looks like this
class AgentState(TypedDict):
    """
    A dictionary representing the state of the research agent.

    Attributes:
        task (str): The description of the task to be performed.
        plan (str): The research plan generated for the task.
        draft (str): The current draft of the research report.
        critique (str): The critique received for the draft.
        content (List[str]): A list of content gathered during research.
        revision_number (int): The current revision number of the draft.
        max_revisions (int): The maximum number of revisions allowed.
        finalized_state (bool): Indicates whether the report is finalized.
    """

    task: str
    plan: str
    draft: str
    critique: str
    content: List[str]
    editor_comment: str
    revision_number: int
    max_revisions: int
    finalized_state: bool
This is where all the information relevant to our problem gets stored, and can be updated by LLM action inside a node of the graph.
Now we can define some nodes. In the code, all the nodes are kept within the AgentNodes class, which is just a way I found helpful to group them. For example the planner node looks like this
    def plan_node(self, state: AgentState) -> Dict[str, str]:
        """
        Generate a research plan based on the current state.

        Args:
            state (AgentState): The current state of the research agent.

        Returns:
            Dict[str, str]: A dictionary containing the generated research plan.
        """
        messages = [
            SystemMessage(content=ResearchPlanPrompt.system_template),
            HumanMessage(content=state["task"]),
        ]
        response = self.model.invoke(messages)
        return {"plan": response.content}
Note how it takes in an AgentState and returns a modification to one of its components, namely the text for the research plan. When this node is run, the plan is updated.
The code inside the node function uses standard LangChain syntax. self.model is an instance of ChatOpenAI, which looks like this
model = ChatOpenAI(
    model="gpt-4o-mini", temperature=0, api_key=secrets["OPENAI_API_KEY"]
)
The prompt consists of a system message from the ResearchPlanPrompt dataclass concatenated with the “task” element of the AgentState, which is the research topic provided by the user. The plan prompt looks like this.
@dataclass
class ResearchPlanPrompt:
    system_template: str = """
    You are an expert writer tasked with creating a high-level outline for a research report.
    Write such an outline for the user-provided topic. Include relevant notes or instructions for each section.
    The style of the research report should be geared towards the educated public. It should be detailed enough to provide
    a good level of understanding of the topic, but not unnecessarily dense. Think of it more like a whitepaper to be consumed
    by a business leader rather than an academic journal article.
    """
Similar nodes need to be made for the following tasks
We need to make a conditional edge in the graph at the editor node: If the editor says yes, we go to the accepted node. If no, we go back to the review node.
To define this logic, we need to make a function to run inside the conditional edge. I have chosen to put this in an AgentEdges class, but this is not a requirement.
 def should_continue(state: AgentState) -> str:
        """
        Determine whether the research process should continue based on the current state.

        Args:
            state (AgentState): The current state of the research agent.

        Returns:
            str: The next state to transition to ("to_review", "accepted", or "rejected").
        """
        # always send to review if editor hasn't made comments yet
        current_editor_comments = state.get("editor_comment", [])
        if not current_editor_comments:
            return "to_review"

        final_state = state.get("finalized_state", False)
        if final_state:
            return "accepted"
        elif state["revision_number"] > state["max_revisions"]:
            logger.info("Revision number > max allowed revisions")
            return "rejected"
        else:
            return "to_review"
In code, the entire graph setup looks like this
from research_assist.researcher.AgentComponents import (
    AgentNodes,
    AgentState,
    AgentEdges,
)
# this is the predefined end node
from langgraph.graph import END

agent = StateGraph(AgentState)
nodes = AgentNodes(model, searcher)
edges = AgentEdges()

## Nodes
agent.add_node("initial_plan", nodes.plan_node)
agent.add_node("write", nodes.generation_node)
agent.add_node("review", nodes.review_node)
agent.add_node("do_research", nodes.research_plan_node)
agent.add_node("research_revise", nodes.research_critique_node)
agent.add_node("reject", nodes.reject_node)
agent.add_node("accept", nodes.accept_node)
agent.add_node("editor", nodes.editor_node)

## Edges
agent.set_entry_point("initial_plan")
agent.add_edge("initial_plan", "do_research")
agent.add_edge("do_research", "write")
agent.add_edge("write", "editor")

## Conditional edges
agent.add_conditional_edges(
  "editor",
  edges.should_continue,
  {"accepted": "accept", "to_review": "review", "rejected": "reject"},
)
agent.add_edge("review", "research_revise")
agent.add_edge("research_revise", "write")
agent.add_edge("reject", END)
agent.add_edge("accept", END)
Before data can flow through a graph, the graph must be compiled. My understanding from the docs is that just runs some simple checks on the structured of the graph and returns a CompiledGraph object, which has methods like stream and invoke.These allow you to pass inputs to the start node, which is defined using set_entry_point in the code above.
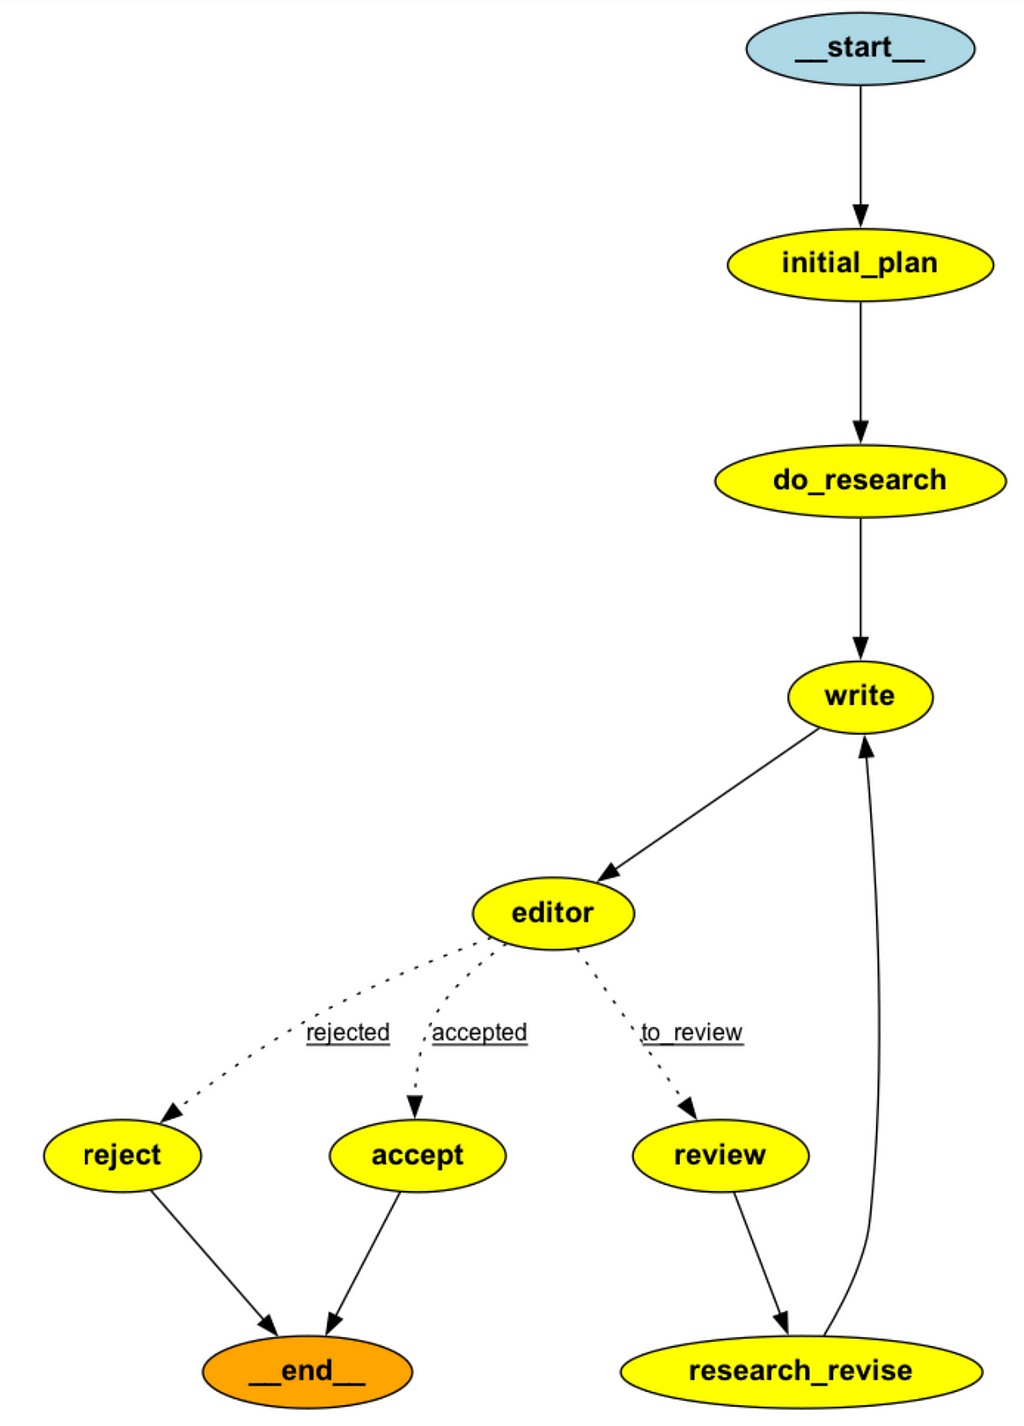
When building these graphs, it can be very helpful to visualize all the nodes and edges in a notebook. This can be done with the following command
from IPython.display import Image

Image(agent.compile().get_graph().draw_png())
LangGraph offers a few different ways of drawing the graph, depending on what visualization package you have installed. I’m using pygraphviz, which can be installed on an m-series mac using the following command
brew install graphviz
pip install -U --no-cache-dir
        --config-settings="--global-option=build_ext"
        --config-settings="--global-option=-I$(brew --prefix graphviz)/include/"
        --config-settings="--global-option=-L$(brew --prefix graphviz)/lib/"
        pygraphviz
How do we test our agent? The simplest way would just be to call invoke with initial values of some of the components of AgentState (i.e. task, max_revisions and revision number), which enter the graph at the entry point node.
graph = agent.compile()
res = graph.invoke(
    {
        "task": "What are the key trends in LLM research and application that you see in 2024",
        "max_revisions": 1,
        "revision_number": 0,
    }
)
After some time (can be several minutes if the max_revisions is set to be large) this will return a dictionary of the agent state with all the components filled in. I’m using gpt4o-mini for this and the results are very impressive, although the extent to which adding the “review” and “editor” components really help to improve the quality of the article could be debated and we’ll return to that in section 3.
What if we want more insight into the inputs and outputs of the nodes at each stage of the graph? This is essential for debugging and explainable as the graph grows or if we’re hoping to deploy something like this in production. Thankfully LangGraph has some great tools here, which are covered under the persistence and streaming sections of its documentation. A minimal implementation looks something like this, where we are using an in memory store to keep track of the updates the come out of each stage of the graph.
from langgraph.store.memory import InMemoryStore
from langgraph.checkpoint.memory import MemorySaver
import uuid

checkpointer = MemorySaver()
in_memory_store = InMemoryStore()
graph = agent.compile(checkpointer=checkpointer, store=self.in_memory_store)

# Invoke the graph
user_id = "1"
config = {"configurable": {"thread_id": "1", "user_id": user_id}}
namespace = (user_id, "memories")

for i, update in enumerate(graph.stream(
  {
     "task": task_description,
     "max_revisions": max_revisions,
     "revision_number": 0,
  }, config, stream_mode="updates"
        )):
   # print the data that just got generated
   print(update)
   memory_id = str(uuid.uuid4())
   # store the data that just got generated in memory
   self.in_memory_store.put(namespace, memory_id, {"memory": update})
   results.append(update)
More sophisticated applications would access the store from inside the nodes themselves, allowing a chatbot to recall previous conversations with a given user for example. Here we’re just using the memory to save the outputs of each of the nodes, which can then be viewed for debugging purposes. We’ll explore that a bit more in the final section.
Perhaps the most interesting parts of the control flow above are the do_researchand research_revise nodes. Inside both of these nodes we are using an LLM to generate some web search queries relevant to the task, and then we’re using the Tavily API to actually conduct the search. Tavily is a relatively new service that offers a search engine optimized for AI agents. Practically what this means is that the service returns search results as chunks of relevant text from websites, rather than just a list of urls (which would need to be scraped and parsed) as in the case of typical search engine APIs.
Under the hood, Tavily is likely using web scrapers and LLMs to extract content relevant to the user’s search, but all of that is abstracted away. You can sign up here for Tavily’s free “Researcher” plan which gives 1000 free API calls. Unfortunately after that you’d need to pay a monthly fee to keep using it, which is likely only worth it for business use cases.
Lets see an example using the code very similar to what’s going on inside AgentNodes.research_plan_node
from langchain_core.messages import (
    SystemMessage,
    HumanMessage,
)
from research_assist.researcher.prompts import (
    ResearchPlanPrompt,
)
from langchain_openai import ChatOpenAI
from tavily import TavilyClient

class Queries(BaseModel):
    """
    A model representing a list of search queries.

    Attributes:
        queries (List[str]): A list of search queries to be executed.
    """

    queries: List[str]

# set up task
task = """
What are the key trends in LLM reseach and application that you see in 2024
"""

# set up LLM and Tavily
model = ChatOpenAI(
    model="gpt-4o-mini", temperature=0, api_key=secrets["OPENAI_API_KEY"]
)
tavily = TavilyClient(api_key=secrets["TAVILY_API_KEY"])

# generate some queries relevant to the task
queries = agent.nodes.model.with_structured_output(Queries).invoke(
            [
                SystemMessage(content=ResearchPlanPrompt.system_template),
                HumanMessage(content=task),
            ]
)
This generates 5 search queries relevant to the task we defined, which look like this
['key trends in LLM research 2024',
 'LLM applications 2024',
 'latest developments in LLM technology 2024',
 'future of LLMs 2024',
 'LLM research advancements 2024']
Next we can call Tavily search on each of these queries
response = tavily.search(query=queries[0], max_results=2)
This provides a nicely formatted result with url, title and text chunk.

This is a very powerful and easy to use search tool that can give LLM applications access to the web without the need for extra work!
In our researcher agent, we’re currently only using the content field, which we extract and append to a list which is passed into the AgentState. That information then gets injected into the prompt thats used for the writer node, hence allowing the LLM to have access to it when generating the report.
There is a lot more you can do with Tavily search, but be aware that experimenting with it will quickly burn through your free API calls. In fact, for our report writing task there are many applications where Tavily calls probably aren’t necessary (i.e. the LLM already has sufficient knowledge to write the report), so I would recommend adding an additional conditional edge that allows the system to bypass the do_research and research_revise nodes if it determines that a web search is not needed. I will likely update the repo with this change soon.
To solidify everything we just learned, let’s walk through an example of the researcher in action, using the same task as above.
First, we import the libraries and set up our LLM and searcher models
from research_assist.researcher.Agent import ResearchAgent, load_secrets
from langchain_openai import ChatOpenAI
from tavily import TavilyClient

secrets = load_secrets()
model = ChatOpenAI(
    model="gpt-4o-mini", temperature=0, api_key=secrets["OPENAI_API_KEY"]
)
tavily = TavilyClient(api_key=secrets["TAVILY_API_KEY"])

agent = ResearchAgent(model, tavily)
Now we can run the agent on a task and give it a maximum number of revisions.
task = """
What are the key trends in LLM reseach and application that you see in 2024
"""
result = agent.run_task(task_description=task,max_revisions=3)
Now the agent will run its task, which might take about a minute. Logging has been added to show what it’s doing and importantly, the results are being saved to the in_memory_store , which we saw at the end of section 2.
The final report is accessible in a few ways. Its stored in the result list and can be visualized in a notebook like this
Markdown(result[-3]['write']['draft'])
Its also stored in the agent’s memory along with all the other outputs. We can access it as follows
agent.in_memory_store.search(("1", "memories"))[-3].dict()
The report itself is about 1300 words long — a bit too much to copy here — but I’ve pasted it into the repo here. We can also take a look at what the editor thought of it after one round of revision
editor_comments = agent.in_memory_store.search(("1", "memories"))[-2].dict()
{'value': {'memory': {'editor': {'editor_comment':
'The report has addressed the critiques by enhancing depth in key sections,
adding clarity, and improving structure with subheadings.
It provides specific examples and discusses ethical considerations,
making it a valuable resource. The revisions are sufficient for publication.',
    'finalized_state': True}}},
 'key': '9005ad06-c8eb-4c6f-bb94-e77f2bc867bc',
 'namespace': ['1', 'memories'],
 'created_at': '2024-11-11T06:09:46.170263+00:00',
 'updated_at': '2024-11-11T06:09:46.170267+00:00'}
It seems the editor was satisfied!
For debugging purposes, we probably need to read though all the other outputs though. This can be painful to do in a notebook so in the next article we’ll discuss how they can be programmatically dropped into Google Docs. Thanks for making it to the end and we’ll pick up in part 2!
The author is unaffiliated with any of the tools discussed in this article.
Building a Research Agent That Can Write to Google Docs (Part 1) was originally published in Towards Data Science on Medium, where people are continuing the conversation by highlighting and responding to this story.
Originally appeared here:
Building a Research Agent That Can Write to Google Docs (Part 1)
Go Here to Read this Fast! Building a Research Agent That Can Write to Google Docs (Part 1)

Originally appeared here:
Unify structured data in Amazon Aurora and unstructured data in Amazon S3 for insights using Amazon Q


Originally appeared here:
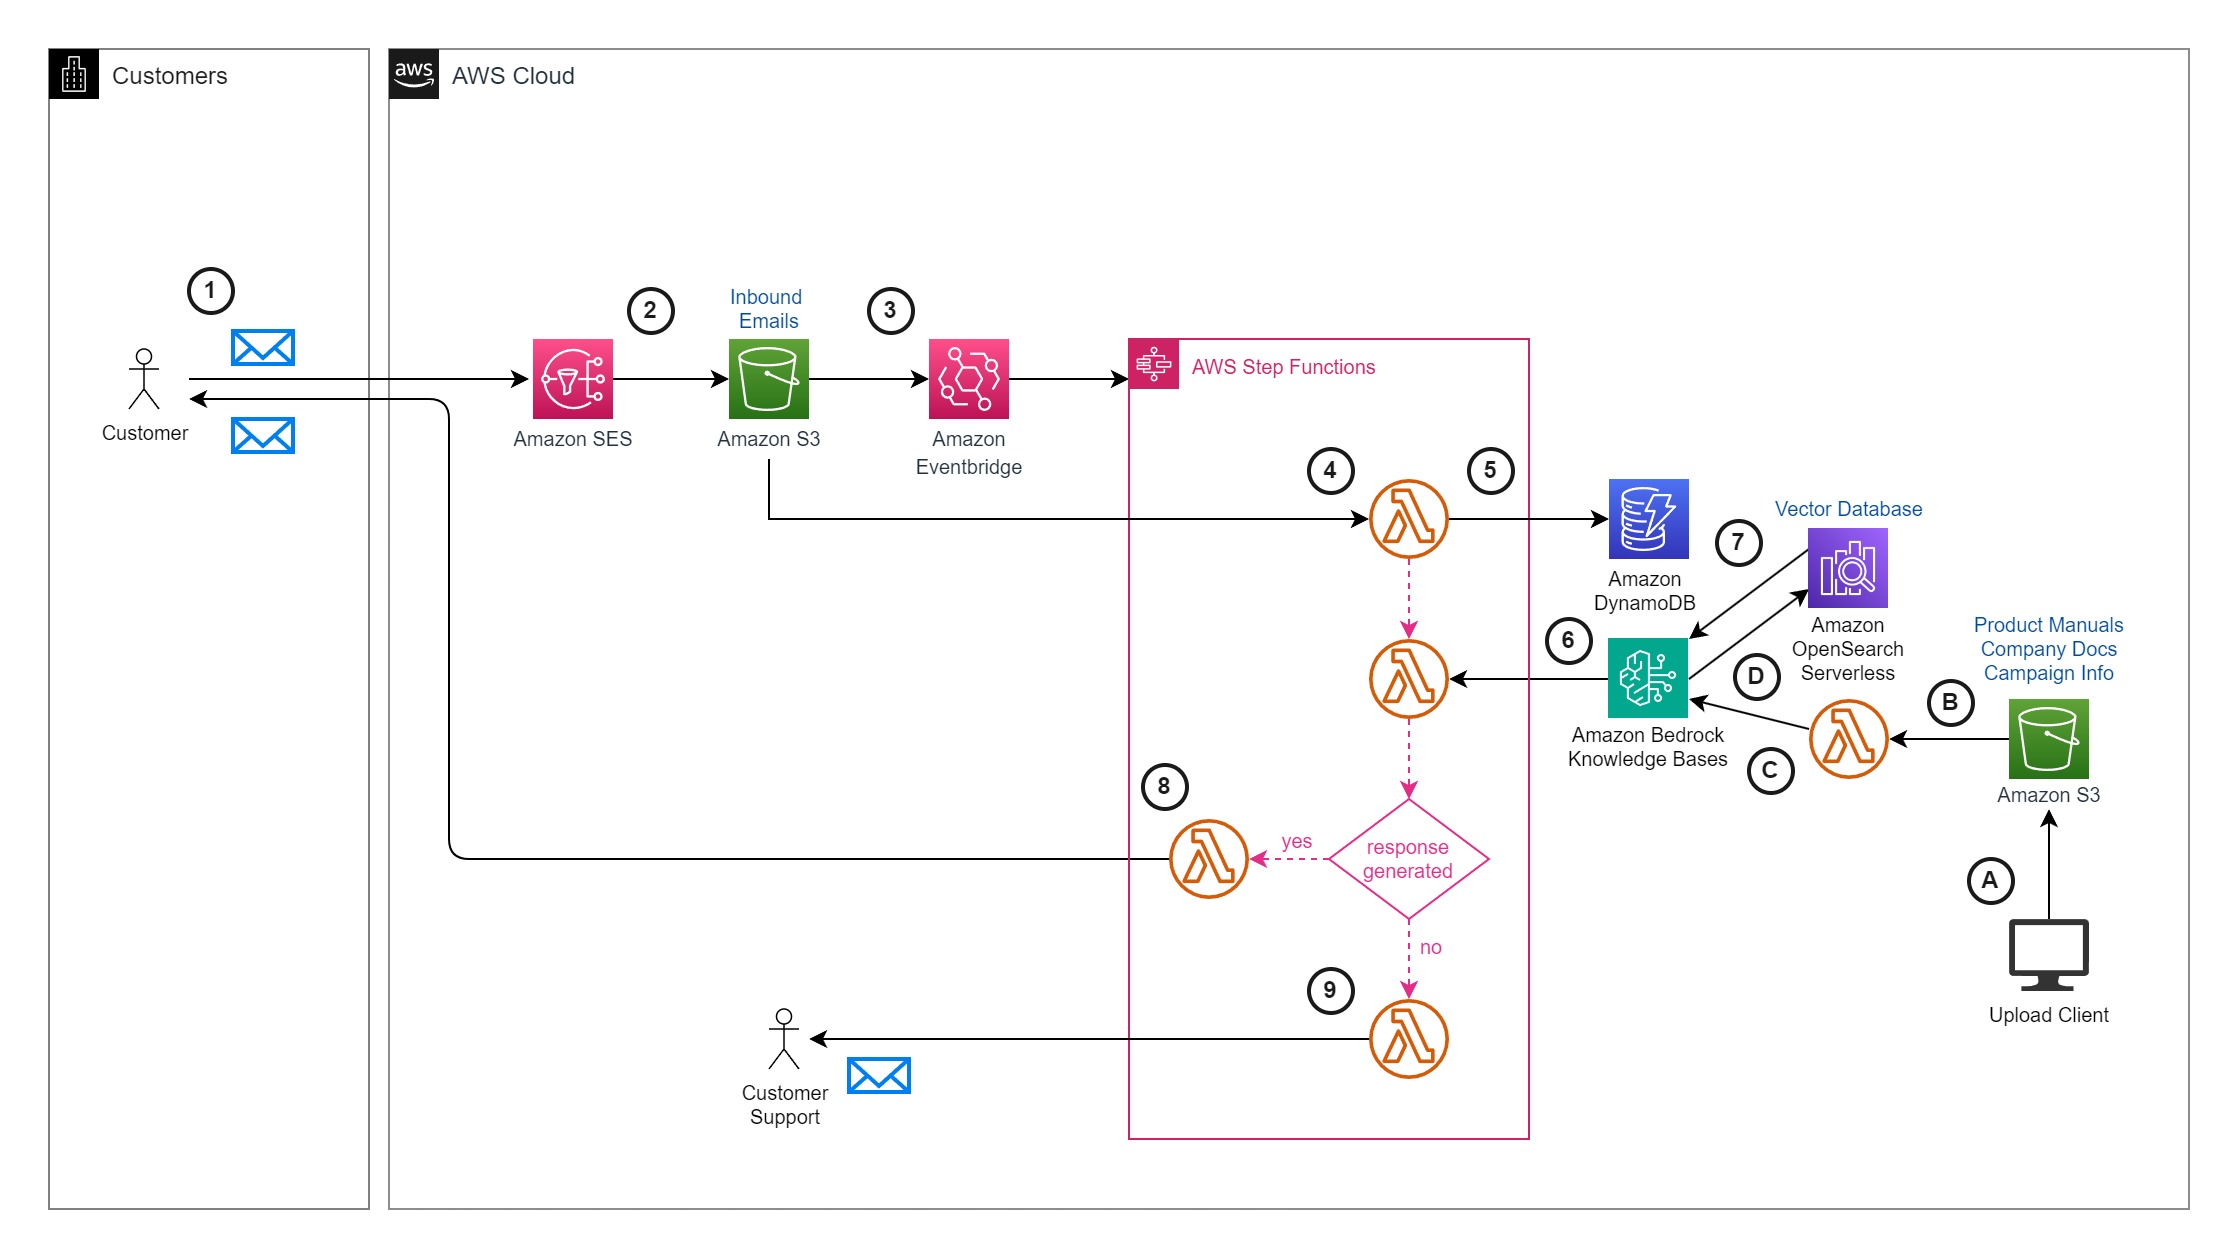
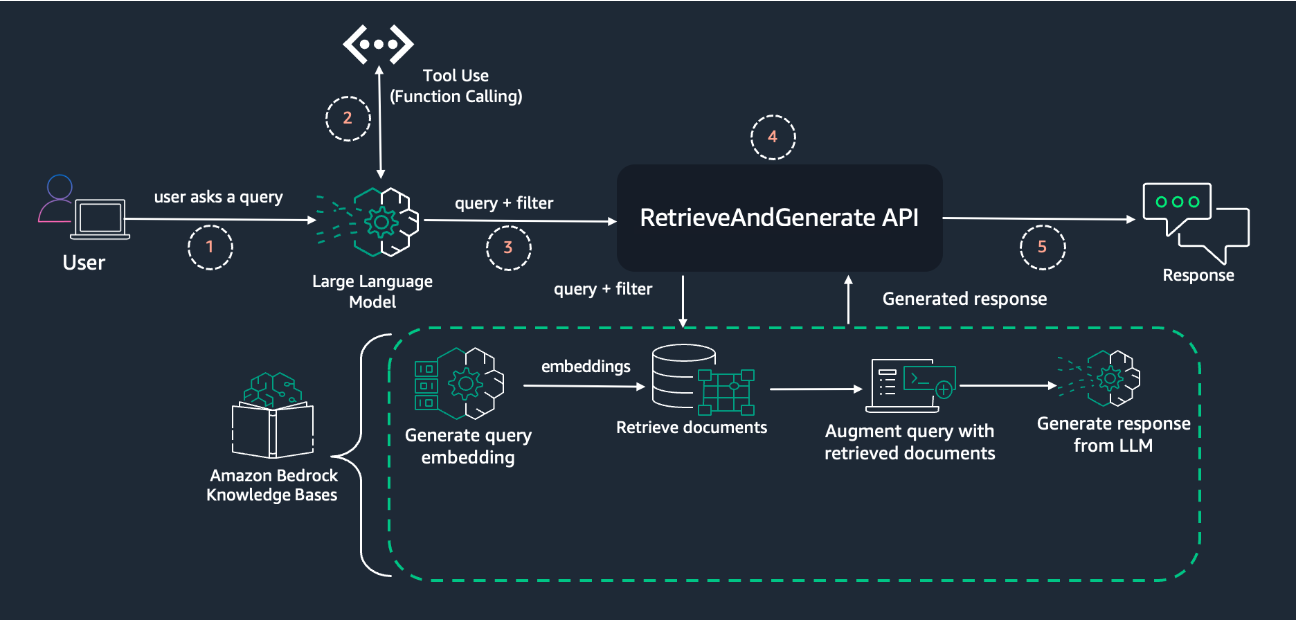
Streamline RAG applications with intelligent metadata filtering using Amazon Bedrock


Originally appeared here:
Embedding secure generative AI in mission-critical public safety applications

Originally appeared here:
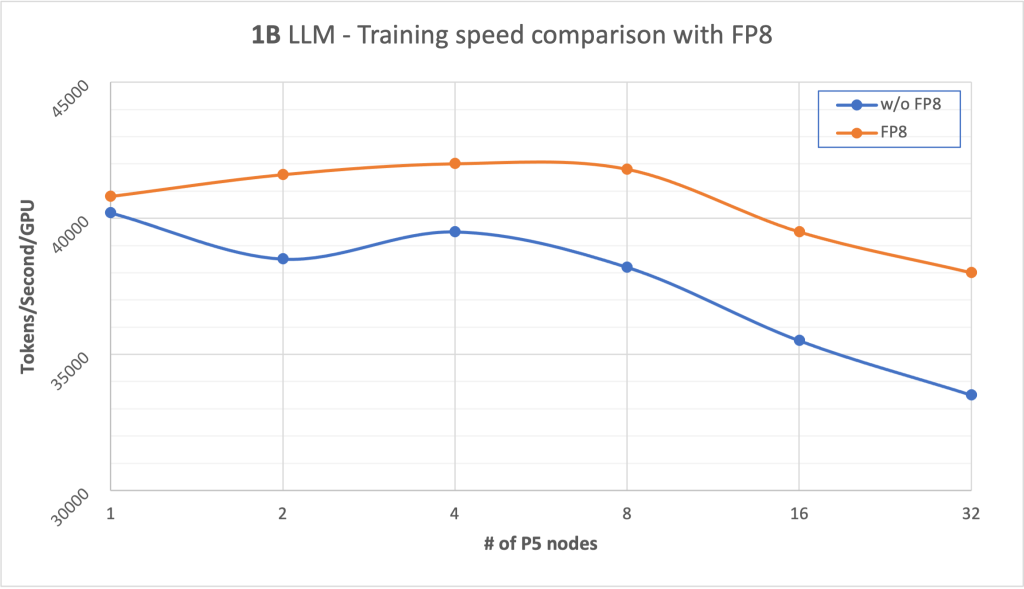
How FP8 boosts LLM training by 18% on Amazon SageMaker P5 instances
Go Here to Read this Fast! How FP8 boosts LLM training by 18% on Amazon SageMaker P5 instances