
How I used Google Mesop, Django, LangChain Agents, CO-STAR & Chain-of-Thought (CoT) prompting combined with the Jira API to better automate Jira

The inspiration for this project came from hosting a Jira ticket creation tool on a web application I had developed for internal users. I also added automated Jira ticket creation upon system errors.
Users and system errors often create similar tickets, so I wanted to see if the reasoning capabilities of LLMs could be used to automatically triage tickets by linking related issues, creating user stories, acceptance criteria, and priority.
Additionally, giving users and product/managerial stakeholders easier access to interact directly with Jira in natural language without any technical competencies was an interesting prospect.
Jira has become ubiquitous within software development and is now a leading tool for project management.
Concretely, advances in Large Language Model (LLM) and agentic research would imply there is an opportunity to make significant productivity gains in this area.
Jira-related tasks are a great candidate for automation since; tasks are in the modality of text, are highly repetitive, relatively low risk and low complexity.
In the article below, I will present my open-source project — AI Jira Assistant: a chat interface to interact with Jira via an AI agent, with a custom AI agent tool to triage newly created Jira tickets.
All code has been made available via the GitHub repo at the end of the article.
The project makes use of LangChain agents, served via Django (with PostgreSQL) and Google Mesop. Services are provided in Docker to be run locally.
The prompting strategy includes a CO-STAR system prompt, Chain-of-Thought (CoT) reasoning with few-shot prompting.
This article will include the following sections.
- Definitions
- Mesop interface: Streamlit or Mesop?
- Django REST framework
- Custom LangChain agent tool and prompting
- Jira API examples
- Next steps
1. Definitions
Firstly, I wanted to cover some high-level definitions that are central to the project.
AI Jira Assistant
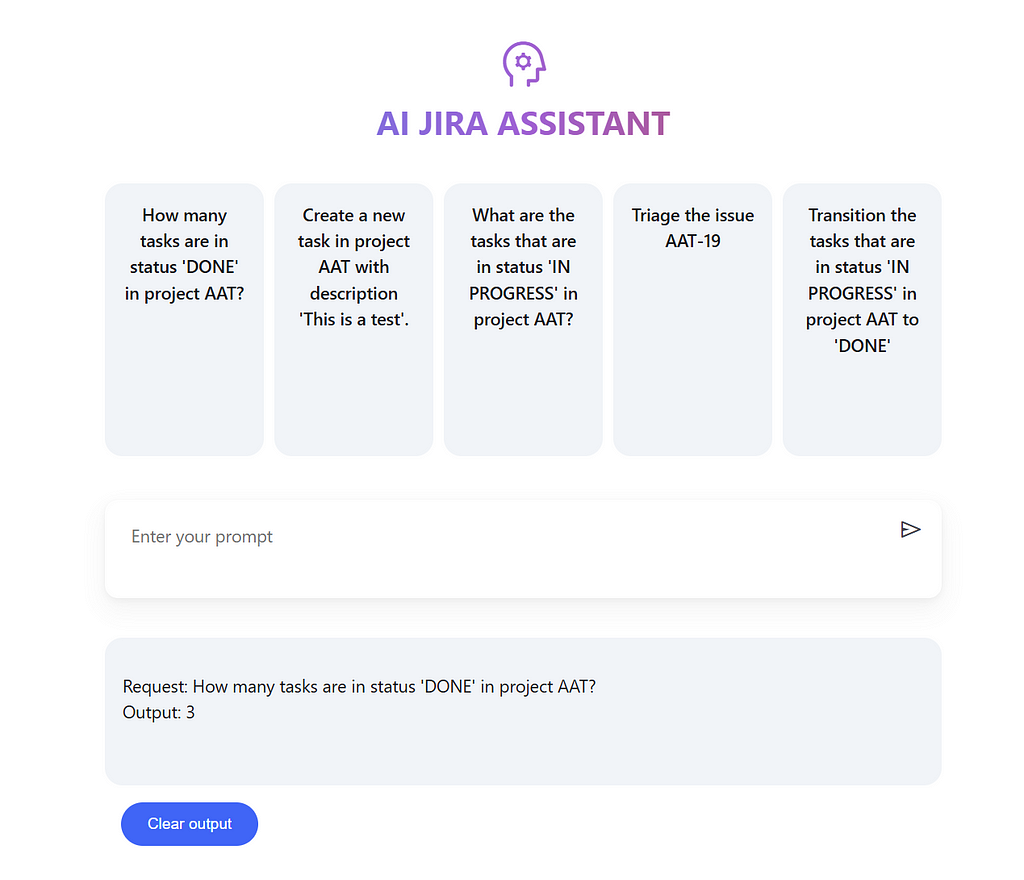
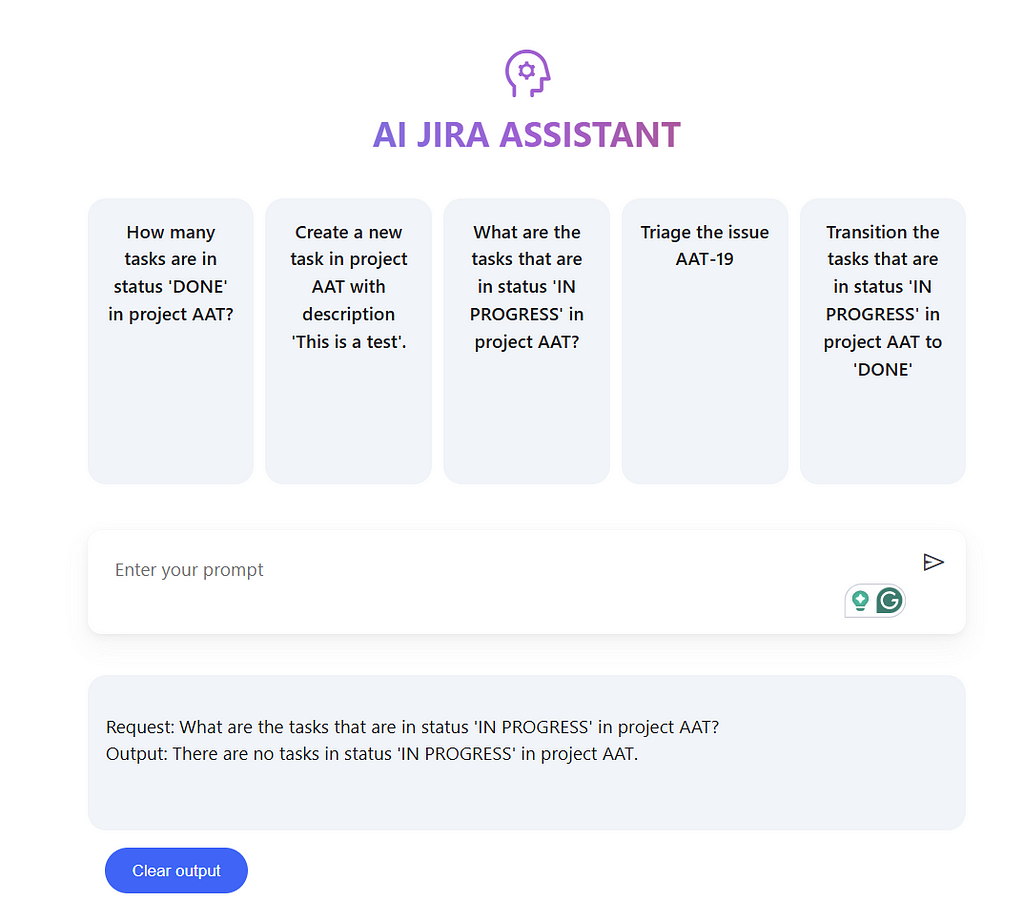
The open source project presented here, when ran locally looks as the below.
Including a chat interface for user prompts, example prompts to pre-populate the chat interface, a box for displaying model responses and a button to clear model responses.
Code snippets for the major technical challenges throughout the project are discussed in detail.
What is Google Mesop?
Mesop is a relatively recent (2023) Python web framework used at Google for rapid AI app development.
“Mesop provides a versatile range of 30 components, from low-level building blocks to high-level, AI-focused components. This flexibility lets you rapidly prototype ML apps or build custom UIs, all within a single framework that adapts to your project’s use case.” — Mesop Homepage
What is an AI Agent?
The origins of the Agent software paradigm comes from the word Agency, a software program that can observe its environment and act upon it.
“An artificial intelligence (AI) agent is a software program that can interact with its environment, collect data, and use the data to perform self-determined tasks to meet predetermined goals.
Humans set goals, but an AI agent independently chooses the best actions it needs to perform to achieve those goals.
AI agents are rational agents. They make rational decisions based on their perceptions and data to produce optimal performance and results.
An AI agent senses its environment with physical or software interfaces.” — AWS Website
What is CO-STAR prompting?
This is a guide to the formatting of prompts such that the following headers are included; context, objective, style, tone, audience and response. This is widely accepted to improve model output for LLMs.
“The CO-STAR framework, a brainchild of GovTech Singapore’s Data Science & AI team, is a handy template for structuring prompts.
It considers all the key aspects that influence the effectiveness and relevance of an LLM’s response, leading to more optimal responses.” — Sheila Teo’s Medium Post
What is Chain-of-Thought (CoT) prompting?
Originally proposed in a Google paper; Wei et al. (2022). Chain-of-Thought (CoT) prompting means to provide few-shot prompting examples of intermediate reasoning steps. Which was proven to improve common-sense reasoning of the model output.
What is Django?
Django is one of the more sophisticated widely used Python frameworks.
“Django is a high-level Python web framework that encourages rapid development and clean, pragmatic design. It’s free and open source.” — Django Homepage
What is LangChain?
LangChain is one of the better know open source libraries for supporting a LLM applications, up to and including agents and prompting relevant to this project.
“LangChain’s flexible abstractions and AI-first toolkit make it the #1 choice for developers when building with GenAI.
Join 1M+ builders standardizing their LLM app development in LangChain’s Python and JavaScript frameworks.” — LangChain website
2. Mesop interface: Streamlit or Mesop?

I have used Streamlit extensively professionally for hosting Generative AI applications, an example of my work can be found here.
At a high level, Streamlit is a comparable open-source Python web framework
For more on Streamlit, please see my other Medium article where it is discussed at length.
AI Grant Application Writer — AutoGen, PostgreSQL RAG, LangChain, FastAPI and Streamlit
This was the first opportunity to use Mesop in anger — so I thought a comparison might be useful.
Mesop is designed to give more fine-grained control over the CSS styling of components and natively integrates with JS web comments. Mesop also has useful debugging tools when running locally. I would also say from experience that the multi-page app functionality is easier to use.
However, this does mean that there is a larger barrier to entry for say machine learning practitioners less well-versed in CSS styling (myself included). Streamlit also has a larger community for support.
From the code snippet, we can set up different page routes. The project only contains two pages. The main page and an error page.
import mesop as me

# local imports
try:
    from .utils import ui_components
except Exception:
    from utils import ui_components

@me.page(path="/")
def page(security_policy=me.SecurityPolicy(dangerously_disable_trusted_types=True)):
    with me.box(
        style=me.Style(
            background="#fff",
            min_height="calc(100% - 48px)",
            padding=me.Padding(bottom=16),
        )
    ):
        with me.box(
            style=me.Style(
                width="min(800px, 100%)",
                margin=me.Margin.symmetric(horizontal="auto"),
                padding=me.Padding.symmetric(
                    horizontal=16,
                ),
            )
        ):
            ui_components.header_text()
            ui_components.example_row()
            ui_components.chat_input()
            ui_components.output()
            ui_components.clear_output()
    ui_components.footer()

@me.page(path="/error")
def error(security_policy=me.SecurityPolicy(dangerously_disable_trusted_types=True)):
    with me.box(
        style=me.Style(
            background="#fff",
            min_height="calc(100% - 48px)",
            padding=me.Padding(bottom=16),
        )
    ):
        with me.box(
            style=me.Style(
                width="min(720px, 100%)",
                margin=me.Margin.symmetric(horizontal="auto"),
                padding=me.Padding.symmetric(
                    horizontal=16,
                ),
            )
        ):
            ui_components.header_text()
            ui_components.render_error_page()
    ui_components.footer()
The error page includes a button to redirect to the homepage.
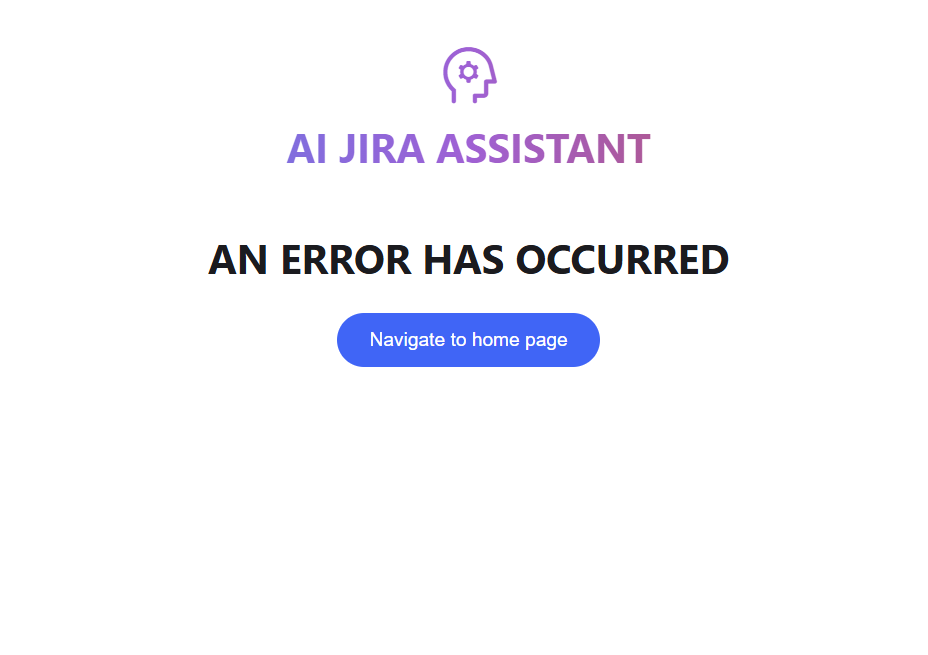
The code to trigger the redirect to the homepage is included here.
def navigate_home(event: me.ClickEvent):
    me.navigate("/")

def render_error_page():
    is_mobile = me.viewport_size().width < 640
    with me.box(
        style=me.Style(
            position="sticky",
            width="100%",
            display="block",
            height="100%",
            font_size=50,
            text_align="center",
            flex_direction="column" if is_mobile else "row",
            gap=10,
            margin=me.Margin(bottom=30),
        )
    ):
        me.text(
            "AN ERROR HAS OCCURRED",
            style=me.Style(
                text_align="center",
                font_size=30,
                font_weight=700,
                padding=me.Padding.all(8),
                background="white",
                justify_content="center",
                display="flex",
                width="100%",
            ),
        )
        me.button(
            "Navigate to home page",
            type="flat",
            on_click=navigate_home
        )
We must also create the State class, this allows data to persist within the event loop.
import mesop as me

@me.stateclass
class State:
    input: str
    output: str
    in_progress: bool
To clear the model output from the interface, we can then assign the output variable to an empty string. There are also different button supported types, as of writing are; default, raised, flat and stroked.
def clear_output():
    with me.box(style=me.Style(margin=me.Margin.all(15))):
        with me.box(style=me.Style(display="flex", flex_direction="row", gap=12)):
            me.button("Clear output", type="flat", on_click=delete_state_helper)

def delete_state_helper(ClickEvent):
    config.State.output = ""
To automatically populate the chat interface with the example prompts provided, we use the button onclick event, by updating the state.
def example_row():
    is_mobile = me.viewport_size().width < 640
    with me.box(
        style=me.Style(
            display="flex",
            flex_direction="column" if is_mobile else "row",
            gap=10,
            margin=me.Margin(bottom=40),
        )
    ):
        for example in config.EXAMPLE_PROMPTS:
            prompt_box(example, is_mobile)

def prompt_box(example: str, is_mobile: bool):
    with me.box(
        style=me.Style(
            width="100%" if is_mobile else 200,
            height=250,
            text_align="center",
            background="#F0F4F9",
            padding=me.Padding.all(16),
            font_weight=500,
            line_height="1.5",
            border_radius=16,
            cursor="pointer",
        ),
        key=example,
        on_click=click_prompt_box,
    ):
        me.text(example)

def click_prompt_box(e: me.ClickEvent):
    config.State.input = e.key
Similarly, to send the request to the Django service we use the code snippet below. We use a Walrus Operator (:=) to determine if the request has received a valid response as not None (status code 200) and append the output to the state so it can be rendered in the UI, otherwise we redirect the user to the error page as previously discussed.
def chat_input():
    with me.box(
        style=me.Style(
            padding=me.Padding.all(8),
            background="white",
            display="flex",
            width="100%",
            border=me.Border.all(me.BorderSide(width=0, style="solid", color="black")),
            border_radius=12,
            box_shadow="0 10px 20px #0000000a, 0 2px 6px #0000000a, 0 0 1px #0000000a",
        )
    ):
        with me.box(
            style=me.Style(
                flex_grow=1,
            )
        ):
            me.native_textarea(
                value=config.State.input,
                autosize=True,
                min_rows=4,
                placeholder="Enter your prompt",
                style=me.Style(
                    padding=me.Padding(top=16, left=16),
                    background="white",
                    outline="none",
                    width="100%",
                    overflow_y="auto",
                    border=me.Border.all(
                        me.BorderSide(style="none"),
                    ),
                ),
                on_blur=textarea_on_blur,
            )
        with me.content_button(type="icon", on_click=click_send):
            me.icon("send")

def click_send(e: me.ClickEvent):
    if not config.State.input:
        return
    config.State.in_progress = True
    input = config.State.input
    config.State.input = ""
    yield

    if result := api_utils.call_jira_agent(input):
        config.State.output += result
    else:
        me.navigate("/error")

    config.State.in_progress = False
    yield

def textarea_on_blur(e: me.InputBlurEvent):
    config.State.input = e.value
For completeness, I have provided the request code to the Django endpoint for running the AI Jira Agent.
import requests

# local imports
from . import config

def call_jira_agent(request):
    try:
        data = {"request": request}
        if (response := requests.post(f"{config.DJANGO_URL}api/jira-agent/", data=data)) and
        (response.status_code == 200) and
        (output := response.json().get("output")):
            return f"Request: {request}<br>Output: {output}<br><br>"
    except Exception as e:
        print(f"ERROR call_jira_agent: {e}")
For this to run locally, I have included the relevant Docker and Docker compose files.
This Docker file for running Mesop was provided via the Mesop project homepage.
The Docker compose file consists of three services. The back-end Django application, the front-end Mesop application and a PostgreSQL database instance to be used in conjunction with the Django application.
I wanted to call out the environment variable being passed into the Mesop Docker container, PYTHONUNBUFFERED=1 ensures Python output, stdout, and stderr streams are sent to the terminal. Having used the recommended Docker image for Mesop applications it took me some time to determine the root cause of not seeing any output from the application.
The DOCKER_RUNNING=true environment variable is a convention to simply determine if the application is being run within Docker or for example within a virtual environment.
It is important to point out that environment variables will be populated via the config file ‘config.ini’ within the config sub-directory referenced by the env_file element in the Docker compose file.
To run the project, you must populate this config file with your Open AI and Jira credentials.
3. Django REST framework

Django is a Python web framework with lots of useful functionality out of the box.
It is comparable to frameworks such as Flask or FastAPI, though does require some additional setup and a steeper learning curve to get started.
If you want to learn more about Flask, please see my article below.
Canal Boat Pricing With Catboost Machine Learning
In this article, I will cover apps, models, serializers, views and PostgreSQL database integration.
An app is a logically separated web application that has a specific purpose.
In our instance, we have named the app “api” and is created by running the following command.
django-admin startapp api
Within the views.py file, we define our API endpoints.
“A view function, or view for short, is a Python function that takes a web request and returns a web response. This response can be the HTML contents of a web page, or a redirect, or a 404 error, or an XML document, or an image . . . or anything, really. The view itself contains whatever arbitrary logic is necessary to return that response.” — Django website
The endpoint routes to Django views are defined in the app urls.py file as below. The urls.py file is created at the initialization of the app. We have three endpoints in this project; a health check endpoint, an endpoint for returning all records stored within the database and an endpoint for handling the call out to the AI agent.
The views are declared classes, which is the standard convention within Django. Please see the file in its completeness.
Most of the code is self-explanatory though this snippet is significant as it will saves the models data to the database.
modelRequest = models.ModelRequest(request=request, response=response)
modelRequest.save()
The snippet below returns all records in the DB from the ModelRequest model, I will cover models next.
class GetRecords(APIView):
    def get(self, request):
        """Get request records endpoint"""
        data = models.ModelRequest.objects.all().values()
        return Response({'result': str(data)})
“A model is the single, definitive source of information about your data. It contains the essential fields and behaviors of the data you’re storing. Generally, each model maps to a single database table.” — Django website
Our model for this project is simple as we only want to store the user request and the final model output, both of which are text fields.
The __str__ method is a common Python convention which for example, is called by default in the print function. The purpose of this method is to return a human-readable string representation of an object.
The serializer maps fields from the model to validate inputs and outputs and turn more complex data types in Python data types. This can be seen in the views.py detailed previously.
“A ModelSerializer typically refers to a component of the Django REST framework (DRF). The Django REST framework is a popular toolkit for building Web APIs in Django applications. It provides a set of tools and libraries to simplify the process of building APIs, including serializers.
The ModelSerializer class provides a shortcut that lets you automatically create a Serializer class with fields that correspond to the Model fields.
The ModelSerializer class is the same as a regular Serializer class, except that:
It will automatically generate a set of fields for you, based on the model.
It will automatically generate validators for the serializer, such as unique_together validators.
It includes simple default implementations of .create() and .update().” — Geeks for geeks
The complete serializers.py file for the project is as follows.
For the PostgreSQL database integration, the config within the settings.py file must match the databse.ini file.
The default database settings must be changed to point at the PostgreSQL database, as this is not the default database integration for Django.
DATABASES = {
    'default': {
        'ENGINE': 'django.db.backends.postgresql_psycopg2',
        'NAME': 'vectordb',
        'USER': 'testuser',
        'PASSWORD': 'testpwd',
        'HOST': 'db' if DOCKER_RUNNING else '127.0.0.1',
        'PORT': '5432',
    }
}
The database.ini file defines the config for the PostgreSQL database at initialization.
To ensure database migrations are applied once the Docker container has been run, we can use a bash script to apply the migrations and then run the server. Running migrations automatically will mean that the database is always modified with any change in definitions within source control for Django, which saves time in the long run.
The entry point to the Dockerfile is then changed to point at the bash script using the CMD instruction.
4. Custom LangChain agent tool and prompting

I’m using the existing LangChain agent functionality combined with the Jira toolkit, which is a wrapper around the Atlassian Python API.
The default library is quite useful out of the box, sometimes requiring some trial and error on the prompt though I’d think it should improve over time as research into the area progresses.
For this project however, I wanted to add some custom tooling to the agent. This can be seen as the function ‘triage’ below with the @tool decorator.
The function type hints and comment description of the tool are necessary to communicate to the agent what is expected when a call is made. The returned string of the function is observed by the agent, in this instance, we simply return “Task complete” such that the agent then ceases to conduct another step.
The custom triage tool performs the following steps;
- Get all unresolved Jira tickets for the project
- Get the description and summary for the Jira issue key the agent is conducting the triage on
- Makes asynchronous LLM-based comparisons with all unresolved tickets and automatically tags the ones that appear related from a text-to-text comparison, then uses the Jira API to link them
- An LLM is then used to generate; user stories, acceptance criteria and priority, leaving this model result as a comment on the primary ticket
from langchain.agents import AgentType, initialize_agent
from langchain_community.agent_toolkits.jira.toolkit import JiraToolkit
from langchain_community.utilities.jira import JiraAPIWrapper
from langchain_openai import OpenAI
from langchain.tools import tool
from langchain_core.prompts import ChatPromptTemplate, FewShotChatMessagePromptTemplate

llm = OpenAI(temperature=0)

@tool
def triage(ticket_number:str) -> None:
    """triage a given ticket and link related tickets"""
    ticket_number = str(ticket_number)
    all_tickets = jira_utils.get_all_tickets()
    primary_issue_key, primary_issue_data = jira_utils.get_ticket_data(ticket_number)
    find_related_tickets(primary_issue_key, primary_issue_data, all_tickets)
    user_stories_acceptance_criteria_priority(primary_issue_key, primary_issue_data)
    return "Task complete"

jira = JiraAPIWrapper()
toolkit = JiraToolkit.from_jira_api_wrapper(jira)
agent = initialize_agent(
    toolkit.get_tools() + [triage],
    llm,
    agent=AgentType.ZERO_SHOT_REACT_DESCRIPTION,
    verbose=True,
    max_iterations=5,
    return_intermediate_steps=True
)
Both LLM tasks use a CO-STAR system prompt and chain-of-thought few-shot prompting strategy. Therefore I have abstracted these tasks into an LLMTask class.
They are instantiated in the following code snippet. Arguably, we could experiment with different LLMs for each tasks though in the interest of time I have not done any experimentation around this — please feel free to comment below if you do pull the repo and have any experience to share.
class LLMTask:
    def __init__(self, system_prompt, examples, llm):
        self.system_prompt = system_prompt
        self.examples = examples
        self.llm = llm

    def construct_prompt(self):
        example_prompt = ChatPromptTemplate.from_messages(
            [
                ("human", "{input}"),
                ("ai", "{output}"),
            ]
        )
        few_shot_prompt = FewShotChatMessagePromptTemplate(
            example_prompt=example_prompt,
            examples=self.examples,
        )
        return ChatPromptTemplate.from_messages(
            [
                ("system", self.system_prompt),
                few_shot_prompt,
                ("human", "{input}"),
            ]
        )

    def run_llm(self, input):
        chain = self.construct_prompt() | self.llm
        return chain.invoke({"input": input})

product_model = LLMTask(system_prompts.get("system_prompt_product"), example_prompts.get("examples_product"), llm)
linking_model = LLMTask(system_prompts.get("system_prompt_linking"), example_prompts.get("examples_linking"), llm)
For the linking tasks, the CO-STAR system prompt is below. The headings of Context, Objective, Style, Tone, Audience and Response are the standard headings for the CO-STAR method. We define the context and outputs including the tagging of each element of the model results.
Explicitly defining the audience, style and tone helps to ensure the model output is appropriate for a business context.
# CONTEXT #
I want to triage newly created Jira tickets for our software company by comparing them to previous tickets.
The first ticket will be in <ticket1> tags and the second ticket will be in <ticket2> tags.

# OBJECTIVE #
Determine if two tickets are related if the issue describes similar tasks and return True in <related> tags, also include your thinking in <thought> tags.

# STYLE #
Keep reasoning concise but logical.

# TONE #
Create an informative tone.

# AUDIENCE #
The audience will be business stake holders, product stakeholders and software engineers.

# RESPONSE #
Return a boolean if you think the tickets are related in <related> tags and also return your thinking as to why you think the tickets are related in <thought> tags.
For performing the product style ticket evaluation (user stories, acceptance criteria, and priority), the system prompt is below. We explicitly define the priority as either LOW, MEDIUM, or HIGH.
We also dictate that the model has the style of a product owner/ manager for which this task would have traditionally been conducted.
# CONTEXT #
You are a product owner working in a large software company, you triage new tickets from their descriptions in <description> tags as they are raised from users.

# OBJECTIVE #
From the description in <description> tags, you should write the following; user stories in <user_stories> tags, acceptance criteria in <acceptance_criteria> tags and priority in <priority>.
Priority must be either LOW, MEDIUM OR HIGH depending on the what you deem is most appropriate for the given description.
Also include your thinking in <thought> tags for the priority.

# STYLE #
Should be in the style of a product owner or manager.

# TONE #
Use a professional and business oriented tone.

# AUDIENCE #
The audience will be business stake holders, product stakeholders and software engineers.

# RESPONSE #
Respond with the following format.
User stories in <user_stories> tags.
Acceptance criteria in <acceptance_criteria> tags.
Priority in <priority> tags.
I will now provide the Chain-of-thought few-shot prompt for linking Jira tickets, we append both the summary and description for both tickets in <issue1> and <issue2> tags respectively. The thinking of the model is captured in the <thought> tags in the model output, this constitutes the Chain-of-Thought element.
The few-shot designation comes from the point that multiple examples are being fed into the model.
The <related> tags contain the determination if the two tickets provided are related or not, if the model deems them to be related then a value of True is returned.
We later regex parse the model output and have a helper function to link the related tickets via the Jira API, all Jira API helper functions for this project are provided later in the article.
    "examples_linking": [
        {
            "input": "<issue1>Add Jira integration ticket creation Add a Jira creation widget to the front end of the website<issue1><issue2>Add a widget to the front end to create a Jira Add an integration to the front end to allow users to generated Jira tickets manually<issue2>",
            "output": "<related>True<related><thought>Both tickets relate to a Jira creation widget, they must be duplicate tickets.<thought>"
        },
        {
            "input": "<issue1>Front end spelling error There is a spelling error for the home page which should read 'Welcome to the homepage' rather than 'Wellcome to the homepage'<issue1><issue2>Latency issue there is a latency issue and the calls to the Open AI should be made asynchronous<issue2>",
            "output": "<related>False<related><thought>The first ticket is in relation to a spelling error and the second is a latency, therefore they are not related.<thought>"
        },
        {
            "input": "<issue1>Schema update We need to add a column for model requests and responses<issue1><issue2>Update schema to include both model requests and model responses Add to two new additional fields to the schema<issue2>",
            "output": "<related>True<related><thought>Both tickets reference a schema update with two new fields for model requests and model responses, therefore they must be related.<thought>"
        }
    ]
Similarly for ticket evaluation, the user story is provided in <user_stories> tags, acceptance criteria in <acceptance_criteria> tags, and priority in <priority> tags. The <thought> tags are also used for capturing the reasoning from the model specifically in terms of the priority given.
All of the examples were annotated manually by myself.
    "examples_product": [
        {
            "input": "<description>Add Jira integration ticket creation Add a Jira creation widget to the front end of the website<description>",
            "output": "<user_stories>As a user, I want to be able to create a Jira ticket directly from the website.nAs a product owner, I want to streamline the process of creating Jira tickets for our team.<user_stories>n<acceptance_criteria>The Jira creation widget should be easily accessible on the front end of the website.nThe widget should allow users to input all necessary information for a Jira ticket, such as title, description, and assignee.nOnce submitted, the widget should create a new Jira ticket in the designated project.nThe widget should have proper error handling in case of any issues with creating the ticket.<acceptance_criteria>n<priority>MEDIUM<priority>n<thought>By adding a Jira integration and creation widget to the website, we can improve the efficiency and accuracy of creating Jira tickets for our team. This will ultimately save time and resources for both the business and the development team. Though there is no immediate need for this to be completed. Therefore, I believe this ticket should be prioritized as MEDIUM.<thought>"
        },
        {
            "input": "<description>Urgent schema update We need to add a column for model requests and responses for compliance<description>",
            "output": "<user_stories>As a developer, I want to be able to view and track model requests and responses for compliance purposes.nAs a product owner, I want to ensure our system is compliant with regulations and standards.<user_stories>n<acceptance_criteria>A new column should be added to the schema for model requests and responses.nThe column should accurately track and store all relevant information for compliance purposes.nThe column should be easily accessible and viewable for authorized users.nThe update should not disrupt any existing functionality of the system.<acceptance_criteria>n<priority>HIGH<priority>n<thought>This ticket is marked as urgent, indicating that it is a high priority for the business. Compliance is a critical aspect of our business and it is important that we address this issue as soon as possible. By adding a new column for model requests and responses, we can ensure that our system is compliant and avoid any potential legal or regulatory issues. Therefore, I believe this ticket should be prioritized as HIGH.<thought>"
        },
        {
            "input": "<description>Homepage CSS error There is a CSS error for the homepage which is affecting a call to action button and negatively impacting conversion<description>",
            "output": "<user_stories>As a user, I want the CSS error on the homepage to be fixed so that I can easily access the call to action button.nAs a product owner, I want to improve the conversion rate of our website by fixing any CSS errors.<user_stories>n<acceptance_criteria>The CSS error should be identified and fixed on the homepage.nThe call to action button should be easily visible and accessible for users.nThe fix should not affect any other functionality of the website.<acceptance_criteria>n<priority>HIGH<priority>n<thought>This CSS error is directly impacting the conversion rate of our website, which is a key metric for our business. It is important that we address this issue as soon as possible to improve the user experience and ultimately increase conversions. Therefore, I believe this ticket should be prioritized as HIGH.<thought>"
        }
    ],
This code snippet uses a muti-threaded approach to linking Jira issues concurrently. This will vastly reduce the time it takes to make pair comparisons with all the open tickets within a project to determine if they are related.
def check_issue_and_link_helper(args):
    key, data, primary_issue_key, primary_issue_data = args
    if key != primary_issue_key and
    llm_check_ticket_match(primary_issue_data, data):
        jira_utils.link_jira_issue(primary_issue_key, key)

def find_related_tickets(primary_issue_key, primary_issue_data, issues):
    args = [(key, data, primary_issue_key, primary_issue_data) for key, data in issues.items()]
    with concurrent.futures.ThreadPoolExecutor(os.cpu_count()) as executor:
        executor.map(check_issue_and_link_helper, args)

def llm_check_ticket_match(ticket1, ticket2):
    llm_result = linking_model.run_llm(f"<ticket1>{ticket1}<ticket1><ticket2>{ticket2}<ticket2>")
    if ((result := jira_utils.extract_tag_helper(llm_result)))
    and (result == 'True'):
        return True
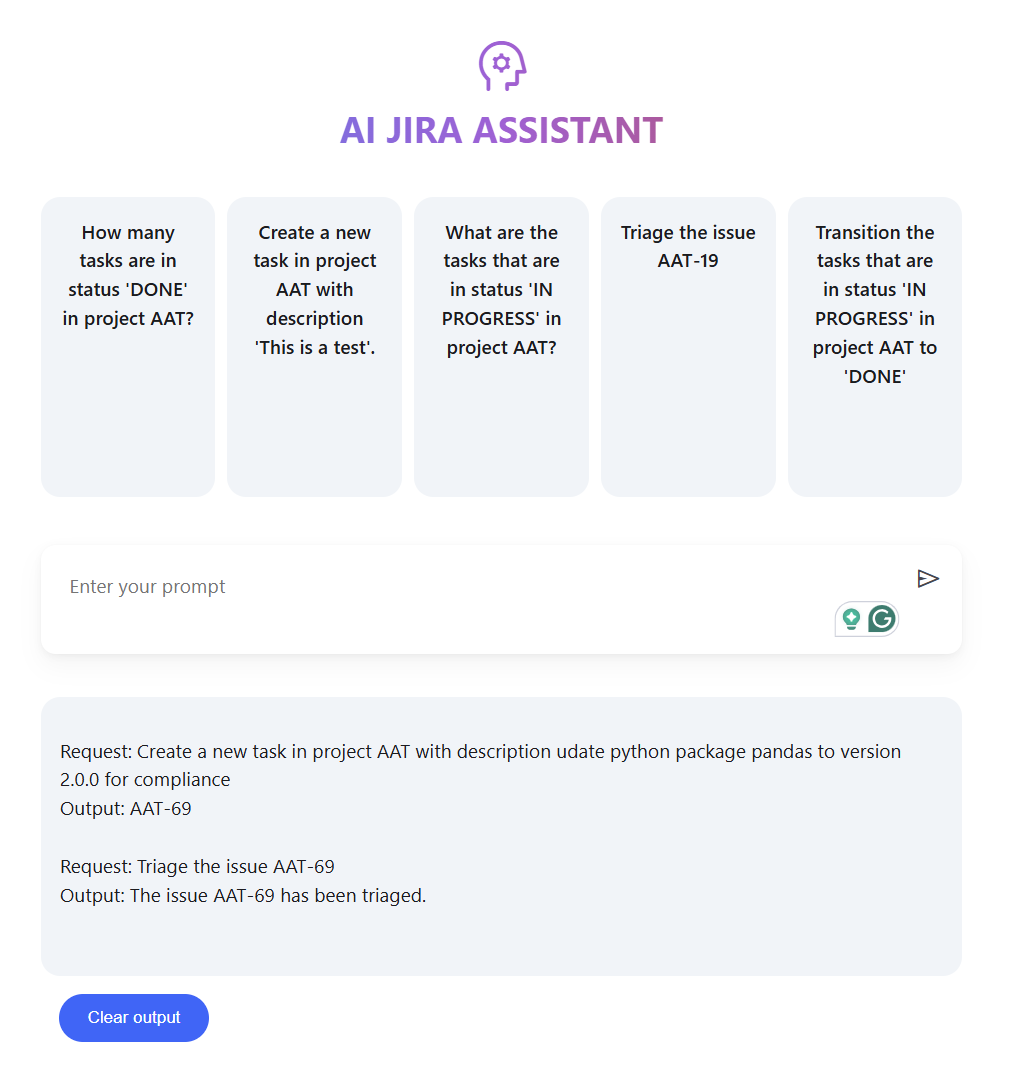
An example workflow of the tool, creating a ticket and triaging it.
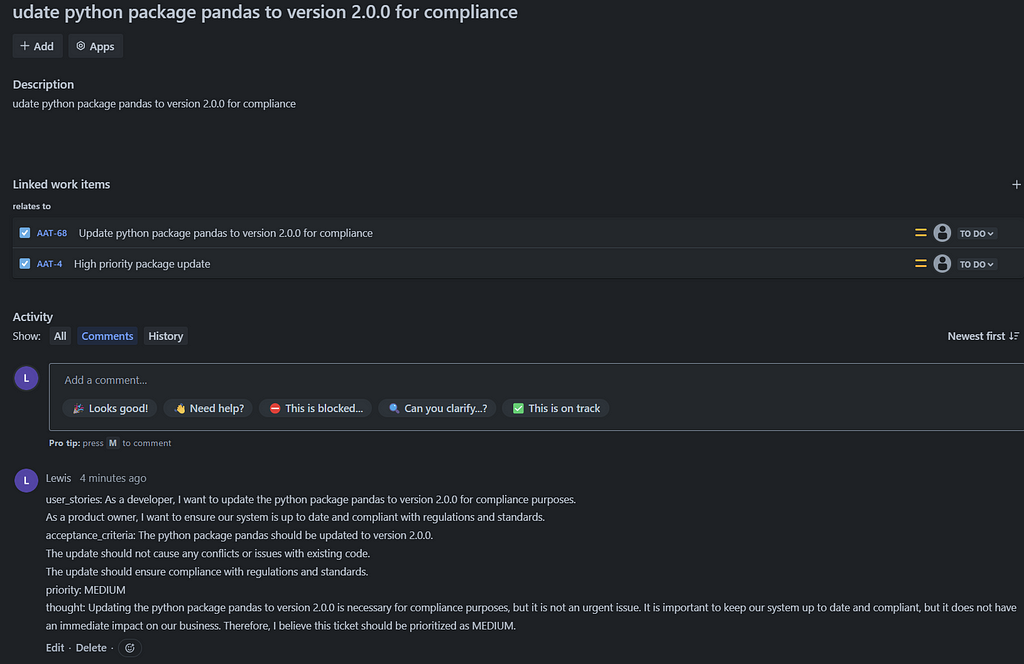
The result of these actions is captured in Jira ticket. Related tickets have been linked automatically, the user stories, acceptance criteria, priority and thought have been captured as a Jira comment.
We can see the agent intermediate steps in the print statements of the Docker container.

5. Jira API examples
All examples in this project where I have explicitly used the Jira REST API have been included below for visibility.
The regex extraction helper function used to parse model results is also included. There is also a Python SDK for Jira though I elected to use the requests library in this instance such that is more easily translated into other programming languages.
6. Next steps
The natural next step would be to include code generation by integrating with source control for a near fully automated software development lifecycle, with a human in the loop this could be a feasible solution.
We can already see that AI code generation is making an impact on the enterprise — if BAU tasks can be partially automated then software developers/product practitioners can focus on more interesting and meaningful work.
If there is a lot of interest on this article then perhaps I could look into this as a follow-up project.
AI Now Writes Over 25% of Code at Google
I hope you found this article insightful, as promised — you can find all the code in the Github repo here, and feel free to connect with me on LinkedIn also.
References
- https://google.github.io/mesop/getting-started/quickstart/#starter-kit
- https://www.django-rest-framework.org/#example
- https://blog.logrocket.com/dockerizing-django-app/
Building a Custom AI Jira Agent was originally published in Towards Data Science on Medium, where people are continuing the conversation by highlighting and responding to this story.
Originally appeared here:
Building a Custom AI Jira Agent
