AWS DeepRacer : A Practical Guide to Reducing the Sim2Real Gap — Part 1 || Preparing the Track
Minimize visual distractions to maximize successful laps
Ever wondered why your DeepRacer performs perfectly in the sim but can’t even navigate a single turn in the real world? Read on to understand why and how to resolve common issues.
In this guide, I will share practical tips & tricks to autonomously run the AWS DeepRacer around a race track. I will include information on training the reinforcement learning agent in simulation and more crucially, practical advice on how to successfully run your car on a physical track — the so called simulated-to-real (sim2real) challenge.
In Part 1, I will describe physical factors to keep in mind for running your car on a real track. I will go over the camera sensor (and its limitations) of the car and how to prepare your physical space and track. In later parts, we will go over the training process and reward function best practices. I decided to first focus on physical factors rather than training as understanding the physical limitations before training in simulation is more crucial in my opinion.
As you will see through this multi-part series, the key goal is to reduce camera distractions arising from lighting changes and background movement.
The Car and Sensors

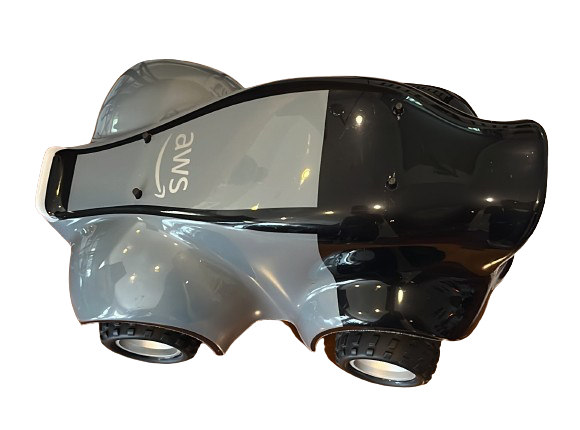
The car is a 1/18th scale race car with a RGB (Red Green Blue) Camera sensor. From AWS:
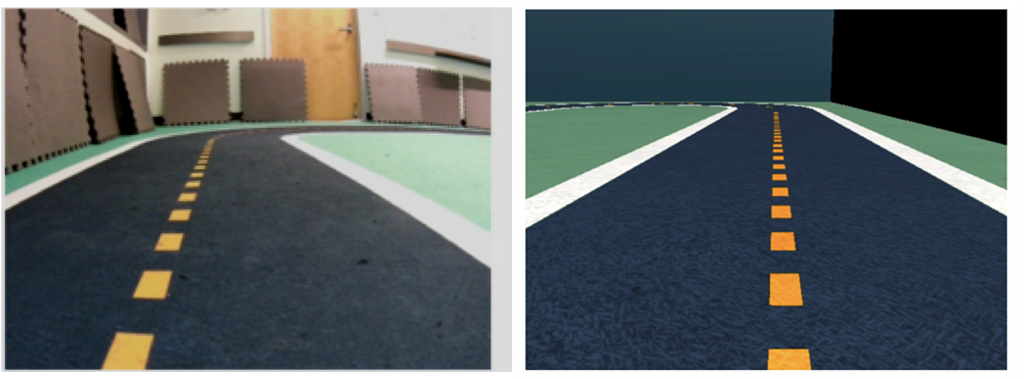
The camera has 120-degree wide angle lens and captures RGB images that are then converted to grey-scale images of 160 x 120 pixels at 15 frames per second (fps). These sensor properties are preserved in the simulator to maximize the chance that the trained model transfers well from simulation to the real world.
The key thing to note here is that the camera uses grey-scale images of 160 x 120 pixels. This roughly means that the camera will be good at separating light or white colored pixels from dark or black colored pixels. Pixels that lie between these i.e. greys — can be used to represent additional information.
The most important thing to remember from this article is the following:
The car only uses a black and white image for understanding the environment around it. It does not recognize objects — rather it learns to avoid or stick to different grey pixel values (from black to white).
So all steps that we take, ranging from track preparation to training the model will be executed keeping the above fact in mind.
In the DeepRacer’s case three color-based basic goals can be identified for the car:
- Stay Within White Colored Track Boundary: Lighter or higher pixel values close to the color white (255) will be interpreted as the track boundary by the car and it will try to stay within this pixel boundary.
- Drive On Black Colored Track: Darker or lower black (0) pixel values close will be interpreted as driving surface itself, and the car should try to drive on it as much as possible.
- Green/Yellow: Although green and yellow colors will be seen as shades of grey by the car — it can still learn to (a) stay close to dotted yellow center line; and (b) avoid solid green out of bounds area.

DeepRacer’s sim2real Performance Gap
AWS DeepRacer uses Reinforcement Learning (RL)¹ in a simulated environment to train a scaled racecar to autonomously race around a track. This enables the racer to first learn an optimal and safe policy or behavior in a virtual environment. Then, we can deploy our model on the real car and race it around a real track.
Unfortunately, it is rare to get the exact performance in the real world as that observed in a simulator. This is because the simulation cannot capture all aspects of the real world accurately. To their credit, AWS provides a guide on optimizing training to minimize sim2real gap. Although advice provided here is useful, it did not quite work for me. The car comes with an inbuilt model from AWS that is supposed to be suited for multiple tracks should work out of the box. Unfortunately, at least in my experiments, that model couldn’t even complete a single lap (despite making multiple physical changes). There is missing information in the guides from AWS which I was eventually able to piece together via online blogs and discussion forums.
Through my experiments, identified the following key factors increasing sim2real gaps:
- Camera Light/Noise Sensitivity: The biggest challenge is the camera’s sensitivity to light and/or background noise. Any light hotspot washes out the camera sensors and the car may exhibit unexpected behavior. Try reducing ambient lighting and any background distractions as much as possible. (More on this later.)
- Friction: Friction between the car wheels and track adds challenges with calibrating throttle. We purchased the track recommended by AWS through their storefront (read on for why I wouldn’t recommend it). The track is Matte Vinyl, and in my setup I placed it on carpet in my office’s lunch area. It appears that vinyl on carpet creates high static friction causes the car to continuously get stuck especially around slow turns or when attempting to move from a standing start.
- Different Sensing Capability of Virtual v/s Real Car: There is a gap in input parameters/state space available to the real v/s simulation car. AWS provides a list of input parameters, but parameters such as track length, progress, steps etc. are only available in simulation and cannot be used by the real car. To the best of my knowledge and through some internet sleuthing — it appears that the car can only access information from the camera sensor. There is a slim chance that parameters such as x,y location and heading of car are known. My research points to this information being unavailable as the car most likely does not have an IMU, and even if it does — IMU based localization is a very difficult problem to solve. This information is helpful in designing the correct reward function (more on that in future parts).
Track — Build v/s Buy
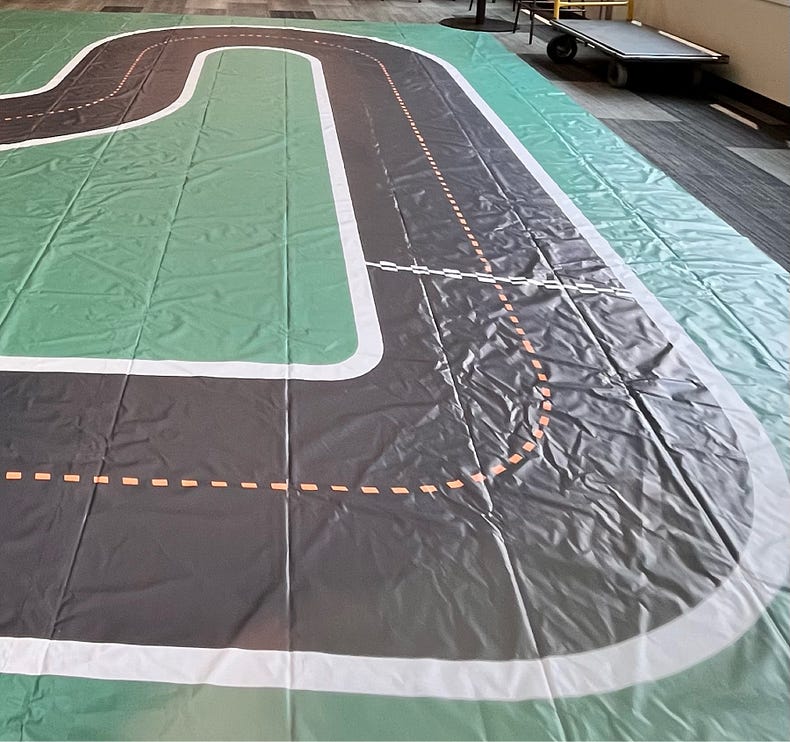
As mentioned earlier, I purchased the A To Z Speedway Track recommended by AWS. The track is a simplified version of the Autodroma Nazionale Monza F1 Track in Monza, Italy.
Track Review — Do Not Buy

Personally, I would not recommend buying this track. It costs $760 plus taxes (the car costs almost half that) and is a little underwhelming to say the least.
- Reflective Surface: The matte vinyl print is of low quality and highly reflective. Any ambient light washes out the camera and leads to crashes and other unexpected behavior.
- Creases: Track is very creased and this causes the car to get stuck. You can fix this to some extent by leaving your track spread out in the sun for a couple of days. I had limited success with this. You can also use a steam iron (see this guide). I did not try this, so please do this at your own risk.
- Size: Not really the tracks fault, but the track dimensions are18′ x 27′ which was too large for my house. It couldn’t even fit in my two-car garage. Luckily my office folks were kind enough to let me use the lunch room. It is also difficult very cumbersome to fold and carry.
Overall, I was not impressed by the quality and would only recommend buying this track if you are short on time or do not want to go through the hassle of building your own.
Build Your Own Track (If Possible)
If you can, try to build one on your own. Here is an official guide from AWS and another one from Medium User @autonomousracecarclub which looks more promising.
Using interlocking foam mats to build track is perhaps the best approach here. This addresses reflectiveness and friction problems of vinyl tracks. Also, these mats are lightweight and stack up easily; so moving and storing them is easier.
You can also get the track printed at FedEx and stick it on a rubber or concrete surface. Whether you build your own or get it printed, those approaches are better than buying the one recommended by AWS (both financially and performance-wise).
Preparing Your Space — Lighting and Distractions
Remember that the car only uses a black and white image to understand and navigate the environment around it. It cannot not recognize objects — rather it learns to avoid or stick to one different shades of grey (from black to white). Stay on black track, avoid white boundaries and green out of bound area.
The following section outlines the physical setup recommended to make your car drive around the track successfully with minimum crashes.

Minimize Ambient Lights
Try to reduce ambient lighting as much as possible. This includes any natural light from windows and ceiling lights. Of course, you need some light for the camera to be able to see, but lower is better.
If you cannot reduce lighting, try to make it as uniform as possible. Hotspots of light create more problems than the light itself. If your track is creased up like mine was, hotspots are more frequent and will cause more failures.
Colorful Interlocking Barriers
Both the color of the barriers and their placement are crucial. Perhaps a lot more crucial than I had initially anticipated. One might think they are used to protect the car if it crashes. Although that is part of it, barriers are more useful for reducing background distractions.
I used these 2×2 ft Interlocking Mats from Costco. AWS recommends using atleast 2.5×2.5ft and any color but white. I realized that even black color throws off the car. So I would recommend colorful ones.
The best are green colored ones since the car learns to avoid green in the simulation. Even though training and inference images are in grey scale, using green colored barriers work better. I had a mix of different colors so I used the green ones around turns where the car would go off track more than others.
Remember from the earlier section — the car only uses a black and white image for understanding the environment around it. It does not recognize objects around it — rather it learns to avoid or stick to one different shades of grey (from black to white).
What’s Next?
In future posts, I will focus on model training tips and vehicle calibration.
Acknowledgements
Shout out to Wes Strait for sharing his best practices and detailed notes on reducing the Sim2Real gap. Abhishek Roy and Kyle Stahl for helping with the experiments and documenting & debugging different vehicle behaviors. Finally, thanks to the Cargill R&D Team for letting me use their lunch space for multiple days to experiment with the car and track.
References
[1] Sutton, Richard S. “Reinforcement learning: an introduction.” A Bradford Book (2018).
[2] Balaji, Bharathan, et al. “Deepracer: Educational autonomous racing platform for experimentation with sim2real reinforcement learning.” arXiv preprint arXiv:1911.01562(2019).
AWS DeepRacer : A Practical Guide to Reducing The Sim2Real Gap — Part 1 was originally published in Towards Data Science on Medium, where people are continuing the conversation by highlighting and responding to this story.
Originally appeared here:
AWS DeepRacer : A Practical Guide to Reducing The Sim2Real Gap — Part 1
Go Here to Read this Fast! AWS DeepRacer : A Practical Guide to Reducing The Sim2Real Gap — Part 1
