
Part 1: Task-specific approaches for scenario forecasting

In product analytics, we quite often get “what-if” questions. Our teams are constantly inventing different ways to improve the product and want to understand how it can affect our KPI or other metrics.
Let’s look at some examples:
- Imagine we’re in the fintech industry and facing new regulations requiring us to check more documents from customers making the first donation or sending more than $100K to a particular country. We want to understand the effect of this change on our Ops demand and whether we need to hire more agents.
- Let’s switch to another industry. We might want to incentivise our taxi drivers to work late or take long-distance rides by introducing a new reward scheme. Before launching this change, it would be crucial for us to estimate the expected size of rewards and conduct a cost vs. benefit analysis.
- As the last example, let’s look at the main Customer Support KPIs. Usually, companies track the average waiting time. There are many possible ways how to improve this metric. We can add night shifts, hire more agents or leverage LLMs to answer questions quickly. To prioritise these ideas, we will need to estimate their impact on our KPI.
When you see such questions for the first time, they look pretty intimidating.
If someone asks you to calculate monthly active users or 7-day retention, it’s straightforward. You just need to go to your database, write SQL and use the data you have.
Things become way more challenging (and exciting) when you need to calculate something that doesn’t exist. Computer simulations will usually be the best solution for such tasks. According to Wikipedia, simulation is an imitative representation of a process or system that could exist in the real world. So, we will try to imitate different situations and use them in our decision-making.
Simulation is a powerful tool that can help you in various situations. So, I would like to share with you the practical examples of computer simulations in the series of articles:
- In this article, we will discuss how to use simulations to estimate different scenarios. You will learn the basic idea of simulations and see how they can solve complex tasks.
- In the second part, we will diverge from scenario analysis and will focus on the classic of computer simulations — bootstrap. Bootstrap can help you get confidence intervals for your metrics and analyse A/B tests.
- I would like to devote the third part to agent-based models. We will model the CS agent behaviour to understand how our process changes can affect CS KPIs such as queue size or average waiting time.
So, it’s time to start and discuss the task we will solve in this article.
Our project: Launching tests for English courses
Suppose we are working on an edtech product that helps people learn the English language. We’ve been working on a test that could assess the student’s knowledge from different angles (reading, listening, writing and speaking). The test will give us and our students a clear understanding of their current level.
We agreed to launch it for all new students so that we can assess their initial level. Also, we will suggest existing students pass this test when they return to the service next time.
Our goal is to build a forecast on the number of submitted tests over time. Since some parts of these tests (writing and speaking) will require manual review from our teachers, we would like to ensure that we will have enough capacity to check these tests on time.
Let’s try to structure our problem. We have two groups of students:
- The first group is existing students. It’s a good practice to be precise in analytics, so we will define them as students who started using our service before this launch. We will need to check them once at their next transaction, so we will have a substantial spike while processing them all. Later, the demand from this segment will be negligible (only rare reactivations).
- New students will hopefully continue joining our courses. So, we should expect consistent demand from this group.
Now, it’s time to think about how we can estimate the demand for these two groups of customers.
The situation is pretty straightforward for new students — we need to predict the number of new customers weekly and use it to estimate demand. So, it’s a classic task of time series forecasting.
The task of predicting demand from existing customers might be more challenging. The direct approach would be to build a model to predict the week when students will return to the service next time and use it for estimations. It’s a possible solution, but it sounds a bit overcomplicated to me.
I would prefer the other approach. I would simulate the situation when we launched this test some time ago and use the previous data. In that case, we will have all the data after “this simulated launch” and will be able to calculate all the metrics. So, it’s actually a basic idea of scenario simulations.
Cool, we have a plan. Let’s move on to execution.
Modelling demand from new customers
Before jumping to analysis, let’s examine the data we have. We keep a record of the lessons’ completion events. We know each event’s user identifier, date, module, and lesson number. We will use weekly data to avoid seasonality and capture meaningful trends.

Let me share some context about the educational process. Students primarily come to our service to learn English from scratch and pass six modules (from pre-A1 to C1). Each module consists of 100 lessons.
The data was generated explicitly for this use case, so we are working with a synthetic data set.
First, we need to calculate the metric we want to predict. We will offer students the opportunity to pass the initial evaluation test after completing the first demo lesson. So, we can easily calculate the number of customers who passed the first lesson or aggregate users by their first date.
new_users_df = df.groupby('user_id', as_index = False).date.min()
  .rename(columns = {'date': 'cohort'})

new_users_stats_df = new_users_df.groupby('cohort')[['user_id']].count()
  .rename(columns = {'user_id': 'new_users'})
We can look at the data and see an overall growing trend with some seasonal effects (i.e. fewer customers joining during the summer or Christmas time).

For forecasting, we will use Prophet — an open-source library from Meta. It works pretty well with business data since it can predict non-linear trends and automatically take into account seasonal effects. You can easily install it from PyPI.
pip install prophet
Prophet library expects a data frame with two columns: ds with timestamp and y with a metric we want to predict. Also, ds must be a datetime column. So, we need to transform our data to the expected format.
pred_new_users_df = new_users_df.copy()
pred_new_users_df = pred_new_users_df.rename(
  columns = {'new_users': 'y', 'cohort': 'ds'})
pred_new_users_df.ds = pd.to_datetime(pred_new_users_df.ds)
Now, we are ready to make predictions. As usual in ML, we need to initialise and fit a model.
from prophet import Prophet

m = Prophet()
m.fit(pred_new_users_df)
The next step is prediction. First, we need to create a future data frame specifying the number of periods and their frequency (in our case, weekly). Then, we need to call the predict function.
future = m.make_future_dataframe(periods= 52, freq = 'W')
forecast_df = m.predict(future)
forecast_df.tail()[['ds', 'yhat', 'yhat_lower', 'yhat_upper']]
As a result, we get the forecast (yhat) and confidence interval (yhat_lower and yhat_upper).

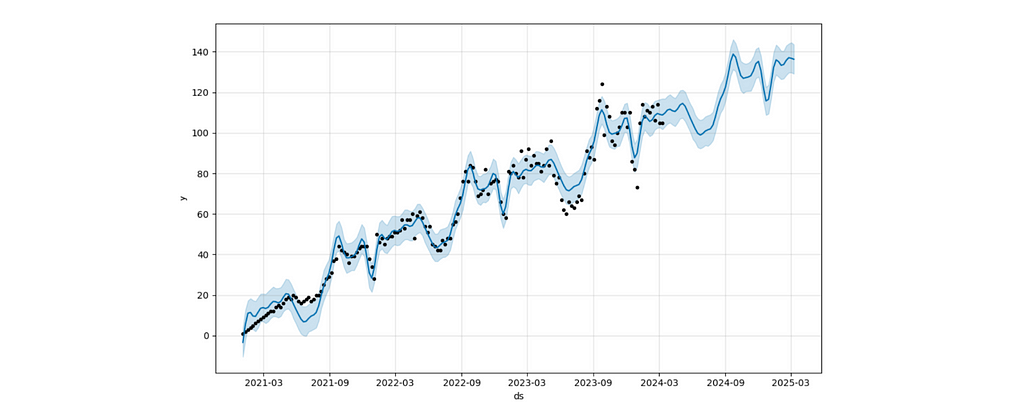
It’s difficult to understand the result without charts. Let’s use Prophet functions to visualise the output better.
m.plot(forecast_df) # forecast
m.plot_components(forecast_df) # components
The forecast chart shows you the forecast with a confidence interval.
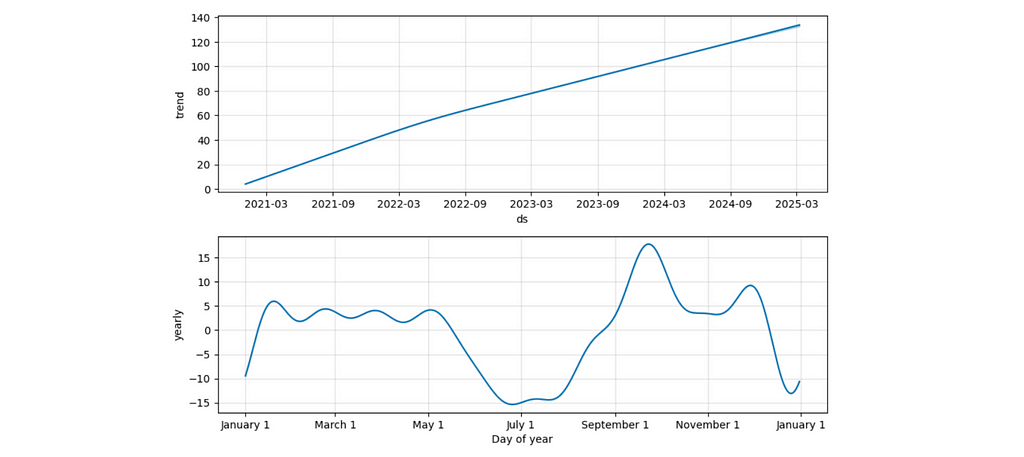
The components view lets you understand the split between trend and seasonal effects. For example, the second chart displays a seasonal drop-off during summer and an increase at the beginning of September (when people might be more motivated to start learning something new).
We can put all this forecasting logic into one function. It will be helpful for us later.
import plotly.express as px
import plotly.io as pio
pio.templates.default = 'simple_white'

def make_prediction(tmp_df, param, param_name = '', periods = 52):
    # pre-processing
    df = tmp_df.copy()
    date_param = df.index.name
    df.index = pd.to_datetime(df.index)

    train_df = df.reset_index().rename(columns = {date_param: 'ds', param: 'y'})

    # model
    m = Prophet()
    m.fit(train_df)

    future = m.make_future_dataframe(periods=periods, freq = 'W')
    forecast = m.predict(future)
    forecast = forecast[['ds', 'yhat']].rename(columns = {'ds': date_param, 'yhat': param + '_model'})

    # join to actual data
    forecast = forecast.set_index(date_param).join(df, how = 'outer')

    # visualisation
    fig = px.line(forecast,
        title = '<b>Forecast:</b> ' + (param if param_name == '' else param_name),
        labels = {'value': param if param_name == '' else param_name},
        color_discrete_map = {param: 'navy', param + '_model': 'gray'}
    )
    fig.update_traces(mode='lines', line=dict(dash='dot'),
        selector=dict(name=param + '_model'))
    fig.update_layout(showlegend = False)
    fig.show()

    return forecast

new_forecast_df = make_prediction(new_users_stats_df,
  'new_users', 'new users', periods = 75)
I prefer to share with my stakeholders a more styled version of visualisation (especially for public presentations), so I’ve added it to the function as well.

In this example, we’ve used the default Prophet model and got quite a plausible forecast. However, in some cases, you might want to tweak parameters, so I advise you to read the Prophet docs to learn more about the possible levers.
For example, in our case, we believe that our audience will continue growing at the same rate. However, this might not be the case, and you might expect it to have a cap of around 100 users. Let’s update our prediction for saturating growth.
# adding cap to the initial data
# it's not required to be constant
pred_new_users_df['cap'] = 100

#specifying logistic growth
m = Prophet(growth='logistic')
m.fit(pred_new_users_df)

# adding cap for the future
future = m.make_future_dataframe(periods= 52, freq = 'W')
future['cap'] = 100
forecast_df = m.predict(future)
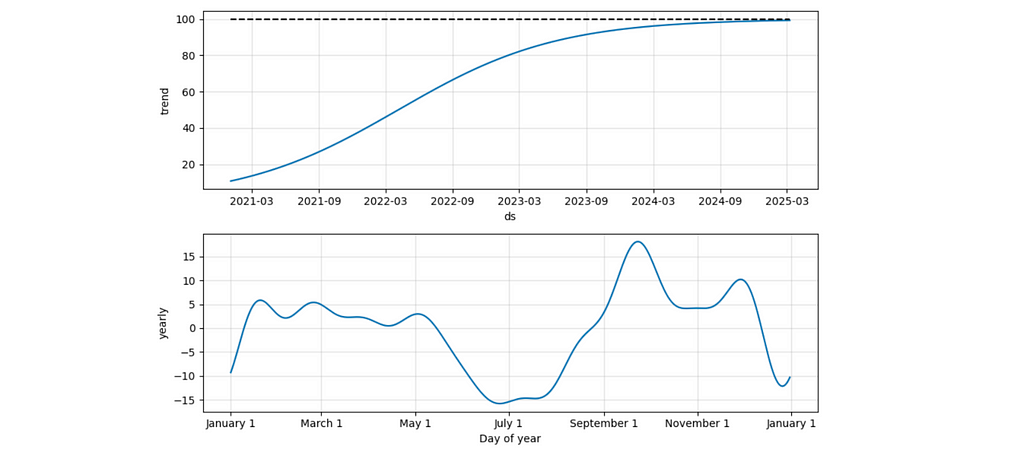
We can see that the forecast has changed significantly, and the growth stops at ~100 new clients per week.

It’s also interesting to look at the components’ chart in this case. We can see that the seasonal effects stayed the same, while the trend has changed to logistic (as we specified).
We’ve learned a bit about the ability to tweak forecasts. However, for future calculations, we will use a basic model. Our business is still relatively small, and most likely, we haven’t reached saturation yet.
We’ve got all the needed estimations for new customers and are ready to move on to the existing ones.
Modelling demand from existing customers
The first version
The key point in our approach is to simulate the situation when we launched this test some time ago and calculate the demand using this data. Our solution is based on the idea that we can use the past data instead of predicting the future.
Since there’s significant yearly seasonality, I will use data for -1 year to take into account these effects automatically. We want to launch this project at the beginning of April. So, I will use past data from the week of 2nd April 2023.
First, we need to filter the data related to existing customers at the beginning of April 2023. We’ve already forecasted demand from new users, so we don’t need to consider them in this estimation.
model_existing_users = df[df.date < '2023-04-02'].user_id.unique()
raw_existing_df = df[df.user_id.isin(model_existing_users)]
Then, we need to model the demand from these users. We will offer our existing students the chance to pass the test the next time they use our product. So, we need to define when each customer returned to our service after the launch and aggregate the number of customers by week. There’s no rocket science at all.
existing_model_df = raw_existing_df[raw_existing_df.date >= '2023-04-02']
  .groupby('user_id', as_index = False).date.min()
  .groupby('date', as_index = False).user_id.count()
  .rename(columns = {'user_id': 'existing_users'})
We got the first estimations. If we had launched this test in April 2023, we would have gotten around 1.3K tests in the first week, 0.3K for the second week, 80 cases in the third week, and even less afterwards.

We assumed that 100% of existing customers would finish the test, and we would need to check it. In real-life tasks, it’s worth taking conversion into account and adjusting the numbers. Here, we will continue using 100% conversion for simplicity.
So, we’ve done our first modelling. It wasn’t challenging at all. But is this estimation good enough?
Taking into account long-term trends
We are using data from the previous year. However, everything changes. Let’s look at the number of active customers over time.
active_users_df = df.groupby('date')[['user_id']].nunique()
    .rename(columns = {'user_id': 'active_users'})

We can see that it’s growing steadily. I would expect it to continue growing. So, it’s worth adjusting our forecast due to this YoY (Year-over-Year) growth. We can re-use our prediction function and calculate YoY using forecasted values to make it more accurate.
active_forecast_df = make_prediction(active_users_df,
    'active_users', 'active users')

Let’s calculate YoY growth based on our forecast and adjust the model’s predictions.
# calculating YoYs
active_forecast_df['active_user_prev_year'] = active_forecast_df.active_users.shift(52)
active_forecast_df['yoy'] = active_forecast_df.active_users_model/
  active_forecast_df.active_user_prev_year

existing_model_df = existing_model_df.rename(
  columns = {'date': 'model_date', 'existing_users': 'model_existing_users'})

# adjusting dates from 2023 to 2024
existing_model_df['date'] = existing_model_df.model_date.map(
  lambda x: datetime.datetime.strptime(x, '%Y-%m-%d') + datetime.timedelta(364)
)

existing_model_df = existing_model_df.set_index('date')
   .join(active_forecast_df[['yoy']])

# updating estimations
existing_model_df['existing_users'] = list(map(
    lambda x, y: int(round(x*y)),
    existing_model_df.model_existing_users,
    existing_model_df.yoy
))
We’ve finished the estimations for the existing students as well. So, we are ready to merge both parts and get the result.
Putting everything together
First results
Now, we can combine all our previous estimations and see the final chart. For that, we need to convert data to the common format and add segments so that we can distinguish demand between new and existing students.
# existing segment
existing_model_df = existing_model_df.reset_index()[['date', 'existing_users']]
  .rename(columns = {'existing_users': 'users'})
existing_model_df['segment'] = 'existing'

# new segment
new_model_df = new_forecast_df.reset_index()[['cohort', 'new_users_model']]
  .rename(columns = {'cohort': 'date', 'new_users_model': 'users'})
new_model_df = new_model_df[(new_model_df.date >= '2024-03-31')
  & (new_model_df.date < '2025-04-07')]
new_model_df['users'] = new_model_df.users.map(lambda x: int(round(x)))
new_model_df['segment'] = 'new'

# combining everything
demand_model_df = pd.concat([existing_model_df, new_model_df])

# visualisation
px.area(demand_model_df.pivot(index = 'date',
          columns = 'segment', values = 'users').head(15)[['new', 'existing']],
    title = '<b>Demand</b>: modelling number of tests after launch',
    labels = {'value': 'number of test'})

We should expect around 2.5K tests for the first week after launch, mostly from existing customers. Then, within four weeks, we will review tests from existing users and will have only ~100–130 cases per week from new joiners.
That’s wonderful. Now, we can share our estimations with colleagues so they can also plan their work.
What if we have demand constraints?
In real life, you will often face the problem of capacity constraints when it’s impossible to launch a new feature to 100% of customers. So, it’s time to learn how to deal with such situations.
Suppose we’ve found out that our teachers can check only 1K tests each week. Then, we need to stagger our demand to avoid bad customer experience (when students need to wait for weeks to get their results).
Luckily, we can do it easily by rolling out tests to our existing customers in batches (or cohorts). We can switch the functionality on for all new joiners and X% of existing customers in the first week. Then, we can add another Y% of existing customers in the second week, etc. Eventually, we will evaluate all existing students and have ongoing demand only from new users.
Let’s come up with a rollout plan without exceeding the 1K capacity threshold.
Since we definitely want to launch it for all new students, let’s start with them and add them to our plan. We will store all demand estimations by segments in the raw_demand_est_model_df data frame and initialise them with our new_model_df estimations that we got before.
raw_demand_est_model_df = new_model_df.copy()
Now, we can aggregate this data and calculate the remaining capacity.
capacity = 1000

demand_est_model_df = raw_demand_est_model_df.pivot(index = 'date',
    columns = 'segment', values = 'users')

demand_est_model_df['total_demand'] = demand_est_model_df.sum(axis = 1)
demand_est_model_df['capacity'] = capacity
demand_est_model_df['remaining_capacity'] = demand_est_model_df.capacity
    - demand_est_model_df.total_demand

demand_est_model_df.head()

Let’s put this logic into a separate function since we will need it to evaluate our estimations after each iteration.
import plotly.graph_objects as go

def get_total_demand_model(raw_demand_est_model_df, capacity = 1000):
    demand_est_model_df = raw_demand_est_model_df.pivot(index = 'date',
        columns = 'segment', values = 'users')
    demand_est_model_df['total_demand'] = demand_est_model_df.sum(axis = 1)
    demand_est_model_df['capacity'] = capacity
    demand_est_model_df['remaining_capacity'] = demand_est_model_df.capacity
      - demand_est_model_df.total_demand

    tmp_df = demand_est_model_df.drop(['total_demand', 'capacity',
        'remaining_capacity'], axis = 1)
    fig = px.area(tmp_df,
                 title = '<b>Demand vs Capacity</b>',
                  category_orders={'segment': ['new'] + list(sorted(filter(lambda x: x != 'new', tmp_df.columns)))},
                 labels = {'value': 'tests'})
    fig.add_trace(go.Scatter(
        x=demand_est_model_df.index, y=demand_est_model_df.capacity,
        name='capacity', line=dict(color='black', dash='dash'))
    )

    fig.show()
    return demand_est_model_df

demand_plan_df = get_total_demand_model(raw_demand_est_model_df)
demand_plan_df.head()
I’ve also added a chart to the output of this function that will help us to assess our results effortlessly.

Now, we can start planning the rollout for existing customers week by week.
First, let’s transform our current demand model for existing students. I would like it to be indexed by the sequence number of weeks and show the 100% demand estimation. Then, I can smoothly get estimations for each batch by multiplying demand by weight and calculating the dates based on the launch date and week number.
existing_model_df['num_week'] = list(range(existing_model_df.shape[0]))
existing_model_df = existing_model_df.set_index('num_week')
    .drop(['date', 'segment'], axis = 1)
existing_model_df.head()

So, for example, if we launch our evaluation test for 10% of random customers, then we expect to get 244 tests on the first week, 52 tests on the second week, 14 on the third, etc.
I will be using the same estimations for all batches. I assume that all batches of the same size will produce the exact number of tests over the following weeks. So, I don’t take into account any seasonal effects related to the launch date for each batch.
This assumption simplifies your process quite a bit. And it’s pretty reasonable in our case because we will do a rollout only within 4–5 weeks, and there are no significant seasonal effects during this period. However, if you want to be more accurate (or have considerable seasonality), you can build demand estimations for each batch by repeating our previous process.
Let’s start with the week of 31st March 2024. As we saw before, we have a spare capacity for 888 tests. If we launch our test to 100% of existing customers, we will get ~2.4K tests to check in the first week. So, we are ready to roll out only to a portion of all customers. Let’s calculate it.
cohort = '2024-03-31'
demand_plan_df.loc[cohort].remaining_capacity/existing_model_df.iloc[0].users
# 0.3638
It’s easier to operate with more round numbers, so let’s round the number to a fraction of 5%. I’ve rounded the number down to have some buffer.
full_demand_1st_week = existing_model_df.iloc[0].users
next_group_share = demand_plan_df.loc[cohort].remaining_capacity/full_demand_1st_week
next_group_share = math.floor(20*next_group_share)/20
# 0.35
Since we will make several iterations, we need to track the percentage of existing customers for whom we’ve enabled the new feature. Also, it’s worth checking whether we’ve already processed all the customers to avoid double-counting.
enabled_user_share = 0

# if we can process more customers than are left, update the number
if next_group_share > 1 - enabled_user_share:
    print('exceeded')
    next_group_share = round(1 - enabled_user_share, 2)

enabled_user_share += next_group_share
# 0.35
Also, saving our rollout plan in a separate variable will be helpful.
rollout_plan = []
rollout_plan.append(
    {'launch_date': cohort, 'rollout_percent': next_group_share}
)
Now, we need to estimate the expected demand from this batch. Launching tests for 35% of customers on 31st March will lead to some demand not only in the first week but also in the subsequent weeks. So, we need to calculate the total demand from this batch and add it to our plans.
# copy the model
next_group_demand_df = existing_model_df.copy().reset_index()

# calculate the dates from cohort + week number
next_group_demand_df['date'] = next_group_demand_df.num_week.map(
    lambda x: (datetime.datetime.strptime(cohort, '%Y-%m-%d')
        + datetime.timedelta(7*x))
)

# adjusting demand by weight
next_group_demand_df['users'] = (next_group_demand_df.users * next_group_share).map(lambda x: int(round(x)))

# labelling the segment
next_group_demand_df['segment'] = 'existing, cohort = %s' % cohort

# updating the plan
raw_demand_est_model_df = pd.concat([raw_demand_est_model_df,
    next_group_demand_df.drop('num_week', axis = 1)])
Now, we can re-use the function get_total_demand_mode, which helps us analyse the current demand vs capacity balance.
demand_plan_df = get_total_demand_model(raw_demand_est_model_df)
demand_plan_df.head()
We are utilising most of our capacity for the first week. We still have some free resources, but it was our conscious decision to keep some buffer for sustainability. We can see that there’s almost no demand from this batch after 3 weeks.

With that, we’ve finished the first iteration and can move on to the following week — 4th April 2024. We can check an additional 706 cases during this week.

We can repeat the whole process for this week and move to the next one. We can iterate to the point when we launch our project to 100% of existing customers (enabled_user_share equals to 1).
We can roll out our tests to all customers without breaching the 1K tests per week capacity constraint within just four weeks. In the end, we will have the following weekly forecast.

We can also look at the rollout plan we’ve logged throughout our simulations. So, we need to launch the test for randomly selected 35% of customers on the week of 31st March, then for the next 20% of customers next week, followed by 25% and 20% of existing users for the remaining two weeks. After that, we will roll out our project to all existing students.
rollout_plan
# [{'launch_date': '2024-03-31', 'rollout_percent': 0.35},
# {'launch_date': '2024-04-07', 'rollout_percent': 0.2},
# {'launch_date': '2024-04-14', 'rollout_percent': 0.25},
# {'launch_date': '2024-04-21', 'rollout_percent': 0.2}]
So, congratulations. We now have a plan for how to roll out our feature sustainably.
Tracking students’ performance over time
We’ve already done a lot to estimate demand. We’ve leveraged the idea of simulation by imitating the launch of our project a year ago, scaling it and assessing the consequences. So, it’s definitely a simulation example.
However, we mostly used the basic tools you use daily — some Pandas data wrangling and arithmetic operations. In the last part of the article, I would like to show you a bit more complex case where we will need to simulate the process for each customer independently.
Product requirements often change over time, and it happened with our project. You, with a team, decided that it would be even better if you could allow your students to track progress over time (not only once at the very beginning). So, we would like to offer students to go through a performance test after each module (if more than one month has passed since the previous test) or if the student returned to the service after three months of absence.
Now, the criteria for test assignments are pretty tricky. However, we can still use the same approach by looking at the data for the previous year. However, this time, we will need to look at each customer’s behaviour and define at what point they would get a test.
We will take into account both new and existing customers since we want to estimate the effects of follow-up tests on all of them. We don’t need any data before the launch because the first test will be assigned at the next active transaction, and all the history won’t matter. So we can filter it out.
sim_df = df[df.date >= '2023-03-31']
Let’s also define a function that calculates the number of days between two date strings. It will be helpful for us in the implementation.
def days_diff(date1, date2):
    return (datetime.datetime.strptime(date2, '%Y-%m-%d')
        - datetime.datetime.strptime(date1, '%Y-%m-%d')).days
Let’s start with one user and discuss the logic with all the details. First, we will filter events related to this user and convert them into the list of dictionaries. It will be way easier for us to work with such data.
user_id = 4861
user_events = sim_df[sim_df.user_id == user_id]
    .sort_values('date')
    .to_dict('records')

# [{'user_id': 4861, 'date': '2023-04-09', 'module': 'pre-A1', 'lesson_num': 8},
# {'user_id': 4861, 'date': '2023-04-16', 'module': 'pre-A1', 'lesson_num': 9},
# {'user_id': 4861, 'date': '2023-04-23', 'module': 'pre-A1', 'lesson_num': 10},
# {'user_id': 4861, 'date': '2023-04-23', 'module': 'pre-A1', 'lesson_num': 11},
# {'user_id': 4861, 'date': '2023-04-30', 'module': 'pre-A1', 'lesson_num': 12},
# {'user_id': 4861, 'date': '2023-05-07', 'module': 'pre-A1', 'lesson_num': 13}]
To simulate our product logic, we will be processing user events one by one and, at each point, checking whether the customer is eligible for the evaluation.
Let’s discuss what variables we need to maintain to be able to tell whether the customer is eligible for the test or not. For that, let’s recap all the possible cases when a customer might get a test:
- If there were no previous tests -> we need to know whether they passed a test before.
- If the customer finished the module and more than one month has passed since the previous test -> we need to know the last test date.
- If the customer returns after three months -> we need to store the date of the last lesson.
To be able to check all these criteria, we can use only two variables: the last test date (None if there was no test before) and the previous lesson date. Also, we will need to store all the generated tests to calculate them later. Let’s initialise all the variables.
tmp_gen_tests = []
last_test_date = None
last_lesson_date = None
Now, we need to iterate by event and check the criteria.
for rec in user_events:
  pass
Let’s go through all our criteria, starting from the initial test. In this case, last_test_date will be equal to None. It’s important for us to update the last_test_date variable after “assigning” the test.
if last_test_date is None: # initial test
    last_test_date = rec['date']
    # TBD saving the test info
In the case of the finished module, we need to check that it’s the last lesson in the module and that more than 30 days have passed.
if (rec['lesson_num'] == 100) and (days_diff(last_test_date, rec['date']) >= 30):
    last_test_date = rec['date']
    # TBD saving the test info
The last case is that the customer hasn’t used our service for three months.
if (days_diff(last_lesson_date, rec['date']) >= 30):
    last_test_date = rec['date']
    # TBD saving the test info
Besides, we need to update the last_lesson_date at each iteration to keep it accurate.
We’ve discussed all the building blocks and are ready to combine them and do simulations for all our customers.
import tqdm
tmp_gen_tests = []

for user_id in tqdm.tqdm(sim_raw_df.user_id.unique()):
    # initialising variables
    last_test_date = None
    last_lesson_date = None

    for rec in sim_raw_df[sim_raw_df.user_id == user_id].to_dict('records'):
        # initial test
        if last_test_date is None:
            last_test_date = rec['date']
            tmp_gen_tests.append(
                {
                    'user_id': rec['user_id'],
                    'date': rec['date'],
                    'trigger': 'initial test'
                }
            )
        # finish module
        elif (rec['lesson_num'] == 100) and (days_diff(last_test_date, rec['date']) >= 30):
            last_test_date = rec['date']
            tmp_gen_tests.append(
                {
                    'user_id': rec['user_id'],
                    'date': rec['date'],
                    'trigger': 'finished module'
                })
        # reactivation
        elif (days_diff(last_lesson_date, rec['date']) >= 92):
            last_test_date = rec['date']
            tmp_gen_tests.append(
                {
                    'user_id': rec['user_id'],
                    'date': rec['date'],
                    'trigger': 'reactivation'
                })
        last_lesson_date = rec['date']
Now, we can aggregate this data. Since we are again using the previous year’s data, I will adjust the number by ~80% YoY, as we’ve estimated before.
exist_model_upd_stats_df = exist_model_upd.pivot_table(
    index = 'date', columns = 'trigger', values = 'user_id',
    aggfunc = 'nunique'
).fillna(0)

exist_model_upd_stats_df = exist_model_upd_stats_df
    .map(lambda x: int(round(x * 1.8)))
We got quite a similar estimation for the initial test. In this case, the “initial test” segment equals the sum of new and existing demand in our previous estimations.

So, looking at other segments is way more interesting since they will be incremental to our previous calculations. We can see around 30–60 cases per week from customers who finished modules starting in May.
There will be almost no cases of reactivation. In our simulation, we got 4 cases per year in total.

Congratulations! Now the case is solved, and we’ve found a nice approach that allows us to make precise estimations without advanced math and with only simulation. You can use similar
You can find the full code for this example on GitHub.
Summary
Let me quickly recap what we’ve discussed today:
- The main idea of computer simulation is imitation based on your data.
- In many cases, you can reframe the problem from predicting the future to using the data you already have and simulating the process you’re interested in. So, this approach is quite powerful.
- In this article, we went through an end-to-end example of scenario estimations. We’ve seen how to structure complex problems and split them into a bunch of more defined ones. We’ve also learned to deal with constraints and plan a gradual rollout.
Thank you a lot for reading this article. If you have any follow-up questions or comments, please leave them in the comments section.
Reference
All the images are produced by the author unless otherwise stated.
Practical Computer Simulations for Product Analysts was originally published in Towards Data Science on Medium, where people are continuing the conversation by highlighting and responding to this story.
Originally appeared here:
Practical Computer Simulations for Product Analysts
Go Here to Read this Fast! Practical Computer Simulations for Product Analysts
