All you need is a bit of computing power

Did you know that for most common types of things, you don’t necessarily need data anymore to train object detection or even instance segmentation models?
Let’s get real on a given example. Let’s assume you have been given the task to build an instance segmentation model for the following classes:
- Lion
- Horse
- Zebra
- Tiger
Arguably, data would be easy to find for such classes: plenty of images of those animals are available on the internet. But if we need to build a commercially viable product for instance segmentation, we still need two things:
- Make sure we have collected images with commercial use license
- Label the data
Both of these tasks can be very time consuming and/or cost some significant amount of money.
Let’s explore another path: the use of free, available models. To do so, we’ll use a 2-step process to generate both the data and the associated labels:
- First, we’ll generate images with Stable Diffusion, a very powerful, Generative AI model
- Then, we’ll generate and curate the labels with Meta’s Segment Anything Model (SAM)
Note that, at the date of publication of this article, images generated with Stable Diffusion are kind of in a grey area, and can be used for commercial use. But the regulation may change in the future.
All the codes used in this post are available in this repository.
Generating data using Stable Diffusion
I generated the data with Stable Diffusion. Before actually generating the data, let’s quickly give a few information about stable diffusion and how to use it.
How to use Stable Diffusion
For that, I used the following repository: https://github.com/AUTOMATIC1111/stable-diffusion-webui
It is very complete and frequently updated, allowing to use a lot of tools and plugins. It is very easy to install, on any distribution, by following the instructions in the readme. You can also find some very useful tutorials on how to use effectively Stable Diffusion:
- For beginners, I would suggest this tutorial
- For more advanced usage, I would suggest this tutorial
Without going into the details of how the stable diffusion model is trained and works (there are plenty of good resources for that), it’s good to know that actually there is more than one model.
There are several “official” versions of the model released by Stability AI, such as Stable Diffusion 1.5, 2.1 or XL. These official models can be easily downloaded on the HuggingFace of Stability AI.
But since Stable Diffusion is open source, anyone can train their own model. There is a huge number of available models on the website Civitai, sometimes trained for specific purposes, such as fantasy images, punk images or realistic images.
Generating the data
For our need, I will use two models including one specifically trained for realistic image generation, since I want to generate realistic images of animals.
The used models and hyperparameters are the following:
- Models: JuggernautXL and Realistic Vision V6.0 B1
- Sampling: Euler a, 20 iterations
- CFG Scale: 2 (the lower the value, the more randomness in the produced output)
- Negative prompt: “bad quality, bad anatomy, worst quality, low quality, low resolution, blur, blurry, ugly, wrong proportions, watermark, image artifacts, lowres, ugly, jpeg artifacts, deformed, noisy image, deformation, digital art, unrealistic, drawing, painting”
- Prompt: “a realistic picture of a lion sitting on the grass”
To automate image generation with different settings, I used a specific feature script called X/Y/Z plot with prompt S/R for each axis.
The “prompt S/R” means search and replace, allowing to search for a string in the original prompt and replace it with other strings. Using X/Y/Z plot and prompt S/R on each axis, it allows to generate images for any combination of the possible given values (just like a hyperparameter grid search).
Here are the parameters I used on each axis:
- lion, zebra, tiger, horse
- sitting, sleeping, standing, running, walking
- on the grass, in the wild, in the city, in the jungle, from the back, from side view
Using this, I can easily generate in one go images of the following prompt “a realistic picture of a <animal> <action> <location>” with all the values proposed in the parameters.
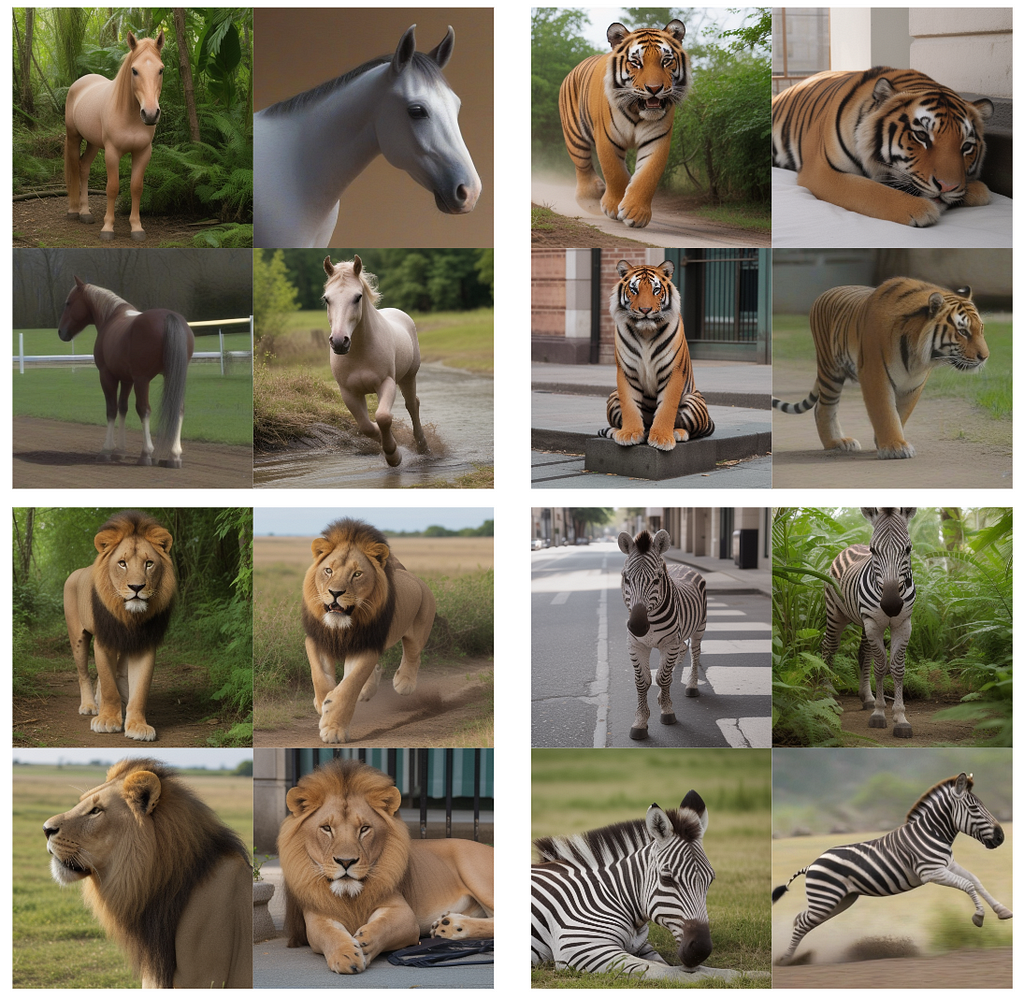
All in all, it would generate images for 4 animals, 5 actions and 6 locations: so 120 possibilities. Adding to that, I used a batch count of 2 and 2 different models, increasing the generated images to 480 to create my dataset (120 for each animal class). Below are some examples of the generated images.

As we can see, most of the pictures are realistic enough. We will now get the instance masks, so that we can then train a segmentation model.
Getting the labels
To get the labels, we will use SAM model to generate masks, and we will then manually filter out masks that are not good enough, as well as unrealistic images (often called hallucinations).
Generating the raw masks
To generate the raw masks, let’s use SAM model. The SAM model requires input prompts (not a textual prompt): either a bounding box or a few point locations. This allows the model to generate the mask from this input prompt.
In our case, we will do the most simple input prompt: the center point. Indeed, in most images generated by Stable Diffusion, the main object is centered, allowing us to efficiently use SAM with always the same input prompt and absolutely no labeling. To do so, we use the following function:
This function will first instantiate a SAM predictor, given a model type and a checkpoint (to download here). It will then loop over the images in the input folder and do the following:
- Load the image
- Compute the mask thanks to SAM, with both the options multimask_output set to True and False
- Apply closing to the mask before writing it as an image
A few things to note:
- We use both options multimask_output set to True and False because no option gives consistently superior results
- We apply closing to the masks, because raw masks sometimes have a few holes
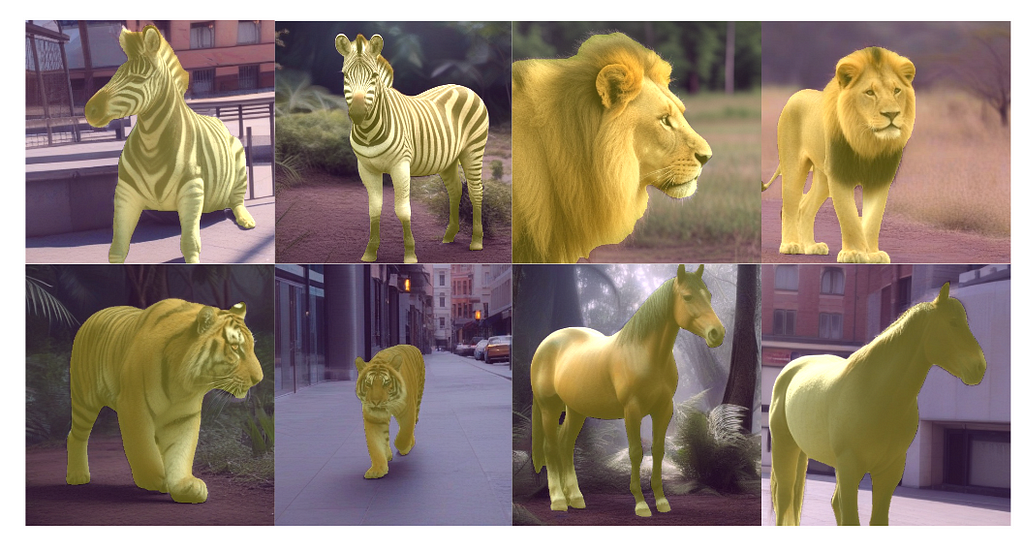
Here are a few examples of images with their masks:

As we can see, once selected, the masks are quite accurate and it took virtually no time to label.
Selecting the masks
Not all the masks were correctly computed in the previous subsection. Indeed, sometimes the object was not centered, thus the mask prediction was off. Sometimes, for some reason, the mask is just wrong and would need more input prompts to make it work.
One quick workaround is to simply either select the best mask between the 2 computed ones, or simply remove the image from the dataset if no mask was good enough. Let’s do that with the following code:
This code loops over all the generated images with Stable Diffusion and does the following for each image:
- Load the two generated SAM masks
- Display the image twice, one with each masks as an overlay, side by side
- Waits for a keyboard event to make the selection
The expected keyboard events are the following:
- Left arrow of the keyboard to select the left mask
- Right arrow to select the left mask
- Down arrow to discard this image
Running this script may take some time, since you have to go through all the images. Assuming 1 second per image, it would take about 10 minutes for 600 images. This is still much faster than actually labeling images with masks, that usually takes at least 30 second per mask for high quality masks. Moreover, this allows to effectively filter out any unrealistic image.
Running this script on the generated 480 images took me less than 5 minutes. I selected the masks and filtered unrealistic images, so that I ended up with 412 masks. Next step is to train the model.
Training the model
Before training the YOLO segmentation model, we need to create the dataset properly. Let’s go through these steps.
Creating the dataset
This code loops through all the image and does the following:
- Randomly select the train or validation set
- Convert the masks to polygons for YOLO expected input label
- Copy the image and the label in the right folders
One tricky part in this code is in the mask to polygon conversion, done by the mask2yolo function. This makes use of shapely and rasterio libraries to make this conversion efficiently. Of course, you can find the fully working in the repository.
In the end, you would end up with the following structure in your datasets folder:

This is the expected structure to train a model using the YOLOv8 library: it’s finally time to train the model!
Training the model
We can now train the model. Let’s use a YOLOv8 nano segmentation model. Training a model is just two lines of code with the Ultralytics library, as we can see in the following gist:
After 15 epochs of training on the previously prepared dataset, the results are the following:

As we can see, the metrics are quite high with a mAP50–95 close to 1, suggesting good performances. Of course, the dataset diversity being quite limited, those good performances are mostly likely caused by overfitting in some extent.
For a more realistic evaluation, next we’ll evaluate the model on a few real images.
Evaluating the model on real data
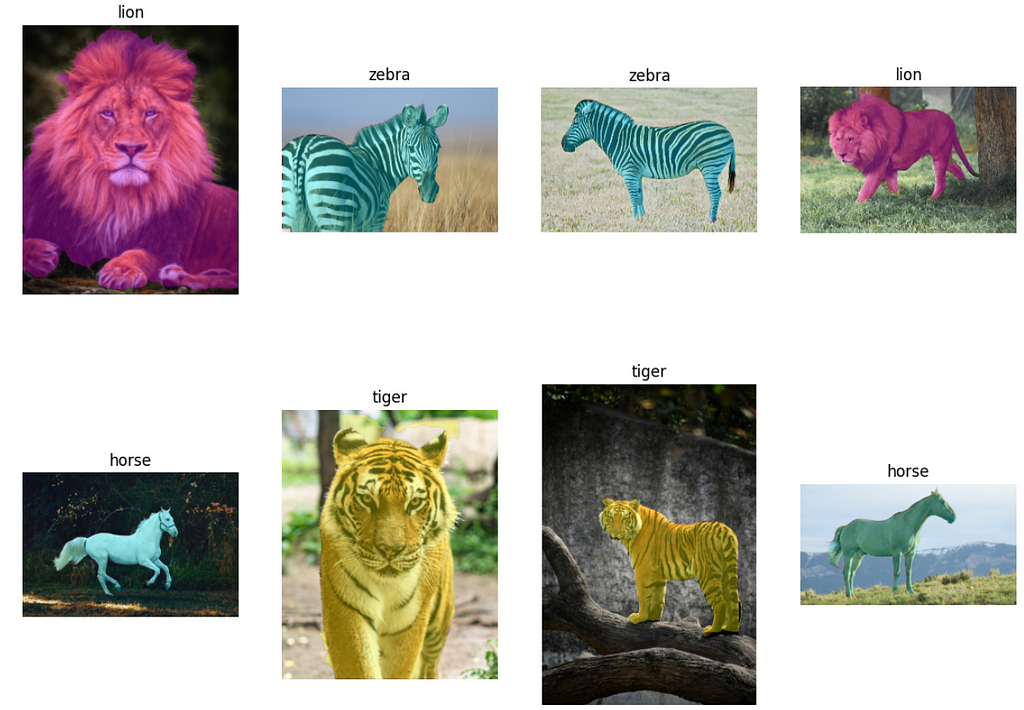
From Unsplash, I got a few images from each class and tested the model on this data. The results are right below:

On these 8 real images, the model performed quite well: the animal class is successfully predicted, and the mask seems quite accurate. Of course, to evaluate properly this model, we would need a proper labeled dataset images and segmentation masks of each class.
Conclusion
With absolutely no images and no labels, we could train a segmentation model for 4 classes: horse, lion, tiger and zebra. To do so, we leveraged three amazing tools:
- Stable diffusion to generate realistic images
- SAM to compute the accurate masks of the objects
- YOLOv8 to efficiently train an instance segmentation model
While we couldn’t properly evaluate the trained model because we lack a labeled test dataset, it seems promising on a few images. Do not take this post as self-sufficient way to train any instance segmentation, but more as a method to speed up and boost the performances in your next projects. From my own experience, the use of synthetic data and tools like SAM can greatly improve your productivity in building production-grade computer vision models.
Of course, all the code to do this on your own is fully available in this repository, and will hopefully help you in your next computer vision project!
How to Train an Instance Segmentation Model with No Training Data was originally published in Towards Data Science on Medium, where people are continuing the conversation by highlighting and responding to this story.
Originally appeared here:
How to Train an Instance Segmentation Model with No Training Data
Go Here to Read this Fast! How to Train an Instance Segmentation Model with No Training Data