Apple’s 14-inch M2 MacBook Pro is $420 off during today’s Deal Zone event at Apple Authorized Reseller B&H Photo, delivering the cheapest price available during the blowout sale.
B&H is having a flash sale that discounts the price of Apple’s 14-inch M2 MacBook Pro with 16GB of unified RAM and a 512GB SSD to just $1,579. Normally priced at $1,999, the 14-inch M2 MacBook Pro in the silver finish is a great choice for those looking for a reliable Apple Silicon laptop at a fraction of the retail price.
Standout features of the M2 MacBook Pro are the 14.2″ Liquid Retina XDR display with a resolution of 3024×1964, as well as the M2 chip with a 10-core CPU and 16-core GPU. From crisp, vibrant visuals to Apple Silicon performance, there’s a lot to love about the closeout model.
Data comes in different shapes and forms. One of those shapes and forms is known as categorical data.
This poses a problem because most Machine Learning algorithms use only numerical data as input. However, categorical data is usually not a challenge to deal with, thanks to simple, well-defined functions that transform them into numerical values. If you have taken any data science course, you will be familiar with the one hot encoding strategy for categorical features. This strategy is great when your features have limited categories. However, you will run into some issues when dealing with high cardinal features (features with many categories)
Here is how you can use target encoding to transform Categorical features into numerical values.
Early in any data science course, you are introduced to one hot encoding as a key strategy to deal with categorical values, and rightfully so, as this strategy works really well on low cardinal features (features with limited categories).
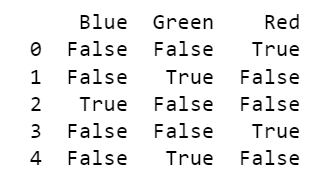
In a nutshell, One hot encoding transforms each category into a binary vector, where the corresponding category is marked as ‘True’ or ‘1’, and all other categories are marked with ‘False’ or ‘0’.
import pandas as pd
# Sample categorical data data = {'Category': ['Red', 'Green', 'Blue', 'Red', 'Green']}
One hot encoding output — we could improve this by dropping one column because if we know Blue and Green, we can figure the value of Red. Image by author
While this works great for features with limited categories (Less than 10–20 categories), as the number of categories increases, the one-hot encoded vectors become longer and sparser, potentially leading to increased memory usage and computational complexity, let’s look at an example.
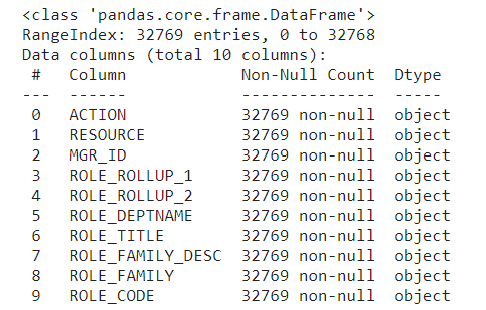
The data contains eight categorical feature columns indicating characteristics of the required resource, role, and workgroup of the employee at Amazon.
data.info()
Column information. Image by author
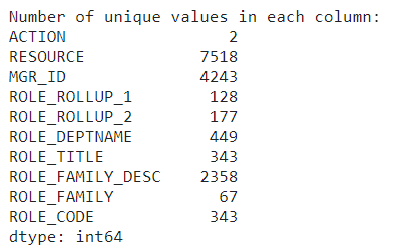
# Display the number of unique values in each column
unique_values_per_column = data.nunique()

print("Number of unique values in each column:")
print(unique_values_per_column)
The eight features have high cardinality. Image by author
Using one hot encoding could be challenging in a dataset like this due to the high number of distinct categories for each feature.
#Initial data memory usage
memory_usage = data.memory_usage(deep=True)
total_memory_usage = memory_usage.sum()
print(f"nTotal memory usage of the DataFrame: {total_memory_usage / (1024 ** 2):.2f} MB")
The initial dataset is 11.24 MB. Image by author
#one-hot encoding categorical features
data_encoded = pd.get_dummies(data,
                              columns=data.select_dtypes(include='object').columns,
                              drop_first=True)

data_encoded.shape
After on-hot encoding, the dataset has 15 618 columns. Image by authorThe resulting data set is highly sparse, meaning it contains a lot of 0s and 1. Image by author
# Memory usage for the one-hot encoded dataset
memory_usage = data_encoded.memory_usage(deep=True)
total_memory_usage = memory_usage.sum()
print(f"nTotal memory usage of the DataFrame: {total_memory_usage / (1024 ** 2):.2f} MB")
Dataset memory usage increased to 488.08 MB due to the increased number of columns. Image by author
As you can see, one-hot encoding is not a viable solution to deal with high cardinal categorical features, as it significantly increases the size of the dataset.
In cases with high cardinal features, target encoding is a better option.
Target encoding — overview of basic principle
Target encoding transforms a categorical feature into a numeric feature without adding any extra columns, avoiding turning the dataset into a larger and sparser dataset.
Target encoding works by converting each category of a categorical feature into its corresponding expected value. The approach to calculating the expected value will depend on the value you are trying to predict.
For Regression problems, the expected value is simply the average value for that category.
For Classification problems, the expected value is the conditional probability given that category.
In both cases, we can get the results by simply using the ‘group_by’ function in pandas.
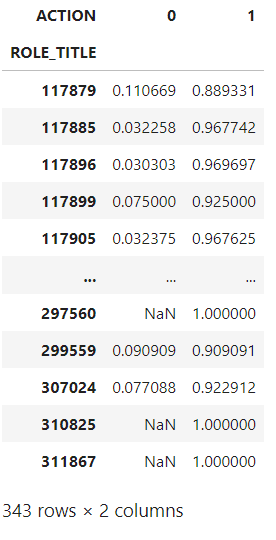
#Example of how to calculate the expected value for Target encoding of a Binary outcome
expected_values = data.groupby('ROLE_TITLE')['ACTION'].value_counts(normalize=True).unstack()
expected_values
The resulting table indicates the probability of each `ACTION` outcome by unique `Role_title` ID. Image by author
The resulting table indicates the probability of each “ACTION” outcome by unique “ROLE_TITLE” id. All that is left to do is replace the “ROLE_TITLE” id with the values from the probability of “ACTION” being 1 in the original dataset. (i.e instead of category 117879 the dataset will show 0.889331)
While this can give us an intuition of how target encoding works, using this simple method runs the risk of overfitting. Especially for rare categories, as in those cases, target encoding will essentially provide the target value to the model. Also, the above method can only deal with seen categories, so if your test data has a new category, it won’t be able to handle it.
To avoid those errors, you need to make the target encoding transformer more robust.
Defining a Target encoding class
To make target encoding more robust, you can create a custom transformer class and integrate it with scikit-learn so that it can be used in any model pipeline.
temp = X.loc[:, self.categories].copy() temp['target'] = y self.prior = np.mean(y) for variable in self.categories: avg = (temp.groupby(by=variable)['target'] .agg(['mean', 'count'])) # Compute smoothing smoothing = (1 / (1 + np.exp(-(avg['count'] - self.k) / self.f))) # The bigger the count the less full_avg is accounted self.encodings[variable] = dict(self.prior * (1 - smoothing) + avg['mean'] * smoothing)
return self
def transform(self, X): Xt = X.copy() for variable in self.categories: Xt[variable].replace(self.encodings[variable], inplace=True) unknown_value = {value:self.prior for value in X[variable].unique() if value not in self.encodings[variable].keys()} if len(unknown_value) > 0: Xt[variable].replace(unknown_value, inplace=True) Xt[variable] = Xt[variable].astype(float) if self.noise_level > 0: if self.random_state is not None: np.random.seed(self.random_state) Xt[variable] = self.add_noise(Xt[variable], self.noise_level) return Xt
It might look daunting at first, but let’s break down each part of the code to understand how to create a robust Target encoder.
Class Definition
class TargetEncode(BaseEstimator, TransformerMixin):
This first step ensures that you can use this transformer class in scikit-learn pipelines for data preprocessing, feature engineering, and machine learning workflows. It achieves this by inheriting the scikit-learn classes BaseEstimator and TransformerMixin.
Inheritance allows the TargetEncode class to reuse or override methods and attributes defined in the base classes, in this case, BaseEstimator and TransformerMixin
BaseEstimator is a base class for all scikit-learn estimators. Estimators are objects in scikit-learn with a “fit” method for training on data and a “predict” method for making predictions.
TransformerMixin is a mixin class for transformers in scikit-learn, it provides additional methods such as “fit_transform”, which combines fitting and transforming in a single step.
Inheriting from BaseEstimator & TransformerMixin, allows TargetEncode to implement these methods, making it compatible with the scikit-learn API.
Defining the constructor
def __init__(self, categories='auto', k=1, f=1,
                 noise_level=0, random_state=None):
        if type(categories)==str and categories!='auto':
            self.categories = [categories]
        else:
            self.categories = categories
        self.k = k
        self.f = f
        self.noise_level = noise_level
        self.encodings = dict()
        self.prior = None
        self.random_state = random_state
This second step defines the constructor for the “TargetEncode” class and initializes the instance variables with default or user-specified values.
The “categories” parameter determines which columns in the input data should be considered as categorical variables for target encoding. It is Set by default to ‘auto’ to automatically identify categorical columns during the fitting process.
The parameters k, f, and noise_level control the smoothing effect during target encoding and the level of noise added during transformation.
Adding noise
This next step is very important to avoid overfitting.
The “add_noise” method adds random noise to introduce variability and prevent overfitting during the transformation phase.
“np.random.randn(len(series))” generates an array of random numbers from a standard normal distribution (mean = 0, standard deviation = 1).
Multiplying this array by “noise_level” scales the random noise based on the specified noise level.”
This step contributes to the robustness and generalization capabilities of the target encoding process.
Fitting the Target encoder
This part of the code trains the target encoder on the provided data by calculating the target encodings for categorical columns and storing them for later use during transformation.
temp = X.loc[:, self.categories].copy() temp['target'] = y self.prior = np.mean(y) for variable in self.categories: avg = (temp.groupby(by=variable)['target'] .agg(['mean', 'count'])) # Compute smoothing smoothing = (1 / (1 + np.exp(-(avg['count'] - self.k) / self.f))) # The bigger the count the less full_avg is accounted self.encodings[variable] = dict(self.prior * (1 - smoothing) + avg['mean'] * smoothing)
The smoothing term helps prevent overfitting, especially when dealing with categories with small samples.
The method follows the scikit-learn convention for fit methods in transformers.
It starts by checking and identifying the categorical columns and creating a temporary DataFrame, containing only the selected categorical columns from the input X and the target variable y.
The prior mean of the target variable is calculated and stored in the prior attribute. This represents the overall mean of the target variable across the entire dataset.
Then, it calculates the mean and count of the target variable for each category using the group-by method, as seen previously.
There is an additional smoothing step to prevent overfitting on categories with small numbers of samples. Smoothing is calculated based on the number of samples in each category. The larger the count, the less the smoothing effect.
The calculated encodings for each category in the current variable are stored in the encodings dictionary. This dictionary will be used later during the transformation phase.
Transforming the data
This part of the code replaces the original categorical values with their corresponding target-encoded values stored in self.encodings.
def transform(self, X):
        Xt = X.copy()
        for variable in self.categories:
            Xt[variable].replace(self.encodings[variable],
                                 inplace=True)
            unknown_value = {value:self.prior for value in
                             X[variable].unique()
                             if value not in
                             self.encodings[variable].keys()}
            if len(unknown_value) > 0:
                Xt[variable].replace(unknown_value, inplace=True)
            Xt[variable] = Xt[variable].astype(float)
            if self.noise_level > 0:
                if self.random_state is not None:
                    np.random.seed(self.random_state)
                Xt[variable] = self.add_noise(Xt[variable],
                                              self.noise_level)
        return Xt
This step has an additional robustness check to ensure the target encoder can handle new or unseen categories. For those new or unknown categories, it replaces them with the mean of the target variable stored in the prior_mean variable.
If you need more robustness against overfitting, you can set up a noise_level greater than 0 to add random noise to the encoded values.
The fit_transform method combines the functionality of fitting and transforming the data by first fitting the transformer to the training data and then transforming it based on the calculated encodings.
Now that you understand how the code works, let’s see it in action.
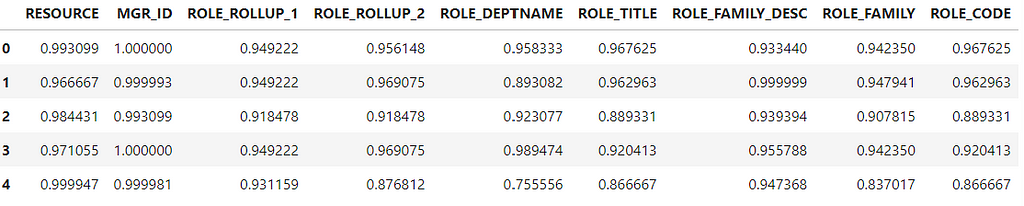
#Instantiate TargetEncode class
te = TargetEncode(categories='ROLE_TITLE')
te.fit(data, data['ACTION'])
te.transform(data[['ROLE_TITLE']])
Output with Target encoded Role title. Image by author
The Target encoder replaced each “ROLE_TITLE” id with the probability of each category. Now, let’s do the same for all features and check the memory usage after using Target Encoding.
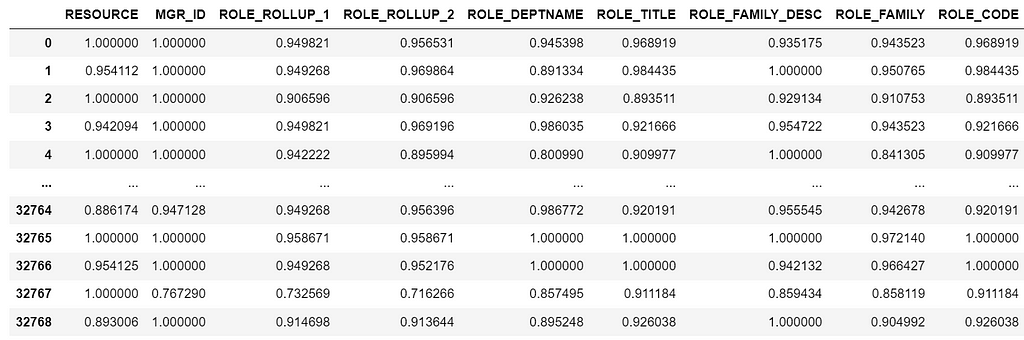
y = data['ACTION']
features = data.drop('ACTION',axis=1)

te = TargetEncode(categories=features.columns)
te.fit(features,y)
te_data = te.transform(features)

te_data.head()
Output, Target encoded features. Image by author
memory_usage = te_data.memory_usage(deep=True)
total_memory_usage = memory_usage.sum()
print(f"nTotal memory usage of the DataFrame: {total_memory_usage / (1024 ** 2):.2f} MB")
The resulting dataset only uses 2.25 MB, compared to 488.08 MB from the one-hot encoder. Image by author
Target encoding successfully transformed the categorical data into numerical without creating extra columns or increasing memory usage.
Target encoding with SciKitLearn API
So far we have created our own target encoder class, however you don’t have to do this anymore.
In scikit-learn version 1.3 release, somewhere around June 2023, they introduced the Target Encoder class to their API. Here is how you can use target encoding with Scikit Learn
from sklearn.preprocessing import TargetEncoder

#Splitting the data
y = data['ACTION']
features = data.drop('ACTION',axis=1)

#Specify the target type
te = TargetEncoder(smooth="auto",target_type='binary')
X_trans = te.fit_transform(features, y)

#Creating a Dataframe
features_encoded = pd.DataFrame(X_trans, columns = features.columns)
Output from sklearn Target Encoder transformation. Image by author
Note that we are getting slightly different results from the manual Target encoder class because of the smooth parameter and randomness on the noise level.
As you see, sklearn makes it easy to run target encoding transformations. However, it is important to understand how the transformation works under the hood first to understand and explain the output.
While Target encoding is a powerful encoding method, it’s important to consider the specific requirements and characteristics of your dataset and choose the encoding method that best suits your needs and the requirements of the machine learning algorithm you plan to use.
References
[1] Banachewicz, K. & Massaron, L. (2022). The Kaggle Book: Data Analysis and Machine Learning for Competitive Data Science. Packt>
We use cookies on our website to give you the most relevant experience by remembering your preferences and repeat visits. By clicking “Accept”, you consent to the use of ALL the cookies.
This website uses cookies to improve your experience while you navigate through the website. Out of these, the cookies that are categorized as necessary are stored on your browser as they are essential for the working of basic functionalities of the website. We also use third-party cookies that help us analyze and understand how you use this website. These cookies will be stored in your browser only with your consent. You also have the option to opt-out of these cookies. But opting out of some of these cookies may affect your browsing experience.
Necessary cookies are absolutely essential for the website to function properly. These cookies ensure basic functionalities and security features of the website, anonymously.
Cookie
Duration
Description
cookielawinfo-checkbox-analytics
11 months
This cookie is set by GDPR Cookie Consent plugin. The cookie is used to store the user consent for the cookies in the category "Analytics".
cookielawinfo-checkbox-functional
11 months
The cookie is set by GDPR cookie consent to record the user consent for the cookies in the category "Functional".
cookielawinfo-checkbox-necessary
11 months
This cookie is set by GDPR Cookie Consent plugin. The cookies is used to store the user consent for the cookies in the category "Necessary".
cookielawinfo-checkbox-others
11 months
This cookie is set by GDPR Cookie Consent plugin. The cookie is used to store the user consent for the cookies in the category "Other.
cookielawinfo-checkbox-performance
11 months
This cookie is set by GDPR Cookie Consent plugin. The cookie is used to store the user consent for the cookies in the category "Performance".
viewed_cookie_policy
11 months
The cookie is set by the GDPR Cookie Consent plugin and is used to store whether or not user has consented to the use of cookies. It does not store any personal data.
Functional cookies help to perform certain functionalities like sharing the content of the website on social media platforms, collect feedbacks, and other third-party features.
Performance cookies are used to understand and analyze the key performance indexes of the website which helps in delivering a better user experience for the visitors.
Analytical cookies are used to understand how visitors interact with the website. These cookies help provide information on metrics the number of visitors, bounce rate, traffic source, etc.
Advertisement cookies are used to provide visitors with relevant ads and marketing campaigns. These cookies track visitors across websites and collect information to provide customized ads.