The market has shaken up once again. Even the best-performing tokens are down by over 30% now#partnercontent
Originally appeared here:
Pushd’s presale attracts Bittensor and Filecoin investors amid market dips
Originally appeared here:
Pushd’s presale attracts Bittensor and Filecoin investors amid market dips
Go here to Read this Fast! HashKey halts Binance transactions amid global challenges
Originally appeared here:
HashKey halts Binance transactions amid global challenges
Go here to Read this Fast! ZKasino is under scrutiny after users face withdrawal issues
Originally appeared here:
ZKasino is under scrutiny after users face withdrawal issues
BlockDAG is setting new standards in the cryptocurrency sector with its innovative approach and robust growth. With a notable $18.7 million raised in its presale and prices set to climb to $0.0060 in
The post BDAG’s Growth, Shiba Inu’s Future Prices and LTC’s Outlook appeared first on AMBCrypto.
Bullish sentiment around Chainlink rose on the back of Bitcoin’s halving
Buying pressure was high, hinting at a sustained price hike
Chainlink [LINK] recorded a solid comeback over the l
The post Can LINK rally to a new ATH on the back of Bitcoin’s halving? appeared first on AMBCrypto.


With XRP poised for immense gains, Ripple CEO Brad Garlinghouse has issued a bold forecast for the cryptocurrency market, envisioning it doubling in value before the year concludes.
Originally appeared here:
Ripple CEO’s $5 Trillion Crypto Market Vision — XRP Market Set to Explode in 2024?


TLDR The Ethena (ENA) price is predicted to bounce back above $1.50. The Celestia (TIA) token is predicted to rise again and trade above $15. Experts predict that the SUI price will rise above $1.50. Rebel Satoshi ($RBLZ) surpasses 357 million $RECQ tokens sold during its skyrocketing presale. With the recent dip in the market, […]
The post 4 crypto underdogs that could be ready to shine in the bull run appeared first on CoinJournal.
Go here to Read this Fast! 4 crypto underdogs that could be ready to shine in the bull run
Originally appeared here:
4 crypto underdogs that could be ready to shine in the bull run
Originally appeared here:
Stellar, XRP, whales bet on Kelexo for substantial profits before Bitcoin halving
WIF and PEPE hiked by by 11% and 4%, respectively, in the last 24 hours
Market indicators hinted at possible price corrections on the charts
The hype around Bitcoin’s [BTC] halving stirred
The post WIF & PEPE’s post-Bitcoin halving hike – Is it sustainable? appeared first on AMBCrypto.

· Introduction
· Overview
∘ Goal
∘ Why semiautomatic?
∘ Entering Label Studio
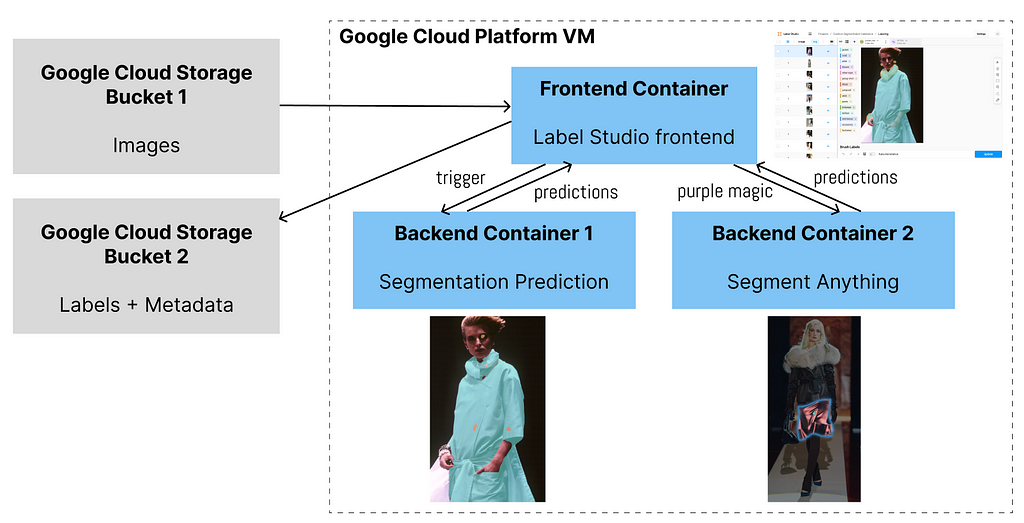
∘ 1 frontend + 2 backends
· Implementation (Local)
∘ 1. Install git and docker & download backend code
∘ 2. Set up frontend to get access token
∘ 3. Set up backend containers
∘ 4. Connect containers
∘ 5. Happy labeling!
· GCP Deployment
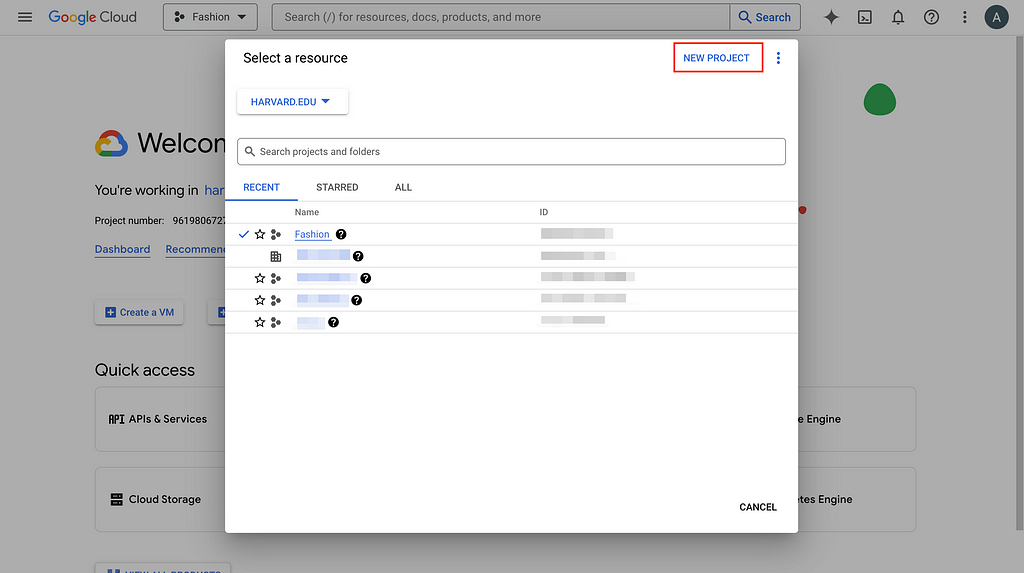
∘ 1. Select project/Create new project and set up billing account
∘ 2. Create VM instance
∘ 3. Set up VM environment
∘ 4. Follow previous section & set up everything on VM
· GCS Integration
∘ 1. Set up GCS buckets
∘ 2. Create & set up service account key
∘ 3. Rebuild backend containers
∘ 4. SDK upload images from source bucket
∘ 5. Set up Target Storage
· Acknowledgement
· References
Creating training data for image segmentation tasks remains a challenge for individuals and small teams. And if you are a student researcher like me, finding a cost-efficient way is especially important. In this post, I will talk about one solution that I used in my capstone project where a team of 9 people successfully labeled 400+ images within a week.
Thanks to Politecnico de Milano Gianfranco Ferré Research Center, we obtained thousands of fashion runway show images from Gianfranco Ferré’s archival database. To explore, manage, enrich, and analyze the database, I employed image segmentation for smarter cataloging and fine-grained research. Image segmentation of runway show photos also lays the foundation for creating informative textual descriptions for better search engine and text-to-image generative AI approaches. Therefore, this blog will detail:
Code in this post can be found in this GitHub repo.
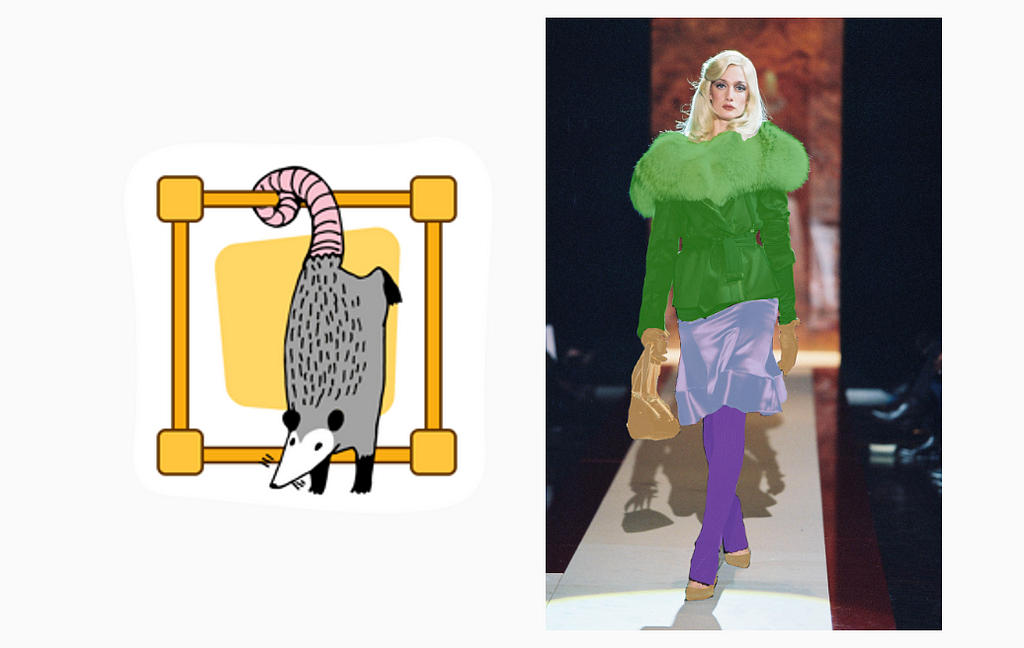
Segment and identify the names and typologies of fashion clothing items in runway show images, as shown in the first image.
Wouldn’t it be nice if a trained segmentation model out there could perfectly recognize every piece of clothing in the runway show images? Sadly, there isn’t one. There exist trained models tailored to fashion or clothing images but nothing can match our dataset perfectly. Each fashion designer has their own style and preferences for certain clothing items and their color and texture, so even if a segmentation model can be 60% accurate, we call it a win. Then, we still need humans in the loop to correct what the segmentation model got wrong.
Label Studio provides an open-source, customizable, and free-of-charge community version for various types of data labeling. One can create their own backend, so I can connect the Label Studio frontend to the trained segmentation model (mentioned above) backend for labelers to further improve upon the auto-predictions. Furthermore, Label Studio already has an interface that looks somewhat similar to Photoshop and a series of segmentation tools that can come in handy for us:
So far, we want 2 backends to be connected to the frontend. One backend can do the segmentation prediction and the second can speed up labelers’ modification if the predictions are wrong.

Now, let’s fire up the app locally. That is, you will be able to use the app on your laptop or local machine completely for free but you are not able to invite your labeling team to collaborate on their laptops yet. We will talk about teamwork with GCP in the next section.
If you don’t have git or docker on your laptop or local machine yet, please install them. (Note: you can technically bypass the step of installing git if you download the zip file from this GitHub repo. If you do so, skip the following.)
Then, open up your terminal and clone this repo to a directory you want.
git clone https://github.com/AlisonYao/label-studio-customized-ml-backend.git
If you open up the label-studio-customized-ml-backend folder in your code editor, you can see the majority are adapted from the Label Studio ML backend repo, but this directory also contains frontend template code and SDK code adapted from Label Studio SDK.
Following the official guidelines of segment anything, do the following in your terminal:
cd label-studio-customized-ml-backend/label_studio_ml/examples/segment_anything_model

docker run -it -p 8080:8080
    -v $(pwd)/mydata:/label-studio/data
    --env LABEL_STUDIO_LOCAL_FILES_SERVING_ENABLED=true
    --env LABEL_STUDIO_LOCAL_FILES_DOCUMENT_ROOT=/label-studio/data/images
    heartexlabs/label-studio:latest
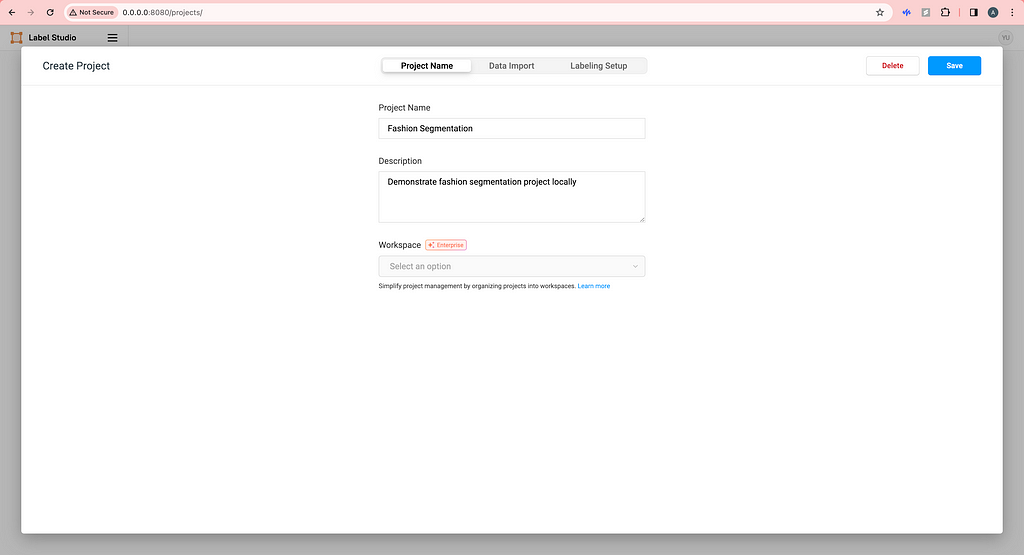
Then, open your browser and type http://0.0.0.0:8080/ and you will see the frontend of Label Studio. Proceed to sign up with your email address. Now, there is no project yet so we need to create our first project by clicking Create Project. Create a name and description (optional) for your project.
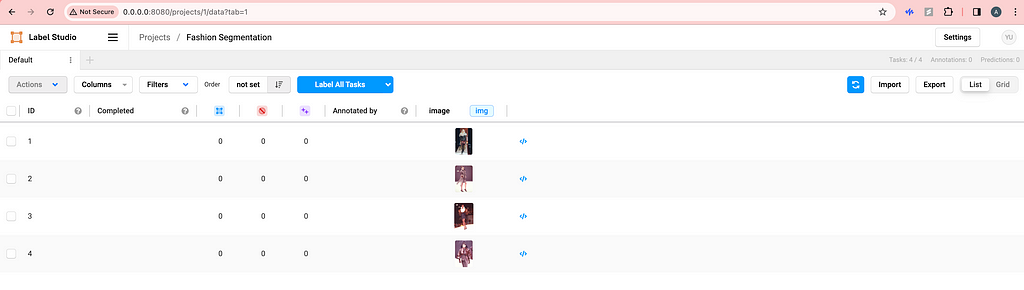
Upload some images locally. (We will talk about how to use cloud storage later.)

For Labeling Setup, click on Custom template on the left and copy-paste the HTML code from the label-studio-customized-ml-backend/label_studio_frontend/view.html file. You do not need the four lines of Headers if you don’t want to show image metadata in the labeling interface. Feel free to modify the code here to your need or click Visual to add or delete labels.

Now, click Save and your labeling interface should be ready.
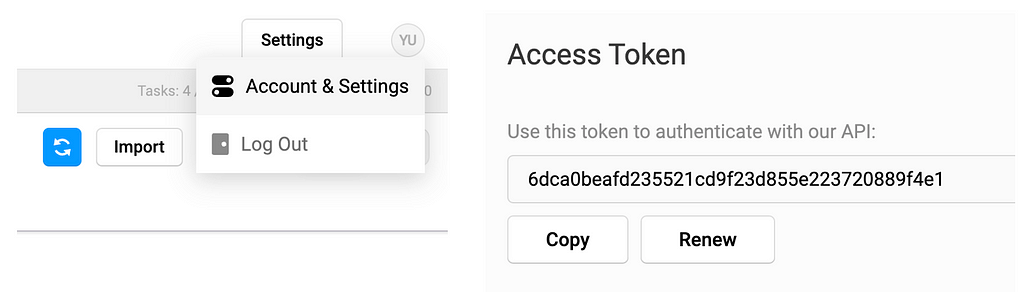
On the top right, click on the user setting icon and click Account & Setting and then you should be able to copy your access token.
In the label-studio-customized-ml-backend directory, there are many many backends thanks to the Label Studio developers. We will be using the customized ./segmentation backend for segmentation prediction (container 1) and the ./label_studio_ml/examples/segment_anything_model for faster labeling (container 2). The former will use port 7070 and the latter will use port 9090, making it easy to distinguish from the frontend port 8080.
Now, paste your access token to the 2 docker-compose.yml files in ./segmentationand ./label_studio_ml/examples/segment_anything_model folders.
environment:
  - LABEL_STUDIO_ACCESS_TOKEN=6dca0beafd235521cd9f23d855e223720889f4e1
Open up a new terminal and you cd into the segment_anything_model directory as you did before. Then, fire up the segment anything container.
cd label-studio-customized-ml-backend/label_studio_ml/examples/segment_anything_model

docker build . -t sam:latest
docker compose up
Then, open up another new terminal cd into the segmentation directory and fire up the segmentation prediction container.
cd label-studio-customized-ml-backend/segmentation

docker build . -t seg:latest
docker compose up
As of now, we have successfully started all 3 containers and you can double-check.
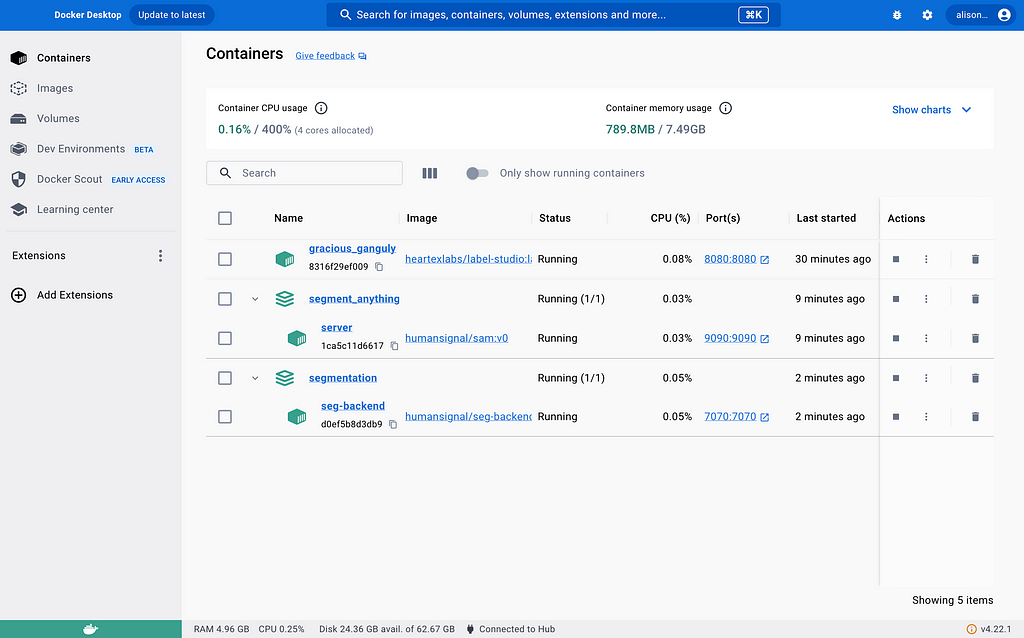
Before, what we did with the access token was helping us connect containers already, so we are almost done. Now, go to the frontend you started a while back and click Settings in the top right corner. Click Machine Learning on the left and click Add Model.
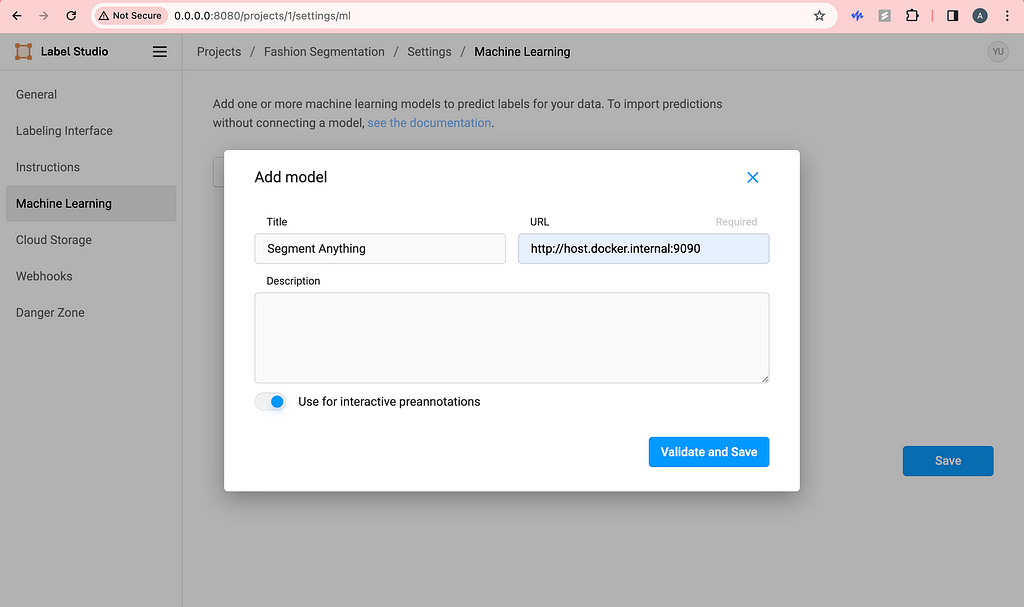
Be sure to use the URL with port 9090 and toggle on interactive preannotation. Finish adding by clicking Validate and Save.
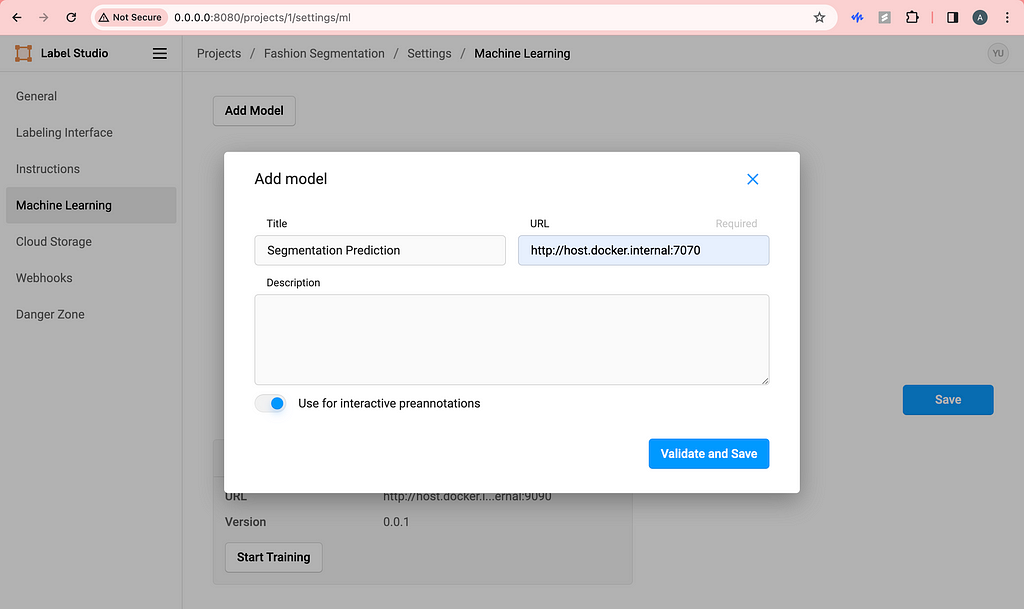
Similarly, do the same with the segmentation prediction backend.
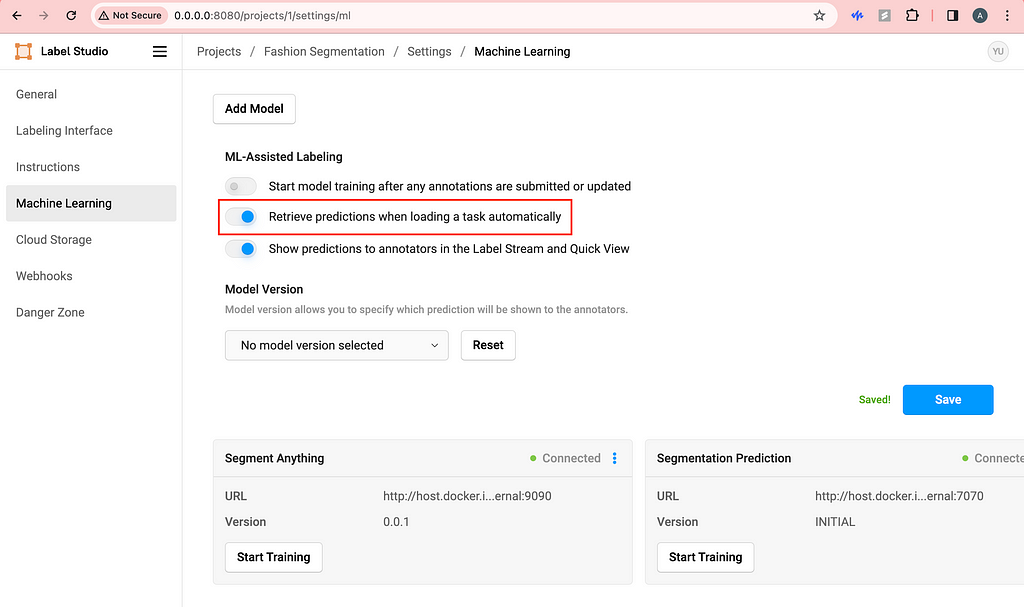
Then, I like to toggle on Retrieve predictions when loading a task automatically. This way, every time we refresh the labeling page, the segmentation predictions will be automatically triggered and loaded.
Here is a demo of what you should see if you follow the steps above.
If we are not happy with the predictions of let’s say the skirt, we can delete the skirt and use the purple magic (segment anything) to quickly label it.
I’m sure you can figure out how to use the brush, eraser and magic wand on your own!
If you are working solo, you are all set. But if you are wondering how to collaborate with your team without subscribing to Label Studio Enterprise, we need to host everything on cloud.
I chose GCP because of education credits, but you can use any cloud of your choice. The point is to host the app on cloud so that anyone in your labeling team can access and use your Label Studio app.
Go to GCP console and create a new project if you don’t have an existing one and set up the billing account information as required (unfortunately, cloud costs some money). Here, I will use the Fashion project I created to demonstrate.
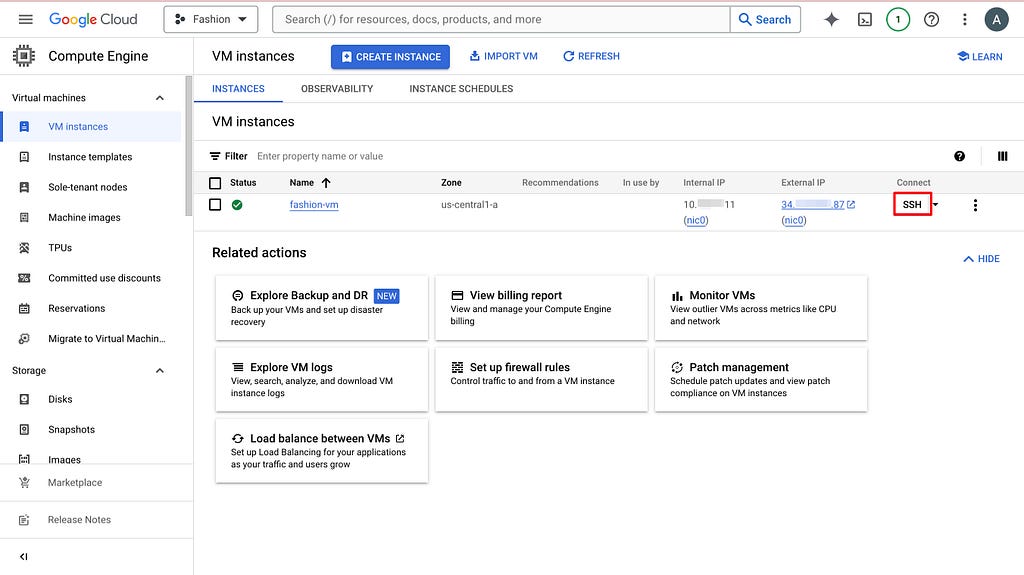
To have a public IP address for labeling teamwork, we need to create a Virtual Machine (VM) on GCP and host everything here. After going to the project you created or selected, search compute engine in the search bar and the first thing that pops up should be VM instances. Click CREATE INSTANCE and choose the setting based on your need.
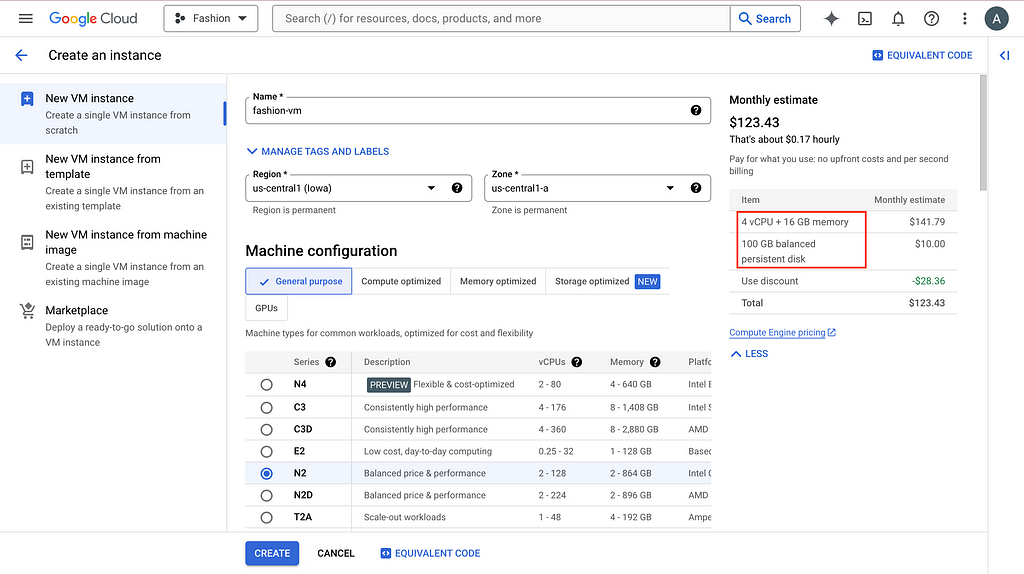
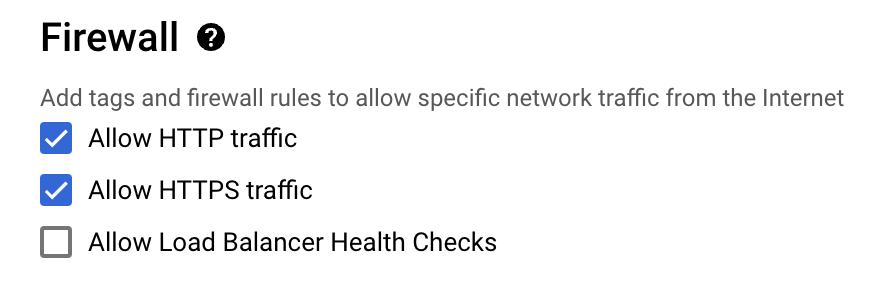
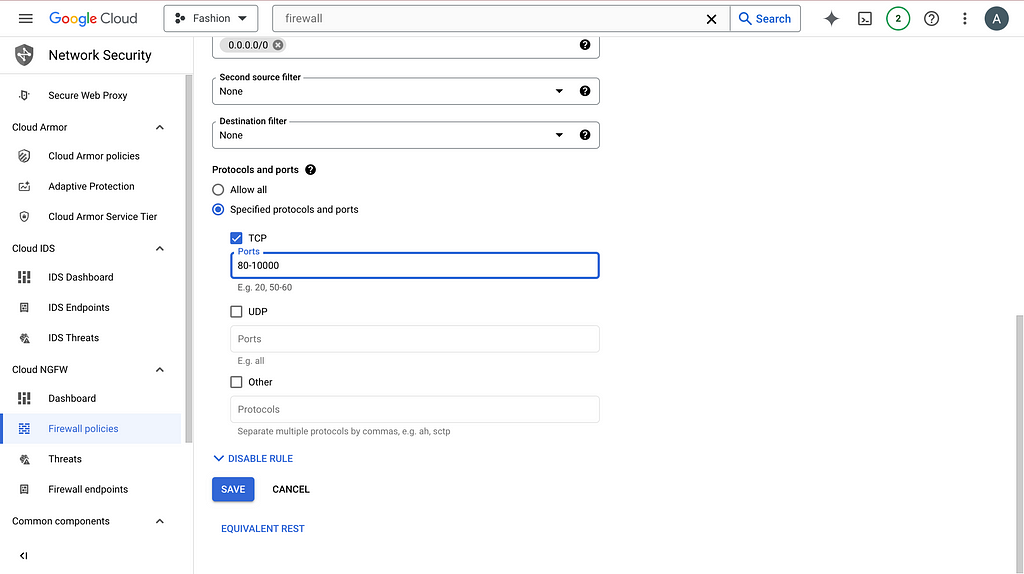
The default 10GB persistent disk will give you problems, so bump it up please. And more importantly, allow HTTP traffic.
It is a bit painful to modify these settings later, so try to think it through before clicking CREATE.
You can think of a VM as a computer somewhere in the cloud, similar to your laptop, but you can only ask it to do things via the terminal or command line. So now we need to set up everything on the VM the same way we set up everything locally (see previous section).
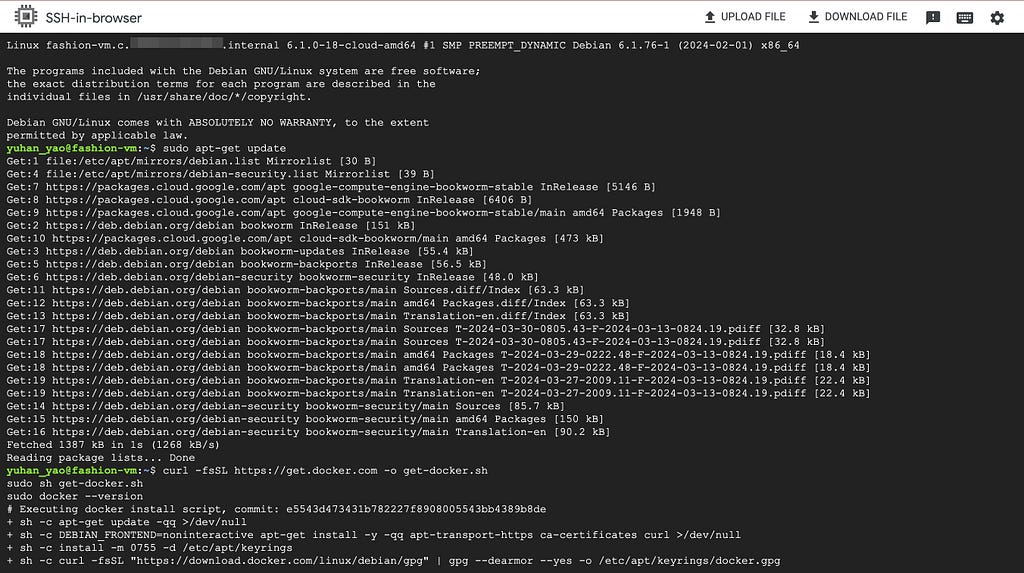
Click SSH, authorize and open up the command line interface.
Do routine update and install docker, docker compose, git and Python.
sudo apt-get update

curl -fsSL https://get.docker.com -o get-docker.sh
sudo sh get-docker.sh
sudo docker --version

sudo apt-get install docker-compose-plugin

sudo apt install git

sudo apt install python3-pip
Now, you can follow steps 1–4 in the previous section but there are some changes:
4. When editing docker-compose.yml files, apart from copy-pasting access token, also modify the LABEL_STUDIO_HOST. Again, swap host.docker.internal with the VM external IP address. An example is http://34.1.1.87:8080 .
5. Similarly, when adding Machine Learning in the frontend settings, also use http://34.1.1.87:9090 and http://34.1.1.87:7070.
You can then export your labeling results and tailor to your uses.
If you only have a couple of images to label or you are fine with uploading images from local, by all means. But for my project, there are thousands of images, so I prefer using Google Cloud Storage to automate data transferring and data versioning.
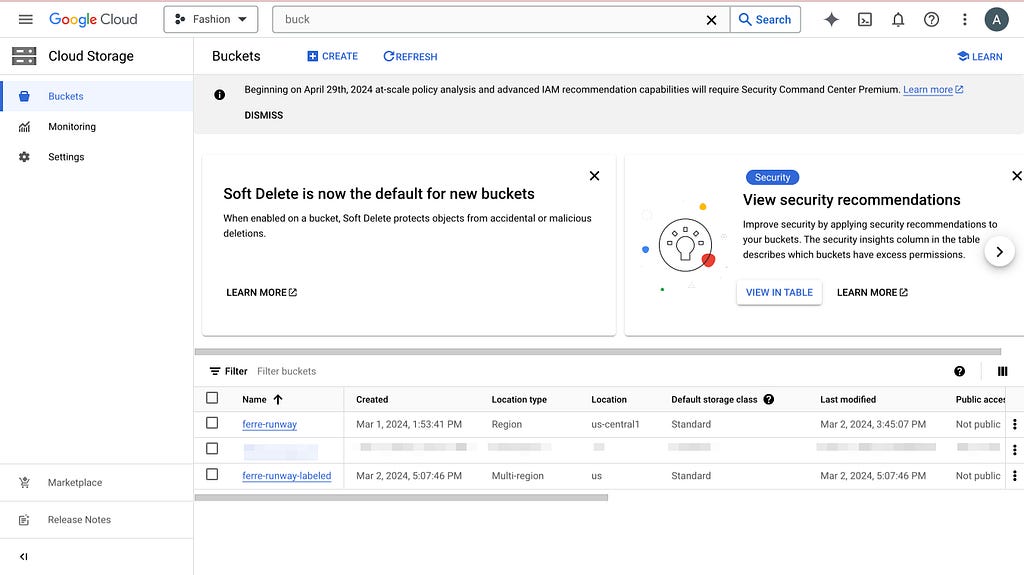
Search bucket in the GCP console and navigate to Cloud Storage buckets. Create 2 buckets: one with your images (source) and another empty (target). The second one will be populated later when you start labeling.
Then, following the official documentation, we need to set up cross-origin resource sharing (CORS) access to the buckets. Click Activate Cloud Shell on the top right, and run the following commands.
echo '[
   {
      "origin": ["*"],
      "method": ["GET"],
      "responseHeader": ["Content-Type","Access-Control-Allow-Origin"],
      "maxAgeSeconds": 3600
   }
]' > cors-config.json

gsutil cors set cors-config.json gs://ferre-runway # use your bucket name
gsutil cors set cors-config.json gs://ferre-runway-labeled # use your bucket name
If you want to set up data versioning for the labeling results, you can click on the bucket and turn on versioning in PROTECTION.
Chances are that you do not want your buckets to be public, then label studio needs authentication to have access to these images. Click CREATE SERVICE ACCOUNT and grant the role of Storage Admin so that we can read and write to the GCS buckets. You should be able to see this service account in the permissions list of the buckets as well.
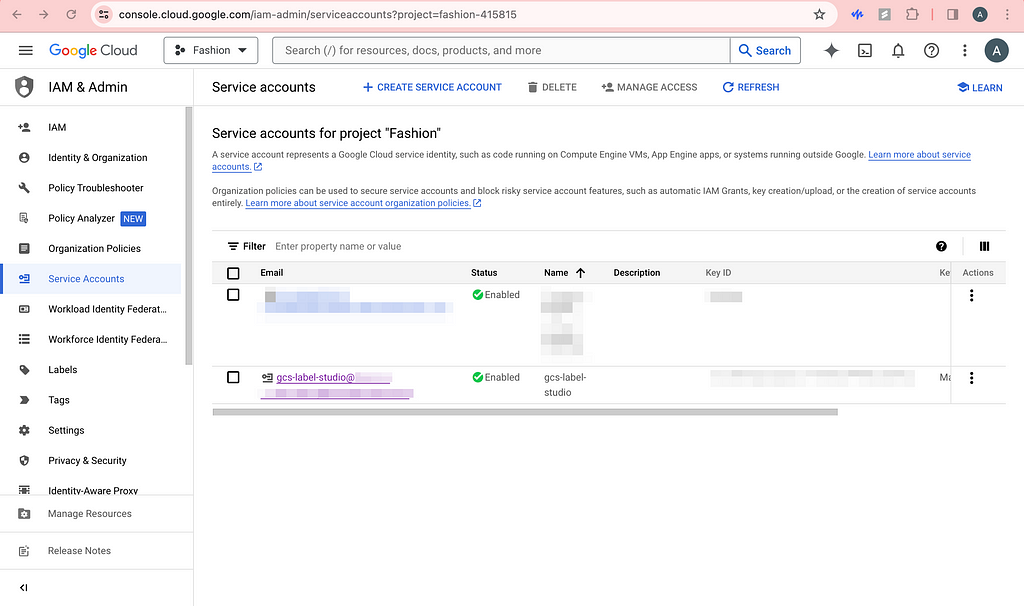
Now, click on the newly created service account and click KEYS. Now add a new key and be sure to download the JSON file to somewhere safe.
Now, open up your local terminal and encode the JSON file.
base64 -i service_account_key.json -o service_account_key_encoded.txt
cat service_account_key_encoded.txt
You can see the random character and number string and copy it. We are now pasting it as metadata for the VM. Click on your VM, click EDIT, and add your custom metadata. For example, my key is GOOGLE_APPLICATION_CREDENTIALS_BASE64.
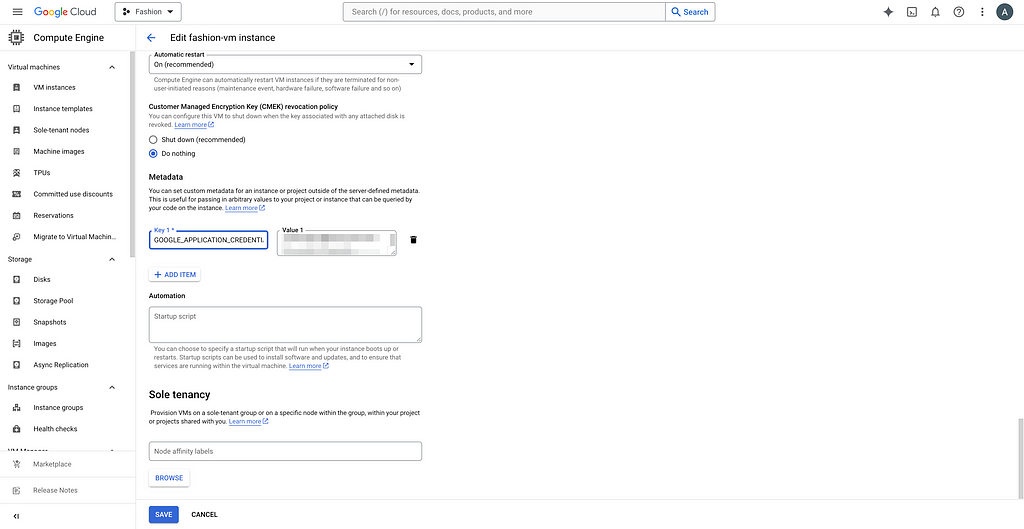
We will then decode the service account key for authentication in our Python code.
Since we modified the docker-compose.yml files, we need to run the new script and rebuild the backend containers.
# Check running containers and their IDs, find the backends you need to kill
sudo docker ps

sudo docker kill a5a5e21537cb
sudo docker kill 54e51b0ae78f

# navigate to the right folders like before and build new containers
sudo docker compose up
Now, you should see the new containers.

If you simply want to upload the images without metadata, you can skip this section and do the exact same thing as step 5 (see next). By metadata, I mean the useful information for each image on the labeling interface that might help with labeling more accurately.
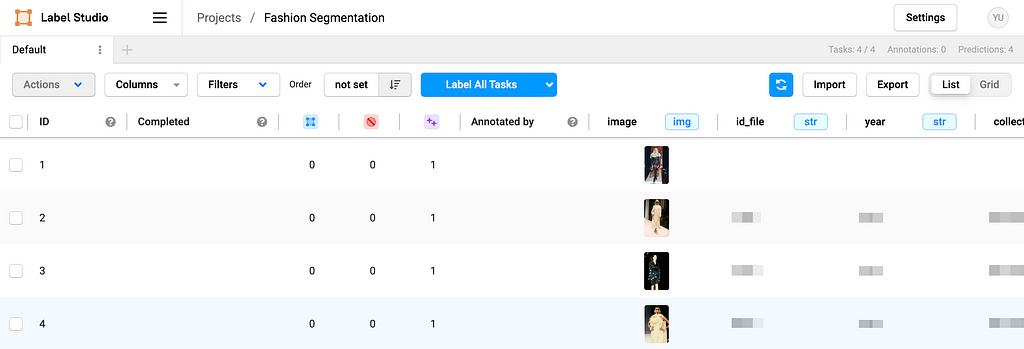
Based on the example from Label Studio SDK repo, you can modify what metadata and how you want to import in the ./label_studio_sdk/annotate_data_from_gcs.ipynb file. After running the python notebook locally, you should be able to see your images and metadata on the frontend.
And you should also see the Source Storage bucket in the settings. Do NOT click Sync Storage as it will sync directly from the bucket and mess up the metadata we imported.
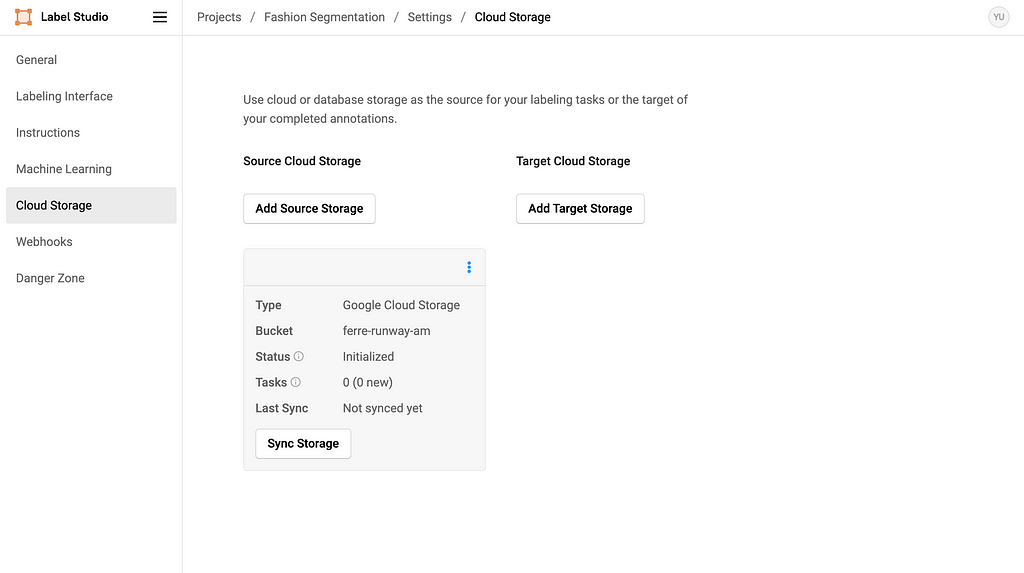
Click Add Target Storage, and filling in the information accordingly. Copy-paste your service account key in the Google Application Credentials textbox and you are all set.
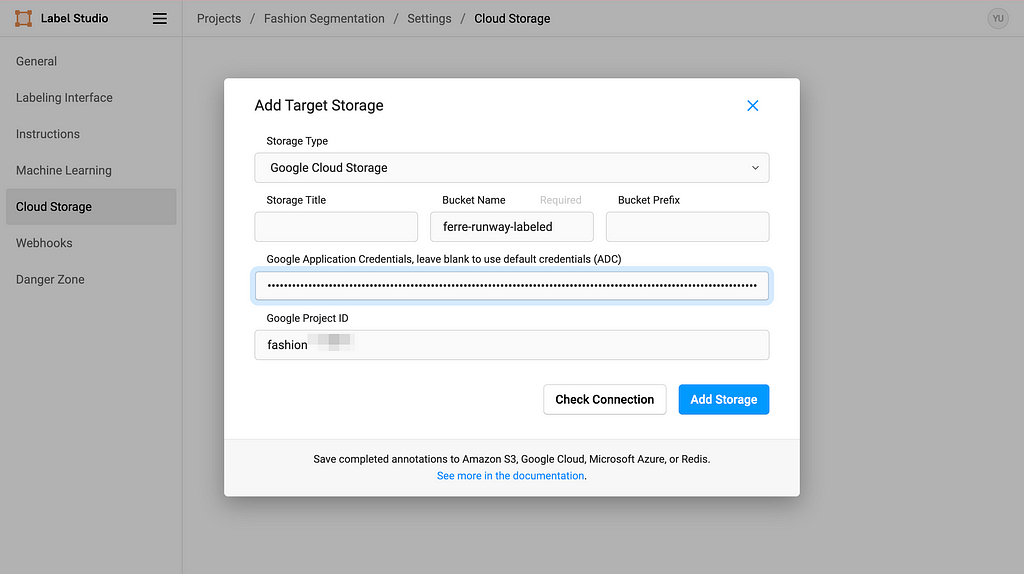
Every time you click Sync Storage on the Target Cloud Storage, it will sync the labeling outcome in the format of text into the GCS bucket. After clicking sync once, the process should be trigger automatically when submitting labeling results, but please check if you need to manually sync from time to time just in case.
Happy labeling!
It is my pleasure to be a part of Data Shack 2024 in collaboration with Politecnico de Milano Gianfranco Ferré Research Center. I would like to thank Prof. Pavlos Protopapas and Prof. Paola Bertola for your guidance and for making this project happen in the first place. I would like to thank Chris Gumb and Prof. Marco Brambilla for technical support and Prof. Federica Vacca and Dr. Angelica Vandi for domain knowledge expertise in fashion. Finally, I would like to thank my teammates Luis Henrique Simplicio Ribeiro, Lorenzo Campana and Vittoria Corvetti for your help and for figuring things out with me along the way. I also want to give a round of applause to Emanuela Di Stefano, Jacopo Sileo, Bruna Pio Da Silva Rigato, Martino Fois, Xinxi Liu, and Ilaria Trame for your continued support and hard work.
Thank you for reading! I hope this blog has been helpful to you.
Code in this post can be found in this GitHub repo.
Label Studio Customized Backend for Semiautomatic Image Segmentation Labeling was originally published in Towards Data Science on Medium, where people are continuing the conversation by highlighting and responding to this story.
Originally appeared here:
Label Studio Customized Backend for Semiautomatic Image Segmentation Labeling